Tiki Central / Other Crafts
Atomic Tiki Punk makes stuff
|
M

MadDogMike
Posted
posted
on
Sat, May 22, 2010 10:23 AM
Looks good ATP. Did you make the stools or modify existing ones? Actually making stools would be a pain in the butt. When making a table I found out that you can NEVER get all 4 legs the same length no matter how carefully you measure. That's why whoever invented the three-legged stool was a genius, it's always stable (plus, you can't tip it backwards when you've had to much to drink :lol: ) |
|
ATP

Atomic Tiki Punk
Posted
posted
on
Sat, May 22, 2010 2:02 PM
Hi Mike, A cheap & simple way to make your own Bar Stools. |
|
ATP
Atomic Tiki Punk
Posted
posted
on
Thu, May 27, 2010 8:28 PM
Made some more stuff, I sold a few sets of these at BambooBens Garage sale & I liked them so much I made a set for my House.
|
|
M
MadDogMike
Posted
posted
on
Thu, May 27, 2010 9:13 PM
ATP, you must have took a few days off. Buildin' shelves & spiffin' the yard :D It's all good. |
|
ATP
Atomic Tiki Punk
Posted
posted
on
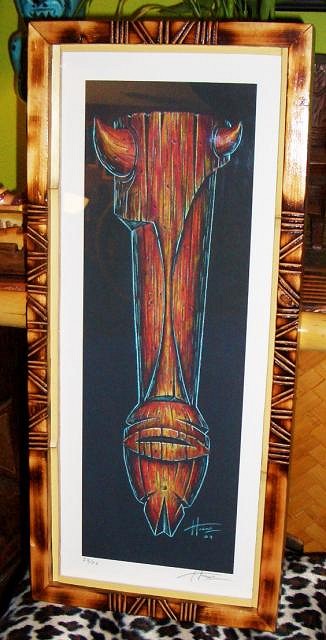
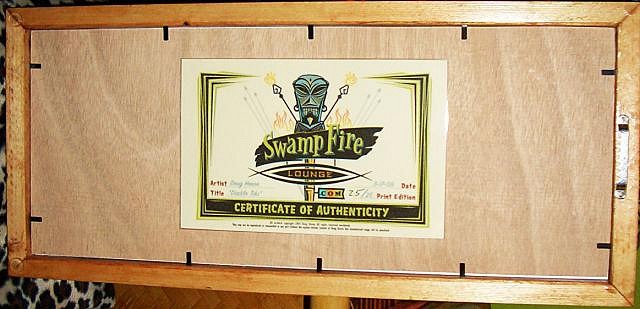
Sat, Jun 12, 2010 9:12 PM
Made a custom frame for Doug Horne's "Diablo Tiki" print.
|
|
ATP
Atomic Tiki Punk
Posted
posted
on
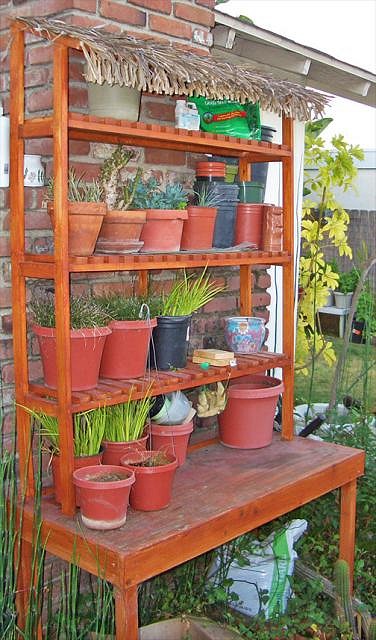
Sat, Jul 31, 2010 9:10 PM
This is something I made a year or two ago, but have not posted a pic of. It's a Tiki Potting Bench...
|
|
LLT

little lost tiki
Posted
posted
on
Sat, Jul 31, 2010 9:43 PM
dang! what a catch! great creations there Lance! |
|
IK

Iokona Ki'i
Posted
posted
on
Sun, Aug 1, 2010 11:48 AM
Awesome ATP! Love seeing your creativity flow. |
|
A

amybean
Posted
posted
on
Mon, Aug 2, 2010 8:14 PM
That is the cutest potting bench evar! Those plants look happy. Now. what's for dinner? |
|
ATP
Atomic Tiki Punk
Posted
posted
on
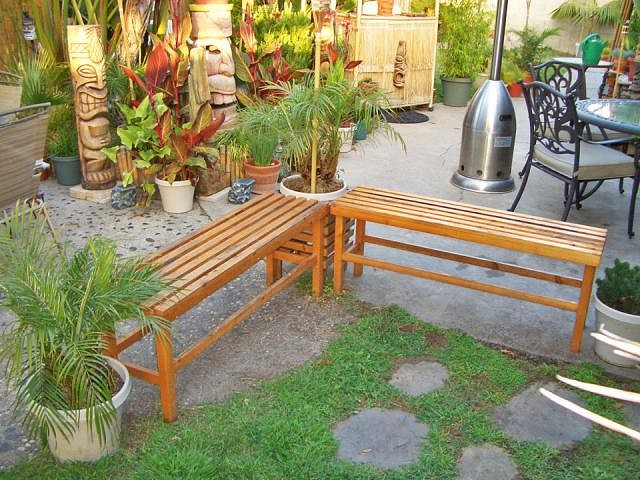
Wed, Aug 4, 2010 8:23 PM
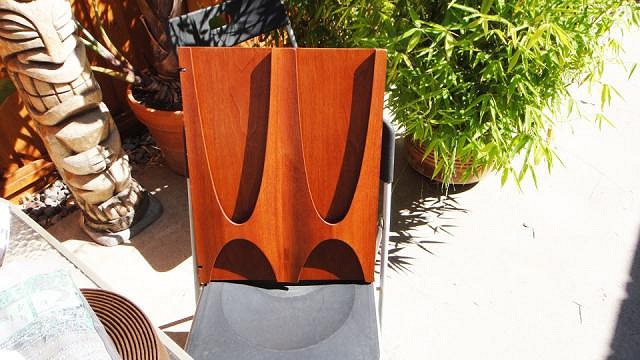
Another Project I did some time ago was make these Mid-Century Modern style
|
|
M
MadDogMike
Posted
posted
on
Wed, Aug 4, 2010 9:19 PM
Nice looking set. What do you plan to do with that pile of walrus tusks in the lower right corner? |
|
ATP
Atomic Tiki Punk
Posted
posted
on
Thu, Aug 5, 2010 1:13 AM
Its a palm leaf,MDM, I had to go back outside to see what the hell it was. |
|
M
MadDogMike
Posted
posted
on
Thu, Aug 5, 2010 6:11 AM
:D |
|
W

WestADad
Posted
posted
on
Thu, Aug 5, 2010 6:55 AM
Nice looking benches ATP. Your outdoor space looks great and very inviting. Chris |
|
ATP
Atomic Tiki Punk
Posted
posted
on
Tue, Aug 24, 2010 1:12 AM
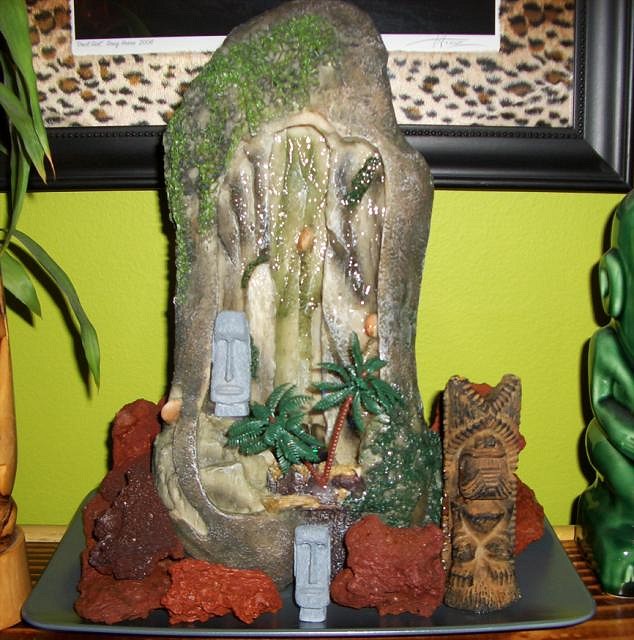
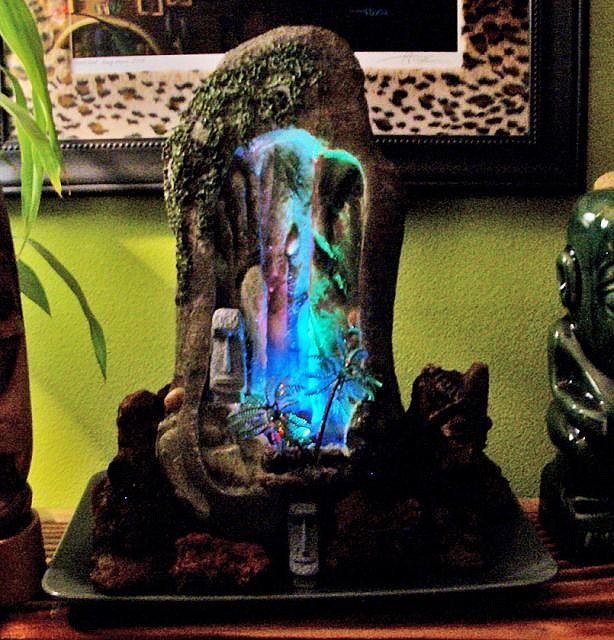
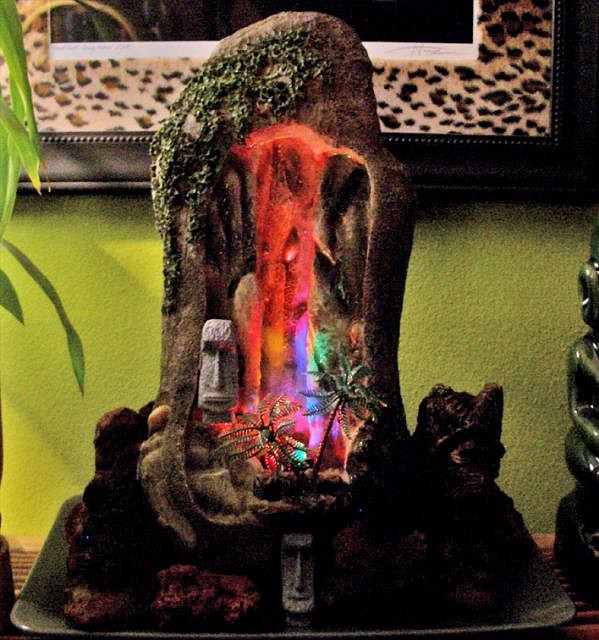
O.K. you guys have to let me know if this is too cheesy,be honest now. I have been looking for an indoor mini fountain for the Atomic Tiki Lounge,I have not been able to find So I put this together, I started with an Asian waterfall Fountain I found at the Orange County fair Set it on a plate with lava rock and a little cement Ku
|
|
Z

zerostreet
Posted
posted
on
Tue, Aug 24, 2010 6:01 AM
I think it's pretty cool. I think maybe it might benefit from some "greenery" just behind. |
|
M
MadDogMike
Posted
posted
on
Tue, Aug 24, 2010 6:07 AM
Looks great! The plastic palm trees look a little "plastic" Any way to replace them with the lottle live ones Walmart and Lowes sell in the little pots? |
|
ATP
Atomic Tiki Punk
Posted
posted
on
Tue, Aug 24, 2010 11:38 AM
Thanks for the input! the fountain is only a little over a foot high,so it's not very big [ Edited by: Atomic Tiki Punk 2010-08-24 11:40 ] |
|
W

woofmutt
Posted
posted
on
Wed, Aug 25, 2010 12:02 AM
In daylight it looks cheesy...But so do a lot of cool bar interiors when the lights come up. With the colored lights on in the low light it looks really swell, even sort of epic. |
|
A
amybean
Posted
posted
on
Wed, Aug 25, 2010 7:16 AM
Cheesy Goodness! I agree with Mike- some fresh plants would take it over the top. |
|
W
WestADad
Posted
posted
on
Wed, Aug 25, 2010 7:36 AM
I like it! Chris |
|
ATP
Atomic Tiki Punk
Posted
posted
on
Wed, Aug 25, 2010 11:55 AM
Well thanks for the input & that is the nicest thing woofmutt has ever said to me,Thanks Woof! [ Edited by: Atomic Tiki Punk 2010-08-26 00:04 ] |
|
H

hiltiki
Posted
posted
on
Wed, Aug 25, 2010 11:05 PM
It looks fine just the way it is, it has a vintage look to it. |
|
E

ErkNoLikeFire
Posted
posted
on
Wed, Aug 25, 2010 11:55 PM
I concur, it is a fine fountain sir! Do you have any particular method for "toasting" the wood for your projects and what grit sandpaper do you use? I'm working on a shelf and am curios about your technique. [ Edited by: ErkNoLikeFire 2010-08-26 23:00 ] |
|
RH

Robb Hamel
Posted
posted
on
Fri, Aug 27, 2010 5:09 PM
I think the fountain is a blast, especially the lighting. This makes me wonder what you could do with a nice geode as a starter... |
|
ATP
Atomic Tiki Punk
Posted
posted
on
Fri, Aug 27, 2010 6:43 PM
Thanks Robb, I sure would like to see one of our ultra craftsmen make a really cool Tiki fountain? |
|
C

capheind
Posted
posted
on
Fri, Aug 27, 2010 8:09 PM
Being a newcomer (well lurker for a few weeks) I actually just read through the whole thread, and I have to say top notch work. I'm rather fond of the fountain, especially your use of lighting. One small addition might be to replace the fake palms with an Anthurium or some other rock-attaching plant that has reasonable care requirements. Just a though. |
|
ATP
Atomic Tiki Punk
Posted
posted
on
Fri, Aug 27, 2010 9:10 PM
Hi ErkNoLikeFire, well I just go from a large grit sandpaper, then Medium, and last a fine grit, all depends on the wood you are using, I mostly work in pine. I use a hand propane torch to burn the wood, get some scraps of wood and just burn along the grain Be very careful with the torch and work outside away from combustible materials! |
|
E
ErkNoLikeFire
Posted
posted
on
Fri, Aug 27, 2010 10:53 PM
Thanks! I will most definitely practice before I start my next project. I rent so shelves and art will go a long way to getting my house the way I want without scaring the landlord. |
|
ATP
Atomic Tiki Punk
Posted
posted
on
Fri, Aug 27, 2010 11:24 PM
ErkNoLikeFire,I am diggin the Buckaroo Banzai reference. "Remember; no matter where you go, there you are." |
|
E
ErkNoLikeFire
Posted
posted
on
Fri, Aug 27, 2010 11:55 PM
hehe "The Declaration of War: the short version" It is one of my all time favorite movies |
|
HJ

Haole Jim
Posted
posted
on
Sat, Sep 11, 2010 10:24 PM
Great fun to view, thank you for sharing. looks like yaws be havin' big FUN creating! |
|
C

ccain
Posted
posted
on
Sun, Sep 12, 2010 1:58 AM
WOW! Beautiful stuff A.T.!!! |
|
ATP
Atomic Tiki Punk
Posted
posted
on
Sat, Nov 6, 2010 8:52 PM
Someone was asking me about my frames a while ago, let me know if I did not get back to you? |
|
P

Potato.
Posted
posted
on
Sat, Dec 3, 2011 10:51 AM
I know this is digging way into the thread, but where did the Digga Digga Doo painting come from? The only mug my wife wants is that one, and I would love to find that painting too. |
|
CTIT

Chuck Tatum is Tiki
Posted
posted
on
Sat, Dec 3, 2011 11:31 AM
That's our very own Brad Parker, I think you can still get one |
|
CTIT
Chuck Tatum is Tiki
Posted
posted
on
Mon, Dec 5, 2011 4:12 PM
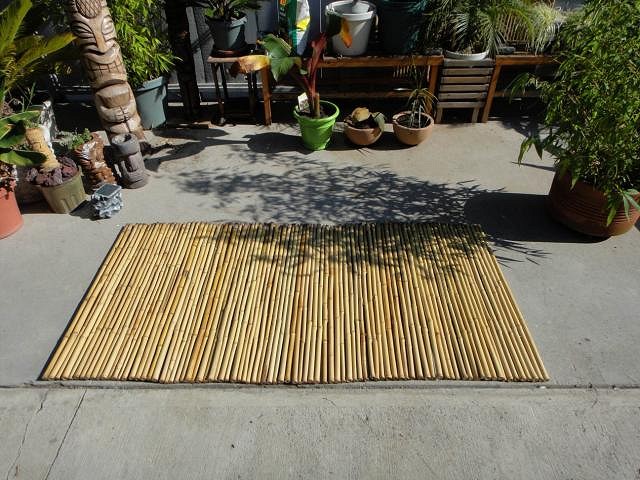
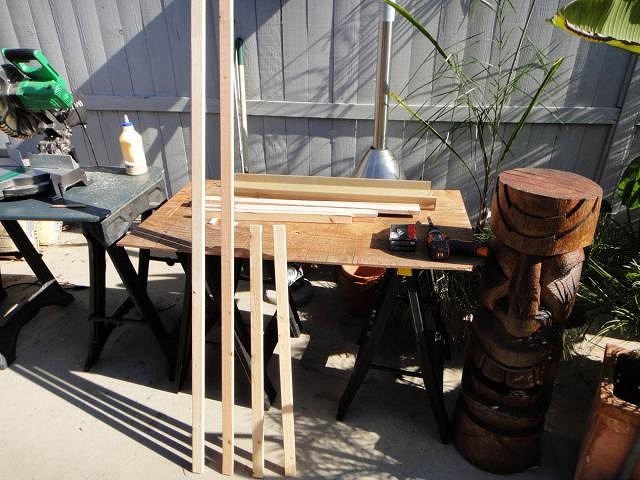
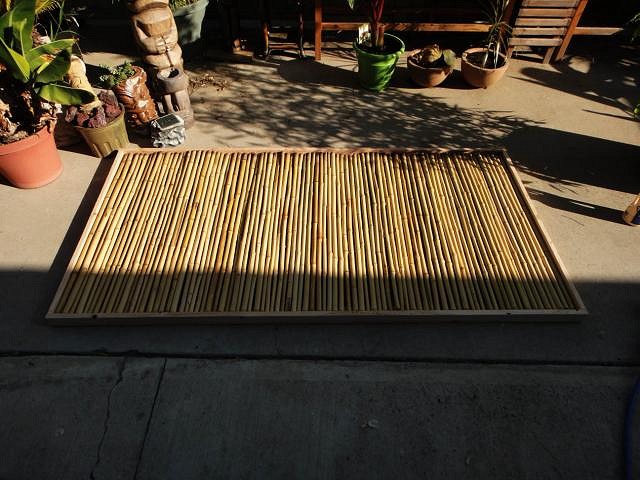
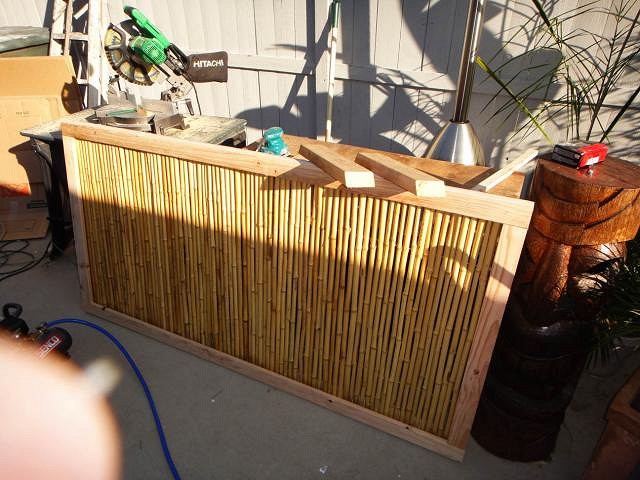
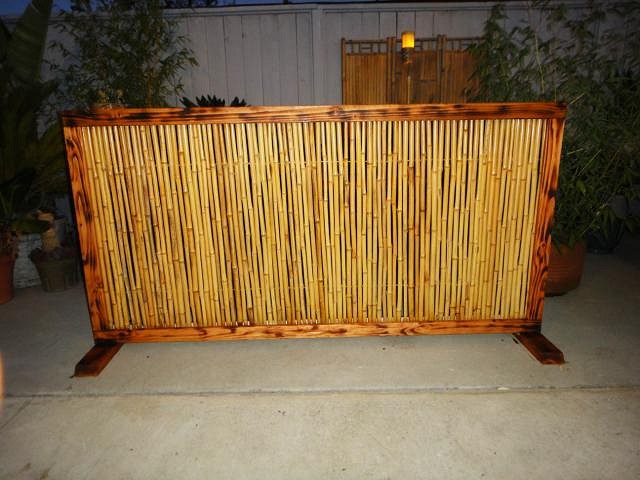
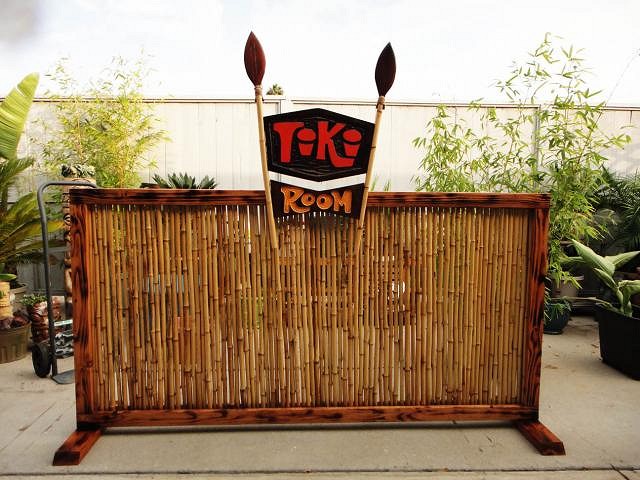
Something new! How to make a "Bamboo Partition" I started with a section of 4' X 6' Bamboo fencing
Then using 1" X 2" pine strips, built a basic frame to fit the Bamboo
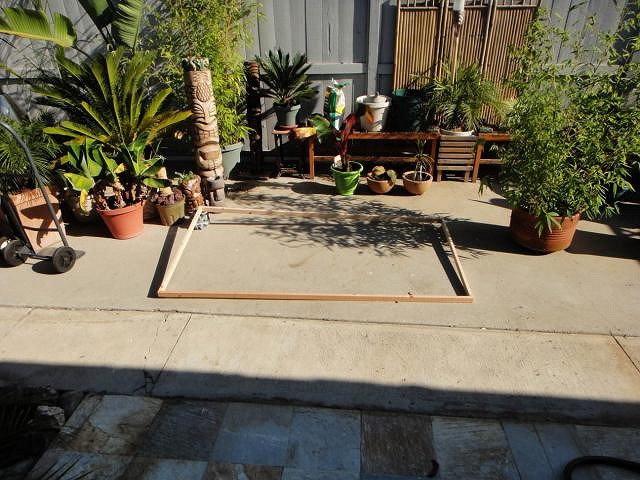
Then I use the 1" X 2" Pine strips to frame the sides of the frame
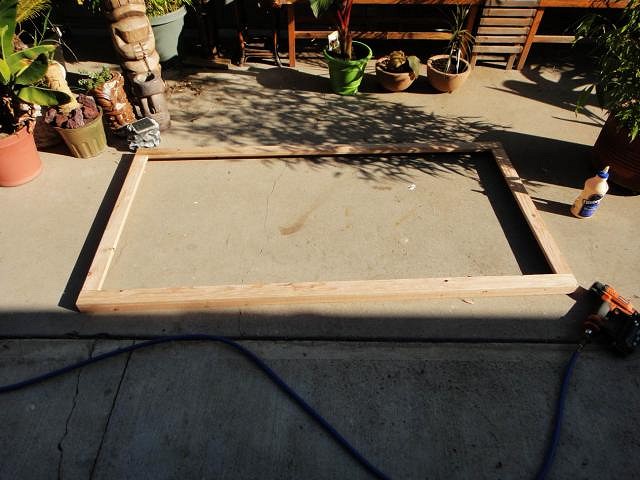
One side done, now flip it over...
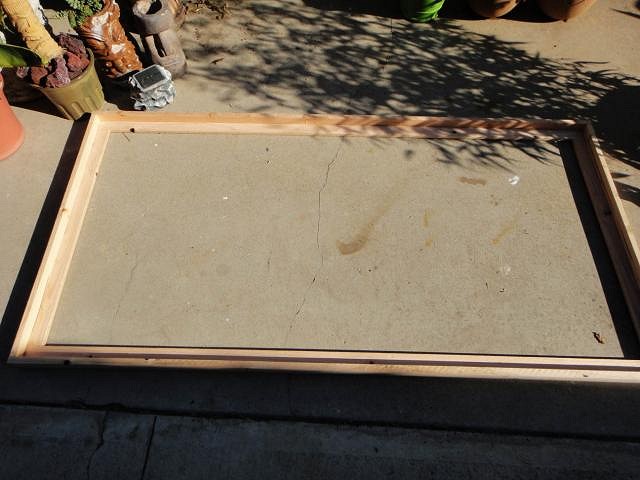
Drop the Bamboo into the frame & drill holes on the top & bottom of the Bamboo about every foot, Fasten with screws & nail strips onto the frame to enclose it.
Cut 2, 2' sections of 2" X 4" for the legs & set screws to hold them firmly in place.
That's the basic partition, now lets finish it.
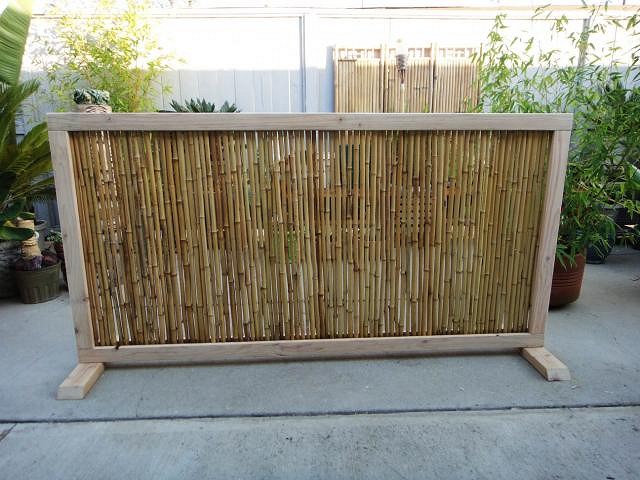
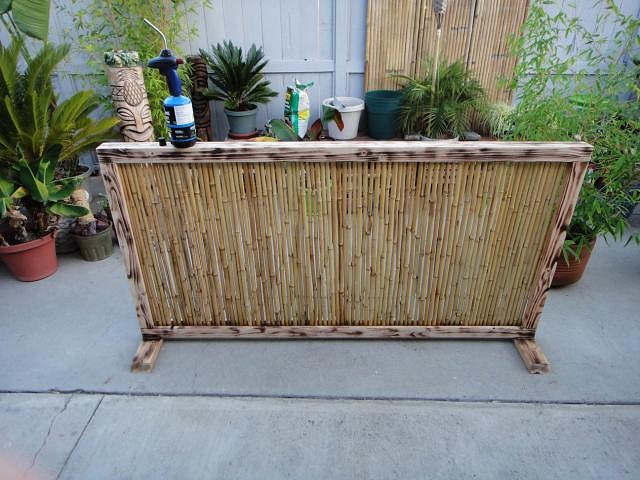
Used a hand torch to burn highlights & bring out the grain of the pine.
Give the frame a nice sanding, apply a wood stain of your choice
Now for that extra touch, you can mount a Tiki mask or whatever floats your boat
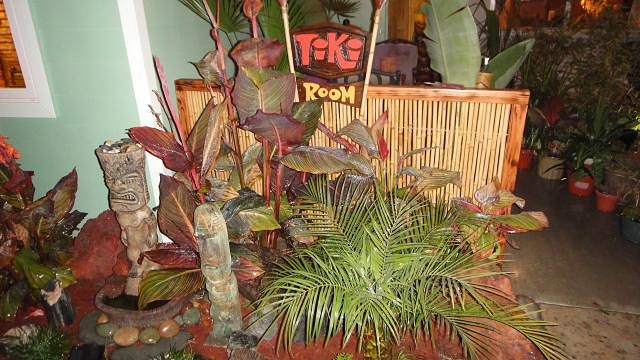
And what it looks like in place.
Cocktail time! P.S. Sand the wood before you burn the grain, got a little ahead of the steps. [ Edited by: Chuck Tatum is Tiki 2011-12-05 16:53 ] |
|
W
WestADad
Posted
posted
on
Tue, Dec 6, 2011 11:00 AM
That is nice, how much to ship that to me? :) |
|
CTIT
Chuck Tatum is Tiki
Posted
posted
on
Tue, Dec 6, 2011 11:17 AM
2 Dollars! it will cost ya 2 Dollars! |
|
W
WestADad
Posted
posted
on
Tue, Dec 6, 2011 11:34 AM
:) Would you take a twenty? That's all I gots in me wallet. |
|
M
MadDogMike
Posted
posted
on
Tue, Dec 6, 2011 11:43 AM
That turned out nice Chuckster. What happens if you torch the bamboo a little too? |
|
CTIT
Chuck Tatum is Tiki
Posted
posted
on
Tue, Dec 6, 2011 3:34 PM
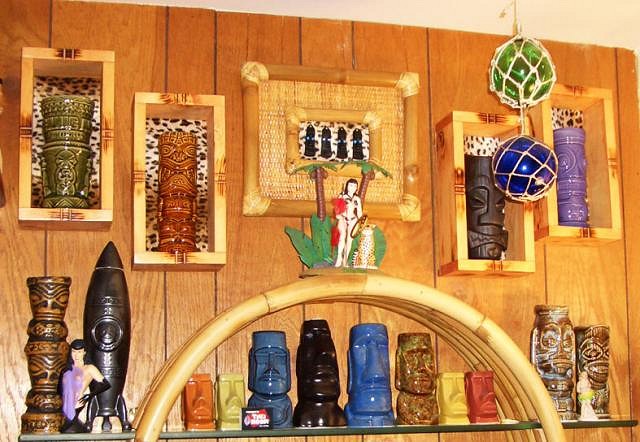
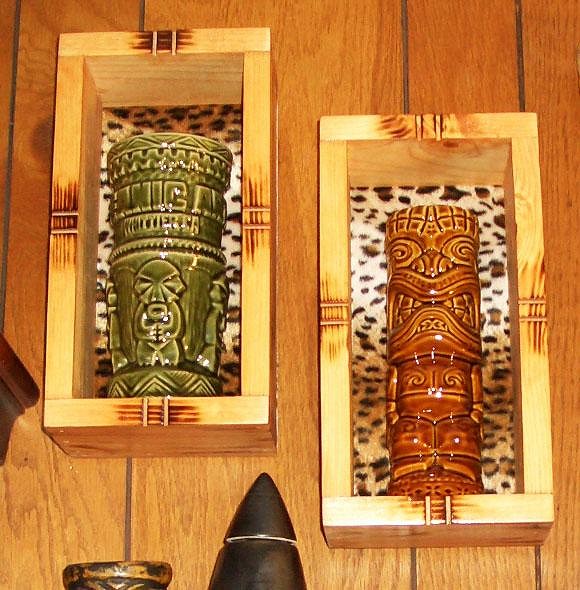
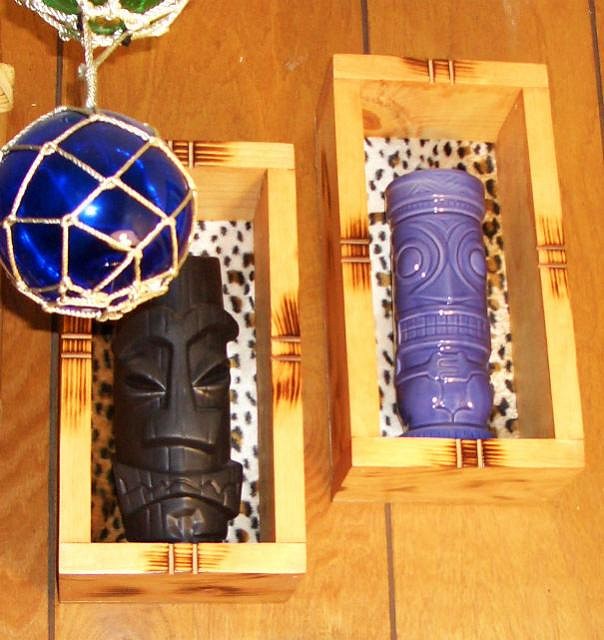
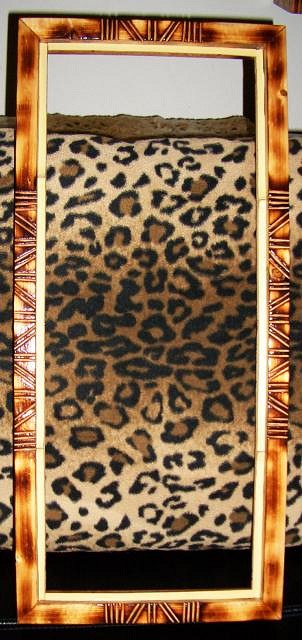
I like the look of those little torch marks at the joints of the Bamboo, Mike You can see the look of torched highlights on Bamboo that I did for my Mug Shelf here [ Edited by: Chuck Tatum is Tiki 2011-12-06 15:39 ] |
|
ATP
Atomic Tiki Punk
Posted
posted
on
Sun, Aug 12, 2012 3:44 AM
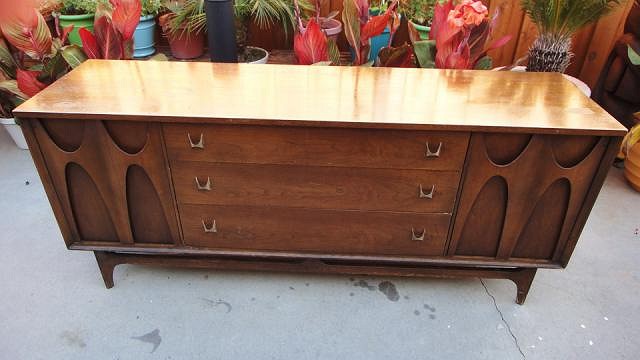
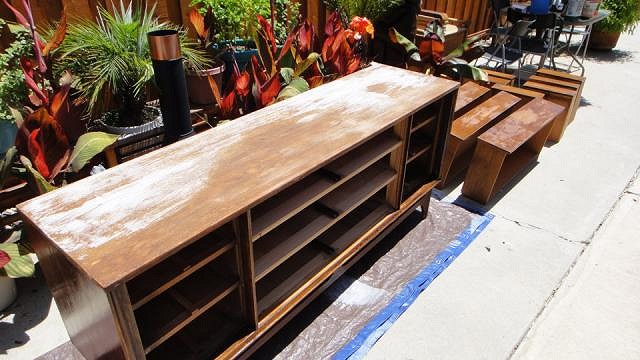
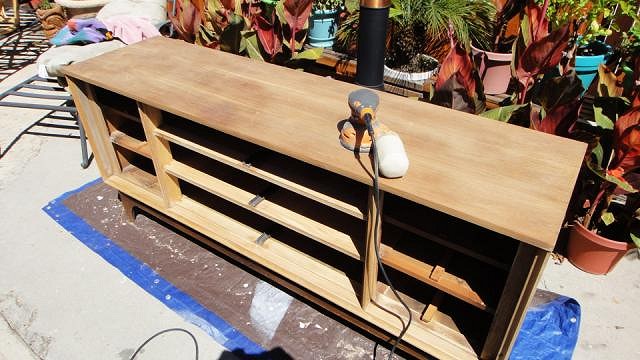
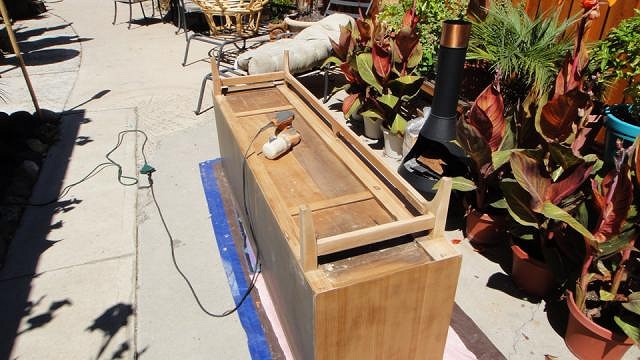
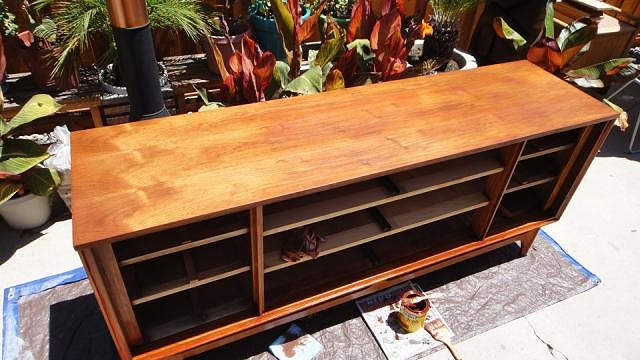
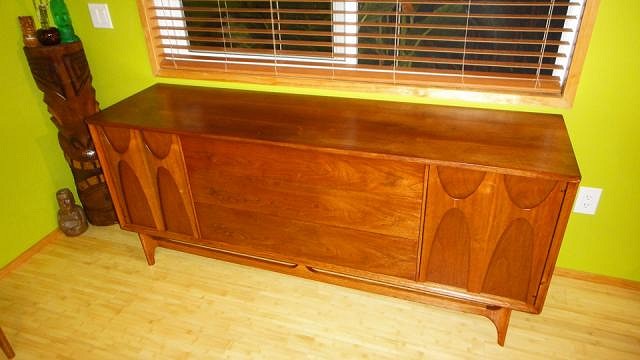
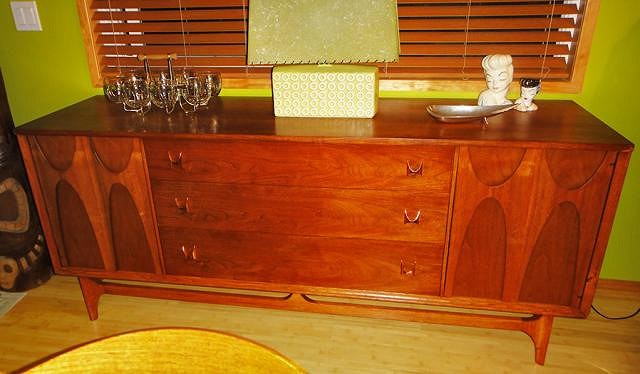
So you have a vintage piece of furniture you want to restore? I got this "Broyhill Brasilia Triple Dresser" from my good friend Brent "CalTiki"
So what do you need to get started: Stripper- I recommend " Citristrip" does not have the toxic chemicals other strippers use, nor the bad smell. Do this outside! put down a plastic sheet or groundcloth Step 1: Remove all drawer pulls, Hinges, Hardware, doors & drawers etc. Step 2: Put on the rubber gloves as these chemicals can damage your skin
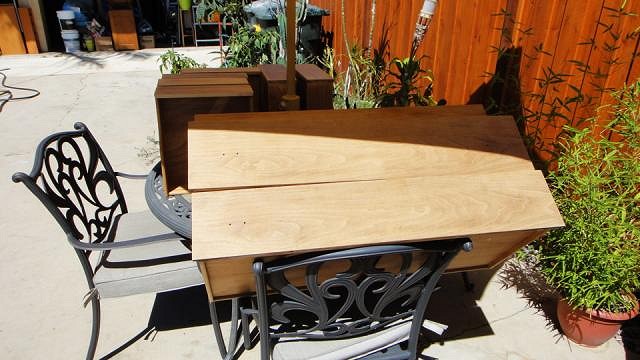
Using a clean rag & the Paint Thinner/Mineral Spirits to wipe down & remove any residual stripper from the furniture. Now we are ready for the refinishing part. Sand paper 120 & 220 grit With this particular piece of furniture I ran into a unique problem as the Broyhill Dresser is constructed out of Step 3: First sand with 120 grit sandpaper to smooth scratches & dents etc.
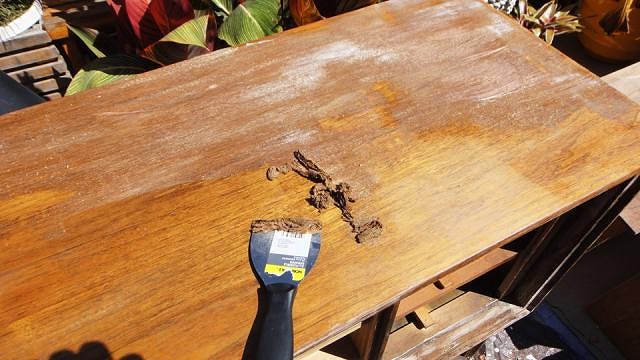
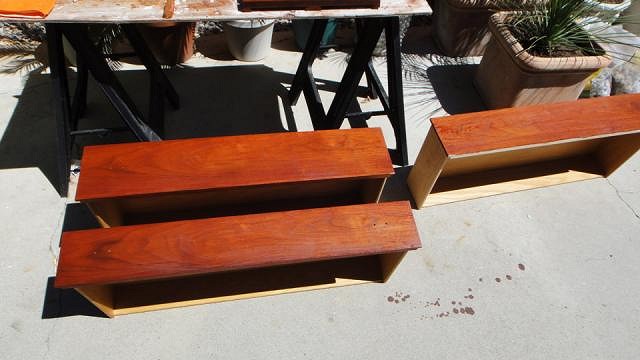
Now we are ready to stain the furniture if you want to at this stage Cheap brushes Step 4: Apply a coat of wood stain to surfaces,wipe down with a clean rag to remove uneven areas of stain etc.
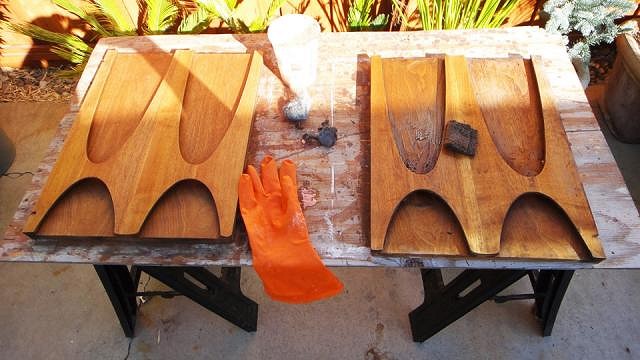
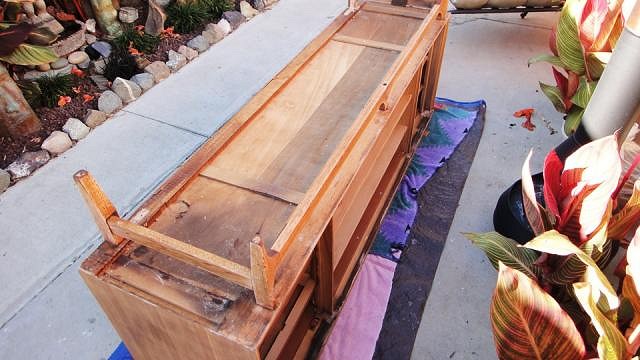
Last stage: Finish & seal wood You will need: Time to apply that finishing coat, I started with one coat of "Minwax Fast-Drying Polyurethane satin finish" I reassembled the dresser (The door pulls are missing as they are still getting a new copper plate finish)
I will post a final picture when I get the door pulls back. |
|
M
MadDogMike
Posted
posted
on
Sun, Aug 12, 2012 6:29 AM
Beautiful piece of furniture ATP and nicely refinished. I don't know about the citrus based stripper but I met a rose covered stripper and boy was she HOT! Umm, what I meant to say is that the non-citrus, solvent based paint strippers are "hot", they burn like crazy if you get them on your skin :D |
|
ATP
Atomic Tiki Punk
Posted
posted
on
Sun, Aug 12, 2012 12:50 PM
ATP Laugh! MDM! I want a special emoticon for this. |
|
ATP
Atomic Tiki Punk
Posted
posted
on
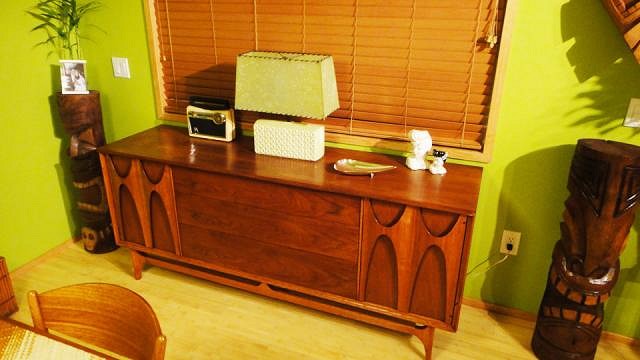
Sun, Sep 9, 2012 11:29 PM
At last got the hardware back from the metal platers
|
|
LLT
little lost tiki
Posted
posted
on
Mon, Sep 10, 2012 12:45 AM
ATP-a handyman with taste.... |
|
T

tikiskip
Posted
posted
on
Sun, May 19, 2013 8:20 PM
This is nice Great Job!! |