Tiki Central / Other Crafts
Maui Tiki Ceramics - by TikiRob
Pages: 1 2 3 4 5 6 260 replies
|
M

MauiTiki
Posted
posted
on
Thu, Feb 24, 2011 11:07 AM
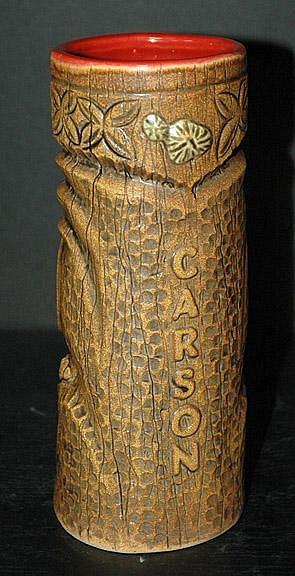
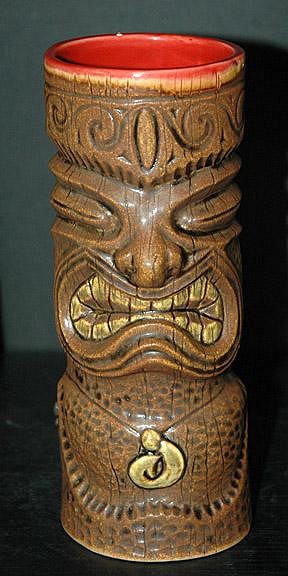
Thanks for the pics Wendy! I have a Geckoma mug! (not as many as you though) I've been keeping Gecko up to date with the progress of my "Big Puka" mug. He stayed with me on Maui for a couple days so I've seen the big Puka necklace in person, although I never tried it on. It really attracts attention and a lot of questions from people where ever he goes. He made one of his Milan Guanko mugs wearing a puka necklace, so I thought I'd give it a try.
Here is a photo of BeachBumz, Gecko and I last time he visited us on Maui.
I'll post pics when it's done. |
|
B

Beachbumz
Posted
posted
on
Thu, Feb 24, 2011 4:51 PM
Hey Brada Rob, I remember that picture. That puka shell is bigger than any I've ever seen.. I think that necklace must weigh 5 pounds! :wink: I'm liking that big puka carson mug, very cool... |
|
M
MauiTiki
Posted
posted
on
Thu, Feb 24, 2011 6:14 PM
Yeah, I had to duck down in the photo so you can see the words behind me.... |
|
D

danlovestikis
Posted
posted
on
Thu, Feb 24, 2011 7:54 PM
I love that threesome photo, I stole it with save as. So what exactly are they selling at the Gecko store? I have one of the Gilligan's Island tikis on the way to my home for Dan's birthday I hope it has the necklace. Here is one more project where its used. He is making my bowl so we'll have to see if he remembers the necklace. ps he is correcting the missing I |
|
D
danlovestikis
Posted
posted
on
Wed, Mar 2, 2011 8:11 AM
I want one of your bowls, don't forget us, Wendy |
|
M
MauiTiki
Posted
posted
on
Wed, Mar 2, 2011 10:40 AM
Hi Wendy, I think Gecko Balls are just Chocolate Covered Macadamia Nuts in fancy packaging. I haven't forgot about your bowl. I'll get it started and send you a PM when it's time to start choosing colors. It's good to see you making molds, I made a new one over the weekend, it's a lot of work to get them right, but we are learning and getting better each time. Aloha! Rob |
|
D
danlovestikis
Posted
posted
on
Wed, Mar 2, 2011 11:38 AM
Ahhhhh! Swizzle just posted photos of a mold he is doing and its very different from how I do them. I'd love to see photos as you make a mold. Wendy |
|
M
MauiTiki
Posted
posted
on
Wed, Mar 2, 2011 12:03 PM
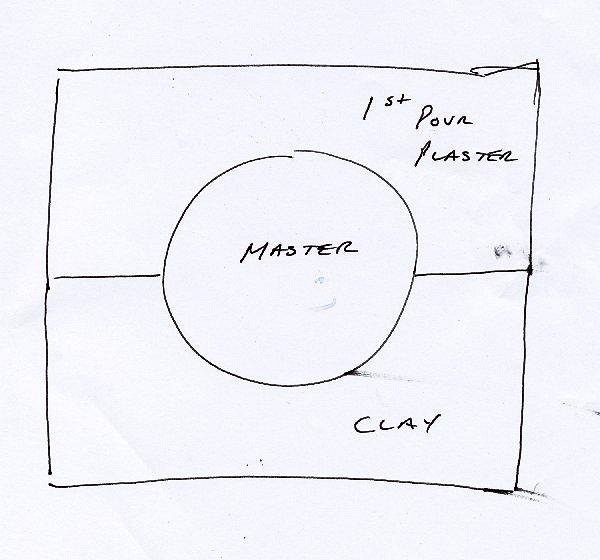
Hmmmmm, I have had several people tell me that what Swizzle is doing is not the best way. That was what I thought would be easy and wouldn't require all the clay when I first started. Hopefully his teacher knows what he is doing. I can't wait to see how it comes out. I do it much like you except that I create a cone of clay around the base of the sculpt and fill it with plaster as my first step. When pouring the sides it looks much like the clay cone at the top of the mug, I just have a plaster cone at the bottom. I carve holes into it before I pour the sides so that it fits correctly into the sides of the mold.
I have also built a box with sides that move in for smaller mugs. This way I don't have to build a box each time or use clamps. I have photos somewhere of the box. I'll post them for you to see. Keep up the Mug Making everyone! |
|
S

swizzle
Posted
posted
on
Wed, Mar 2, 2011 1:33 PM
That's interesting to hear Rob. When I first started the class I actually took in a few pictures of Wendys mold photos ( I hope thats OK Wendy?) and my teacher said that the way she is showing me how to do it is the way that the "professionals" do it. She has been doing it for a long time and does a lot of slipcasting herself so as this is my first mold i'm interested to see how it works out. It certainly looks far simpler to me if it is just going to be a two/three piece mold but when you start doing intricate molds using five or six pieces, after thinking about it myself, I get the feeling that you would need to pack clay around the master in order to avoid undercuts and to get the right shapes so the mold pulls apart easily. I'm not sure how much of that she has done herself. Like all of us newbies to mug/mold making it is a learning process and whilst I know I could have gone it alone and done this by myself, the reason I took the class was to give me a kick up the bum and also to have someone guide me through the steps so that I wouldn't have to learn by my mistakes, so to speak, and get it right the first time. If/when I make another one I could end up doing things differently, but so far this technique looks a lot easier to me at the moment. Although I need to wait until it's finished first as I might end up having to eat my own words. :) |
|
D
danlovestikis
Posted
posted
on
Wed, Mar 2, 2011 3:45 PM
MauiTiki and Swizzle, all of us sharing how we do these is wonderful. Please don't stop. Rob, I hadn't figured out how to do the bottom like you just showed us. Thank you. I thought it was done with some other material than clay so on my bowl mold I did a huge slab for the bottom. This will be how I will do it on my next bowl mold. I am so excited to know this technique. Big Smile, Wendy |
|
M
MauiTiki
Posted
posted
on
Wed, Mar 2, 2011 4:33 PM
Swizzle, This will work out for you, it's just a different method. When I wanted to make a mold I didn't even have any extra clay so I thought this would be a good way. Gecko and another person told me it was not how they do it. It's hard to know, the way yours looks it should come out fine. I would think you need some space at the top because the slip water absorbs into the plaster the slip level goes down about an inch before it's thick enough to pour out. I tried adding some plaster to holes in an existing mold and the dried plaster immediately sucks the moisture out of the wet plaster making it crumble. It will be interesting to see how you fill the holes below your mug. I'm no expert, that's for sure, so be sure to keep us posted on your teacher's techniques. We're all learning...That's why were are on this thread!! Wendy, I'll find the photos so you can see what the next step looks like. |
|
M

MadDogMike
Posted
posted
on
Wed, Mar 2, 2011 4:36 PM
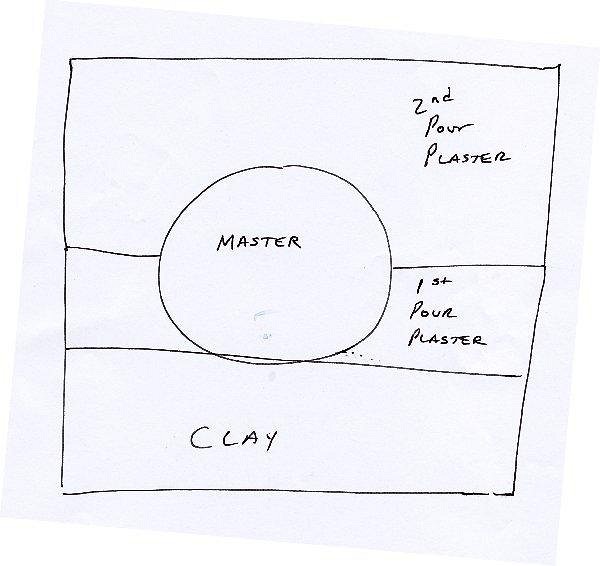
Here's what it looks like to me, Swizzle can correct me if I'm wrong.
Swizzle, I think this is how most molds are made.
As far as mixing plaster by feel, it's the method I use :D It works fine if you are just making a mold to pull a limited number of casts. If you are doing mass production work, it's better to measure everything to produce the optimal quality mold. |
|
M
MauiTiki
Posted
posted
on
Wed, Mar 2, 2011 5:09 PM
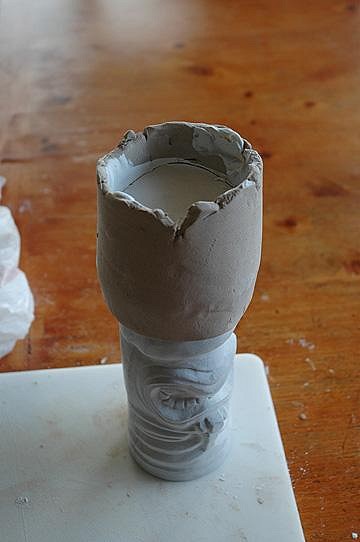
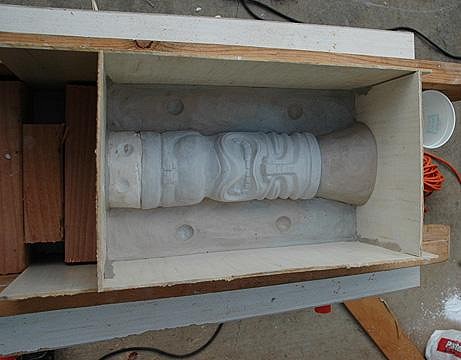
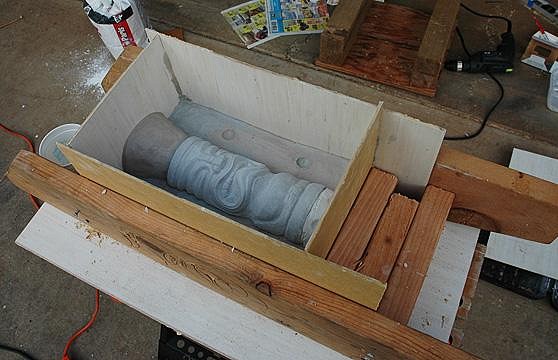
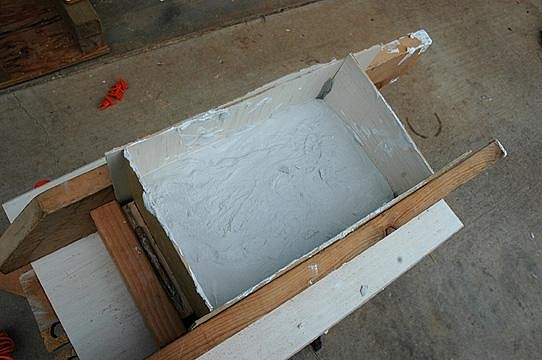
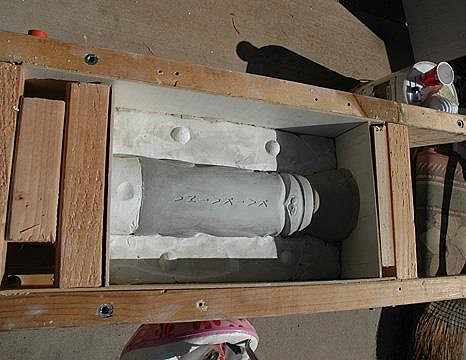
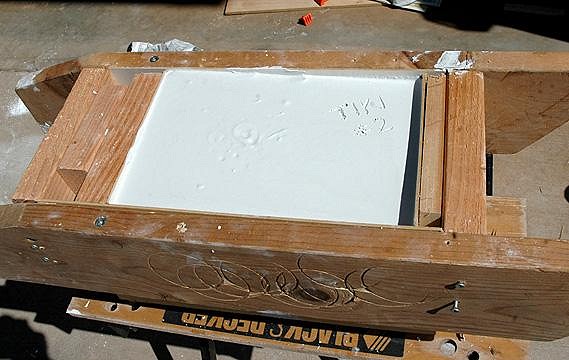
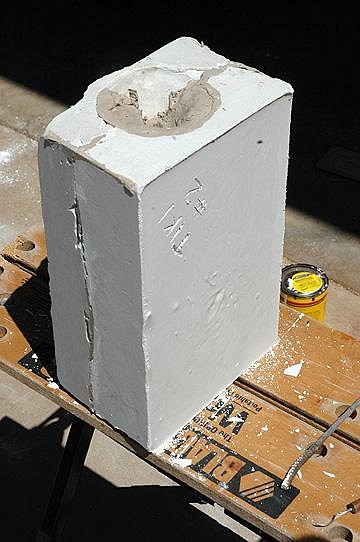
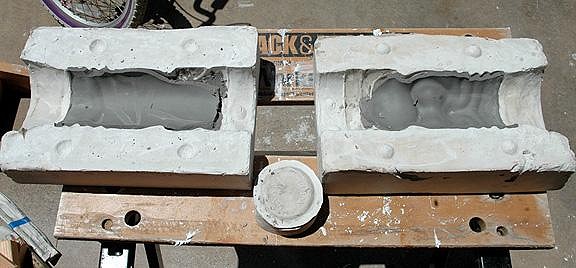
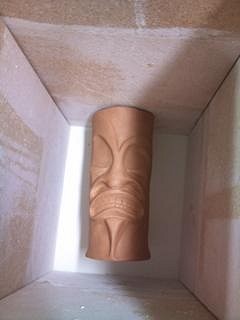
Here is my "How to make a mold" contribution to TC... Lots of Photos, not so much words... This mold was made from a slip cast mug that I modified and customized. I wrap clay around the bottom and fill it with plaster to make the bottom part of the mold. Carve some alignment holes in the plaster bottom. Next I fit it in to my custom ADJUSTABLE box and add a cone of clay at the top for pouring slip in and out. It should be a couple inches tall as the slip level drops about an inch during the casting process. Another angle...Don't for get "divots" to help the mold line up correctly. Pour plaster so that it's about 1.5 inches thick on the top of the mug. This plaster isn't very smooth because I spent too much time mixing, it should have been poured sooner and probably could have used more water. FOLLOW THE PLASTER MIXING INSTRUCTIONS! I flip the box and remove the clay. Paint on some "soft soap" so the plaster won't stick to itself and pour another layer of plaster. I mixed this plaster much better this time after learning from the other side. When it's dry you can remove it from your box. Take the clay out of the top and you should be able to pull apart the mold. Because I used a slip cast Mug as my master it soaks up the water from the wet plaster and becomes soft. It tears as the mold comes apart. Most of it easily peels out, but I have to hose "Power wash" out the rest of the remaining original. Let the mold sit in the hot sun for a day before using it for the first time. I leave a fan on it too, to help the drying process. Whoo Hooo!! now you have a mold. I pour slip, let it sit for 35-40 minutes before pouring out, then I let it sit for a minimum of 1 hour before removing it from the mold. Often I leave it overnight and remove the mug in the morning. Watch the slip level too, sometimes you need to add more slip if it starts to drop too low in the mold. Good Luck! |
|
S
swizzle
Posted
posted
on
Thu, Mar 3, 2011 12:22 AM
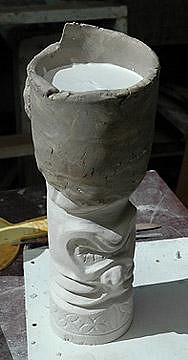
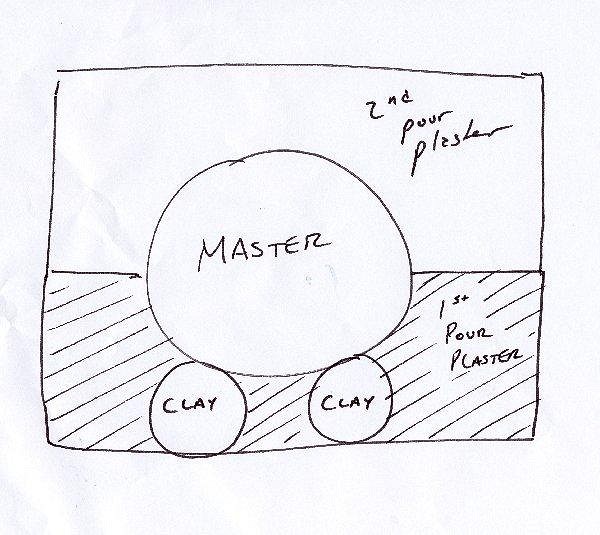
Hi guys, We all seem to have a slightly different method going on here to achieve the same affect. Rob, your bottom part of the mold is something I might try next time, mine is not going to be like that at the moment, however the cone of clay is something that will be part of my mold but it will be a separate piece on top. Not sure if that makes sense but everyone will see the photos as I go. Your mold is a three piece with the third piece being on the bottom where as mine will have the third piece on the top. I'm actually curious to see how my mold will work out and whether or not i'm going to do it a different way if I make another. I'm going to get my teacher to check out these threads next week to see her opinion. Now MDM, I dont know how to do a sketch to show what i've done but what my teacher has shown me is sort-of a combination of both your drawings. From what i've picked up here on TC the second diagram is what I expected to be doing. But it is effectively a cross between the two.
MDM said, "Finally, the mold is flipped over, the clay is removed, and the rest is poured. This time there is no coating used so that the 3rd pour becomes part of the first pour". Exactly. The final pour will be the cone on top which my teacher calls a "spare". As I mentioned in my post, to me it seems like a slightly simpler way to get the same result, with the difference being you are probably not using as much clay to pack it up as you are only using the two small columns and enough clay to seal the gaps where the box sides meet, and then you just have to do another small plaster pour to plug the holes. I'll take another picture next week which will probably make it far more easier to make sense of than me trying to explain it. It's good we can all learn from one another and possibly find a method we haven't tried before that might make things easier, but ultimately I suppose it comes down to doing what works for the individual as long as you get the desired result. P.S. Sorry for hi-jacking your thread.:) [ Edited by: swizzle 2011-03-03 00:26 ] |
|
M
MauiTiki
Posted
posted
on
Thu, Mar 3, 2011 10:20 AM
Swizzle, keep posting photos and keep us updated, it will be good for us to see how they do it "Down Under". Here is the link to Swizzle's mug/mold making thread: Sounds like your instructor knows what she is doing. Be sure to add me to your list of people who want one of your mugs! |
|
S
swizzle
Posted
posted
on
Thu, Mar 3, 2011 12:28 PM
Thanks Rob. Will do. Much appreciated. |
|
T

TikiKIrby
Posted
posted
on
Thu, Mar 3, 2011 9:12 PM
Nice walkthrough, mahalo... I like your adjustable box, it looks like it gives you better access to the mold. You don't have clamps in your way, keep up the great work.. |
|
G

GROG
Posted
posted
on
Fri, Mar 4, 2011 2:16 AM
Only one day to dry your molds? GROG usually let GROG' mold dry for the better part of a week before GROG start pouring. The drier your molds are before you start pouring, the longer they will last. If your molds feel cold to the touch, they're still wet. [ Edited by: GROG 2011-03-04 02:17 ] |
|
M
MauiTiki
Posted
posted
on
Fri, Mar 4, 2011 12:27 PM
Grog... Rob live on sunny rock in da middle of da ocean. Very dry and hot in Kihei. Mold dries fast. |
|
M
MadDogMike
Posted
posted
on
Sat, Mar 5, 2011 8:37 PM
Like this Swizzle?
|
|
S
swizzle
Posted
posted
on
Sat, Mar 5, 2011 9:33 PM
That's the puppy dog MDM. After the second pour that clay is removed and filled with plaster. |
|
M
MauiTiki
Posted
posted
on
Mon, Mar 7, 2011 7:34 PM
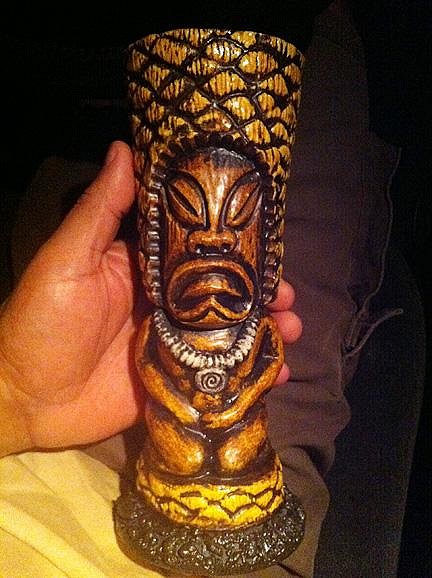
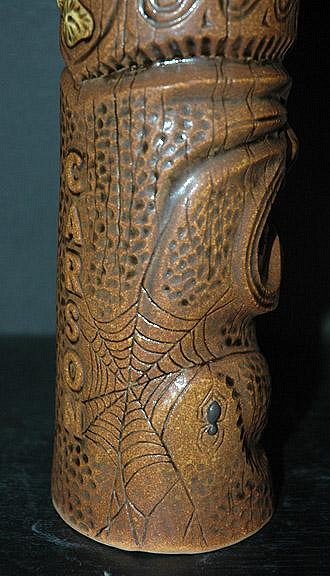
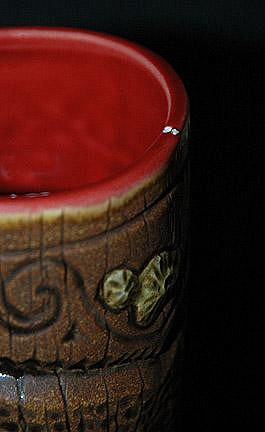
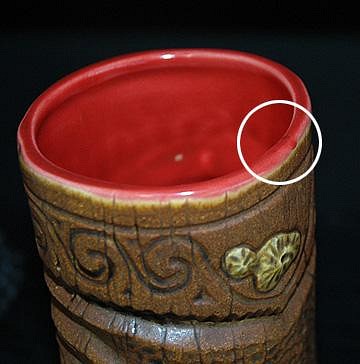
Da Big Puka Mug and the Spider mug are out of the kiln!!! They came out darker than the last batch. I got the glaze on a little thicker. Check them out...
The Spider mug for Dale and Janet...
The rim of the spider mug has a flaw.
My friend thinks there may have been a tiny piece of plaster from the mold that popped during the firing. You can see how it flipped out of the hole. I'm going to try to file it down and re-glaze the rim and fire it again. I'll let you know how it goes. |
|
M
MadDogMike
Posted
posted
on
Mon, Mar 7, 2011 8:00 PM
They look beautiful. There's a very good chance that spot will re-fire just fine. |
|
D
danlovestikis
Posted
posted
on
Mon, Mar 7, 2011 10:15 PM
After sanding wash it really good so that there isn't any dust to make the glaze crawl. I bet you knew that but I couldn't help myself. I love your photos so keep posting them. I'm looking forward to my next mug when I can use your technique for the round bottom piece, thank you for teaching us that! Hugs, Wendy |
|
M
MauiTiki
Posted
posted
on
Tue, Mar 8, 2011 10:09 AM
I rinse the mugs after bisque firing, but don't really sand or scrub them. Maybe I should. I'll let you know how the flaw repair goes. |
|
MT

Makiki Tiki
Posted
posted
on
Wed, Mar 9, 2011 12:10 AM
Love the spider mug. The color and texture are awesome! |
|
M
MauiTiki
Posted
posted
on
Wed, Mar 9, 2011 10:47 AM
Thanks Makiki, Let me know if I can make one for you. The repaired rim has gone back in the kiln this morning. I ground it down with my dremmel and there was a air bubble in the slip. There may be a small divot there but at least it will be glazed. BeachBumz got a new Kobalt gravity feed "detail Spray Gun" so we sprayed some glaze last night. It works much better than a little airbrush. Picking up a bucket of slip tomorrow so I can get some more mugs started. |
|
M
MauiTiki
Posted
posted
on
Thu, Mar 10, 2011 7:50 PM
The rim is fixed! came out great!
|
|
D
danlovestikis
Posted
posted
on
Fri, Mar 11, 2011 5:53 PM
Are you and Beachbumz ok? Wendy |
|
M
MauiTiki
Posted
posted
on
Fri, Mar 11, 2011 7:33 PM
Wendy... Beachbumz and I made it through the Tsunami. We both live high enough up that it didn't effect us. BeachBumz shop is low but I don't think the water made it to his shop. Close, but not quite there. I started work on your bowl, I didn't for get about you! |
|
B
Beachbumz
Posted
posted
on
Fri, Mar 11, 2011 8:42 PM
Hi Wendy, the water came within 15ft of our shop... I was thinking early this morning I was going to have some time off... Thank you god... :wink: We got lucky out here this time.. |
|
M
MadDogMike
Posted
posted
on
Fri, Mar 11, 2011 10:15 PM
Maui, glad you could salvage your mug - Beachbumz, glad you didn't have to salvage your shop! |
|
D
danlovestikis
Posted
posted
on
Sat, Mar 12, 2011 9:40 AM
Good news with so much bad news out there. I'll have to contact Mike, I know his house is high but his day job is on the water. I'm excited about my bowl. Beachbumz I need one from you too. (: Wendy |
|
M
MauiTiki
Posted
posted
on
Fri, Mar 25, 2011 8:52 PM
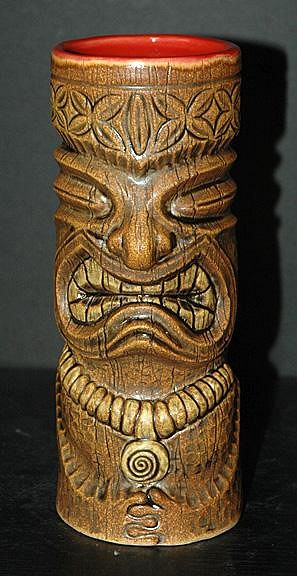
Got three mugs out of the kiln this morning. I promised I'd post a photo of this one. Sorry the photo is kind of dark. I can't re-take it, 'cause it's already on its way to his new home.
More photos of the other two mugs this weekend! |
|
M
MadDogMike
Posted
posted
on
Fri, Mar 25, 2011 9:04 PM
Very nice - beautiful sculpt, beautiful texturing, beautiful glazing. |
|
S

SeaDawg
Posted
posted
on
Fri, Mar 25, 2011 9:36 PM
|
|
B
Beachbumz
Posted
posted
on
Fri, Mar 25, 2011 11:41 PM
This mug is awesome, the glaze on this one was unreal brada! |
|
S
SeaDawg
Posted
posted
on
Tue, Mar 29, 2011 7:03 AM
Hey Rob, :tiki: :tiki: :tiki: |
|
M
MauiTiki
Posted
posted
on
Tue, Mar 29, 2011 11:27 AM
SeaDawg - Glad it made it to you so quickly (and in one piece). I'm happy to have it in your collection. You can put the mugs together and see how I've progressed in my mug making over the past year. Although I really love this design and customizing it, I'm going to force myself to move on to a new design. I have several in the works, but not 100% confident with any of them. I just need to take the time and finish one up and make a new mold. For me the sculpting of the original is the hardest part. I do have one more custom Carson mug I like to call "my little monkey Skull" in the customizing stage. Inspired by Munktiki's "my little shrunken head" mug. I still need to post photos of my first Kaikaina Lava Cinders mug that I started a couple months back. So much to do...So little time... |
|
Z

zerostreet
Posted
posted
on
Tue, Mar 29, 2011 11:36 AM
|
|
D
danlovestikis
Posted
posted
on
Tue, Apr 12, 2011 8:53 AM
You are so good at glazing. How is my bowl coming along? Wendy |
|
M
MauiTiki
Posted
posted
on
Tue, Apr 12, 2011 11:10 AM
Oooh Wendy, I wish I had more time in the day. I own my own business and we are super busy right now, plus Little League Baseball is in full swing and my son has 3 games a week. With all the rain we've been having my yard is becoming a jungle. Not a controlled Jungle like your jungle room, but an overgrown tropical rainforest. I spent a good part of Saturday preparing a 30+ foot tall fan palm for cutting down, mu truck is overflowing with yard trimmings (I hop to make it to the green waste dump today). Just think of the tiki's I'll be able to carve from the 30 foot tall palm trunk! I'm planning on saving a few 6 foot tall sections for tiki's!! Maybe I can get Beachbumz over to carve one too. Good news is I did work on Tiki ceramics last night, working on a new sculpt and started the glaze process for my "SKULL" mug. Here is a crappy photo from my phone... |
|
D
danlovestikis
Posted
posted
on
Tue, Apr 12, 2011 12:54 PM
Clever! Our bushes are all in need of pruning too. Best wishes for all your chores to work out and your son to win his game. Just remember me when you have a bowl for sale, cheers, Wendy |
|
M
MauiTiki
Posted
posted
on
Wed, Apr 13, 2011 1:08 AM
Hey Wendy. What happens May 27th? Dan's birthday? I can have your bowl ready by then. |
|
D
danlovestikis
Posted
posted
on
Wed, Apr 13, 2011 8:34 AM
Our 33rd wedding anniversary. Our tradition is always to give him tikis. I get to choose a restaurant. Wendy |
|
M
MauiTiki
Posted
posted
on
Mon, Apr 18, 2011 10:20 PM
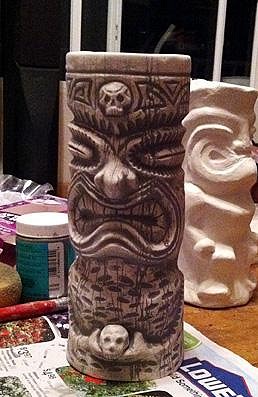
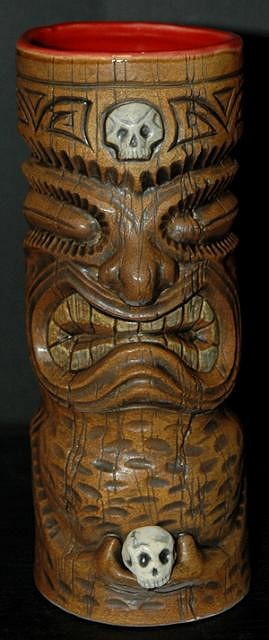
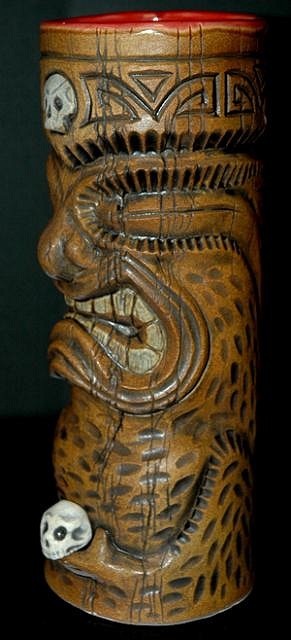
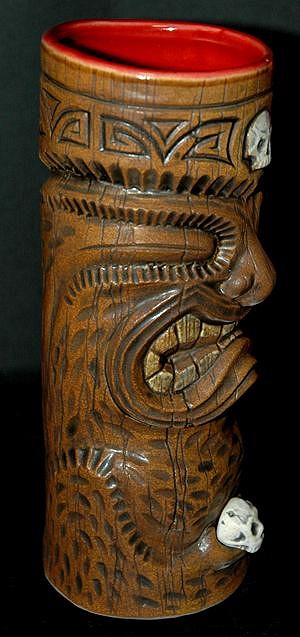
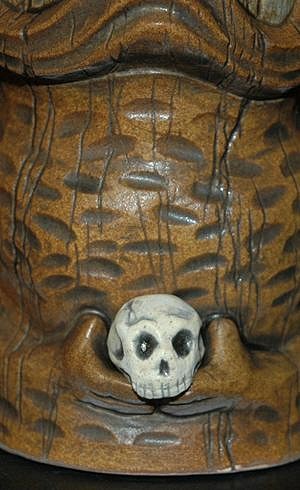
the "Skull Trader" mug is out of the kiln and looking good! I was going to call it "My little monkey Skull" after MunkTiki's new mug "My little Shrunken Head" but when Beachbumz called it the "Skull Trader" mug it stuck.
|
|
M
MauiTiki
Posted
posted
on
Mon, Apr 18, 2011 10:30 PM
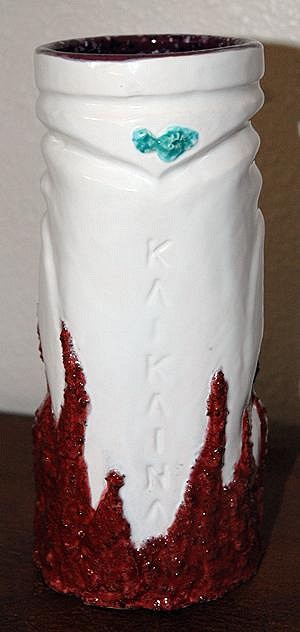
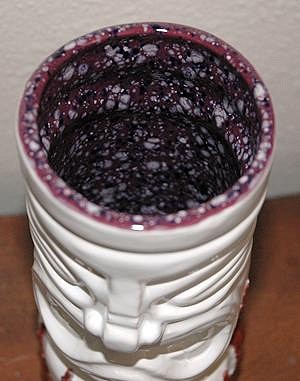
I never posted final photos of the Lava stuff I was messing with. I mixed some cinders into some slip and experimented on this Kaikaina mug. I thought the white would really set it off. I tried some speckle Glaze on the inside.
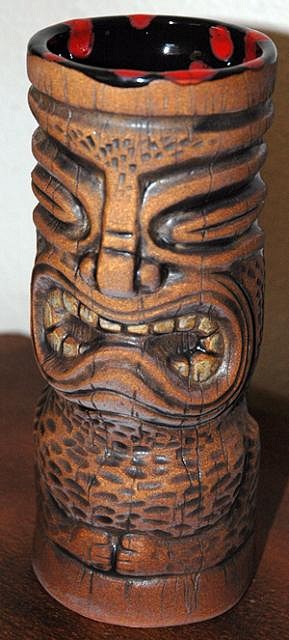
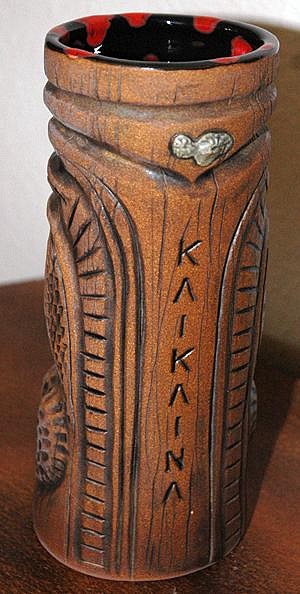
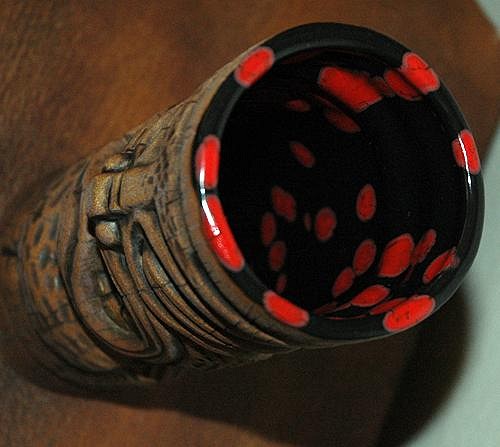
This Kaikaina mug has some added detail and some crazy black with red glob glaze inside...
|
|
LT

LOL Tiki
Posted
posted
on
Tue, Apr 19, 2011 12:20 AM
The Skull Trader is sweet! |