Tiki Central / Other Crafts
Tiki Tiger Studios: Big long Egyptian trip report!
Pages: 1 2 3 4 5 6 7 288 replies
|
V

VanTiki
Posted
posted
on
Sat, Apr 27, 2013 11:30 AM
LOVE the Hell's Half Acre poster! I run by the old honolulu police department all the time (it is currently some boring office building), and the outlines of the cool arches that led to the police car garages are still there. It was SUCH a thrill to see old time-ey police cars zipping out into Chinatown through the arches in the movie. Your build-out is looking great! Henrik "VanTiki" |
|
T

tigertail777
Posted
posted
on
Sat, Apr 27, 2013 10:56 PM
Hey thanks Vantiki! It's getting there, I will have more pics after this weekend. Wanna know a funny thing? I have never seen "Hell's Half Acre" only clips here and there. When I was looking around for some appropriate 40's/50's stuff to put on the wall I wanted some kind of Noir type feel and ran across that poster for cheap on ebay and fell in love with it. One of these days I should pick up the DVD I bet its one WOW of a movie. I wanted to put the "Voodoo Tiger" poster on the inside door of the studio, but I am little worried how much sunlight it would be exposed to constantly so I may need to find somewhere else to put it. All in all the place is finally starting to look more like a studio and less of a construction zone/blast area. :wink: |
|
D

danlovestikis
Posted
posted
on
Thu, May 2, 2013 9:40 AM
Looking forward to more photos now that you have the POWER! Wendy |
|
T
tigertail777
Posted
posted
on
Fri, May 3, 2013 6:15 AM
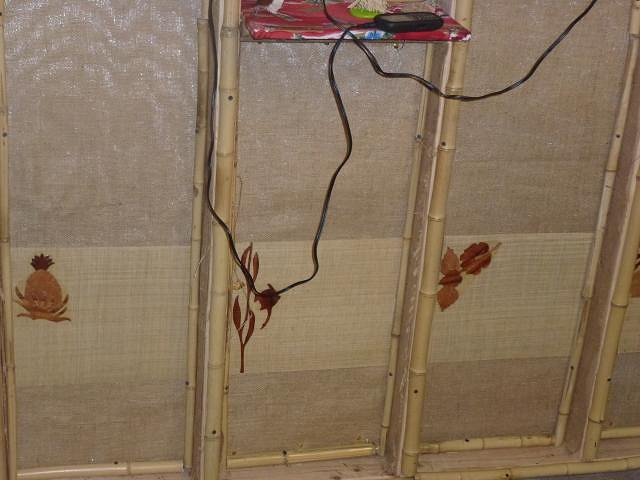
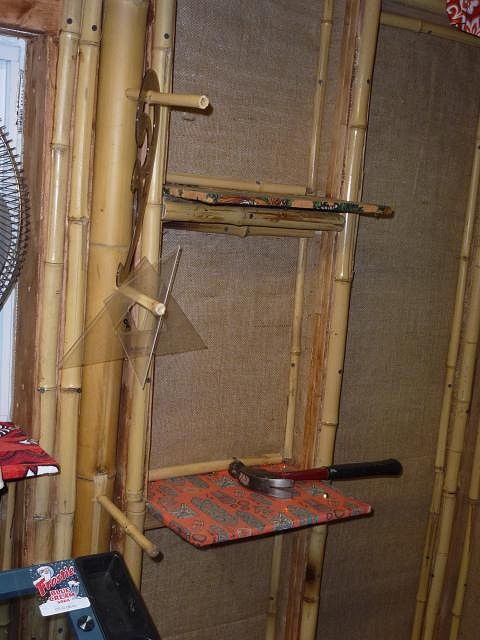
Little more progress as I said before. Waiting on more supplies coming in the mail before I can go much farther. mainly I added the old placemats to the walls, and did more shelf wrapping with Hawaiian cloth. You can also see my new studio toy a friend sent to me: an old 80's boombox that I can connect my phone to and play music over the awesome blaring speakers. I need to get a cd player that can play Mp3 discs (probably an old cd walkman) so I can connect that to it as well since I have so many cd's. That's all folks for now. Hopefully the stuff I ordered will come soon so I can work on it more. |
|
D
danlovestikis
Posted
posted
on
Fri, May 3, 2013 10:44 AM
Wow you have been working again. It does look like a studio and a fun one. Love your photos, Wendy |
|
C

cy
Posted
posted
on
Fri, May 3, 2013 2:46 PM
Making great progress Tigertail! I have some magnetic stock we use to print truck/car signs that would work over the grey electric box that you can have.. You can decorate any way you like and remove when you need to replace fuses, etc. Pop on by the shop if interested. Hope to see you at Hale Pele next Saturday. |
|
T
tigertail777
Posted
posted
on
Sat, May 4, 2013 4:27 AM
What a treat to come home to comments after a hard days night slogging away at janitorial duties. :) Thanks a bunch for the offer Cy, I will take you up on that. Hopefully I can make it to the Hale Pele event, going to certainly try, if I can't make it though I know where your work place is at least. Yesterday I got one of the Hawaiian fabrics I have been waiting for so I can work on the hut a little. Am hoping that I get Sophistitiki's fabric soon that will be used to cover all the front shelves by the desk, it's a pretty nifty design and she went to some trouble to accommodate my request which I really appreciated. :) Next, I need to order some 3 inch diameter 8 foot long bamboo poles (hoping to get one 4 inch one too). I have something unique and special in mind for them that I don't think I have seen anyone else do. :wink: I already ordered around 1,000 bamboo paint stir sticks...you'll just have to wait and see what I do with those. :) |
|
G

Gwen
Posted
posted
on
Sat, May 4, 2013 6:48 AM
It is coming along so beautifully. I am with you on that wonderful vintage bark cloth. Really perfect stuff. |
|
L

littlegiles
Posted
posted
on
Sat, May 4, 2013 7:56 AM
Your studio is really coming along nicely. It has a very nice tropical feel to it. Your use of the placemats was really creative. Dale |
|
T
tigertail777
Posted
posted
on
Mon, May 6, 2013 5:06 AM
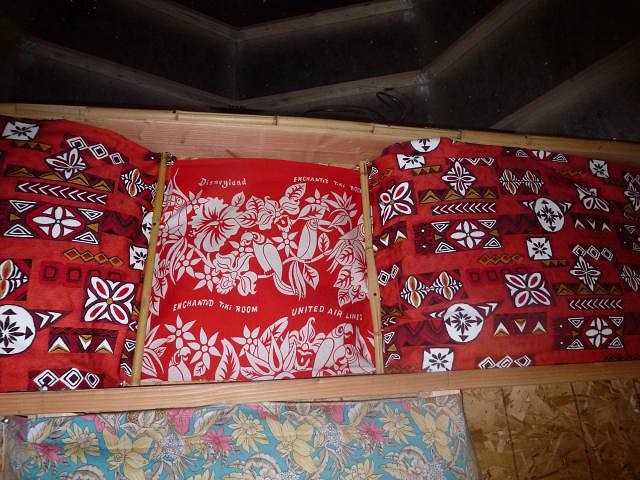
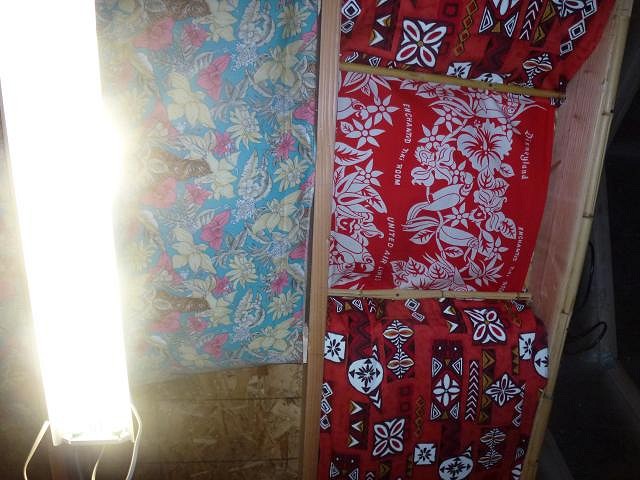
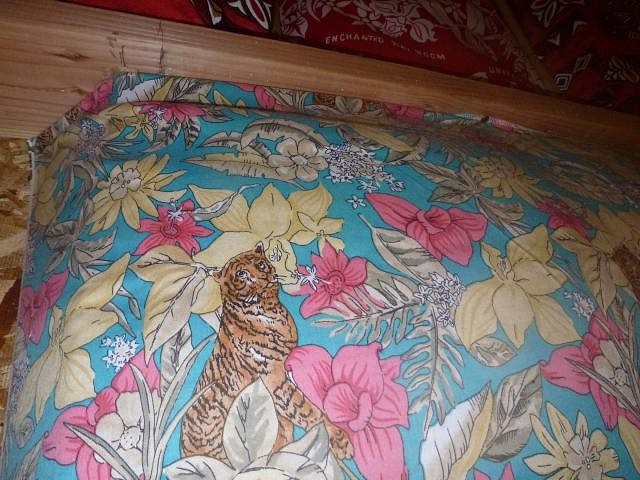
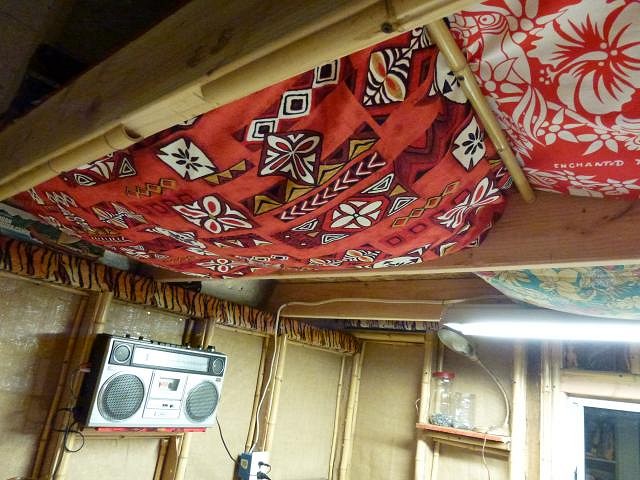
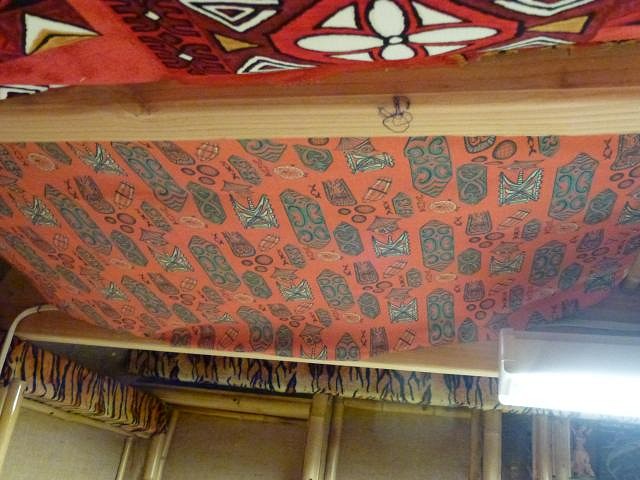
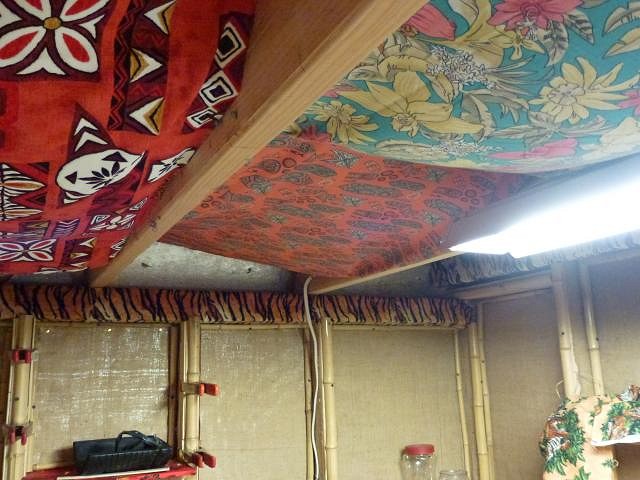
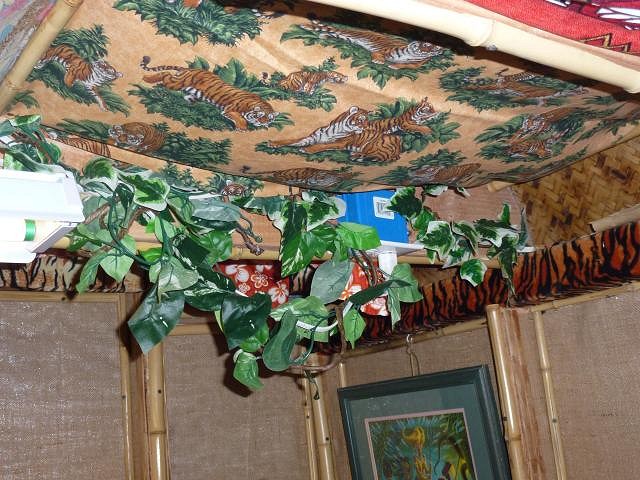
Got one other fabric I have been waiting for so got to do a modicum of extra work on the hut. I am putting loose draped fabric all over the ceiling, its supposed to look like the fabric coverings they use in the Lanai/que area of the Enchanted Tiki Room at Disneyland. But I am going to need to find about 12 more feet of appropriate Hawaiian fabric to finish. This is looking upwards under the first part of the overhang rafters. I had that Enchanted Tiki Room cloth for years now I originally bought it for my theme park fanzine so I could use the pattern for the Tiki Room issue, it is one of the original patterns that the hostesses/hosts would wear in the attraction with a tie into United Airlines the original sponsor before Dole. Next to it is another barkcloth piece I found on ebay that I thought was a good color match for the Tiki room piece, and of course rife with my favorite color; orange. Hard to see due to the fluorescent light, but under the second division of rafter beams is another fabric that is quasi Hawaiian; a turquoise background with the usual tropical flora. I chose it in this location because it is directly above where my work desk chair will be, and when I am stumped or blocked artistically I can stare up at the calming aqua color and the tigers hidden among the flowers. Figured it might slow down the brain fizzle enough to give me the ideas I need. A little better picture where you can see the tiger and design. Here is how it all looks in context as you start to walk under. That's about it for now till my other supplies arrive. :) Thanks everyone for the replies and following along it is really gratifying to know there are other wacky weirdos out there like myself. :lol: Your words are a great encouragement and it is appreciated. :) |
|
M

MadDogMike
Posted
posted
on
Mon, May 6, 2013 5:50 AM
I like that ceiling design, unique and interesting. Cool tiger print there Tiger, nice addition! |
|
S

Sophista-tiki
Posted
posted
on
Mon, May 6, 2013 7:02 AM
sophista-tiki fabric, on its way! |
|
D
danlovestikis
Posted
posted
on
Mon, May 6, 2013 8:27 AM
This is so much fun Tiger. I really enjoy all that you are adding to your studio. I didn't even know there was Disneyland cloth. Cool to have Dawn as a coming soon addition. Thanks for posting, Wendy |
|
T
tigertail777
Posted
posted
on
Tue, May 7, 2013 3:25 AM
Gwen: Thanks for stopping by. Yeah, I really love barkcloth it has this unique vintage feel that nothing else has, and man is it durable! Littlegiles: Thanks for the compliments, I wasn't really sure how well the placemats were going to work out till I had them up there against the burlap. I was afraid they were going to be exactly the same shade as the burlap and get “lostâ€, but luckily they were just a bit lighter. I am super happy how spiffy the koa wood looks against the walls. Mike: I got really lucky on that fabric. After sifting through hundreds of Hawaiian fabric patterns on ebay and other sites I ran across that one. It does have a bit too modern of a feel to it in comparison to the other fabrics (seems to have a 70's vibe to me) but where the heck else am I gonna find a Hawaiian style pattern with tigers in it? :wink: Sophista-tiki: Hey thanks so much Dawn! I felt kind of guilty after all the trouble I put you through and only ordered one yard, but with any luck I will throw some more business your way in the future. Can't wait to see how it looks on the shelves. I reserved all the front shelves by the desk for your wonderful fabric. Wendy (and Dan): Thanks Wendy! I am excited about it all too. Here is a nice pic of some of the original 1968 Hostesses in the costumes with the fabric: http://www.disneybymark.com/wp-content/uploads/2011/05/7-15-68TikiRoomHostesses1-931x1024.jpg After the original sponsorship by United Airlines was dropped they changed the hostess/host costume to the more familiar pattern of this (first photos), http://matterhorn1959.blogspot.com/2006/04/souvenir-friday-enchanted-tiki-room.html and also changed some of the audio dialogue in the Lanai for the tikis (originally one of the tikis had a direct “advertisement†for United in its patter). The stewardesses on the United flights for Disneyland also wore very similar costumes with the original fabric as an advertising tie in. I suppose they really had to promote the attraction since it was the only one in the park with its own high price separate admission ticket. I often wonder though how come I can never find any newspapers or magazines carrying any large articles from the time period specifically about the tiki room since it was so incredibly ground breaking. I especially have never been able to find much about the ceremonies or anything for opening day of the attraction despite actively looking for years which really kinda bothers me for something so historic you would think there would be a huge paper trail. Anyways, I digress as usual just thought you'd like to know more on the history of the fabric. :) [ Edited by: tigertail777 2013-05-07 03:27 ] [ Edited by: tigertail777 2013-05-07 03:29 ] |
|
T
tigertail777
Posted
posted
on
Mon, May 13, 2013 5:16 AM
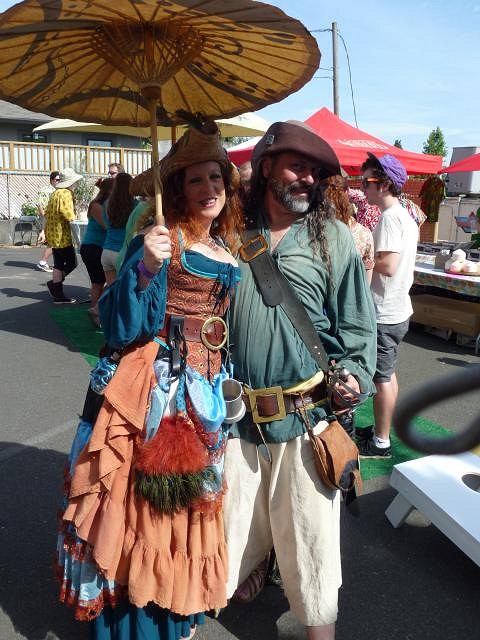
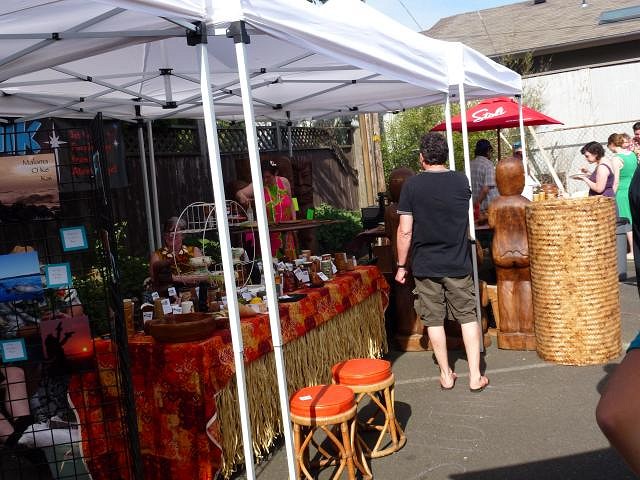
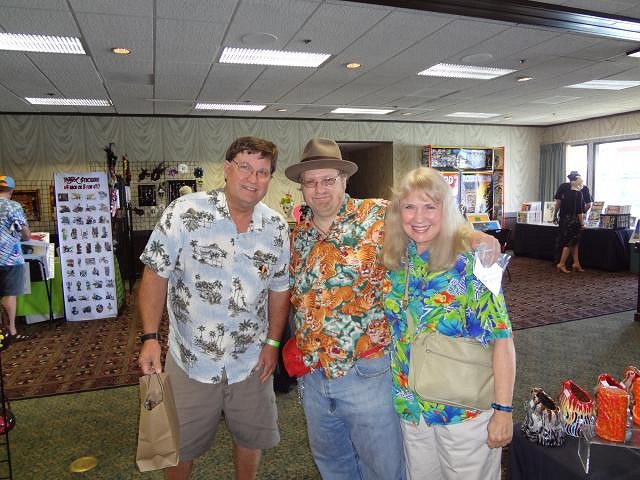
Well this is going to be a big update, because not only did I get work done on the Tiki Tiger hut, I also got to go to my first tiki event at the Hale Pele here in Portland. I got some great deals on stuff for the hut; over 10+ yards of vintage tiki fabric, some used Lauhala Matting for CHEAP, and my first Coco Joes tiki figure. First I'll start off with the pictures from the Hale Pele event and then get into the work on the hut. I found someone else wearing a cool tiger Aloha shirt, and had to get a picture with him. I am the one wearing the fedora hat.
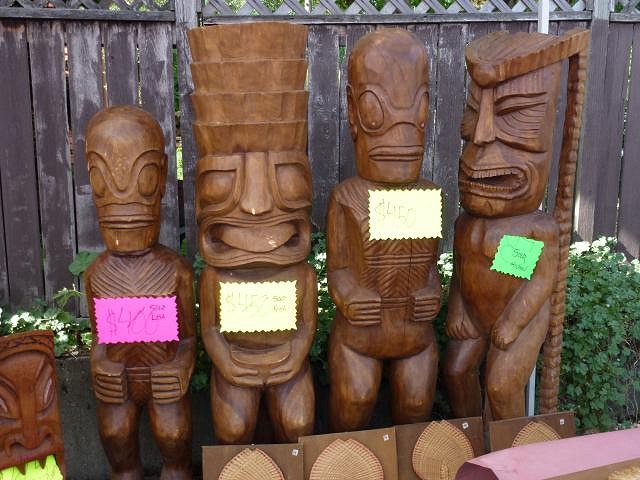
Then I found Cy's Frog Island Tiki booth, chatted with him and took a bunch of pictures of his wonderful carvings. I know Cy from quite a few years ago when my family had him make shirts for our portable miniature golf business, but its been quite a long time since I have seen him and have never seen his tiki carvings in person. Let me tell you they are impressive and hilarious. They remind me a lot of some of the wackier work of Wally Wood and Basil Wolverton like the "Ugly" trading cards from the 60's. I know without a doubt he will sell all of his great work at Oasis. :)
Of the ones there, this tiki might be favorite:
Although this tiki fellow with a moving pendulum is also ultra cool
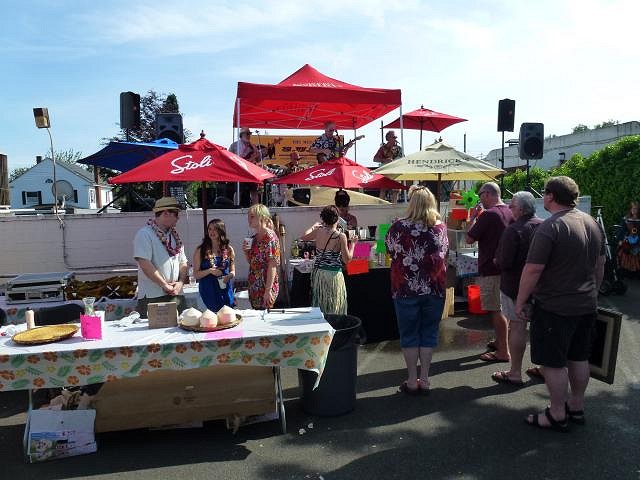
Here is the man from Frog Island himself, Cy. I don't think he realized I was taking a picture of him. Bwahahaha! There were pirates with umbrella's.
There was a live band a lot of hullaballoo...
A guy selling fresh coconut water in the coconut. He would use a small machete and cut off the top and serve it to you fresh. Mixed feelings on the flavor; I liked the initial flavor of it, but it had a strange aftertaste. I could possibly get used to it, it was an interesting experience.
The band was pretty enjoyable, "The Men From S.U.R.F" can't remember what it stood for, but good tunes!
Here is the place I got my CocoJoe from. I had a hard time deciding what to get. I could have gotten my first tiki mug from there, but I keep holding out on that because I want my first one to be something special. I was going to get a fishing float lamp made by TikiSkip from a seller next door to these guys, but I swear I turned my back for like 5 minutes and it was already sold. Oh well I got the tiki cloth from that seller anyways.
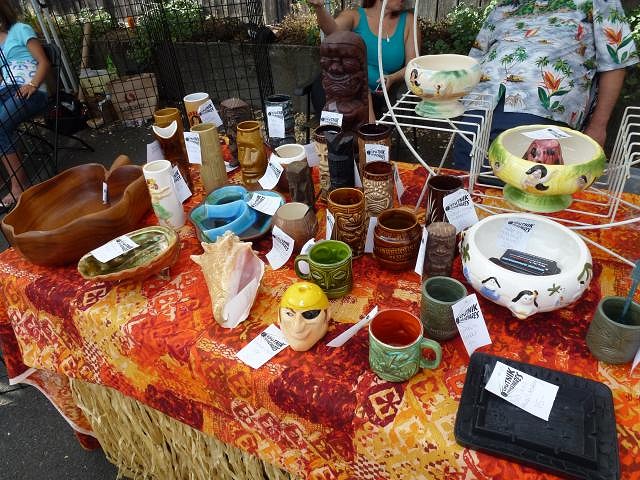
Close ups of some of their wares.
The Hale Pele was selling off some stuff, including tiki's which were in the previous incarnation of the tiki bar (The Thatch). Pretty big and nice they sold out quick.
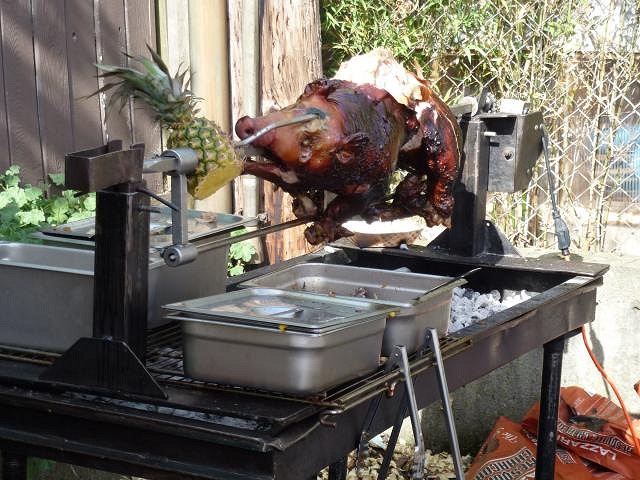
I had some pork, rice and beans and asked for some pineapple that was on the same skewer as the roasting pig cause I am a pineapple fiend...but ummm... yuck. Note to self do not eat pineapple that has been roasting over coals with a pig. I was really surprised no one was selling fresh pineapple slices I would have got some in a heart beat.
In this photo see that beautiful golden brown rolled up stuff in the corner? That is my lauhala Matting, there is also a smaller roll piece inside of that...all for $15 what a steal huh? Cy has it in keeping for me till I can pick it up Tuesday.
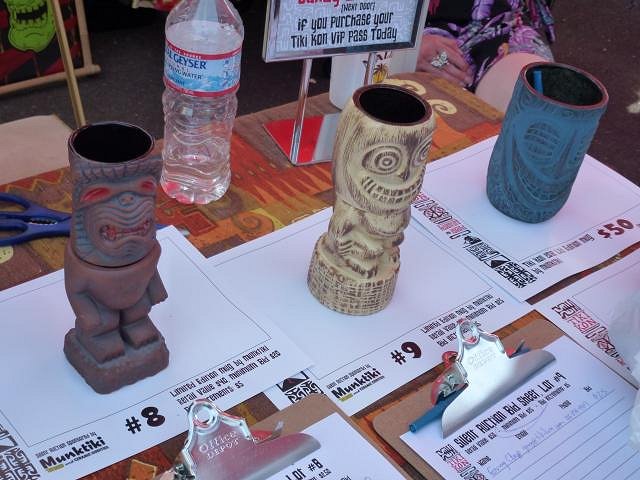
There were a bunch of Muntiki mugs going up for bids in a silent auction. Really cool stuff. I had heard of the name before, but didn't know they were a local Portland tiki mug company. Bids were going well beyond my means though.
This was probably my favorite of the Muntiki, I am a sucker for super bright saturated hot colors like reds and oranges.
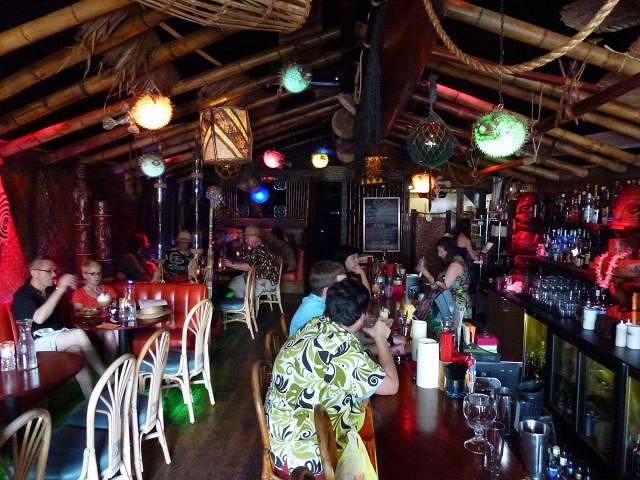
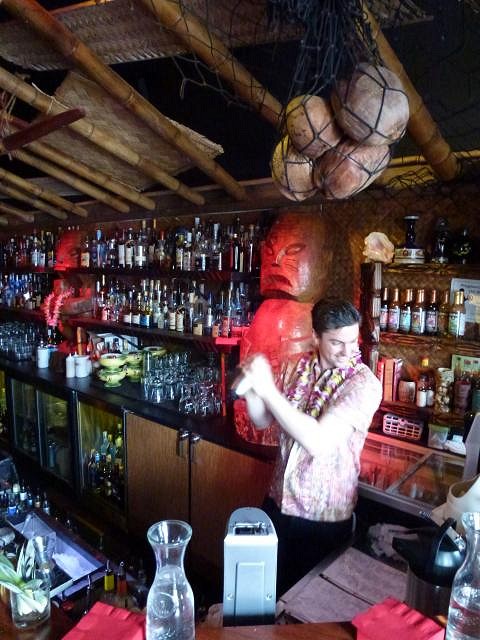
Then for the first time I stepped foot into the Hale Pele bar itself. I loved it. The lighting in particular I really thought was cool. I ordered a Pina Colada with a few splashes of cinnamon and ginger (it really gives the rum a bit of a savory kick and brings it forwards in taste, whereas normally you would taste the coconut pineapple first, a "tigertail" colada LOL). I can't have any alcohol but rum because of the way my body processes different sugars and my allergies to gluten so there was not a lot on the drink menu I could have. In fact, Pina Colada actually wasn't on there but I figured they could make it. The bartender was nice enough to oblige my weird splash of cinnamon and ginger (cinnamon is one of my favorite flavors and smells so I put it liberally on lots of stuff I eat). :)
I can't remember the bartender's name (think it was Steve) but here is a picture of him doing his thing. Some of the really cool decor in Hale Pele. The nifty fountain tikis as you walk in the door and over the tiny little bridge.
Other side of the bridge a little lagoon. Every 20 minutes or so there is a little rain storm that happens over the lagoon. You hear thunder and then sprinklers in the ceiling in the entry way start pouring down water for a little while.
Okay now onto my own tiki hut and its progress. I got the super spiffy fabric I ordered from Sophista-tiki (Dawn) and got that installed, and I got those paint sticks I ordered so you will finally see what those were for. I was hoping to get actual full size paint sticks, but the place I ordered from on Amazon doesn't seem to get what a real paint stick size is. so I ended up with 1,000 bamboo sticks about half the size of a real paint stick. Oh well when life gives you lemons make Mai Tais.
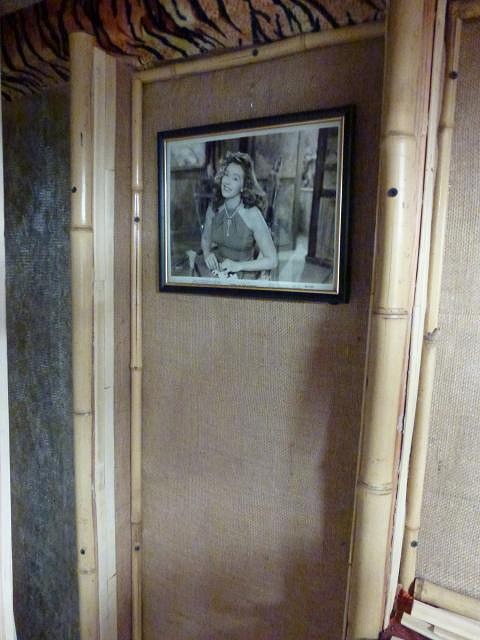
Here you can see where on the inner part there is already a border of the bamboo paint sticks glued down waiting for stain. I also have up one of my pictures (a glossy promo photo from the movie "Song of the Sarong" I got a bunch of them cheap off ebay and loved the tropical noir look of them). I was experimenting with what to do to hang pictures since the walls are so thin I can't just use screws or nails. I came up with using thin bent wires (two Christmas bulb hangers twisted together) and snagging them into the burlap, seems to work pretty well...I knew I put that burlap up for a reason.
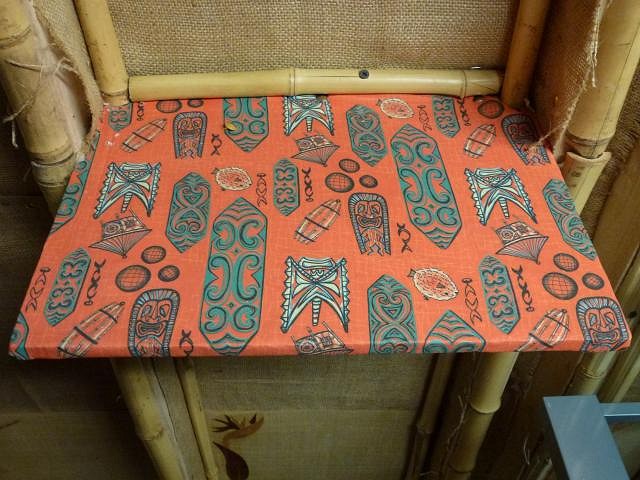
Here is one of the two shelves I covered with Sophista-tiki's fabric. I was going to use it for all the shelves in front, but got to thinking that the shelves will be mostly covered with stuff and you won't really see much of the fabric. It was so beautiful I wanted to use it for something more prominent. I had a few spaces in the ceiling to fill yet and the fabric fit there perfectly.
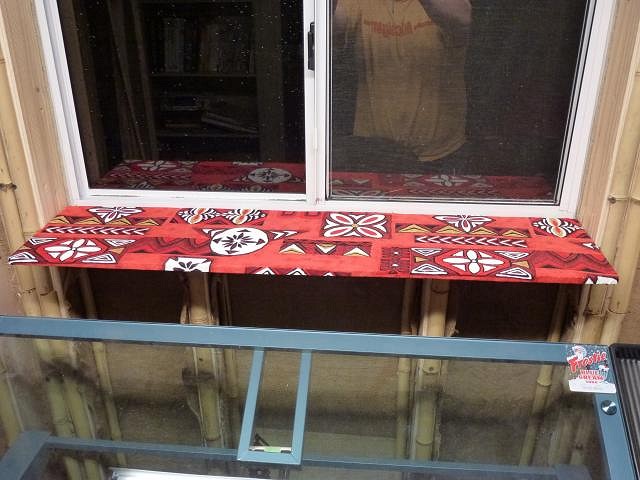
Then I had to find some cloth to fit the window shelf. It is long and narrow and I didn't have a lot of cloth scraps left that would fit, so I was happy to find I had some of the orange barkcloth from the ceiling left. I thought it might resist fading from sunlight a little better too, but time will tell.
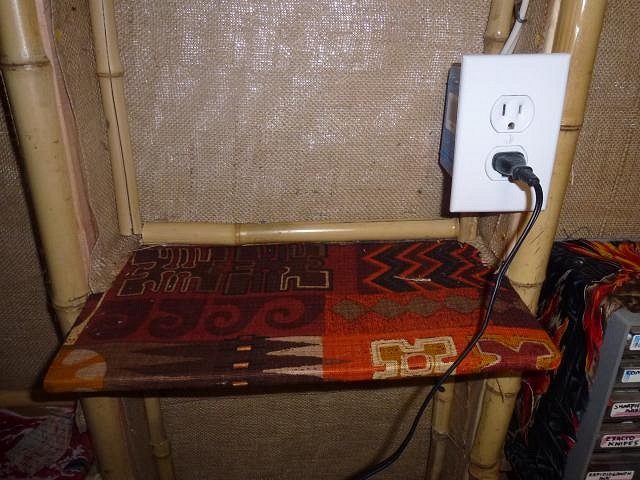
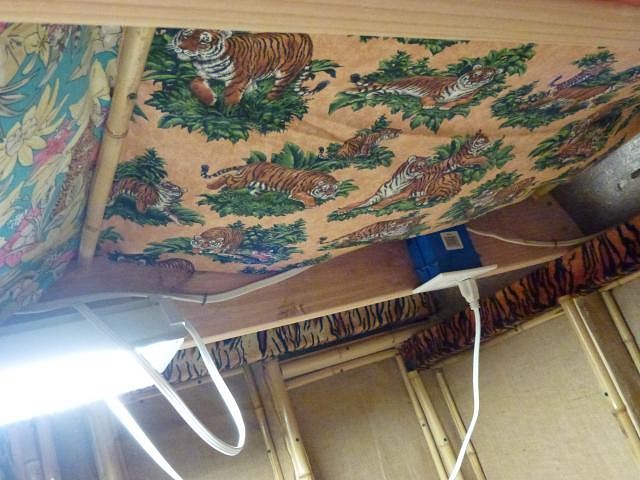
And I found a decent scrap of tiger fabric which also became a ceiling panel. Unfortunately no matter how I tried the fabric would not conform enough to hide that damned electric plug in box so I will have to devise something else to hide its ugliness.
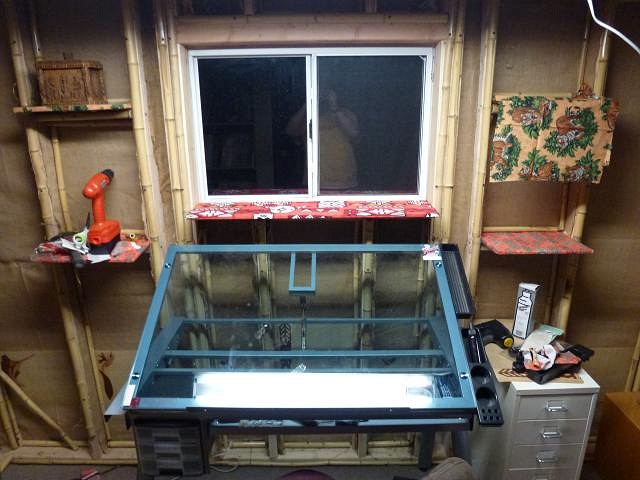
Finally, here is a bit of a back up shot so you can see the desk and the shelving in context (covered with tools and construction stuff of course).
That's all folks till next time! :) |
|
M
MadDogMike
Posted
posted
on
Mon, May 13, 2013 6:04 AM
Welcome to Tiki Event Madness Tiger, looks like you had a great time and found some bargins. The studio is lookin good too. |
|
PG

Professor G
Posted
posted
on
Mon, May 13, 2013 6:11 AM
That looks like a pretty good day. The workshop is coming together well. Congratulations. |
|
D
danlovestikis
Posted
posted
on
Mon, May 13, 2013 9:00 AM
Tigertail777 you are wonderful at sharing. I enjoyed every photo you posted. We know CY too and are going to see him at Tiki Caliente this week. I feel like I was at the event thanks to your photos. Your shed is progressing wonderfully. I'm looking forward to its finish then the grand tour and the start of your art projects. We are going to Tiki Kon, will you be there? Cheers, Wendy |
|
C
cy
Posted
posted
on
Tue, May 14, 2013 3:46 PM
Cool pictures TigerTail, you captured the mood (as well as my ugly mug and pasty white Oregonian legs) It was nice talking to you, and I really enjoyed the event. |
|
T
tigertail777
Posted
posted
on
Tue, May 14, 2013 11:36 PM
Mike: I know, it will be like a Jekyll and Hyde thing now: with Mr. Tiki Hyde coming out for events and going quite insane running from table to table. :lol: Professor G: Thanks for dropping by, yeah its coming together bit by bit. I get impatient with how slow it is in my perception, but as I said before I have to keep reminding myself Rome was not built in a day. (By the way you have me curious, and you know curiosity killed... Professor of what?) Wendy (and Dan): Thanks for looking, I actually got the idea of all the pictures of my trip to the Hale Pele from your thread since you are so great with sharing all your adventures. Believe me I would love to go to Tiki Kon, but I am not sure if I will be able to money-wise. The Tiki Tiger hut has been quite a drain on my savings lately, and my family are thinking of going to Disneyland around September. My mom really wants to go as her health has been not as good lately (she just had surgery for hemorrhoids, and now they have found she has both a sideways and separated vertebrates in her neck) she thinks it won't be too long before she can't enjoy going on big trips like this so wants "one last nice big vacation". She wanted to go to Walt DisneyWorld originally as I have been the only one in the family to do so, and when I brought back the photos I took when I went around 2003? (800 plus pics LOL) she really fell in love with the idea of going. I wish I made enough money that I could send her and dad on that trip, but I don't so she is settling for Disneyland if at all possible, and I want to make sure within my power that happens for her. I can always wait to see Tiki Kon other years, I've waited this long after all. :) Cy: It was great seeing you again. Thanks for holding the matting for me I appreciate it. You need to get those pasty white legs into the sun a little more often :wink: I am sure Oasis will help in that matter. :) |
|
Z

zerostreet
Posted
posted
on
Wed, May 15, 2013 2:55 AM
Cool! Thanks for sharing the pics and the work process! |
|
T
tigertail777
Posted
posted
on
Mon, Jun 3, 2013 4:44 AM
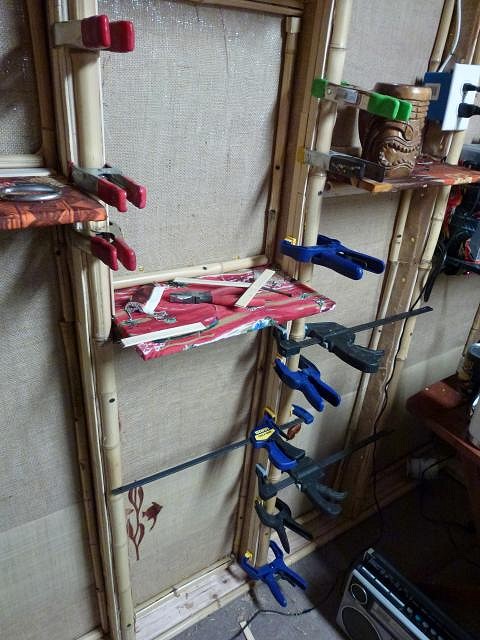
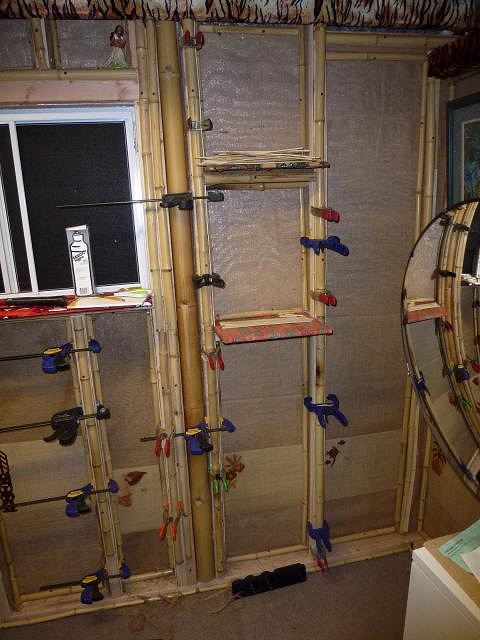
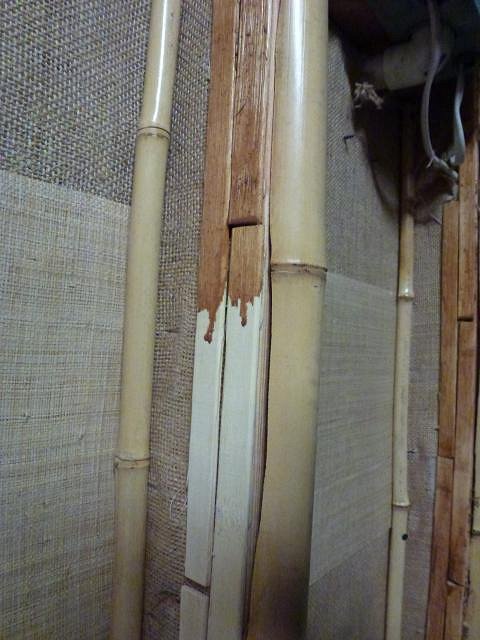
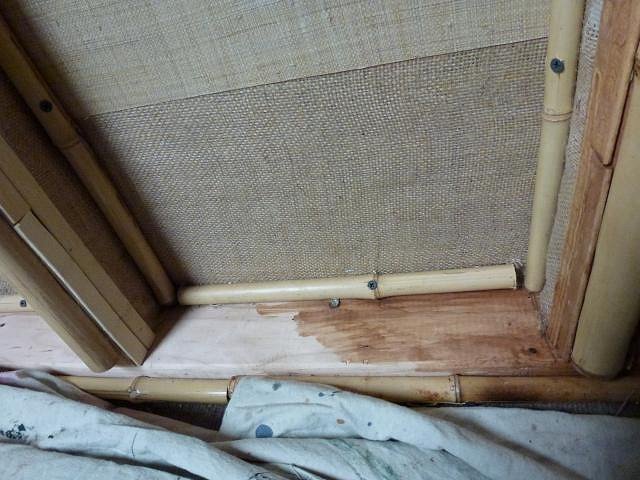
First off, thanks for dropping by Zero and everyone else who is following along! Well it's been a while, and there is a reason for it... my deadline to get the studio done for a combination birthday party and studio opening is June 9th (today is actually my birthday, but I decided to do the celebrating of it on the weekend when more people could come). So this week is the last week I have to get any final touches done before the grand opening party. I have started to hang some framed art and mementos such as Shrunken Head Ned cards from Disneyland. I had to figure out a way to hang heavier stuff because the walls are too thin to go putting a lot of big screws into, so I ended up getting open eye hooks and screwing those into the 2x4 beams. The small stuff I twisted together two Christmas bulb hangers and then snagged then into the burlap, so they are hanging essentially from the burlap cloth. The last of the wall clamping. I was using liquid nails to "glue" bamboo sticks to the edges as a border to seal and hide the fraying edges of the burlap. I used every clamp I could get my hands on.
After they were all glued down and dried, I started to paint on a wood stain, you can see the difference it makes here. I was trying match the golden brown of the koa wood on the placemats I used as a border lower on the walls.
Then to match, I stained every other wood wall surface such as the base boards here.
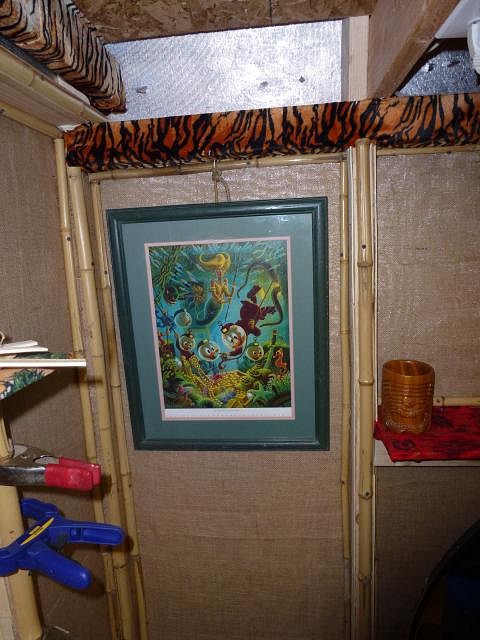
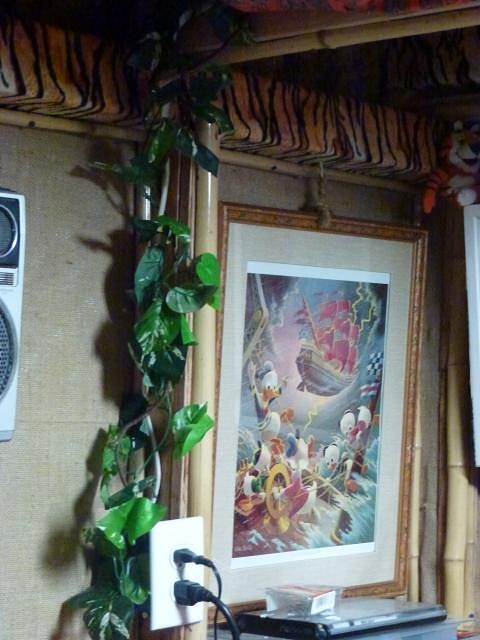
I found a couple of very nice older looking frames at Goodwill for cheap, I just had to do some fancy cutting to get rid of some tacky pictures of dogs and ponies and glued in matte boards. Then I took some oversize calendar prints of paintings from my favorite artist Carl Barks, and put them into the frames. I chose two nautical themed paintings he did to go with my tiki theme. This one is called "Makings of a Fish Story" with Uncle Scrooge, Donald and the kids diving for treasure (Carl Barks is the creator of Uncle Scrooge, and wrote and drew over 500 Disney comics. When he retired he began to do paintings of his characters.) I really liked how the green frame set off the painting, and was fortunate to find both this frame and the next one on the same day and they both match the painting color schemes.
This Carl Barks painting is called "Afoul of the Flying Dutchman", based on a full length Uncle Scrooge comic story of the same name.
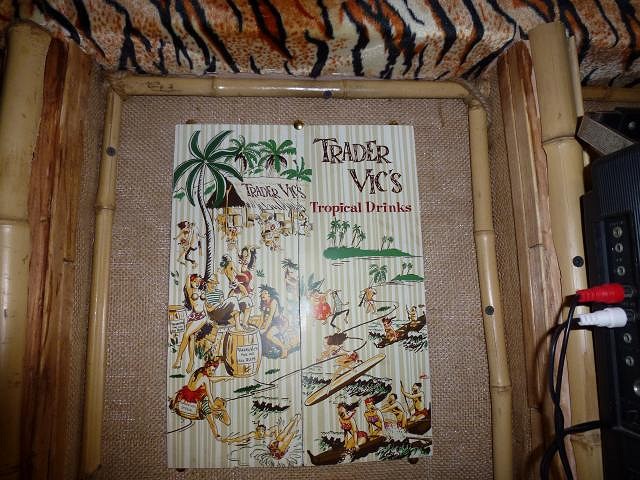
I had to put up the menu from the first time I went to Trader Vic's, but I didn't want to frame it because I wanted to be able to open it up and see the drinks inside. So I just thumb tacked it to the wall in such a way that it rests on the thumbtacks without putting holes in it.
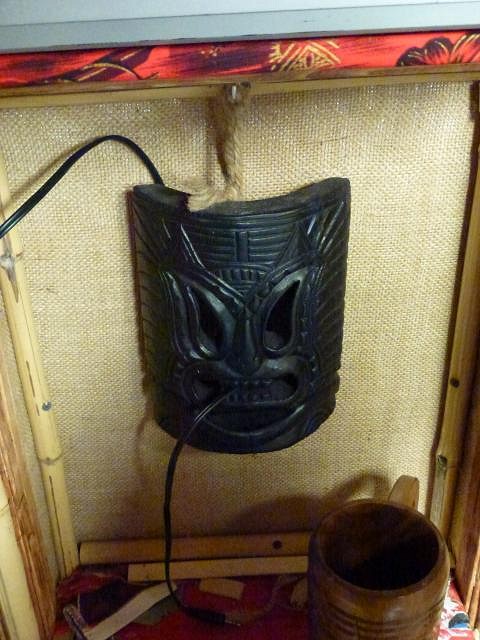
I know this mask is tacky, and not exactly in the tiki tradition but it is special to me because I got it on my first trip back to Honolulu since we moved away when I was kid. It was the first time as an adult I had been back to my birthplace, and I found this mask at a marketplace in there. It is hanging from one the hooks, and I am using it to conceal some of the cords from the boombox above it, so the wire to any external device such a CD player to be plugged into the boombox comes out of the tiki mask mouth.
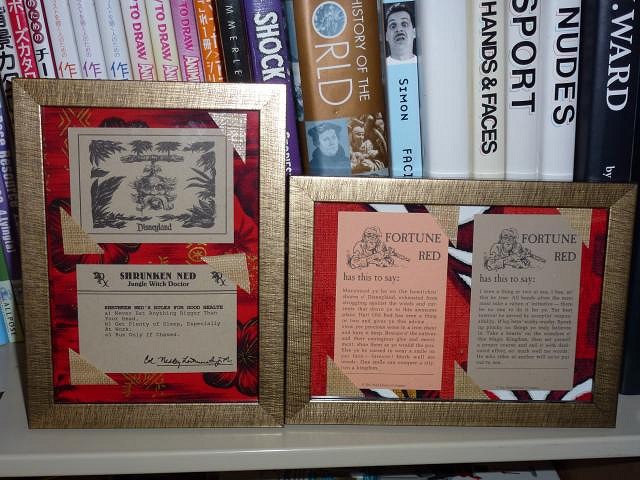
If you have ever been to Disneyland and are familiar with Adventureland, you might know about "Shrunken Head Ned" The jungle's only witch doctor. It is a sort of humorous fortune telling machine with a shrunken head giving you your fortune. In addition to an audio fortune, you also get these cards dispensed randomly to you that are quite hilarious. I framed several of them against a few scraps of Hawaiian cloth for the studio. I also as you can see, framed some similar cards from the older "Fortune Red" teller machine at the exit to Pirates of the Caribbean ride.
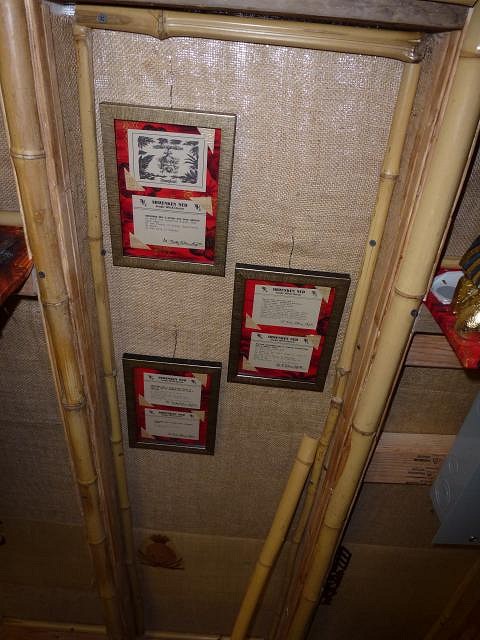
Here are the Shrunken Head Ned ones on the wall.
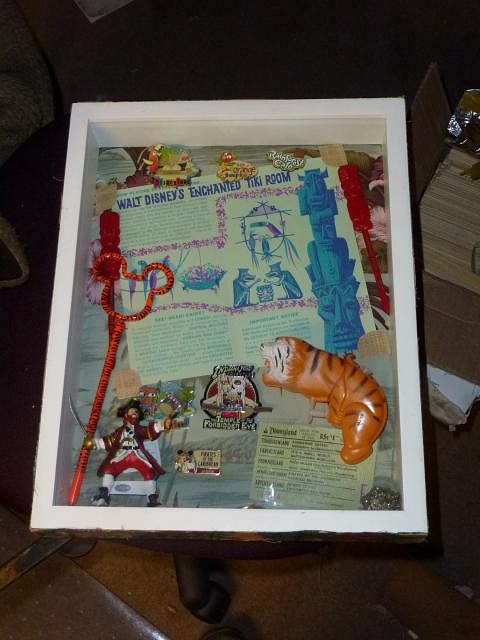
I found a shadowbox at Goodwill also that I knew I could make good use of. I stuffed it with various trinkets I acquired over the years, mainly Disneyland stuff. There is a rare opening brochure for the Enchanted Tiki Room, and E ticket that lists the tiki room and several now gone attractions, various pins such as one for the little orange bird (Florida tiki room's old mascot), replica doubloons, and last but not least one of the earliest "tiger things" I ever bought: a tiger squirt gun I have had since I was about 7 years old.
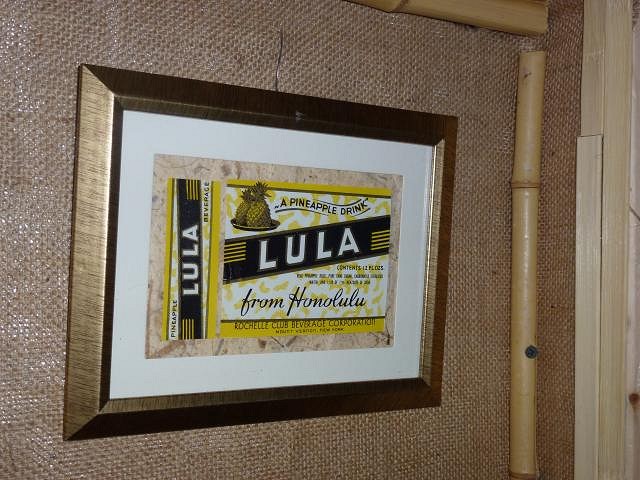
I got this old label cheap off ebay, it is for a pineapple flavored soda that was marketed around the late 1930's called Lula. I thought it looked quite nice mounted against the mulberry paper. Back to the construction... Remember the lauhala matting I got at the tiki event? I decided to cut it into squares to cover what I could of the ugly silver ceiling (later I will have to buy more to finish it off). I was not prepared for how difficult and dangerous this stuff could be to work with. I did remember from looking at some past threads on installation of the stuff to tape the back to hold it together when you cut it, but was not prepared for how sharp those edges were and how much splintering there would be. I am still digging splinters out of my hands and those are nasty little buggers let me tell you. After the first few tries I got smart and got some gloves, but splinters still went through the gloves even though they were rubber coated. Here it is being laid out for cutting.
And where they are on the part of the ceiling I covered.
As a final touch to the bamboo on the walls I am taking rope bits and snugging them up behind the bamboo in such a way that it looks like the bamboo is tied together (this also hides some of the more ill fitting bamboo pieces where they come together). It's like a Hollywood set though; don't pull on those ropes too hard it's just for show. :wink:
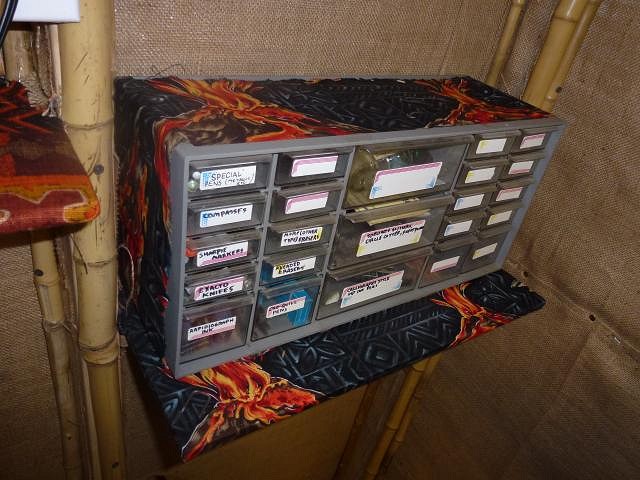
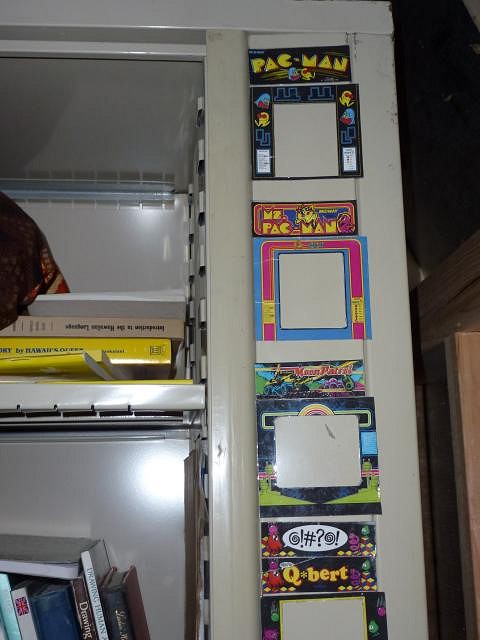
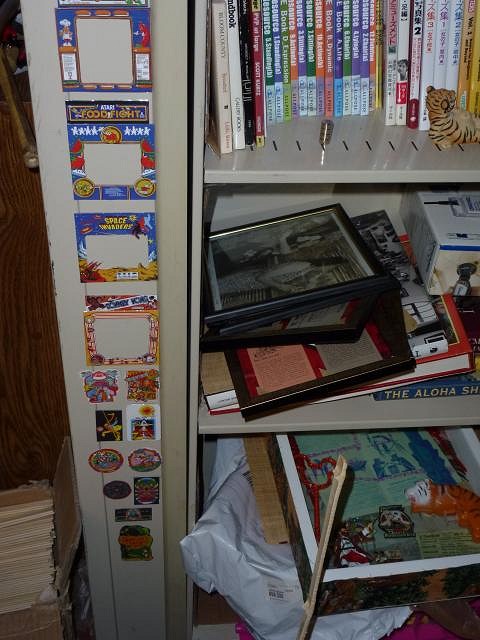
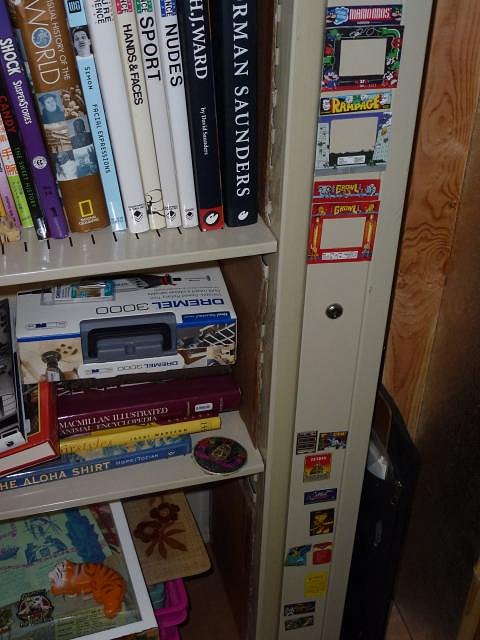
And it is not tiki so avert your eyes if you are sensitive to the purity of tiki being invaded by things wholly of non-tiki nature.... I had a bunch of flat magnets that were being thrown away (you know those magnetic advertising "cards" that banks and businesses use). I tore off the top paper coating and glued down and laminated my own graphics of old arcade game marquee's and bezels. I thought these would be perfect for post it note size papers that could go behind the bezel frames. Being a child of the 70's and 80's I grew up playing these games and dearly love the artwork from them. They work perfectly on the edge of my huge metal cabinet. Cy from Frog Island Tiki's gave me a sample of the same kind of magnet sheet stuff to cover the ugly electric box, but it got lost somewhere in the layers of construction. Once I find it I am going to make something to cover the electric box, but it probably won't be in time for the opening party.
The next time I post it will be of the grand opening/birthday celebration! :) |
|
M
MadDogMike
Posted
posted
on
Mon, Jun 3, 2013 1:56 PM
Looks great Tiger, love all of the framed memorabilia. Have fun at the grand opening and happy birthday! |
|
T

tikilongbeach
Posted
posted
on
Mon, Jun 3, 2013 2:27 PM
I wish Disney would make a talking Shrunken Head Ned toy! |
|
D
danlovestikis
Posted
posted
on
Mon, Jun 3, 2013 3:07 PM
Wow now that was a thrill ride like Magic Mountain. Love the photos and your flare for displaying memorabilia. What a special place to be inspired to create art. Go man go. Wendy |
|
T
tigertail777
Posted
posted
on
Tue, Jun 4, 2013 2:00 AM
Mike: Thanks, I had to work on my birthday that was another reason for bumping the celebration but overall it was a pretty good day. I was actually surprised how well some of the framing turned out. Some of those frames are from the dollar store. :lol: Tikilongbeach: Yeah I know! I would absolutely love to have a miniature electronic talking Shrunken Head Ned...come on Disney! Do you want our money or not??? :wink: Wendy (and Dan): A thrill ride like Magic Mountain? Well hopefully without the sickness inducing motion :lol: your description cracked me up, thanks for stopping by. Don't worry once the party is over there will be not stopping this tiger! :wink: I will try to take a few more pics of some details I added after those photos were taken, including one of my favorite little additions that is utilitarian as well as decorative. The next big thing is to rent a carpet shampooer and get all that mud and junk out of the main carpet so I can lay down my area rug over it... wait till you see that. :wink: [ Edited by: tigertail777 2013-06-04 02:01 ] |
|
L
littlegiles
Posted
posted
on
Tue, Jun 4, 2013 7:19 AM
Happy belated Birthday! You have done well putting together a fun and creative place for you to work.
|
|
T
tigertail777
Posted
posted
on
Wed, Jun 5, 2013 5:37 PM
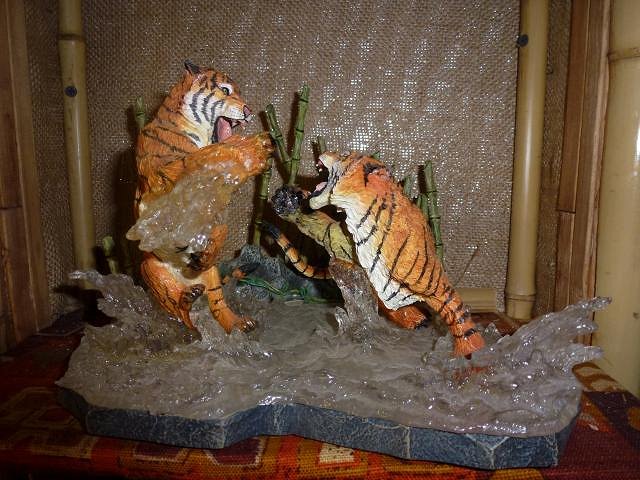
Hey thanks for stopping by and the Birthday wishes littlegiles! :) A few more pics of some details before the opening... First off the too cool tiger sculpture my folks got me for my Birthday. I will show more detailed pics of it in a bit (never mind my horrible hair, I just woke up since it was a work night).
My dad and sister's husband who worked on digging the ditch for the electricity earlier surprised me with a nice new wood chip covered trail. No more clay mud feet coming inside YAY! Bonus: it's cedar chips so it smells nice. :) Eventually I am going to get some solar tiki torches to line the path so I don't kill myself trying to use a flashlight getting back to the house at night.
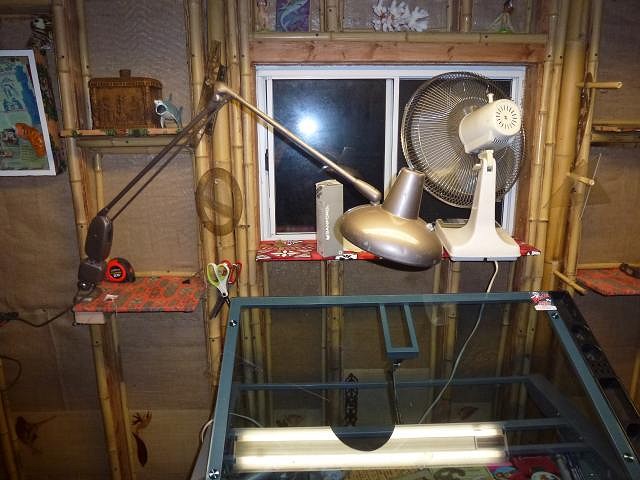
Found this spectacular old architect style arm lamp on ebay. It positions really well, much better than my old defunct spring arm modern lamp, and best of all it had "color correct" lighting: it takes one fluorescent ring light, and one middle incandescent light. Fluorescent light has a blue tint to it, incandescent light has a yellow/red tint so it sort of balances out for a much truer color under the light. They used to be really popular in graphic design offices, photography studios, and architect firms in the 1950's.
See those really BIG bamboo poles on either side of the desk? Originally I was going to carve open holes in them above each joint so it would have little pocket holes to store stuff in, but was a little afraid it wouldn't work too well and that I might find black mold inside the bamboo as I had with some of the smaller stuff. So instead I drilled holes big enough to put some small bamboo pieces into to use as hangers for some of my tools.
Remember those crappy looking overhead cords? I hated those it ruined the whole look so I took a page from Wendy and Dan and used some plant vines to cover them up.
And the vine appears to crawl through the overhead cloth hangings to reach down and wind around the cord on the other side. :wink:
If you look close here you can see the large bamboo halves that flank each side of the door. That same annoying white electric cord runs along the length of the beam above the door so its hid by bamboo pieces. The cardboard tiki pole is just a placeholder until I can make some real ones. It's leftover from my college graduation fair where I had a tiki themed booth to show off my graphic design skills.
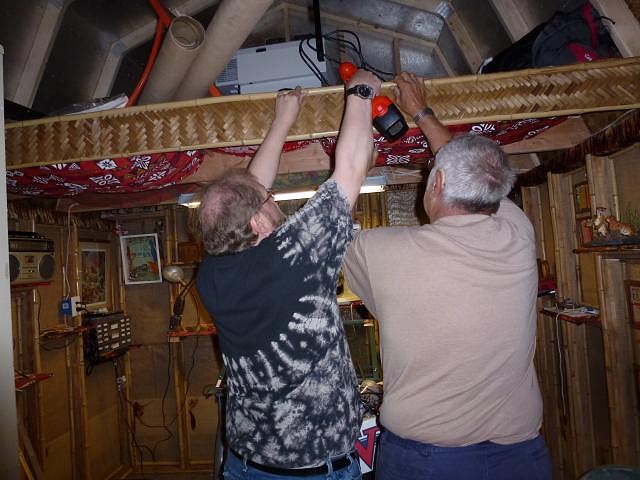
Mom caught a few pics of me and dad at work putting some last touches. This is us together trying to put bamboo over the fraying lauhala matting I put on the end beam of the overhead loft.
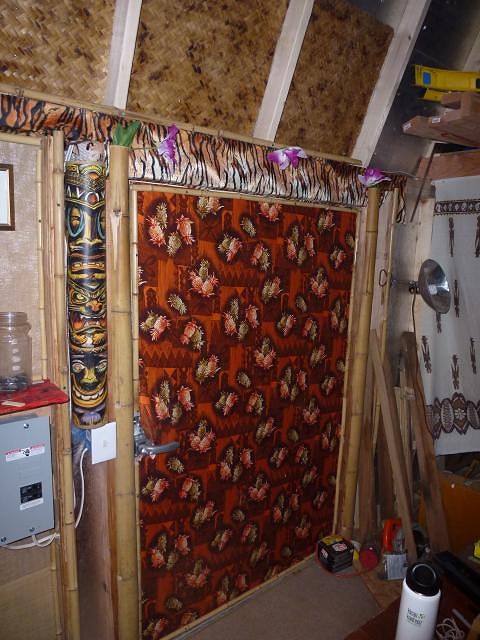
Me using a small handsaw to cut some bamboo. I did this a lot for the hut, and a few times the blade slipped and cut me pretty good, or I got bamboo splinters in my fingers (or one memorable time, splinters UNDER my fingernails... ouch.) Behind me you can see part of the tiki fabric wall divider between my half of the shed and dads. I still have a ton of that cloth left maybe make a shirt or something later.
Finally, a more detailed shot of the tiger sculpture in its new home.
Next time will be shots of the party. Aloha my tiki friends. :) |
|
D
danlovestikis
Posted
posted
on
Wed, Jun 5, 2013 6:20 PM
Awesome. Love the photos and special touches. What a great place. Wendy |
|
T
tigertail777
Posted
posted
on
Thu, Jun 13, 2013 4:03 PM
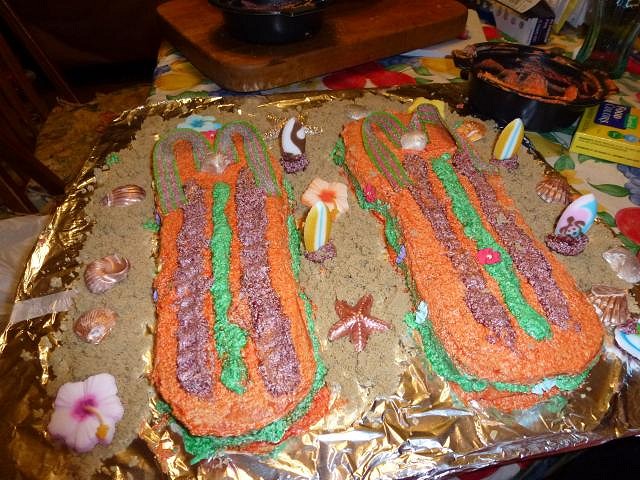
There will be more pics to follow, but for now here is a sampling from the party... Since I did some training in cooking/baking at Job Corps when I was younger, I have made dozens of cakes for friends and family over the years. My sister decided for once that she would try to make me a decorated cake this time. She made this very cute pair of sandal cakes and completely stressed over them not turning out right (she made the rookie mistake of not creaming the butter at the right time in the butter cream frosting), but I think they turned quite good myself. Bonus points on the extra theming of brown sugar for sand and the edible candy decorations. :) The cake was (gluten free) lemon pound, my favorite.
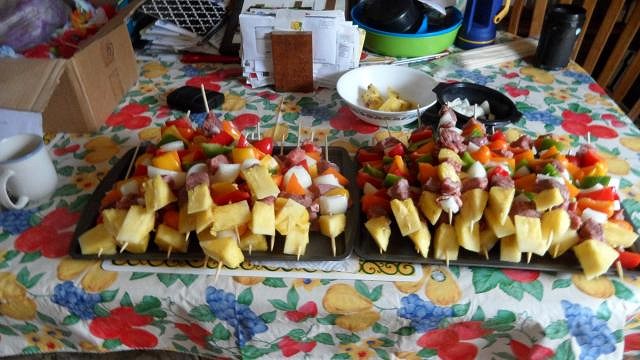
We had several food dishes, but the main thing was barbecue with delicious shishkabobs taking the starring role. I found out those bamboo skewers are actually pretty damned sharp when one slipped and went under my skin with the point breaking off where I had to use tweezers to get it out. The pains a cook must go through. :roll:
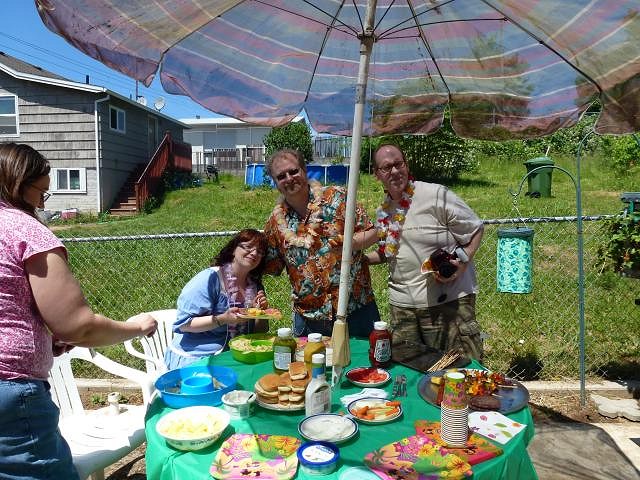
Me in the middle with the tiger Aloha shirt, alongside some of my good friends and some of the food spread.
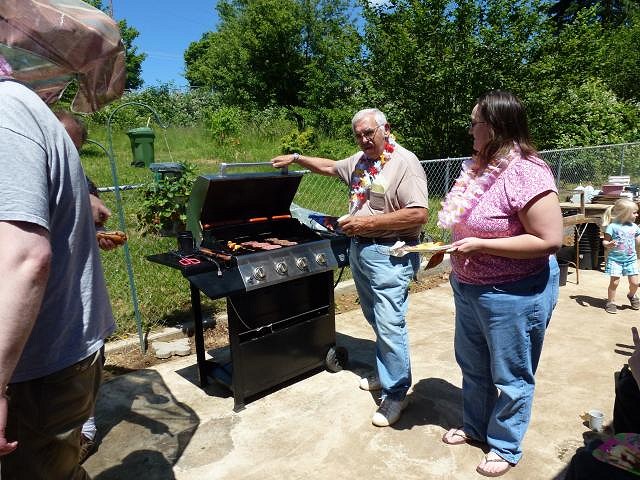
My pop the grillmeister.
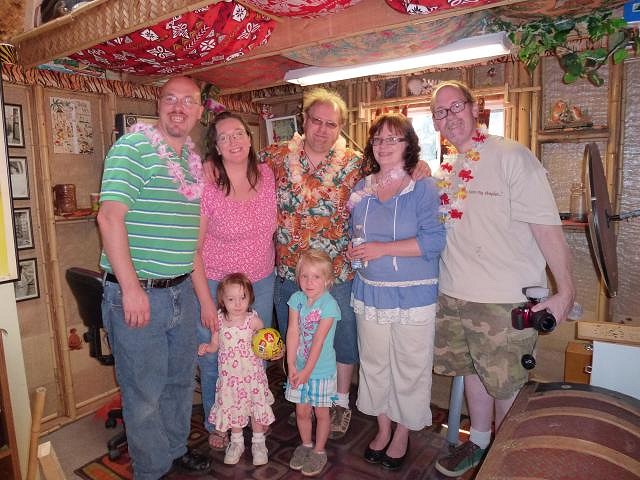
Most of my main friends that were at the party (some couldn't come at the last minute, and some are camera shy) gathered together in the new studio.
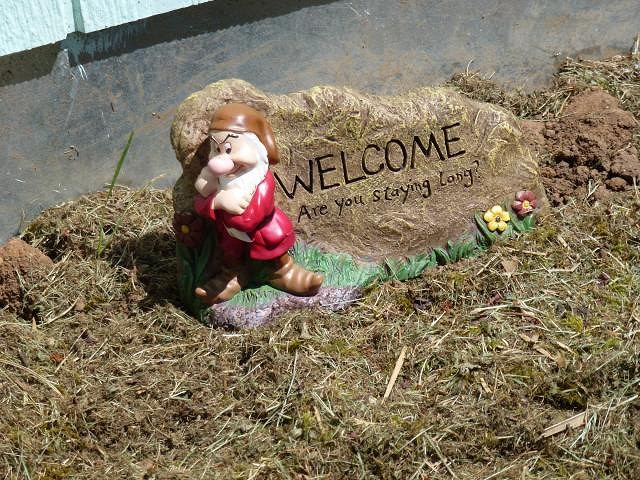
One of my Birthday presents was this garden sign for outside the studio. My friends know I am a Disney nut and have a "grumpy" disposition at times...
Another birthday present from my sister, another cool cat for the studio. :)
And finally, our little dog Cha Cha got into the Aloha act as well...
More pics once I get them from one of my friends next time... Aloha Tiki-riffic friends! |
|
M
MadDogMike
Posted
posted
on
Thu, Jun 13, 2013 7:05 PM
PAR-TEEEE!!! Looks like you got everything finished just in time. Looks like everyone had a great time :D The tigers fighting in the water sculpture is very cool indeed! |
|
L
littlegiles
Posted
posted
on
Fri, Jun 14, 2013 5:40 PM
Looks like you and everyone else had a great time and let your sister know I think the cake is cool. :)
|
|
T
tigertail777
Posted
posted
on
Sun, Jun 30, 2013 5:00 AM
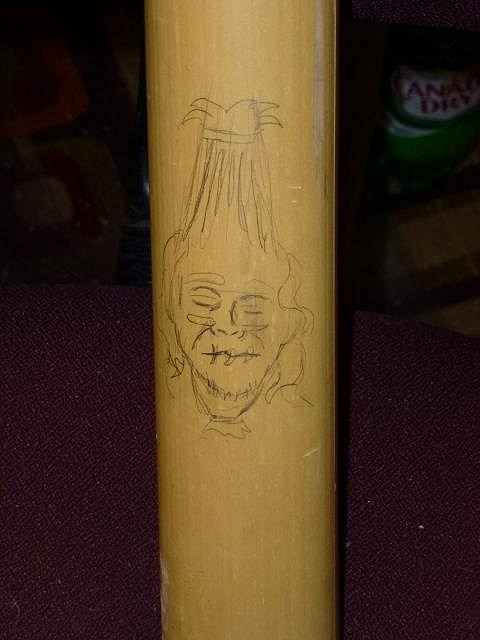
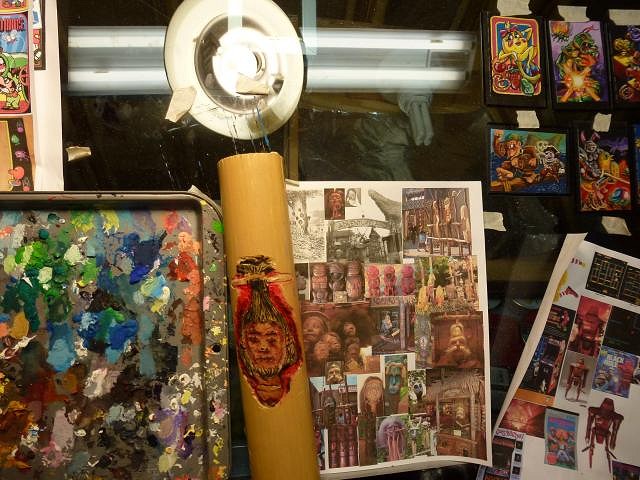
It's a bit late, but I did tell my sister what you said Littlegiles and she appreciated it. :) I have been doing quite a lot of non-tiki art in the new studio, but last night I started my piece for the cannibal art trade which is a shrunken head carved into bamboo. I had a few larger size pieces of bamboo left from the build and thought it would be cool to use them somehow for the art trade. I also had a dremel tool I originally purchased to carve tapa designs into some wood details of the tiger hut, but never found the time and the brand new dremel was pushed aside. I have used a dremel before for other projects when I was younger (cutting eggs in half to make Fabrige style jewel boxes among other things) but I have never really carved anything hard before. The only stuff I ever carved was super soft like soap... well I DID try to carve a wood stick with a jack knife once, but gave up on it. So needless to say this was pretty new territory for me. I was really concerned that bamboo might get crazy splintery on me, but it really didn't do too bad in the department. First I drew a sketch of a shrunken head after doing a lot of research (and I never want to see photos of cannibals again thanks so much for that nightmare fuel, Google).
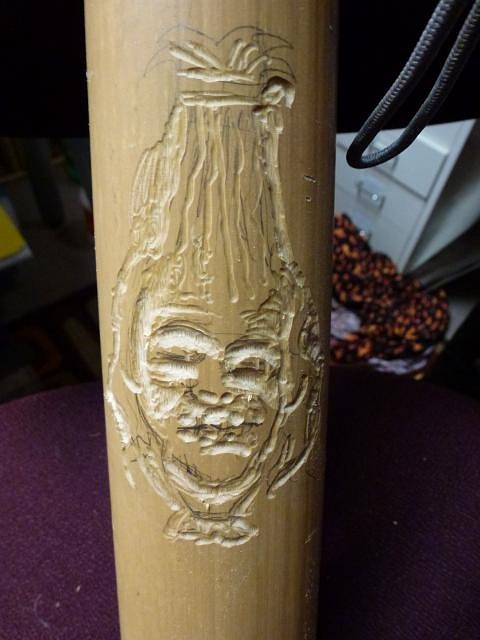
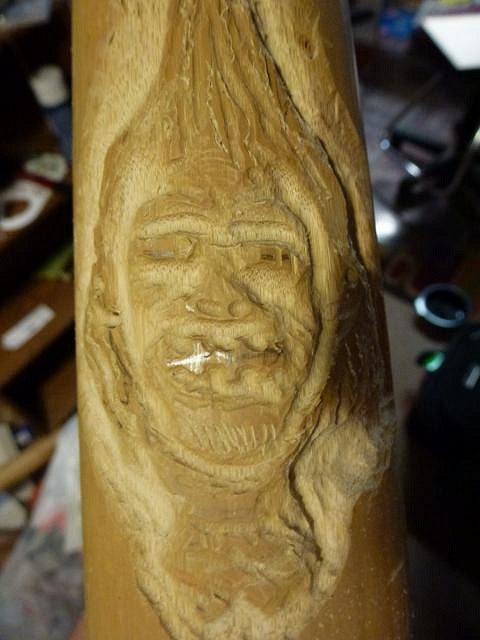
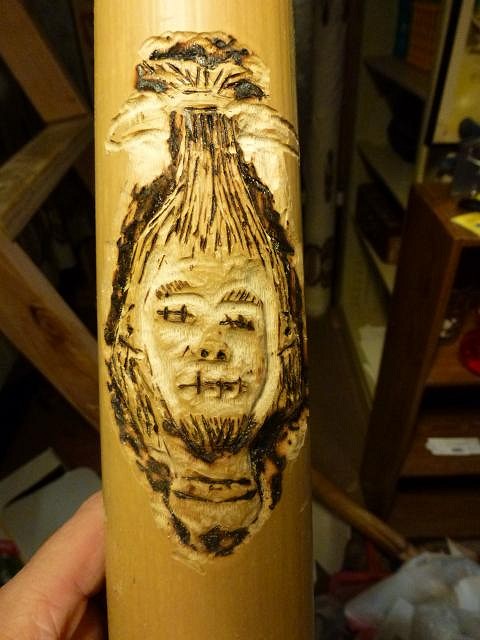
Then I started carving with two different bit heads I had. I really needed another one for smaller finer details, but had to make do. I tried to carve as deep as I dared without going through the bamboo wall. This made a hell of a lot of bamboo sawdust which is super fine I really should have been wearing a mask but I expected larger bits like wood has. Then the plan was to woodburn the fine details, but I could only find my crappy hobby burner I've had since I was a kid. A good wood burner should allow you to do softer shadowing with the tip so the burning can have varying degrees of a light burn or a dark one. As you can see here it was pretty much all dark like overly burnt toast. This was not turning out how I envisioned and was getting less confident by the minute with the carving and burning. So I thought it would help bring out the details if I gave it a light wash of acrylic paint. I really should have stopped at the wood burning stage. Part of being a good artist is knowing when to pull back, or stop and sometimes I just don't know when to do that. Forgive the photo it also shows some non-tiki trading card size art I am working on based on old arcade games, but I thought it would be kind of neat to show my reference sheet and my cookie sheet I used to mix my paints.
It's probably time to clean that cookie sheet and start over with my paints.:roll: I hope this project turns out better by the time it's done. Right now the results are disappointing. I guess we will see later if the fat bamboo sings. :wink: |
|
L
littlegiles
Posted
posted
on
Sun, Jun 30, 2013 6:58 AM
don't be so hard on yourself. I think it is turning out really cool. Love the cookie sheet, paint palette. I myself am a fan of paper plates. LOL
|
|
S
Sophista-tiki
Posted
posted
on
Sun, Jun 30, 2013 7:33 AM
you've been super busy! lovem to see peoples visions come together. |
|
D
danlovestikis
Posted
posted
on
Sun, Jun 30, 2013 7:45 AM
Where to start, the party photos were a feast for the eyes. The cake was wonderful. Your studio looks great with so many things to look at. I love the artists palate it looks better than most modern art pieces. Your shrunken head is coming along great it looks primitive like the subject. What fun it is to visit here. Happy Belated Birthday tigertail777, Wendy |
|
M
MadDogMike
Posted
posted
on
Sun, Jun 30, 2013 7:46 AM
Looking good Tiger. It may be too late after the paint but steel wool or a small wire brush may help lighten the "burnt toast" if you want. Even if you are not happy with the way this one eventually turns out, it will help you with the next one :) |
|
H

hang10tiki
Posted
posted
on
Sun, Jun 30, 2013 9:35 AM
Tiger dude- wow, u are busy. Love what you have done with everything. Jon |
|
T
tigertail777
Posted
posted
on
Thu, Jul 11, 2013 3:00 AM
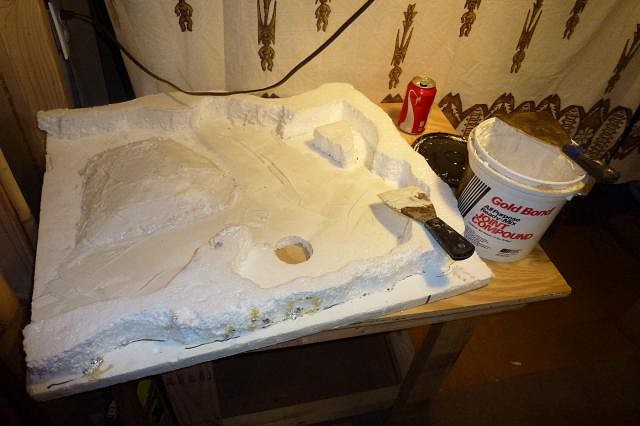
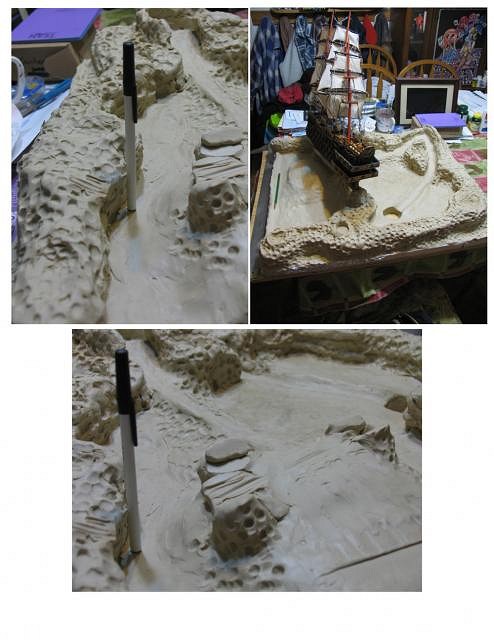
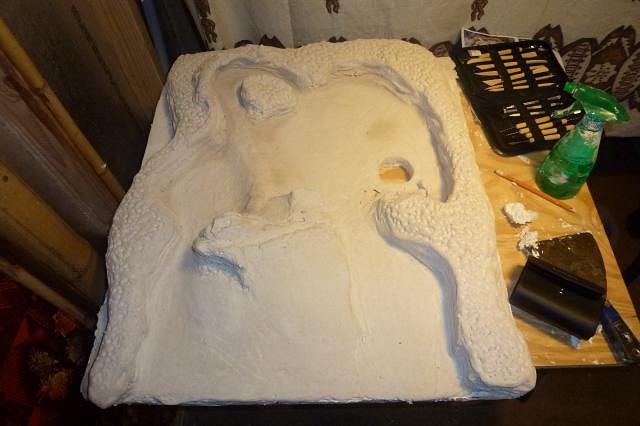
littlegiles: I used to use old glass dishes I found at goodwill. But it was such a pain to scrape off the paint, I got tired of it and tried a cookie sheet... tends to work pretty well; the teflon coating makes it quite a bit easier to get the paint off when the time comes to start over (usually when I have nowhere else to mix a color on the sheet without muddying it with another color). I actually should probably use a different cookie sheet for each type of paint; gouache crumbles off too easy, and acrylic and water based oils peel or stay stuck and need prying more. Sophistatiki: Thanks! I usually have quite a number of art project "plates" spinning at the same time in case one lags. Drives me crazy to have to wait on something outside of my control for a project to continue. It's gratifying when a project does finally come together. Wendy (and Dan): Thanks for the compliments Wendy, I don't think I can top the entertainment of the Wendy and Dan show though. :wink: I tried to make the studio a fun place I would look forwards to going to, and keep it "special" and focused for my work. It's a dream I have waited so long to come to fruition that I still have a hard time believing it is real even when I am in it. MDM: Good tip to know! I will keep it in mind if there is a next time. I do want to try and get a better wood burner eventually the working one I have right now is not much better than a soldering iron. Hang10: Yeah I try to keep busy with my art if I can. Sometimes with my regular joe job (janitorial) I am so exhausted that even on my days off I just can't get up the energy to accomplish much. When I do finally get the inner dynamo going though, there is no stopping me. Glad you like the bamboo, it's been a fun little experiment. So I have started another art project "plate" spinning again... you might remember the tiki themed tabletop miniature golf I was wanting to create before... well I started on it again. For those that don't know I am a avid fan of miniature golf and my family actually had a portable mini golf course we rented out for parties and events at one time, but it was horribly heavy and difficult to transport since it was made of 2X4's and plywood. Since then I have been wanting to revisit the idea, but in a more manageable way. I came up with the idea of making "micro golf" holes that could fit on top of tables several years ago and figured I would make them of clay that could be cast into molds and then in those molds use a hard light weight spray foam. I had the first hole all sculpted and ready to cast when I discovered the incredible expense it would take to work my plan. So I put it on the back burner and turned over idea after idea of how to accomplish what I wanted: intricately crafted micro golf holes that would be light weight, but still have a little bit of weight/bulk to them so they were not "abused" by playing patrons. I also needed a sculpting material that while strong when dry, would not shrink much in the drying. I finally ran across some stuff online called "Skratch" http://skratchworks.com/ and it seemed just the ticket: hard and durable but light weight when dry, can be sculpted with fairly minute detail and have sufficient drying time to sculpt those details. It also had to be pretty cheap by the pound because I would need a lot of it. I ordered some and am about to see if it will work. Meanwhile I stripped my original now neglected clay covered first course hole down to the styrofoam base I had made for it previously. Then I coated it in joint compound mix, because the "Skratch" clay instructions said it would be best so it would have something to cling to, and to prevent warping (skratch doesn't shrink much, just around 10% or less of it's bulk, but it does shrink). Probably won't make a lot of sense to you right now, but it will soon. :wink:
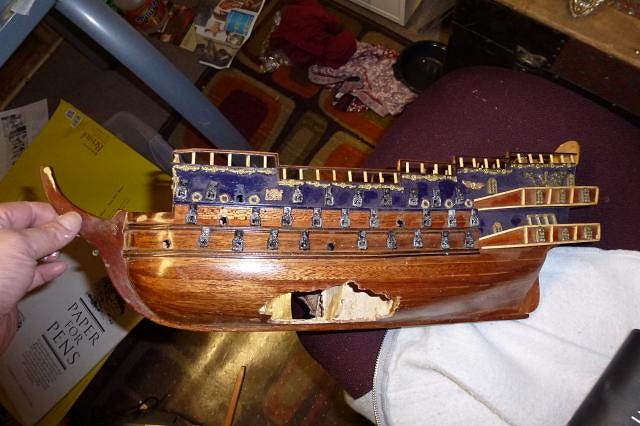
The micro course will have the story of a uncharted island home to a previously undiscovered cannibal tribe that have a culture somewhere between Polynesia and Aztec. Over the years many have accidentally landed on the various sides of the island, and there is ample remains of their owners, but every one has never been heard from again. You and your crew came to the island on a life raft after having been involved in a shipwreck, and now must escape the perils of the island. The first course hole has evidence of previous remains: an old 1600's Galleon's rotting hulk is there on the beach where you land, it obviously encountered something pretty nasty in the ocean as there are gaping holes in it's sides.
It will look a lot more aged once I work on it some more. The hardest part of the holes is done; you see, you will have to putt your ball through the ship holes, and one is a long path to the golf hole, and the other through so channels in the boat will roll down to the backside of the boat and out the backside hole rolling right next to the golf hole. I've always loved "surprise mechanics" in mini golf courses. :) I finally found the photos of the original sculpted micro golf, so maybe my crazy idea can be understood better:
[ Edited by: tigertail777 2013-07-11 03:09 ] |
|
HT

Hale Tiki
Posted
posted
on
Thu, Jul 11, 2013 12:11 PM
Mini tiki mini golf....mind = blown. |
|
T
tigertail777
Posted
posted
on
Fri, Jul 19, 2013 4:58 AM
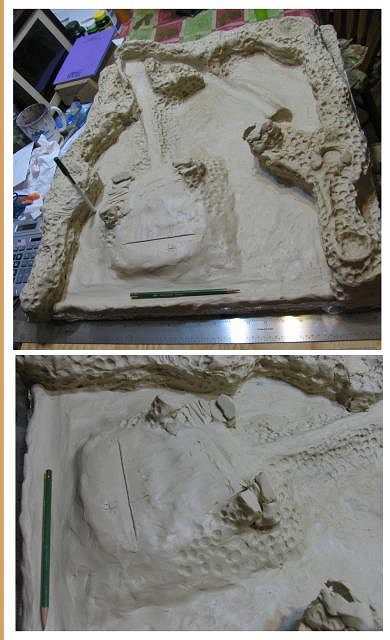
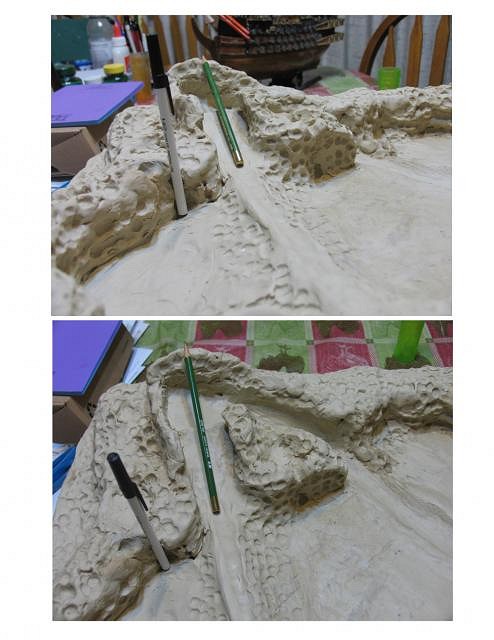
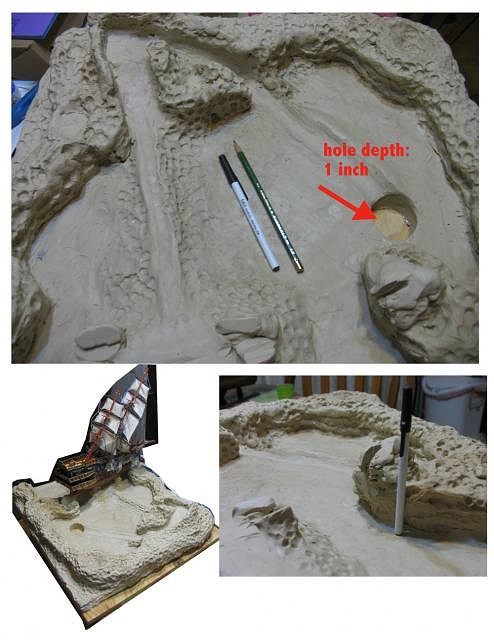
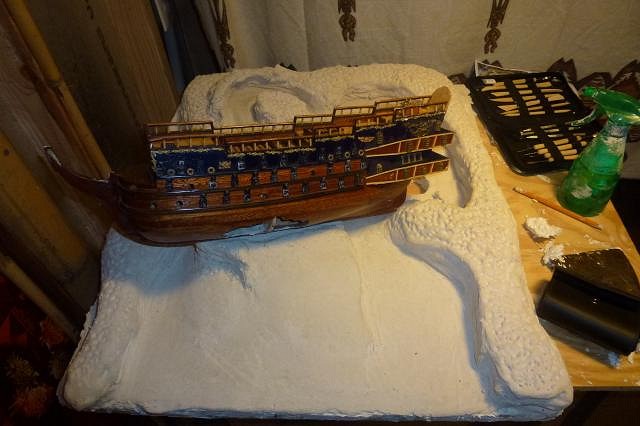
Well first off to blow Haletiki's mind more... A little bit of an update on the tabletop mini golf. The first hole has been re-sculpted for the most part. I gotta order more clay to finish it off then I can paint it and add the "green". I would also like to put fiber optic lighting in eventually, but it may have to wait. Here is just the course without the galleon ship prop.
Here it is with the ship in temporary position (I still have to build up the lip of the hill leading into the holes in the side).
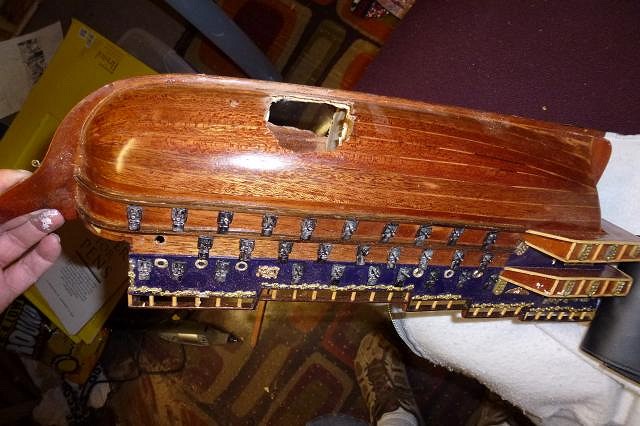
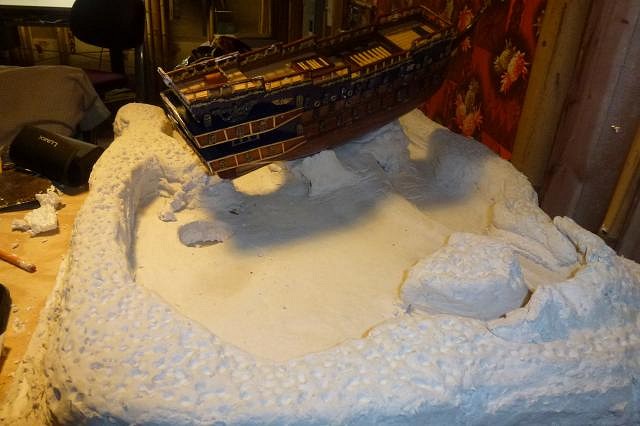
Here is the backside of the ship resting on the reef. You can just barely see the hole in its hull. If you put into one of the two holes on the front, a series of channels inside the ship will deposit the ball directly into the golf hole for a hole in one.
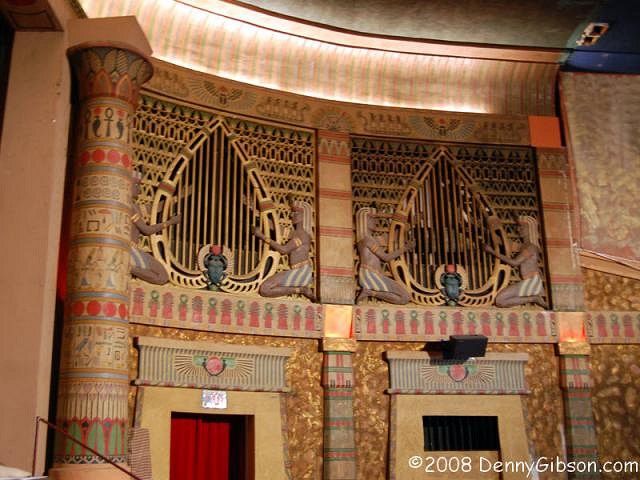
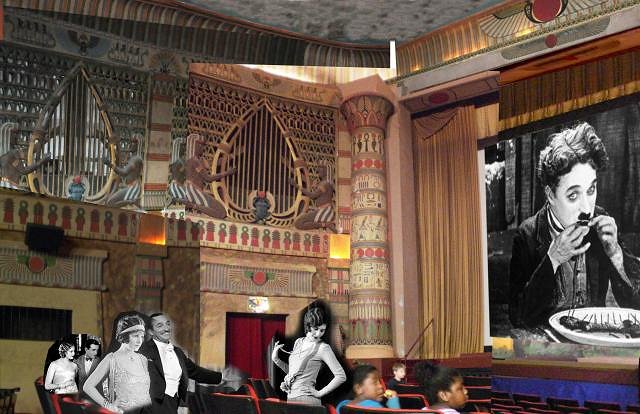
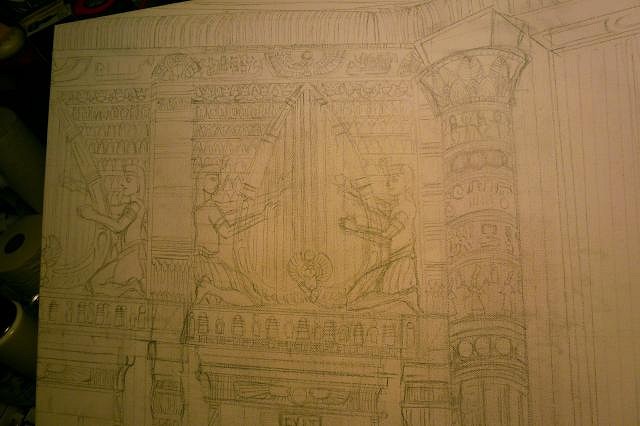
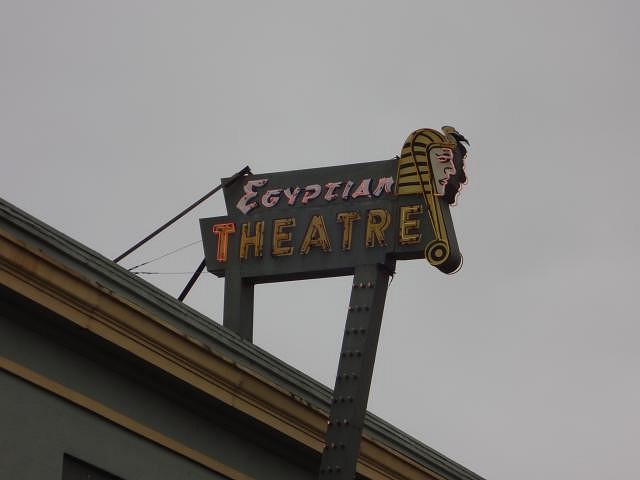
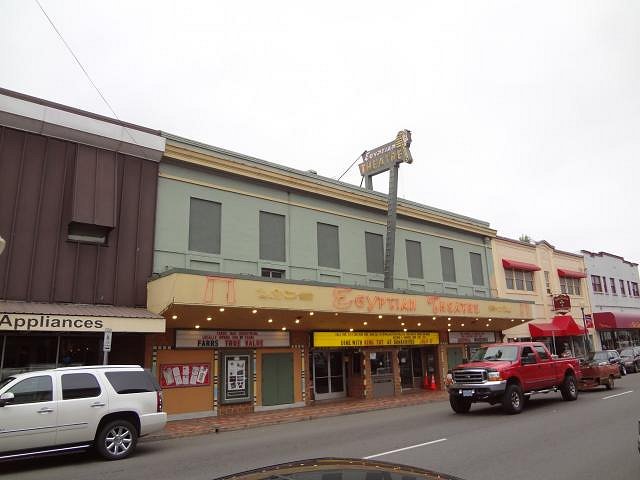
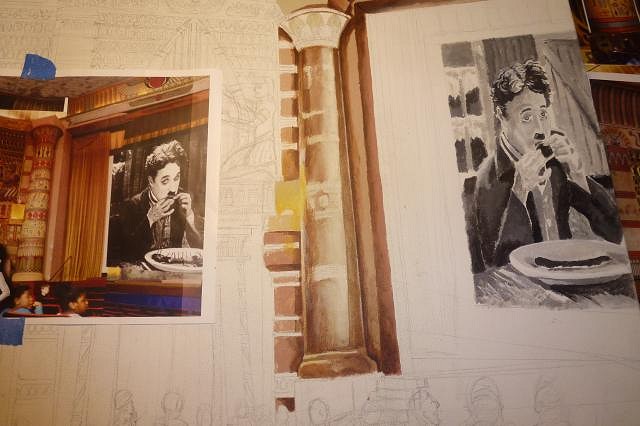
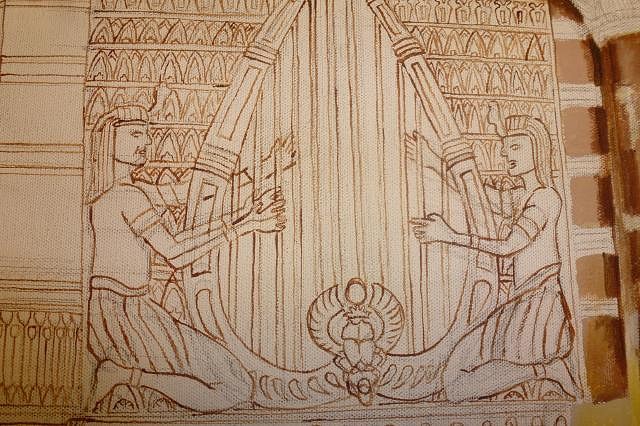
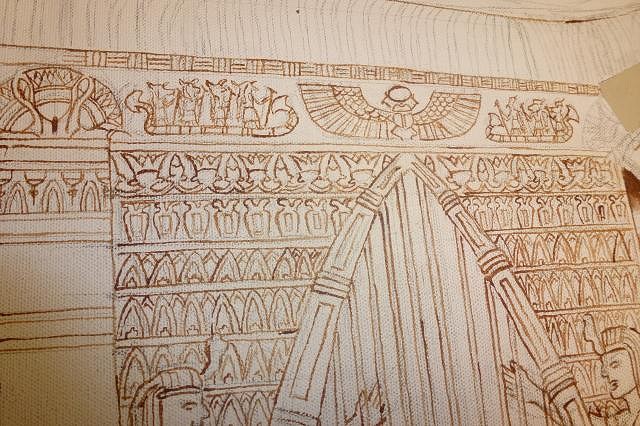
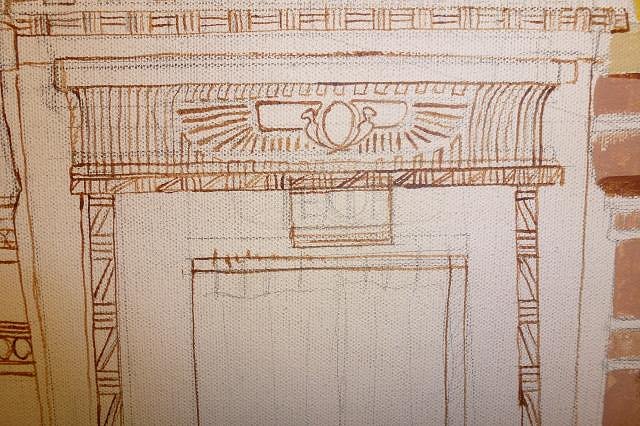
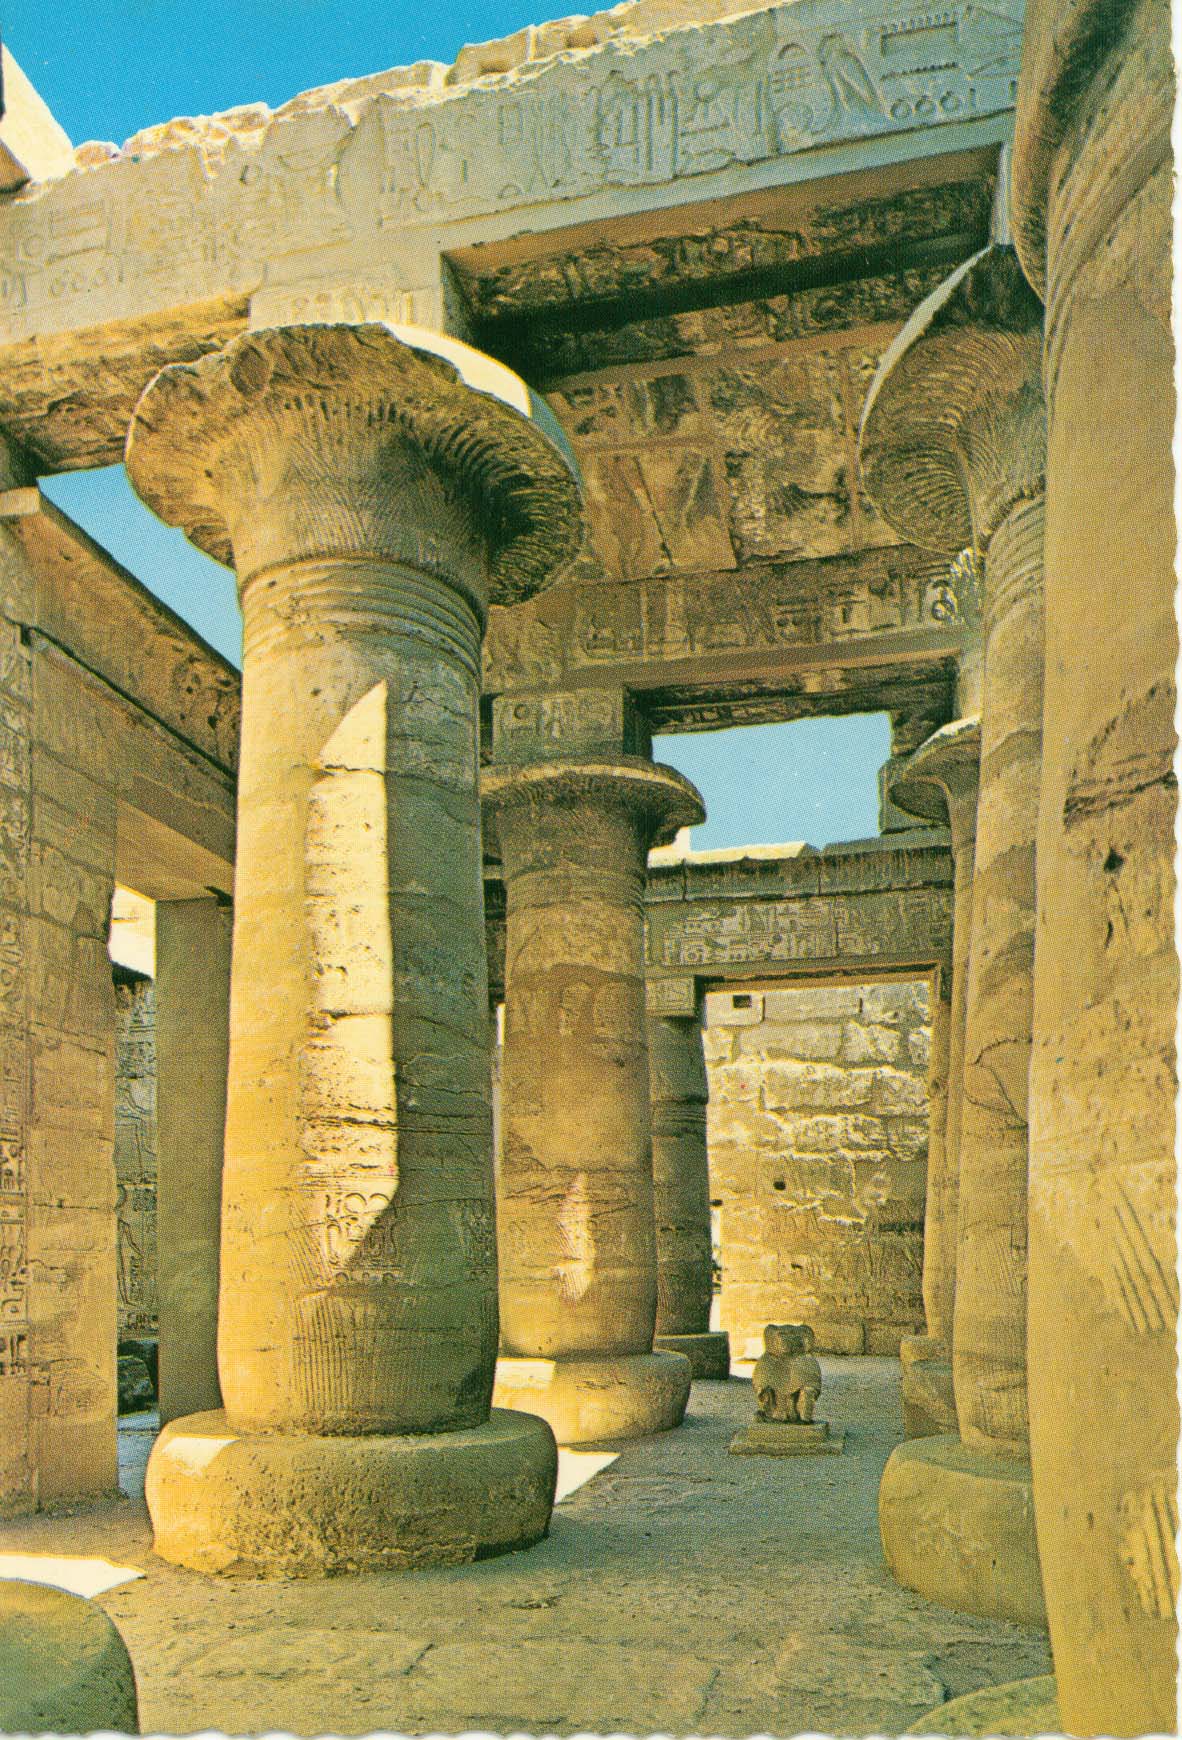
Now for the squeemish folks who can't stand anything non-tiki I ask you to temporarily leave the room... First a bit of explanation. I grew up in Coos Bay Oregon for a lot of my younger years, and had the good fortune to get to see a movie theater there of antiquity that made me fall in love with all things Egyptian and nearly spurned me into a archaeology career. This theater was opened in 1925 and is utterly drenched in Art deco Egyptian revival theming. It still is mostly intact inside and is one of only about four Egyptian themed theaters left in the United States. Unfortunately it is currently closed to the public because it needs a lot of renovation to the roof and walls, and they need to raise a considerable amount to be able to get it up to code enough to open again. All the volunteers that are working towards that goal are doing a bang up job, and I wondered if there was anything I could do art wise to help. I pitched the idea to the board of making a painting to sell, and also make prints of it to sell to raise money. So I am now working on the largest canvas I have ever done (24X30) to capture the fantastically tiny details of the interior auditorium. I am trying to portray the opening night of the theatre in 1925, so eventually there will be an audience of flapper women and dapper men along with what is there now. In order to be as authentic as possible I have been doing a lot of back and forth conversations with the older members of the board who can remember details of how things originally looked before time took its toll. There is virtually no photos or other actual evidence of how the interior originally was, so I am having to go partly with detective work and partly guessing although as I said much of it is still intact. I will link you to their facebook page for most photos, I don't feel comfortable putting up too many here because they had a dispute with their volunteer photographer about the rights. Here is the FB photo album: https://www.facebook.com/media/set/?set=a.10151206324019051.467758.233578989050&type=3 I'll post a few though just enough to show you what I am up to. The auditorium still has it's original Wurlitzer organ, and really intricate and beautiful front grills for the organ lofts from which the music would emanate behind.
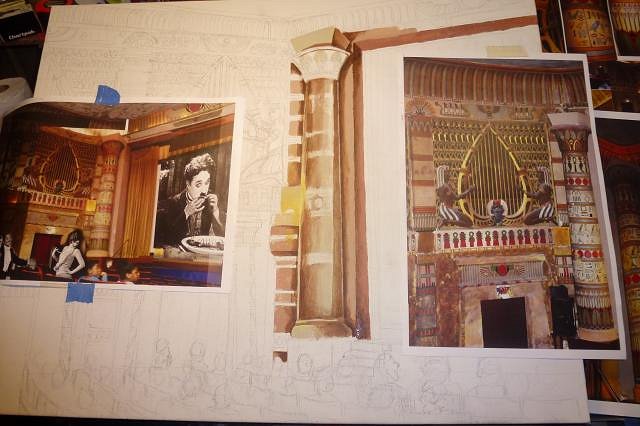
The first phase was to make a composition layout in photoshop by cobbling together a bunch of photos. I had to scour the net for non official photos because they did not have the angle I was looking for. I wanted to show one of the main side walls with the organ loft, have an audience in their seats in the foreground, show a bit of the theater screen with Charlie Chaplain's "Gold Rush" movie (which opened in 1925 so was a pretty safe bet it was there for opening night), and have it all be in slightly forced perspective. I really wanted to convey the immensity of the place by having one of the main stage pillars looming in front. Here is the quickly cobbled together "blueprint" for the painting.
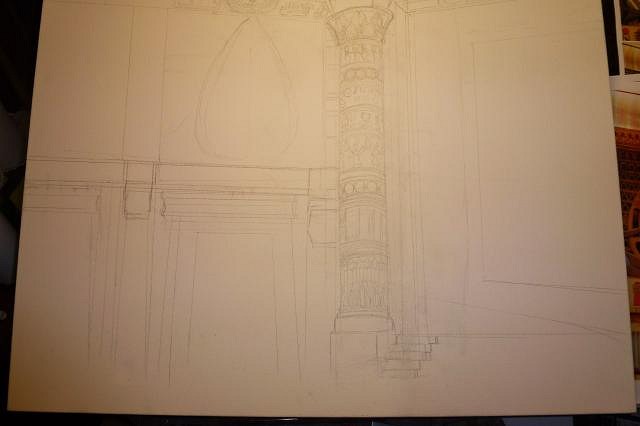
Next I had to try and get all those angles worked out correctly, and get the most important part proportioned right: the pillar. All other measurements and spacing would emanate from that one point so it was crucial it be as correct as possible.
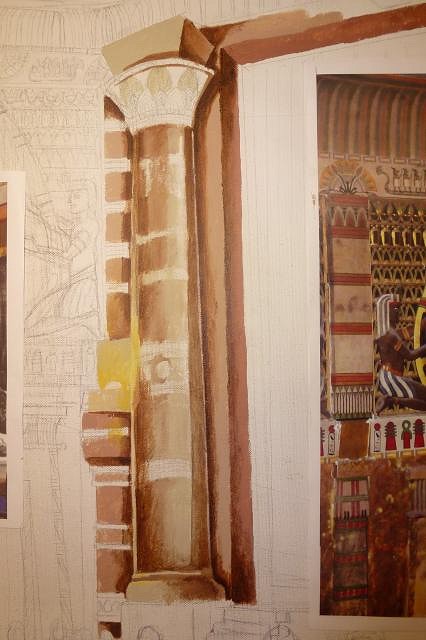
You can see here how I am using the dividing bands on the pillar to measure space and placement of the other details.
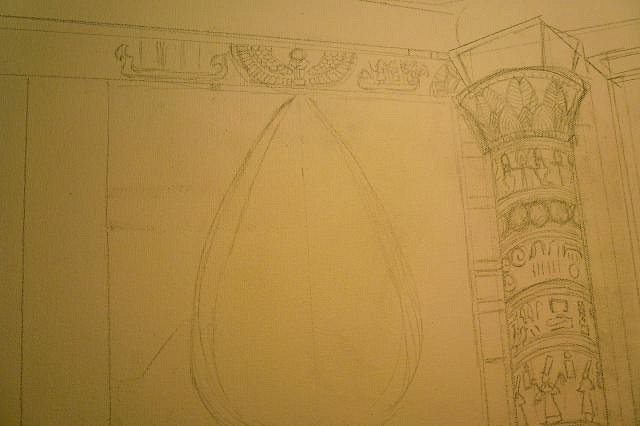
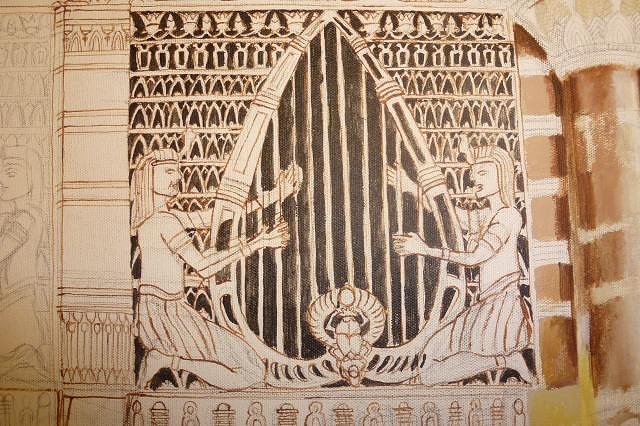
See all that insane detail? Well, like it or not it has to be sketched out before it can be painted. I started on that tonight and got pretty far. Apologies for all the bad photos, very difficult to photograph fine pencil lines.
The little tramp by himself...
More details...
This is without a doubt going to be the most challenging painting I have ever done. The perspective is already making me insane. But I also know once I get down to the painting it will also be one heck of a lot of fun. Sorry for the non-tiki interruption. I figured it would be too large of a jump from saving urban tiki temples to saving urban Egyptian temples. For those in lack of tiki shock, we now return you to your regularly scheduled program. :wink: |
|
D
danlovestikis
Posted
posted
on
Sat, Jul 20, 2013 8:59 PM
Wow wow wow, that is so impressive. We went to Coos Bay on our way home and we found the theater. Here's some photos that I took of the place. Also note: VampiressRN and Dan and I have Egyptian master bedrooms. Doesn't that make them tiki enough?
Dan, tigertail777 and myself (Wendy). Kari of Tiki News Magazine and tigertail777 We loved hanging out with you at Tiki Kon. Keep showing the painting its going to be terrific. You are a great guy, Wendy _PS the golf course is really fun too [ Edited by: danlovestikis 2013-07-20 21:00 ] |
|
T
tigertail777
Posted
posted
on
Sun, Jul 21, 2013 4:48 AM
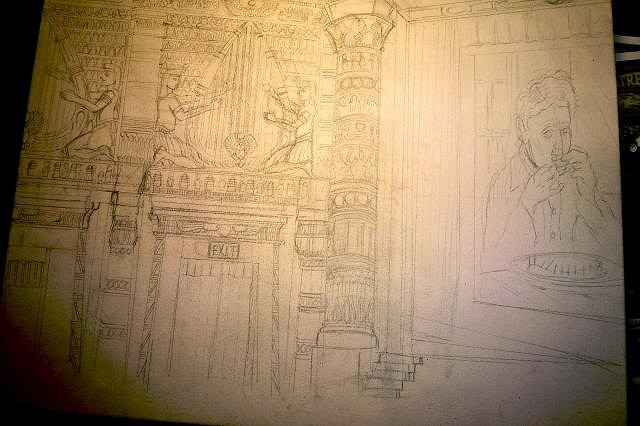
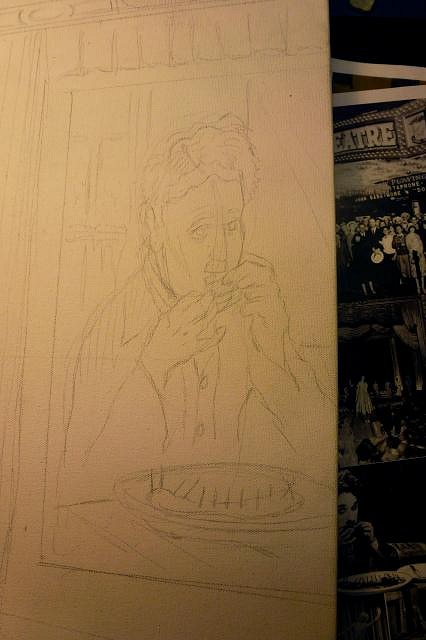
Thanks for those great photos Wendy! Makes me a little homesick for Coos Bay. Well, I guess if it's good enough for Wendy then it's tiki enough. :wink: A little progress, I sketched out some basic seating areas and then got bored with it so I decided to start on the painting part and worry about doing the audience when the time comes. Got a fair amount of progress done tonight, and as I left the studio around 4 am I saw a little visitor. :wink: I wanted to start on the pillar since it is the central focus, and wanted to figure out some of the light sources since its going to be a fairly dark picture.
Then I knew that the movie screen would be one of the main light sources so I concentrated on that part. I tried to give it a little bit of a squished look because of the angle. I need to do some corrections to his eyes though I didn't quite capture that Chaplin "look" I wanted. Plus I want the finished screen to have a softer and brighter look.
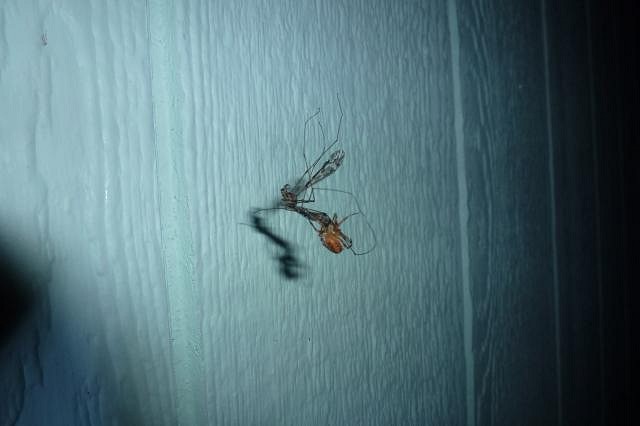
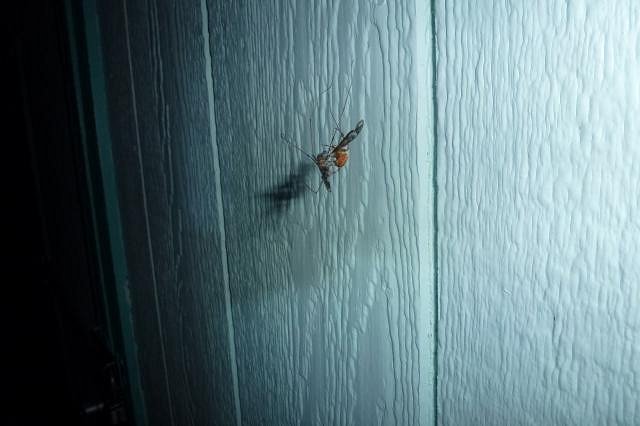
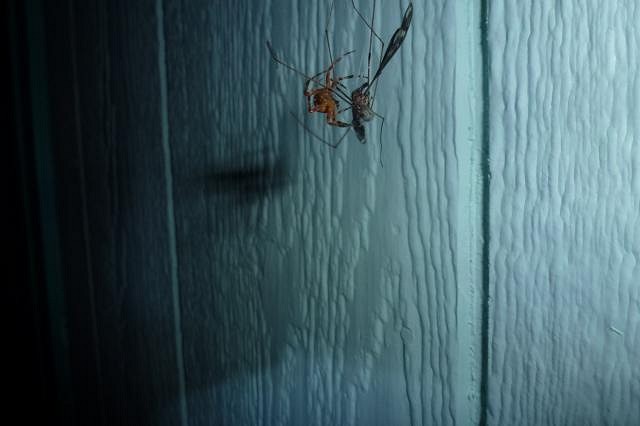
Close up And now the little visitor I saw as I left out the door. I am okay with these things being off to the side so long as they don't get on ME. Besides I have been having an insect pest problem lately that this will help sort out. Warning to the squeemish... it has eight legs and spins webs. Not sure if this particular one is poisonous, but it was fairly big.
And that's it for the Tigertail show for now. :) |
|
M
MadDogMike
Posted
posted
on
Sun, Jul 21, 2013 7:40 AM
WOW, that's gonna be quite a painting Tiger. Looks like it should keep you busy for a while, hope it turns out just like you envision it. |
|
D
danlovestikis
Posted
posted
on
Sun, Jul 21, 2013 9:49 AM
Hi tigertail777 I would be more afraid of the mosquito. We have West Nile Virus here, one bite and you bite the dust, maybe for good. What I have to say about your painting is talent, talent, talent and you have an abundance. I'm enjoying the step by steps more than I can express. The people who are trying to save the theater are going to love it too. (((((: Wendy |
|
T
tigertail777
Posted
posted
on
Sun, Jul 21, 2013 11:04 PM
MDM: Thanks, I hope it turns out how I want it too. Wendy: Thanks you are too kind. I hope they love it however... I just had one of the older board members contact me, and told me an interesting tidbit of historical info I wish I possessed before I started painting. It seems the pillars were moved in the 1950s to their current position due to theater screens becoming wider. So the original position would have been much farther into the arches to frame a more square screen. I am waiting for a reply, but I may have to start over on the pillar and move it. These kinds of things make me want to scream, but at the same time I want it to be as authentic as I can to help preserve history. |
|
D
danlovestikis
Posted
posted
on
Tue, Jul 23, 2013 6:58 PM
tigertail777 history is re-written all the time. I wouldn't think that moving the pillars back would be necessary. I personally like how your painting looks as is, really just make it the best you can which will be terrific. An art instructor once told me that making decisions is the hardest part of art and I've found that to be true. Finishing this is more important than moving a pillar. I'm looking forward to the next step, Wendy |
|
T
tigertail777
Posted
posted
on
Sun, Jul 28, 2013 5:08 AM
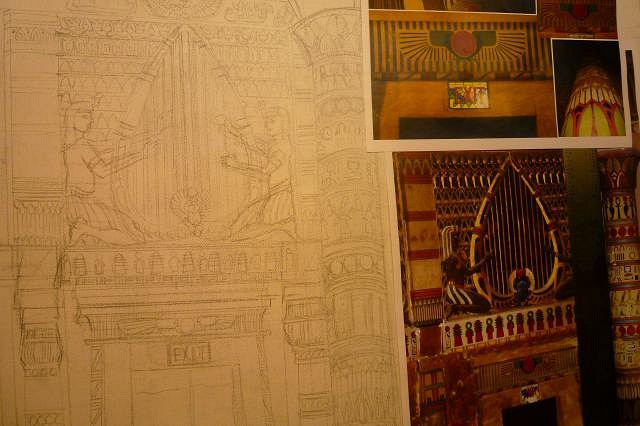
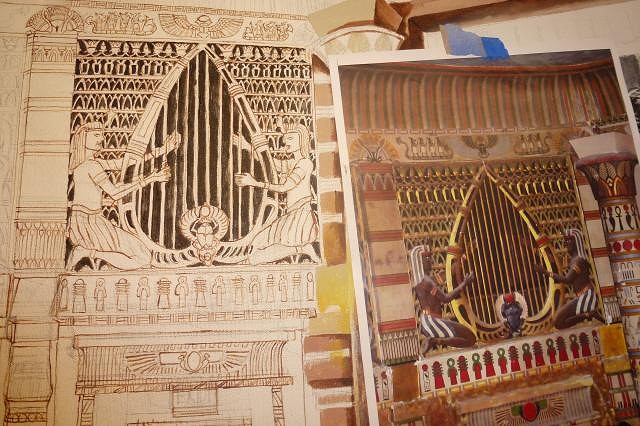
Well, Wendy I understand what you are saying and if it was a fantasy painting I would agree. However, this is to preserve history and the little bit of an archaeologist in me screams against changing things. I did actually want to be an archaeologist once, and even took a few preliminary classes and had discussion about my aspirations with an archaeologist professor. One thing he said that really stuck with me is: "never change the facts of what you find to fit your hypothesis. Our profession is one of discovering and preserving the past. Do not intentionally rewrite history, there are already enough revisions of history through accident." I am already appalled at how little documentation there is on the past of this theatre, I would be ashamed to add to any future historian's distorted knowledge of the truth. So to the best of my ability I will document through my painting how the theatre originally looked. This of course means I will need to continue doing detective work to piece together how it must have looked. Besides the stage originally had a very time period specific design when the pillars were in their original place. It formed an older type of stage with what is called a proscenium arch. This means that an archway with sides was designed to frame in the active part of the stage. It isn't used much anymore because it often would leave open wings where you could see the actors "backstage" which is where the term "breaking the fourth wall" comes from. To give some idea, here is another restored Egyptian Theatre in Boise Idaho that also has a proscenium arch: http://www.egyptiantheatre.net/wp-content/uploads/2012/05/Egyptian-Theatre-1-of-1-2.jpg In the case of Egyptian style it is especially important because it copies the actual look of papyrus pillars as they are found in egypt with a load bearing cross piece resting on the pillars. You can still see some of these intact in Karnak. http://img.groundspeak.com/waymarking/2b0256b2-2d38-47bb-a25a-02333d41e68d.jpg That is my long winded way of saying I will be changing the pillar. Meanwhile, I decided to work on the other aspects of the painting that I am near 100% certain are correct in their depiction. Which is mainly the organ loft. I do know now that the bottom half of the wall beneath the organ loft was painted over at some point, and memories of people seem to point to water damage via a flooding problem. I am not sure, but I think I may have discovered some traces of what may have been painted on the walls before the repainting through blowing up some of the photos and messing around with contrast and such in photoshop. So I may have to make an educated guess on what was there since no one remembers. And I really do not know why I never thought to do this before, but I took a page from Brad (tiki shark) Parker's current painting project and outlined all the details in paint first. Normally I just plunge ahead with filling in the darks and lights and generally drive myself crazy (case in point the mermaid painting at the very beginning of this thread). With outlining in paint I can see much clearer the details and whether anything is "off". I think I may do this trick from now on it really came in handy.
Then I started filling in the pure black recesses between the wood carved parts of the organ loft.
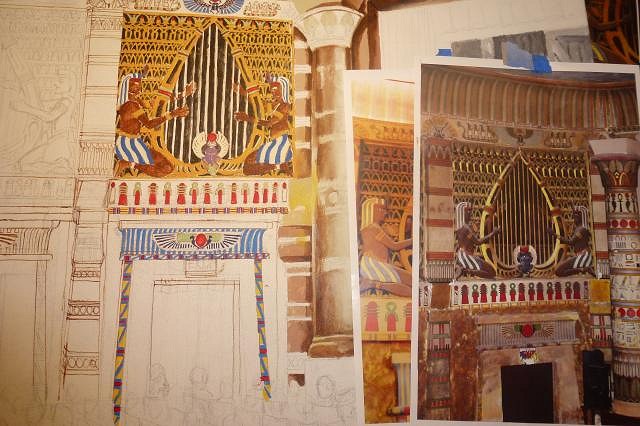
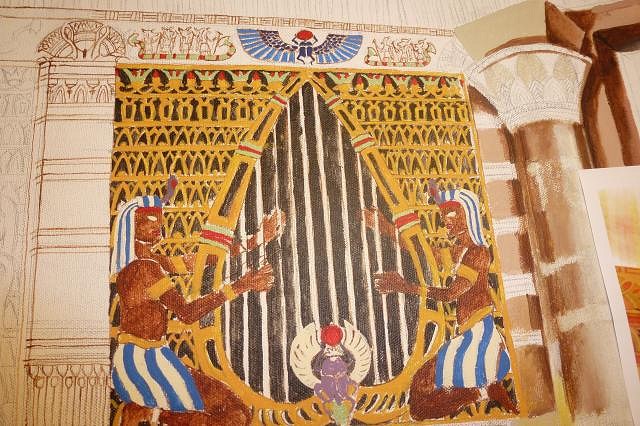
It was at this stage that I really started to appreciate the incredible motif details incorporated into the organ loft carving. I love the lotus flowers at the top and the clever snake head canopic jars. Actually, those are probably a vulture and snake head to represent the rule of upper and lower Egypt as was on the head piece of Tutankhamen, but it is difficult to tell from the photos due to the fine detail. Even blowing the picture up doesn't reveal precisely what type of canopic jars, but I am betting they are probably trying to depict kings head jars (which never had the snakes/vultures, but could be a "westernized" art deco style interpretation). OR, they are Duamutef jackal head jars and those things that look like snakes in the photos are actually ears like here: http://upload.wikimedia.org/wikipedia/commons/8/8f/CanopicJarsOfNeskhons-BritishMuseum-August21-08.jpg I am going to assume most folks know what canopic jars are, but in case you don't they were used to store the sacred "innards" of the mummies. The reasoning behind it all is much more complex of course. I am not sure what the other pattern below the jars is, unless it is just echoing the shape of the harp. It could be some actual Egyptian design though, since the large majority of the rest of the theatre designs are based on real ones. Difficult to tell sometimes where the "real" thing is, and where the art deco stylization starts. Then I started in on the color. This is basic under colors though so be aware that it is just a starting point. I always try to make my under colors very bright and then dim them down with layers over them. I don't like starting dark and going light because for me at least, it tends to muddy the colors and dim down the parts I DO want bright too much.
With the outlining before painting technique, I was able to see some of my perspective was a bit off. I am trying to pull off a very tricky slightly forced perspective (in a corner no less). I see I am going to have to completely redo the harp strings as the spacing between them is all wrong and ruins the illusion, as well as some of the stripe decor. Stripes are difficult normally, but to do them in forced perspective.... I must be insane to attempt this. There really is no other explanation. Okay, until next time... walk like an Egyptian my tiki friends! [ Edited by: tigertail777 2013-07-28 05:28 ] |


