Tiki Central / Other Crafts
VanTiki Mugs: Octopus Time Lapse
Pages: 1 2 3 4 5 6 7 8 9 10 11 12 13 14 15 16 17 18 19 20 927 replies
|
V

VanTiki
Posted
posted
on
Tue, Dec 9, 2008 1:06 PM
Mahalo Mike! edit: Forgot to add - the robot messed up the koi on the first attempt (forgot to cut one of the fins on the tail) - so we ended up with an extra set that I got to keep! Now I just need to find a place for them. We are thinking bedroom closet - for now they are hanging out in my office.
[ Edited by: VanTiki 2008-12-09 13:08 ] |
|
B

Babalu
Posted
posted
on
Tue, Dec 9, 2008 6:54 PM
Henrick, It's very cool to see what you've been up to! :-) That koi is amazing...I hope you were able to stand there and watch that thing cut those out. Your parents must be STOKED! |
|
H

hewey
Posted
posted
on
Tue, Dec 9, 2008 7:18 PM
The octopus is the best :D Love to see some more pics of the house too! |
|
V
VanTiki
Posted
posted
on
Tue, Jan 6, 2009 2:46 PM
Ok - believe it or not, I've actually finished a mug! I know, I know, after three months of near silence it is hard to swallow. I assure you it is true, and that more mugs will be coming along shortly! The end of 08 turned into a bit of a whirlwind for my day job. Happily, 2009 is here, and with it the wonderful smell of fresh clay! Here is the newest finished fellow: The Gold Eater. I'll post more about it in the marketplace when the auction kicks off this weekend, but I wanted to share a few shots with the fellow creators in this forum. I tried several new things with this guy - the whole mug-within-a-mug thing (look for three more pieces along this vein in the future) and I was able to try airbrushing under-glazes for the first time as well. Very excited about future airbrush glaze possibilities. I also had a good time cooking up this mugs back-story, which you can read about here: http://www.vantiki.com/VanTiki/The_Gold_Eater.html And now the Photos!
Mahalo for peeking (and not forgetting about me!). |
|
M

Monkeyman
Posted
posted
on
Tue, Jan 6, 2009 2:58 PM
always mind blowing.... !!!! |
|
B
Babalu
Posted
posted
on
Tue, Jan 6, 2009 4:52 PM
YES! An excellent treat from all angles! |
|
T

teaKEY
Posted
posted
on
Tue, Jan 6, 2009 5:22 PM
I almost forgot what a Van mug looks like. Don't let that happen again. Cheers |
|
S

Sneakytiki
Posted
posted
on
Tue, Jan 6, 2009 5:23 PM
Very cool Meso-American vibe, shdes of earth monster/cave/mother who swallows the corpse back into the earth! Dig the skulls and gold! |
|
M

MadDogMike
Posted
posted
on
Tue, Jan 6, 2009 5:47 PM
Henrik, glad you finally got out, did you get the care package I sent with the soap-on-a-rope? Hope your new parole officer isn't as bad as the last one...oh, the TC people don't know?...sorry :lol: It's good that your day job is keeping you busy (money is a great thing) but I'm happy to see you playing with the clay again. The new mug is gorgeous! Mike |
|
N

NOTCH
Posted
posted
on
Tue, Jan 6, 2009 7:01 PM
Bitchin!!! |
|
V
VanTiki
Posted
posted
on
Wed, Jan 7, 2009 11:26 AM
Mahalo for the positive vibes everyone! Your kind words of aloha kept me warm on a cold January day in Kailua :) Monkeyman - I aim to please! :) Babalu - Mahalo - This mug will be tricky to display, lots going on all over! teaKEY - I'll do my best to keep them coming. I may not have had time for clay over the past few months, but I did plenty of sketches - and I can't wait to try them out in clay. Sneakytiki - Thank you so much! I wanted this mug to look OLD - as if made by an ancient culture that traveled to the island thousands of years ago (perhaps on an ice-age land bridge?) and the natives of VanTiki island discovered it and revered it. I know, I'm crazy. MadDog - Well, they didn't exactly let me out - lets just say the file-shaped birthday cake you sent came in handy. NOTCH - Mahalo! I wanted to add one more photo to give a better sense of scale. This mug is HEAVY - I don't know how heavy because my little scale maxes out at 7 pounds, so let's just say it is 7+ pounds :)
Once again, Mahalo! Henrik "VanTiki" |
|
B

BigToe
Posted
posted
on
Wed, Jan 7, 2009 3:52 PM
Van, ur my HERO! that is so completely sick i am drooling...even more than usual! insanely brilliant Alohas, t |
|
M
MadDogMike
Posted
posted
on
Wed, Jan 7, 2009 5:53 PM
:lol: :lol: :lol: :lol: :lol: :lol: :lol: :lol: :lol: :lol: :lol: :lol: :lol: :lol: |
|
V
VanTiki
Posted
posted
on
Tue, Jan 13, 2009 7:35 PM
Aloha folks! Got some more studio time in this week - was able to get a start on a series I've been kicking around: Caution - Giant Crabs, and Caution - Giant Squid. Here is a first stab at the giant crabs taking shape. I imagine these fellows patrolling the beaches of VanTiki island by the light of a full moon. The Natives think they are delicious, unfortunately, the crabs feel the same way about the natives. This is a huge mug made from a claw shell:
I was hoping to make a mug you could wear - but I dunno if I got this claw big enough... Next up: The Giant Squid idea needed a skull, so I made a few. The one on the right will end up as a Trepanning accident mug (remember those?). The one with the jaw will be a part of the Giant Squid mug. And as you may notice the treebrain mugs survived the bisque fire with flying colors :) All these sculpts are still a bit rough - just wanted to give you all a peek!
Mahalo,
[ Edited by: VanTiki 2009-01-14 10:50 ] |
|
M
MadDogMike
Posted
posted
on
Tue, Jan 13, 2009 8:08 PM
HOLY CRAP!!!!! I am SO glad I'm allergic to crab! |
|
B
Babalu
Posted
posted
on
Wed, Jan 14, 2009 7:16 AM
Holy Crab Shacks!! Your on fire Henrik! I'm soooo happy your back playing in the studio! I love, love these progress shots you post. Oh Thank you, Thank you! :) |
|
C

Clarita
Posted
posted
on
Wed, Jan 14, 2009 9:51 AM
Oh I love the gold eater!! super cool!! |
|
B
BigToe
Posted
posted
on
Wed, Jan 14, 2009 11:02 AM
brilliant...that claw is insane. can't wait to see the squid. no really, hurry up and finish! MAD alohas, t |
|
RH

Robb Hamel
Posted
posted
on
Wed, Jan 14, 2009 11:45 AM
7 pounds! Da-amn! Use a straw. The claw is too crazy, but very diggable. |
|
V
VanTiki
Posted
posted
on
Wed, Jan 14, 2009 11:49 AM
Mahalo everyone! Allow me to introduce the HenrikCrab:
|
|
H
hewey
Posted
posted
on
Wed, Jan 14, 2009 7:02 PM
Thats insane man! You're not going to be able to ship those puppies soon, they getting BIG |
|
V
VanTiki
Posted
posted
on
Thu, Jan 15, 2009 11:48 AM
Babalu - I'm Soooooo happy to be playing with the clay again! glad you like the progress shots. I love it so much when other TC artists show their process - so I feel compelled to share as well. Charita - Mahalo! It is going to be hard to box that one up and send it away. Sigh.... BigToe - I'm happy to say that "Caution: Giant Squid" mug photos are mere sentences away! Robb - Yeah, it is beefy! Hewey - Ms. VanTiki shares your shipping concerns. I keep telling myself that I gotta do a few smaller works next, but big is so fun! OK - on to the new one! I call it "Caution: Giant Squid". Took a bunch of shots as the mug took shape. First off - the sketch. I really enjoyed making those tentacle mugs last year, and I thought I could expand on the idea with a bizarre "wine glass" type of mug - with the stem of the glass being a tentacle and the bowl being a skull.
Fist step was spending an hour or so producing a zillion suckers of various sizes. Did these out of a vivid blue porcelain
Next up I rolled out a hefty slab of the ceramic paper clay. THe clay looks red (the black streaks you see are mold - eew!), but it will be an off white when fired. THe wood strips on the side help me control the thickness of the slab
After a couple of test rolls, I cut a piece of clay pie
And roll it into a big pointy cone!
NOw - the nifty thing about this paper clay stuff is you can attach dry clay to wet clay - that is how I could wrap the wet tentacle around the three-day-dry skull. After a few test fits, I scored and slipped the skull and tentacle together
At this point I hit the tentacle with my blowtorch to firm it up. Wanted it to hold its shape without slumping before moving on to the next step. This is another great thing about paper clay - I can force-dry it with almost no worries about cracking (or so I am told). From this point on I added all the details. Texturing the back and "fleshy underside", adding some edging, and sticking all the little suckers in (which had dried out at this point, letting me press them into the wet tentacle without distorting them).
And here we have the finished sculpt!
Not quite as cute as my original sketch - but I can always try another! Mahalo for peeking, |
|
M
MadDogMike
Posted
posted
on
Thu, Jan 15, 2009 3:08 PM
Amazing! I gotta get (or make) me some paper clay - what the heck, I already have a blowtorch! |
|
B
Babalu
Posted
posted
on
Fri, Jan 16, 2009 8:22 AM
Dang Sweet! The blue underglaze on those suckers is going to look cool! Like MD, I'm going to have to look up more info on that paper clay - love the way your rolling slabs out with the stuff....looks fun as hell :) Your smackin'-um outta the park Henrick! |
|
B
Babalu
Posted
posted
on
Fri, Jan 16, 2009 11:16 AM
Are those blue suckers that colored porcelain stuff? |
|
V
VanTiki
Posted
posted
on
Fri, Jan 16, 2009 11:27 AM
Yessir - this is the stuff I've been using. It is $$ - but as I only use it for highlights I imagine the first batch of color I purchased will last me for years. http://www.axner.com/axner/claybodies/clay-colored-porcelain.php Here is the paperclay I've been using - they ship flat rate priority mail! FANTASTIC news for someone who lives on a far off island in the Pacific :) http://www.axner.com/axner/claybodies/clay-paperclay.php Get some and go crazy! It is a bit different than standard clay - the fibers can sometimes get in the way, but I've been enjoying the benefits of the clay too much to complain! Mahalo, |
|
TSA
Tiki Shark Art
Posted
posted
on
Fri, Jan 16, 2009 11:34 AM
Vantiki~ WOW! |
|
B
Babalu
Posted
posted
on
Fri, Jan 16, 2009 11:41 AM
Sweet! I called my guys here in SD to see if I could have them order 50 lbs of the low fire white "wades" to try, but they said it came out of Ohio....so thanks for the link man. I also ordered up 100 lbs of that Red Laguna EM-234 cone 06 stuff today....I think it will work better than that whiteware with grog in larger applications. YAY CLAY! |
|
M
MadDogMike
Posted
posted
on
Fri, Jan 16, 2009 11:49 AM
Babalu, that's funny - I called Freeform this morning about paperclay too. Now they're thinking WTF? |
|
L

leleliz
Posted
posted
on
Mon, Jan 19, 2009 9:29 PM
so amazing! love seeing progress pics. really blows my mind. Great work on the squid! |
|
V
VanTiki
Posted
posted
on
Thu, Jan 22, 2009 3:49 PM
Aloha Folks! First off, a warning: If you are a Tiki purist, you may want to look away. This next mug isn't a tiki (well, I guess the last 2 weren't tiki either, but at least they were nautical/tropical). If you are anti-robot, or if you feel that all mugs must be tiki shaped, please avert your eyes :) So I love robots. There. I said it. Some of you may have seen some of my stainless steel robots in my "non-tiki" thread in the Forum of Mystery. I was going to talk about this mug there as well - but I decided to not be ashamed of its robotic roots and share it with everyone :) I sketched a few robot mugs last year - one was "The Rusting Remains of Attack Robot 12" and I had another called "Robot 3 - some assembly required" (it consisted of a head and hand shaped mug set). I would occasionally look back at the sketches, but I never felt the spark to make them till I had a bit of an LED breakthrough yesterday afternoon. I love making light up mugs: http://www.vantiki.com/VanTiki/Fire_God.html and yesterday I thought of a way to wire the LEDs through the clay walls of the mug! Yes! Now, lemmie just say I am sure I'm not the first to think this up, but I am really stoked about the possibilities! I ran out to Radio Shack and Kailua Hardware before they closed, and this morning I put together a "test Bed" robot mug. Consider this fellow a prototype - I wanted to test both my wiring idea and some glaze application techniques before going all-out. WHat is the idea? Well, I was cleaning up my workbench when I came upon a box of wax wire sprues that I use for casting rings and other metal goodies. I suddenly realized that I could imbed them into clay - and that after firing I'd have perfect hollow channels running through the clay that I could slide wire through! The wax is a bit delicate - so I ran to the hardware store to look for possible substitutes. I settled on the rubber gasket wire used to hold the screen into a screen-window frame. Here are some shots of this morning's mug taking shape. This was all put together with my new friend: Paper Clay (but I am sure it would work with any kind of ceramic body). Photo 1 - Roughed out the body and head shape. I then used a loop tool to carve out 2 channels for the rubber to sit in (1 for each eye) photo 2 - rubber wire pressed into place. the ends of the wire run into the hollow bottom of the "upper body" shape photo 3 - using coils of clay, I fill in the wire channels and smooth out the surface.
photo 4 - I begin detailing the mug, and add on eye shapes that will help to hold and protect the LEDs. photo 5,6 - more detail, and done! The top dome has a straw hole and is removable. Eyes will light up via a push button on the robots back. Batteries stored in the body at the base of the mug. This fellow is just a test - I am VERY excited about the possibilities this may open up for future mugs! Whoo! Mahalo for peeking, |
|
M
MadDogMike
Posted
posted
on
Thu, Jan 22, 2009 5:00 PM
Way cool Henrik! I did a cobra-shaped straw with a similar technique, I used a thin cotton rope instead of rubber. That way it didn't stink to high heaven when it burned out. The rubber spline would leave smoother channels than rope though. The rope had enough "give" that it didn't crack the clay as it dried, I'm sure the rubber would do the same. Or did you plan to pull the rubber out before firing? Blurring the fine line between art and crap. [ Edited by: MadDogMike 2009-01-22 17:03 ] |
|
L
leleliz
Posted
posted
on
Thu, Jan 22, 2009 8:13 PM
Man even your "test" mug idea is amazing! Can't wait to see the results. Great concept! |
|
V
VanTiki
Posted
posted
on
Thu, Jan 22, 2009 10:37 PM
Leleliz - mahalo! I like the little test fellow too. Perhaps I'll get to keep this one :) MadDog - Good idea on the rope! I was originally going to use the foam tubing backer that you stuff into a crack before sealing it with caulk, but I couldn't find it in a small enough diameter. Time for a google search! As far as clay shrinkage, I'm hoping that the paper clay is tough enough to handle it without cracking. We shall see! It is gonna stink when I fire it - but my kiln is vented (yaay) so it shouldn't be too bad. Henrik |
|
B
Babalu
Posted
posted
on
Thu, Jan 22, 2009 11:01 PM
GENIUS!! |
|
JT

Jungle Trader
Posted
posted
on
Fri, Jan 23, 2009 8:08 AM
I don't know.....kind of looks like a fire hydrant to me. |
|
M
MadDogMike
Posted
posted
on
Fri, Jan 23, 2009 10:49 AM
Let's hope Fido doesn't think it looks like a hydrant! |
|
V
VanTiki
Posted
posted
on
Fri, Jan 23, 2009 10:55 AM
Ha - yeah, I see what you mean. Hopefully the glaze idea I have for it will discourage any fire trucks from pulling up to my studio :) Henrik |
|
V
VanTiki
Posted
posted
on
Fri, Jan 23, 2009 6:37 PM
So you folks may remember those BIG treebrain mugs I sculpted for http://www.thesneeze.com I bisqued them before xmas, and while I loved the mugs, I hated the fit and look of the brains. Today I decided to do something about it. I wrapped the bisqued trees in saran wrap, and sculpted some fresh custom-fit mug cup toppers for them. Hopefully the shrinkage won't pose too great a problem and they will still fit after firing. This is the third attempt at sculpting a brain I liked for these mugs. A tricky balance between the real fungus that inspired the mug, and an actual brain. Here is a peek (these are two different mugs):
Mahalo for peeking! |
|
V
VanTiki
Posted
posted
on
Sat, Feb 14, 2009 10:08 AM
Lots has been cooking since my last post - let's see... Fist up, made a new "making of" time-lapse video: http://www.youtube.com/watch?v=dk6afOheBuo&feature=channel_page Secondly, glazed up the Tree Brain mugs and am really happy with the results!
And lastly, I am dipping my toe into the FaceBook pages pool. Become a fan! :) http://www.facebook.com/pages/VanTiki/54728547171 Whew! Busy week! Henrik |
|
M
MadDogMike
Posted
posted
on
Sat, Feb 14, 2009 12:04 PM
Henrik, a "mug accessory"? You're either a genius or a madman - I vote for genius :) |
|
V
VanTiki
Posted
posted
on
Sun, Feb 15, 2009 4:17 PM
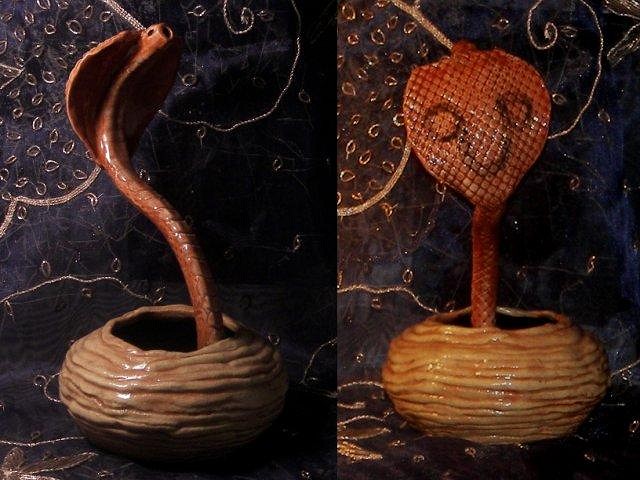
Mike - I hope you are right! :) Here are some shots of the wall sconce slowly drying. I had fun detailing the "stone slabs" that the small mug will rest on inside the mouth. This is a big one!
Mahalo, |
|
T

TiKiMaN77
Posted
posted
on
Mon, Feb 16, 2009 12:01 AM
Dude..you truly are a MAD GENIUS!! Is it any wonder I've gotten so many cool ideas jsut from checking out your thread. Haven't done anything with them, but they are all jsut swimming around in my brain. Truly fantastic stuff Henrick. Keep 'em coming...Please. |
|
B
Babalu
Posted
posted
on
Tue, Feb 17, 2009 6:43 PM
ahhhh, very cool vid Henrick. I've been away for a minute doing some other stuff; it was very nice coming back to this. I hope it gets as many views as that last one :) Keep rockin' the house brother! |
|
V
VanTiki
Posted
posted
on
Sun, Feb 22, 2009 10:27 AM
Aloha Folks - Been doing some glazing this weekend - Yesterday I did up the Robot Prototype A1, and today (after a bit of GeoCaching) I'm getting some paint on the squid tentacle. I played with a bunch of different application techniques on the robot head. I call it a prototype, because I am using it to try a few things before making some larger robots. Here is the freshly painted piece:
Keep in mind - these colors will shift A LOT when I fire it. Cold be for the better - could be (most likely) for the worse! Lots of masking, washing. and airbrushing on this one. The mouth grill and inner eyes are a gloss black, and after the first firing I'll go back over them with a white gold glaze (followed by another firing) to get a chrome effect. Man, I hope it comes out OK. I hate putting so much time into glazing only to have it ruined in the kiln! No wonder I chew my nails! Mahalo for peeking - |
|
M
MadDogMike
Posted
posted
on
Sun, Feb 22, 2009 9:32 PM
Love the distressed/aged look! I too, got some white gold luster I've been messing with a little - does it work best over black or does it make much difference what you put it over? |
|
V
VanTiki
Posted
posted
on
Tue, Feb 24, 2009 1:07 PM
Well - the problem with applying the gold luster over gloss black is that the gold luster itself is gloss black until you fire it. Makes it really hard to keep track of what you have glazed. The guy I bought it from recommends applying it outdoors - as the dried luster lacquer has a reddish tint in sunlight and that makes it easer to see what you have and haven't painted. Since the luster is opaque, I've had better results applying it over a vivd gloss red glaze - I could keep track of what I painted, and it turned out looking really sharp. I opted for gloss black on this one because I wanted any unpainted areas to be black - and I kinda did a sloppy application to make the robot look beat up and old. THe big key I have found in my ultra-limited experience with the luster glazes is that the key to success is a high gloss base glaze. Painted luster on the robot this morning, and the firing just finished (cone 019). Can't wait to see if it worked! Henrik |
|
O

OceaOtica
Posted
posted
on
Tue, Feb 24, 2009 1:15 PM
I had the same issue with using the Gold and Platinum at first as well, being that i was using it over solid black underglaze/clear glazed sections. For waht i was doing, doing fine line stuff, i started to plan out before i underglazed the black sections, leaving thin lines unpainted so that i would have those spots visible when i painted on the gold and platinum. |


Pages: 1 2 3 4 5 6 7 8 9 10 11 12 13 14 15 16 17 18 19 20 927 replies