Tiki Central / Other Crafts
VanTiki Mugs: Octopus Time Lapse
Pages: 1 2 3 4 5 6 7 8 9 10 11 12 13 14 15 16 17 18 19 20 927 replies
|
V

VanTiki
Posted
posted
on
Sat, Feb 11, 2012 12:12 AM
Aloha folks - I do appreciate this debate - but I'd like to ask again that we move it to the thread I mentioned earlier where it belongs. I'll post some new work next week to get things back on topic: creating tiki! Mahalo, |
|
K

KokoKele
Posted
posted
on
Sat, Feb 11, 2012 12:34 AM
I've been arguing with Sven? My most humble apologies! You da man, that's for sure! Sorry! Rookie mistake! I still like the mug, though! |
|
CTIT

Chuck Tatum is Tiki
Posted
posted
on
Sat, Feb 11, 2012 1:59 AM
If I can say what I take from Sven's points, (which I am in agreement on (Please correct me Sven, If need be) Then you have the "Tiki Revival" or as Sven calls it "Tiki Style" which I like to call "Neo Tiki" Just don't call it Tiki, because its not and because enough people might like to change the definition But it does fit in with Tiki Style, Neo Tiki or what ever you would like to call it, just not "Tiki" If I can speak for Sven here, I believe this is the point that( In doing so, keeps us on track) he needs to remind us of. VanTiki your work is the Bees Knees! by the way :) :) :) and a :drink: |
|
S

SandraDee
Posted
posted
on
Sat, Feb 11, 2012 10:12 AM
Vantiki I think you should just post your work on everyone else's thread--I would love if every thread had a photo of one of your pieces of art. Too bad you respect people more than they respect you---how rude to ignore VanTIki's request to debate the same topic to death OUTSIDE of his artwork thread. Have some respect already people. Anyways BACK TO VANTIKI'S ART .... Are you making new swizzle designs any time soon? Or more of the ones you have already created? I keep checking the Etsy shop but don't see any so thought I would ask. [ Edited by: SandraDee 2012-02-11 10:16 ] |
|
K
KokoKele
Posted
posted
on
Sat, Feb 11, 2012 10:38 AM
Back to VanTiki's art, indeed! SO SORRY for the stir! If I may post a simple appreciation of not only this work but ALL VanTiki work, I'd like to thank you not only for sharing your pieces both finished and in progress but for the delightful amount of creativity you put into creating backstories for most of your works. They are most entertaining and do a wonderful job of adding to the sense of the exotic that exists in all your art. One of the things that really draws me to a VanTiki creation is the use of texture. I'm sure it's been said by many, but your transformation of clay into wood, stone and organic textures is danged near alchemic. Unfortunately the same thing that makes you able to create such elaborate textures is the same thing that makes it so hard to own one of your masterpieces: they are usually one-offs! I really appreciate all the time you take to catalog and display each piece to the community, because I know it's unlikely that I'll have one on my shelf soon. Most generous, sir! I think it exemplifies the generosity of all the artistis on this site. Sorry again for the kerfluffle. Aloha! |
|
CTIT
Chuck Tatum is Tiki
Posted
posted
on
Sat, Feb 11, 2012 1:52 PM
Edit: Sorry I moved it to that other thread. [ Edited by: Chuck Tatum is Tiki 2012-02-11 13:53 ] |
|
J

JOHN-O
Posted
posted
on
Sat, Feb 11, 2012 4:03 PM
While not classic Tiki-style, it did evoke TIKI for me. I also agree with the "rock monster" aesthetic that the Bigbro pointed out. It's like Jack "The King" Kirby leaving his NYC Marvel Comics office during the 1960's for drinks at the Hawaii Kai and being inspired by his Tiki mug...
One "rock" begets another ? Pretty trippy stuff. :) It also vibed some of Kirby's "cosmic" work...
BTW, the Kirby comparison is a compliment !! [ Edited by: JOHN-O 2012-02-11 16:17 ] |
|
V
VanTiki
Posted
posted
on
Tue, Feb 14, 2012 9:45 PM
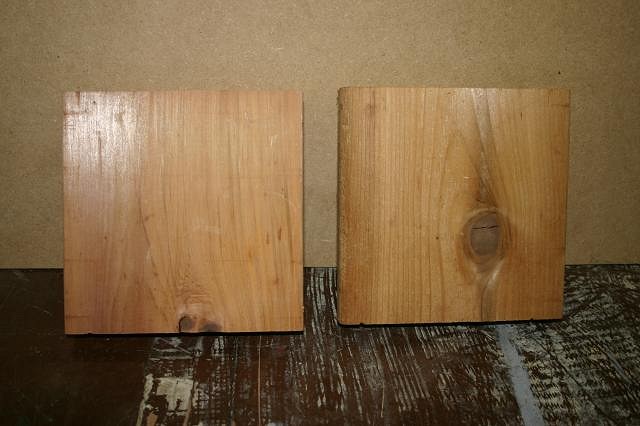
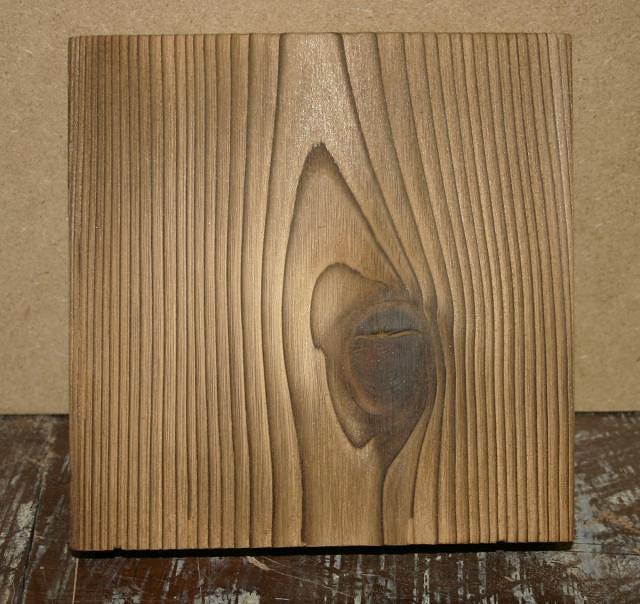
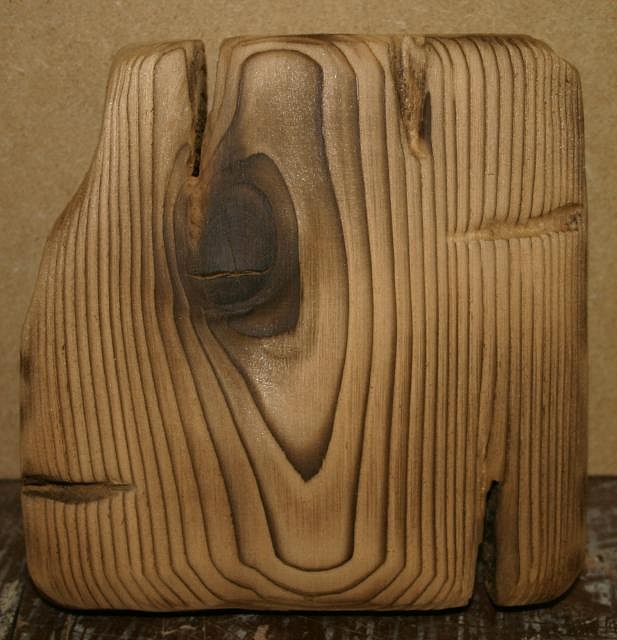
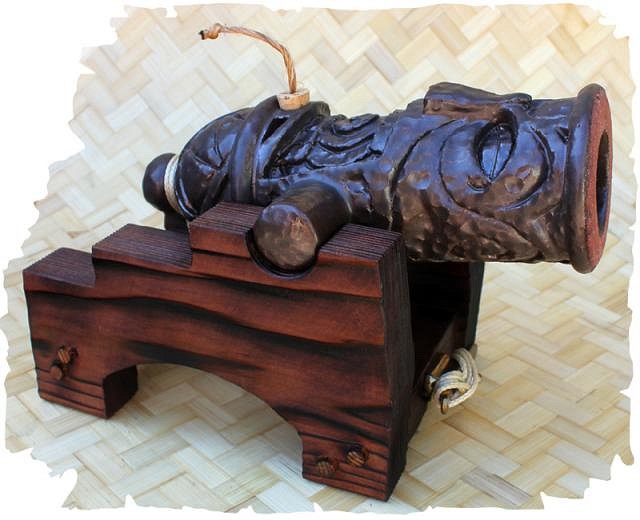
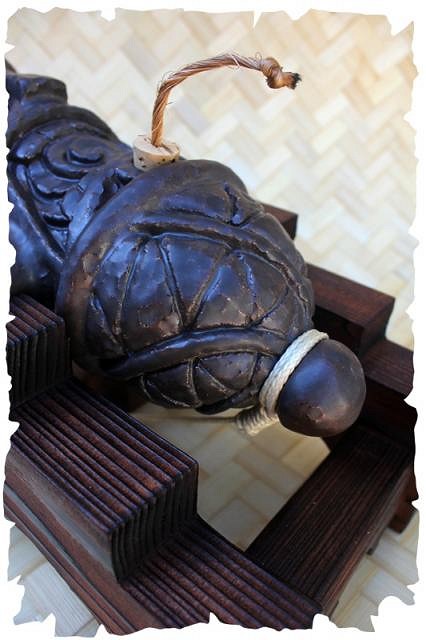
Mahalo to you all for the kind words, encouragement, and (most importantly) your passion for tiki. Now - onto making stuff! As you may recall, I did a few cannon mugs before oasis. My concept for the pieces is that the natives of VanTiki island salvaged them from a shipwreck, and re-forged them in fire into terrible gods of war (and rum drinking). I made a cradle for the cannon out of oak - but was not to happy with the first attempt. I've re-designed the cradles, and have come up with what will hopefully be a nifty way of lashing the cannons into either a "firing" or "drinking" position. My question is this: I'm making the new bases out of redwood. I'm no carver - but I do enjoy working with wood on occasion. Now - I see many a wonderfully weathered and torched piece of redwood in TC. I'm thinking "Witco-esque" How do you get a carving to that state? I'm thinking sandblasting and a light pass with a torch. I have a torch - but no sandblaster. WOuld a brush wire brushing do the same thing? Perhaps with a stiff wire brush - followed by a softer stiff nylon brush? Help me, TC wood folk! Mahalo, |
|
M

MadDogMike
Posted
posted
on
Tue, Feb 14, 2012 10:17 PM
Henrik, hopefully one of the experts will chime in. In the meantime, experiment with torching the wood fairly heavily first, then brushing the charred wood away with a wire brush. You can hit it lightly with the torch to bring back some of the dark coloration. |
|
A

AlohaStation
Posted
posted
on
Wed, Feb 15, 2012 7:06 AM
I have limited experience with Redwood, but here's what I know. Sandblasting is the best. To get a similar effect use sveral brush with varying degrees of stiffness. Mike is correct that using the torch will assist in creating the effect you want. be sure to wear a mask when sanding/grinding/brushing redwood - it is caustic (meaning it it exremely bad for your lungs). Good luck - be sure to post pics! |
|
K
KokoKele
Posted
posted
on
Wed, Feb 15, 2012 7:02 PM
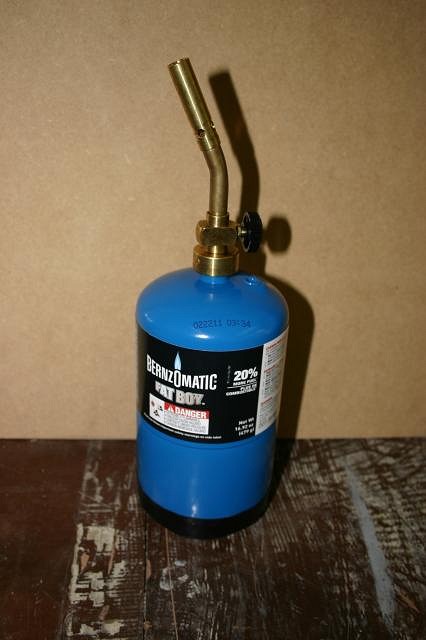
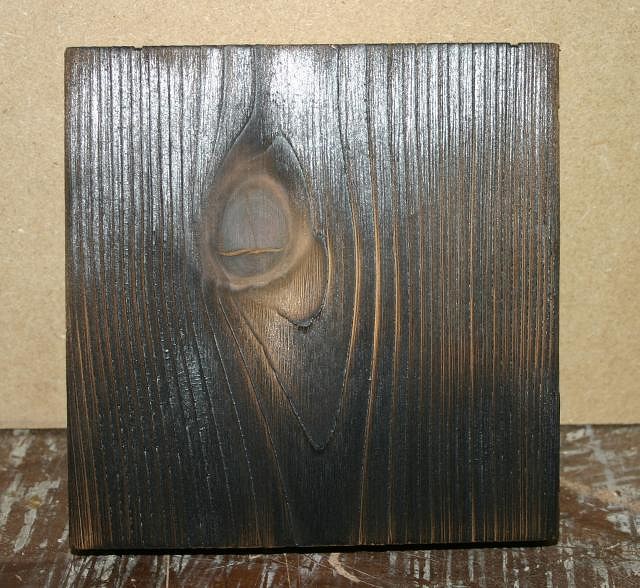
I didn't have redwood, but here's cedar: Here's propane and propane accessories: Burn that wood! Brush the burned wood to get the soot off: Torture the wood. Torture it I say! Then burn and brush it again: Add stain if you want. Sorry, I was in a hurry and missed a few spots: Finally, wipe some black stain on and off to add a bit of pop: I didn't varnish this because I have no reason to make it durable. But you get the idea. [ Edited by: KokoKele 2012-03-28 13:07 ] |
|
K
KokoKele
Posted
posted
on
Wed, Feb 15, 2012 7:16 PM
Post removed: I posted a long wood-burning discussion here. I edited it out because Mr. VanTiki completed his cannon cradle and did an awesome job on it. No need to let this long-winded entry clutter up the thread. [ Edited by: KokoKele 2012-03-28 13:05 ] |
|
K
KokoKele
Posted
posted
on
Wed, Feb 15, 2012 9:08 PM
Awesome work! [ Edited by: KokoKele 2012-03-28 13:09 ] |
|
CTIT
Chuck Tatum is Tiki
Posted
posted
on
Wed, Feb 15, 2012 9:27 PM
My, KokoKele you are verbose (Not meant as an insult) :lol: :lol: :lol: |
|
K
KokoKele
Posted
posted
on
Wed, Feb 15, 2012 10:44 PM
Totally! |
|
WC

Will carve
Posted
posted
on
Thu, Feb 16, 2012 5:31 AM
http://www.harborfreight.com/21-oz-hopper-gravity-feed-spot-blaster-gun-95793.html |
|
V
VanTiki
Posted
posted
on
Mon, Feb 20, 2012 5:12 PM
Kokokele - mega mahalo! Super advice, and I can't wait to try it all out. I've been sidetracked for the past month building a micro house in our backyard, and that is why there has been little to no studio activity. I really appreciate the photos - just the effect I am looking for! That cedar is really nice. WillCarve - yep, the gun is affordable - but I don't think Ms. VanTiki would be too thrilled if I fired that thing up in the home studio! :) until I get a booth or other safe locale for blasting, I'll have to stick with the torch and brush technique. Henrik "VanTiki" |
|
K
KokoKele
Posted
posted
on
Mon, Feb 20, 2012 9:13 PM
Glad to help. I can't wait to see your treatment. I added one last pic, above, of a slightly different torture method. Hopefully no one will report me to People for the Ethical Treatment of Wood. Sandblasting is a great way to "weather" wood, but you're right, it makes a horrific mess without a booth. That fatboy torch I pictured above is about thirteen bucks at Home Depot (in Oregon; probably forty clams in Hawaii) and should do the trick for you. Don't be afraid to char the wood, it adds to the effect and the soot brushes right off. I used a regular steel wire brush to get the soot off and didn't notice a bunch of unwanted scratching. Just use a fine bristle wire brush and you'll be good to go. After burning you'll find that the grain is much deeper, and of course more pronounced. It shouldn't take too much goofing around with scrap wood before you're feeling good about your results and ready to dominate your cannon cradle. |
|
V
VanTiki
Posted
posted
on
Fri, Mar 23, 2012 11:03 AM
Finally secured some studio time to start building the cannon cradles! Here they are taking shape - with some of the cord and bronze cleats I picked up for the lashing. Designed the cradles on the computer with Adobe Illustrator, printed out 1:1 plans, transferred them to cardboard to check fit, then cut the redwood
Went great - until I ran out of pegs! Heading back to town today to pic up some more. Was able to get 1 of the 2 cradles assembled
The new cradle and lashing design makes it easy to display the cannon at various angles, and to lash it vertical for drinking. Plan on torching them this afternoon. Can't wait! Mahalo, |
|
M
MadDogMike
Posted
posted
on
Fri, Mar 23, 2012 12:43 PM
Awesome Henrik, FIRE IN THE HOLE!!! |
|
H

Heath
Posted
posted
on
Fri, Mar 23, 2012 3:45 PM
Those look like a lot of fun! |
|
K
KokoKele
Posted
posted
on
Fri, Mar 23, 2012 3:58 PM
Way cool! |
|
V
VanTiki
Posted
posted
on
Fri, Mar 23, 2012 4:01 PM
Mahalo Mike and Heath! Henrik |
|
M
MadDogMike
Posted
posted
on
Fri, Mar 23, 2012 4:06 PM
Henrik, you going to be able to patina that cleat somehow? |
|
H
Heath
Posted
posted
on
Fri, Mar 23, 2012 4:52 PM
If the brass doesn't have a clear coat use lemon juice. This has worked for me with the customers that don't want new shiny brass next to the original. |
|
V
VanTiki
Posted
posted
on
Fri, Mar 23, 2012 7:15 PM
No worries folks - the cleat will get a patina. No shiny bronze for me! I'm going to hit it with liver of sulfur (sulfurated potash) to blacken and age it. I'll scuff up the highlights then seal with caranuba wax. Should look great. Will report back soon! :) Henrik |
|
V
VanTiki
Posted
posted
on
Tue, Mar 27, 2012 2:18 PM
Weathered and sealed cannon cradles drying on the workbench:
They turned out sooo great! Really happy with them - HUGE mahalo to the great TC artists for all your help on this one. Will be shooting "official" photos later this week of the assembled cannons - just wanted to share a quick peek. Mahalo! |
|
M
MadDogMike
Posted
posted
on
Tue, Mar 27, 2012 2:37 PM
Well shiver me timbers! Pardon me lassie, do ya mind if I fire me cannon through yer porthole? :lol: |
|
D

danlovestikis
Posted
posted
on
Wed, Mar 28, 2012 11:45 PM
Wow, who knew this was even possible. A tiki cannon! I hope to see it in person at Oasis. Now is that possible? Wendy |
|
V
VanTiki
Posted
posted
on
Thu, Mar 29, 2012 3:48 PM
The Bowchaser mugs are done! Here are some photos: And a video! Will kick off the auction and post sales info in the Marketplace shortly. Super stoked about how these mugs turned out. Mahalo! |
|
S

swizzle
Posted
posted
on
Thu, Mar 29, 2012 4:46 PM
Absolutely amazing as usual Henrik. |
|
H

hang10tiki
Posted
posted
on
Thu, Mar 29, 2012 6:29 PM
awesome |
|
M
MadDogMike
Posted
posted
on
Thu, Mar 29, 2012 7:02 PM
Beautifully done and a perfect glaze match. Henrik, you first posted those on 7/22 (my birthday :D ) and you are finally getting them finished 10 months later! That tells me you are working way too hard and don't have nearly enuf free time to play :lol: |
|
V
VanTiki
Posted
posted
on
Thu, Mar 29, 2012 9:46 PM
Mike, you hit the nail on the head (or should I say, the carving on the chisel?) there! We are re-grouping after a digital illustration/animation roller coaster that ended up swallowing all my time since few months prior to Tiki Oasis last year. Lots more clay fun is in the works! Henrik PS - the cradles did turn out to be a bit more complex than I thought. I had one done for Oasis last year - but was less than happy with the result. Took a few more months (or half-a-year) to dial the cradles in :)
[ Edited by: VanTiki 2012-03-29 21:47 ] |
|
TB

Tiki Baï
Posted
posted
on
Tue, Apr 3, 2012 1:38 AM
way soooo cool! :) |
|
V
VanTiki
Posted
posted
on
Wed, Apr 4, 2012 1:29 PM
Mahalo Baï! I'm doing my best to keep up with your incredible work! :) Henrik |
|
V
VanTiki
Posted
posted
on
Wed, Oct 17, 2012 12:52 PM
Aloha! So, this weekend I've been invited to teach a 1 day workshop at the Hawaii Potter's Guild. After pondering the possible things we could make out of clay in the limited amount of time, I settled on a small wall hanging shelf. I've made a small batch of sample shelves to show the class, and I thought you folks may enjoy a peek at the tiki themed shelf. Perfect landing pad for your favorite mug, or possibly just your car keys.
Mahalo for peeking! |
|
D
danlovestikis
Posted
posted
on
Wed, Oct 17, 2012 5:59 PM
Super super super, love the shelf. We sure missed you at Oasis. Wendy and Dan |
|
V
VanTiki
Posted
posted
on
Wed, Oct 17, 2012 6:44 PM
Mahalo Wendy! I missed YOU two at Oasis! We will do our darndest to get over for this year's show. Here is a peek at another demo shelf I just finished for the class. Brace yourself: it is NOT a tiki! :)
I call it: A Shelf For Ahab, and it will be done in a nice white and grey underglazes with an angry smokey eye! Hope to crank out 2 more odd little shelves today and tomorrow for the class to give the students lots of construction options. Can't wait! Henrik |
|
M
MadDogMike
Posted
posted
on
Wed, Oct 17, 2012 6:55 PM
Great idea Henrik! |
|
V
VanTiki
Posted
posted
on
Thu, Oct 18, 2012 12:50 PM
Mahalo Mike! Here is the 2nd demo shelf I did yesterday - once again, it isn't a tiki, I just thought you may want to see. If I have time, I'm going to do one or two abstract shelves today - I figure 5 samples are plenty for a 3 hour class :)
Henrik "VanTiki" |
|
M

MaukaHale
Posted
posted
on
Thu, Oct 18, 2012 1:41 PM
I like how you think outside of the box!
[ Edited by: MaukaHale 2012-10-18 13:44 ] |
|
T

TikiAno
Posted
posted
on
Thu, Oct 18, 2012 4:39 PM
Henrik, As always, beautiful. Love how your mind works (I left a similar comment on your FB post, ha!) Wish I was over there to take the workshop. Love the idea of making clay shelves- though I think I'd prefer to have one of your creations... :) |
|
S
SandraDee
Posted
posted
on
Fri, Oct 19, 2012 8:44 AM
These are great, Henrik! Can't wait to see them completed! |
|
V
VanTiki
Posted
posted
on
Thu, Nov 15, 2012 1:43 PM
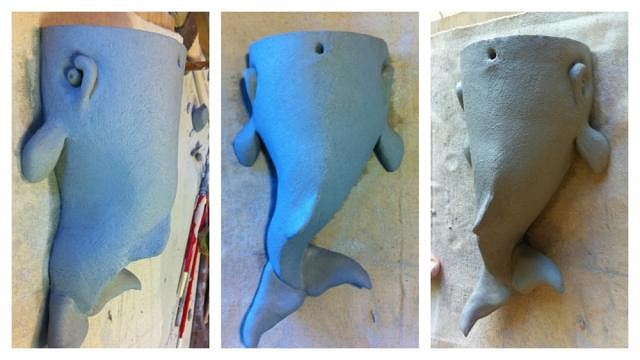
SO the 50lbs of Laguna buff sculpture in my studio had been languishing on the shelf long enough. Time to make some mugs! This clay is EXTRA groggy - it's like making sand castles on the beach. Started off blocking out 2 mug forms. One BIG, and one odd (I'll let you all decide which is which) The odd mug eventually transformed into a ceremonial Zombie mug - perhaps for sipping an elixir that transforms you into the undead? Here is the mug just before the final detail passes I'll post photos of the mug after the final detail pass, as well as shots of the BIG mug taking shape Mahalo for peeking! |
|
PG

Professor G
Posted
posted
on
Thu, Nov 15, 2012 2:01 PM
I've seen some (and I own some) of your work, Henrik. Big and odd don't necessarily cancel each other out on Van Tiki Island. I'll bet the big one is pretty dang odd and the odd one veers toward big. |
|
V
VanTiki
Posted
posted
on
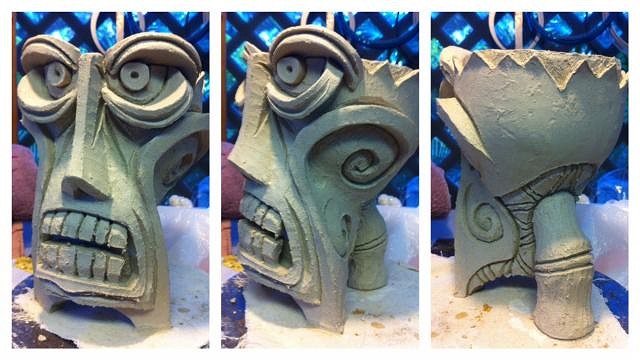
Thu, Nov 15, 2012 5:31 PM
Professor, I believe you may be correct! :) As promised, a shot of the finished Ceremonial Zombie Mug sculpt: It is now gonna take a week-long nap on the drying rack. Hopefully he'll survive the drying process crack free! Henrik "VanTiki" |
|
M
MadDogMike
Posted
posted
on
Thu, Nov 15, 2012 6:17 PM
Very cool Henrik. Do you wrap and unwrap your pieces while they are drying? |


Pages: 1 2 3 4 5 6 7 8 9 10 11 12 13 14 15 16 17 18 19 20 927 replies