Tiki Central / Home Tiki Bars
The Zombie Hideaway
|
M

Murph
Posted
posted
on
Thu, Feb 12, 2009 7:26 PM
Lookin' awesome! This should be a show on HGTV. |
|
TM

Tipsy McStagger
Posted
posted
on
Fri, Feb 13, 2009 9:03 AM
..did i get this right??..you put a shelf for tiki mugs and stuff behind a door that opens inward???....and what keeps folks from bustin all yer mugs when the door swings open??.....you better park your big lots and accountrements tiki stuff on that one!!! har!! |
|
T

TabooDan
Posted
posted
on
Fri, Feb 13, 2009 3:53 PM
Hey, Thanks Murph!! Tipsy, when you put it like that it does sound a bit funny!! |
|
T
TabooDan
Posted
posted
on
Fri, Feb 13, 2009 4:36 PM
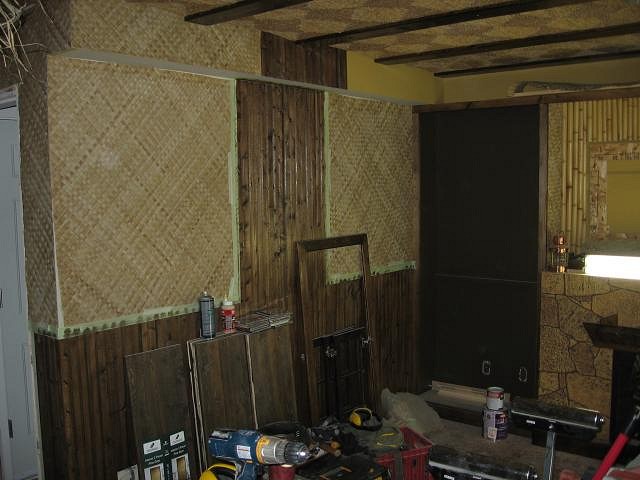
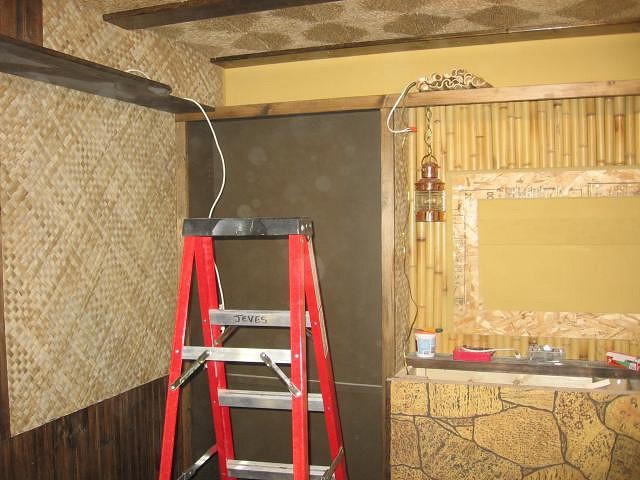
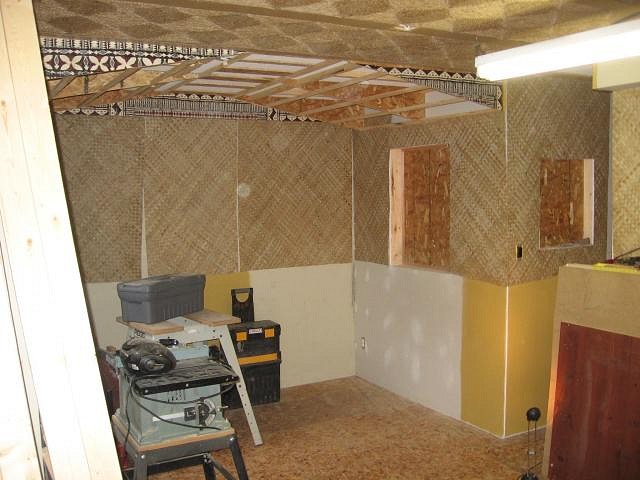
Once I thought about this drop down, above the T&G, on the door wall, I decided against boxing it in to make it look like a big beam. I wanted to install a shelf up here to the underside of the drop down and wanted a different type of background for the items on the shelf as opposed to just dark wood. Plus, with a shelf mounted on the bottom, it would have plenty of wood in this area.
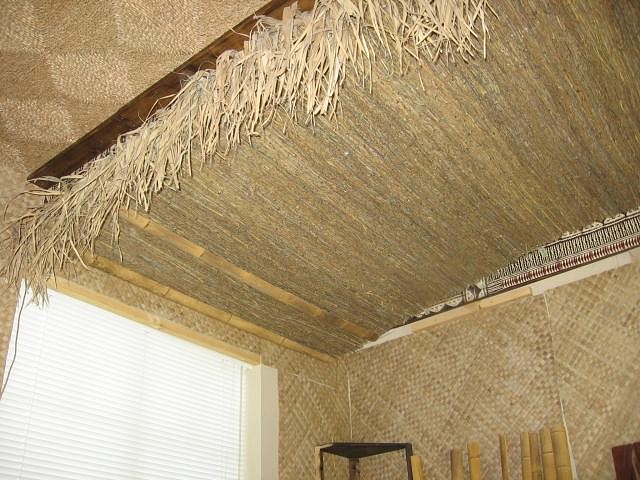
I finally decided on just continuing the same look as below right up to the ceiling. I would have the matting on either side and have T&G come all the way up. Like in this shot, where I have added the T&G and one side of the matting:
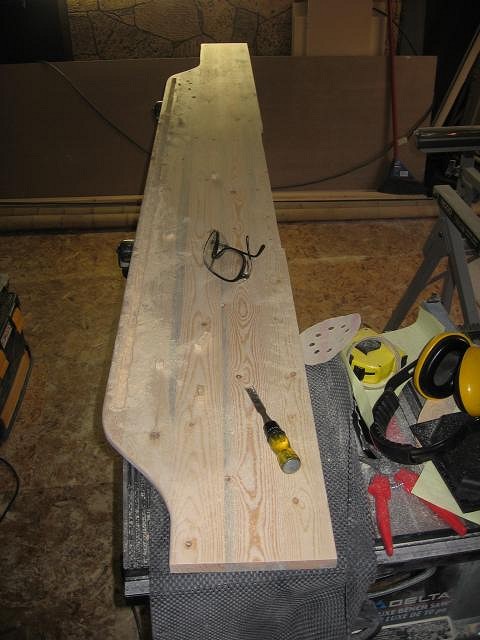
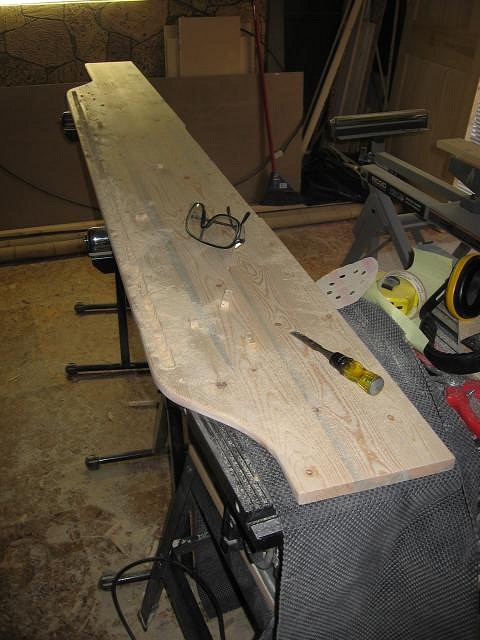
Once I got the matting finished, I started on the shelf. I didn't want just a plain straight shelf so I cut a little flavor into it. Here is a shot of the shelf being finished:
And another where it gives an idea of the shape:
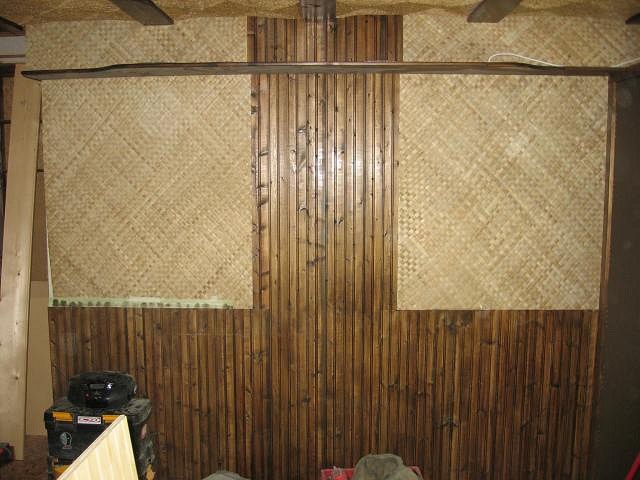
You can also see that I have cut out a small 5/8 channel into the shelf. This will be on the top side and this is where I will install rope lighting to lite up the items on the shelf and give a nice glow on the ceiling. The shelf is really just an accent piece and again just really giving me another spot to but a bunch of crap!! This piece of wood is 16" deep. The drop down from the ceiling is about 10" deep so this shelf will only be about 6" deep. Perfect for a row of mugs!! Here's one with the matting completed and the shelf installed:
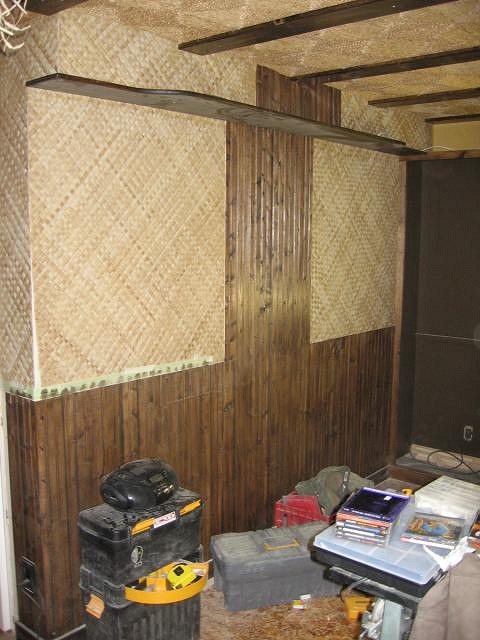
You can just make out the wire on the far right hand side coming up from the shelf. This will be channeled to the back and you will not see it at all. Here's a little closer shot of some of the electrical I was playing around with:
This next one is a straight on shot of the wall:
I will be adding bamboo to cover some seems and will also be adding a small side bar sort of shelf which will go right at the point between the matting and T&G. This I had planned on for a while and did this height the same as the bar, which is 42". This will tie in with the rest of the room. It will also be cut with the curved style as the above shelf so that they mimic each other. This side bar will also have a custom hand carved molding running from the left all the way to the shelf unit. More to come! |
|
S

Swanky
Posted
posted
on
Sat, Feb 14, 2009 6:08 AM
I really dig the seagrass mats on the ceiing. I've never seen anyone attempt that in a home bar. |
|
T
TabooDan
Posted
posted
on
Sat, Feb 14, 2009 12:21 PM
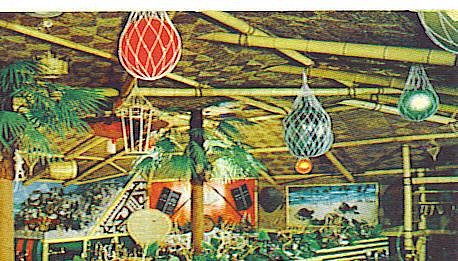
Hey Swanky, Perfect!! Thanks! The sea grass matting on the roof I have always wanted to do as it looks really classy. This card of the Mauna Loa, as I've shown before, really made up my mind to try it:
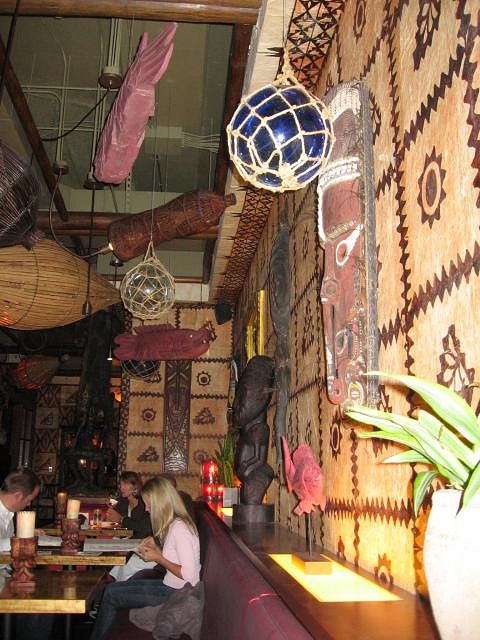
This one of the beautiful exotic Papeete Room at the Kon Tiki in Dallas screams class to me and also helped:
Oh, and this nice one of the Islands Restaurant in San Diego:
I'm not copying what these places did just using it as an influence for what I can try to create at home. TabooDan |
|
B

boutiki
Posted
posted
on
Sun, Feb 15, 2009 3:00 PM
Fantastic ceiling! I'm jealous. Nice work. |
|
T
TabooDan
Posted
posted
on
Tue, Feb 17, 2009 4:14 PM
Hey Duke, thanks alot!! I had a little bit easier ceiling to deal with then yours with all the pipes and ducts in that awesome room of yours!! TabooDan |
|
T
TabooDan
Posted
posted
on
Tue, Feb 17, 2009 5:55 PM
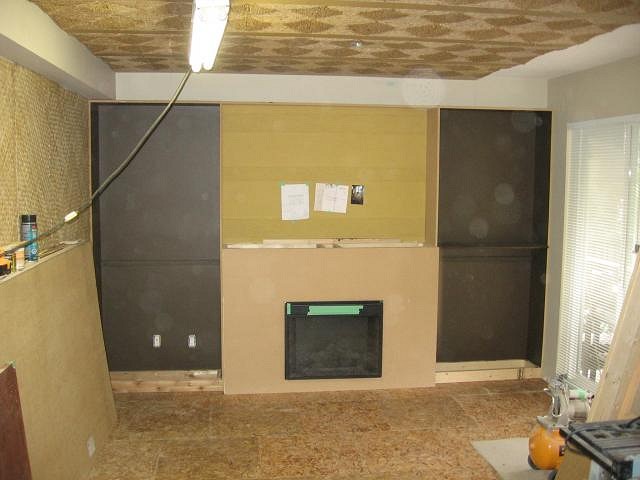
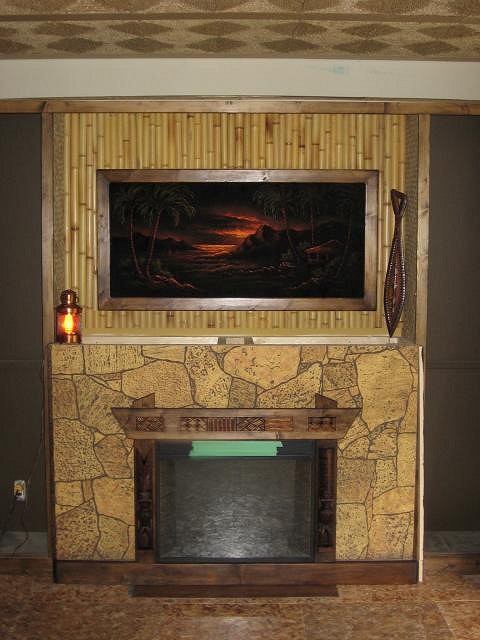
Okay, let's go back over to the fireplace I had been working on. Here is the fireplace after it was built:
This is what it was like when I just added the stone panel:
Here it is with the bamboo and vintage velvet (plus some crap in the way!):
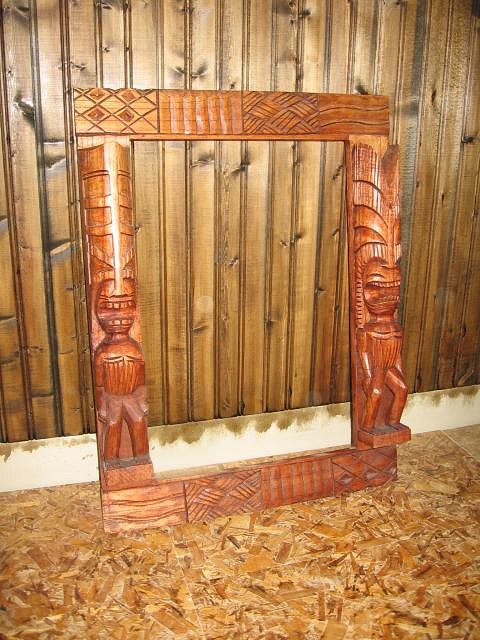
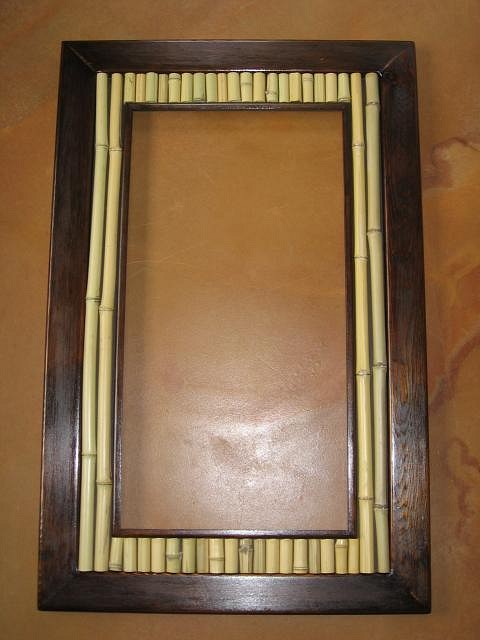
At first I was going to have Tiki carvings either side of the fireplace and then a hand carved molding all along the top, bottom and sides. Sure this would have looked great but I didn't really want to spend the time on it and have Reido spend the time on it. He will be doing carvings for other areas of the room so why don't I handle the fireplace? I am not a carver, by any means, so whatever I was going to do it would be more of using materials that I had or could get and using them in a way that was different but yet still be suitable for a fireplace. I also wanted to stay around or have a style of something that you might have seen back in the day. I decided on doing some moldings around the fire and then possibly adding bamboo or some decorative woodworking to the molding. Then I remembered I had an old frame from a mirror that was carved and I could probably put that to good use. We had imported a few of these framed mirrors from Bali and I had one left over as it had a broken mirror. Here's the frame, in the beginning, without the mirror:
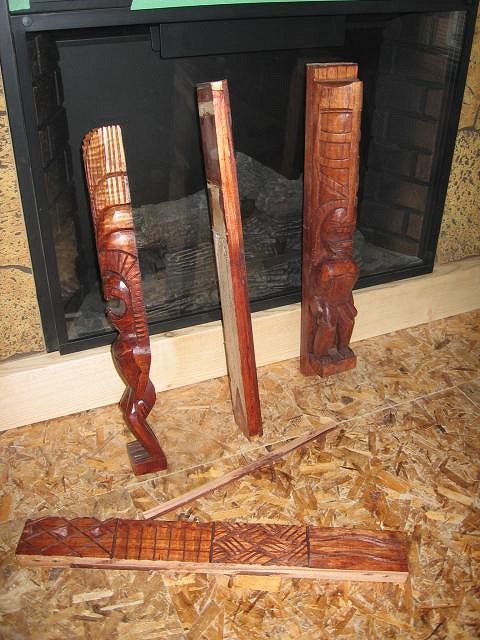
It was about 24"x20" or so. The whole frame together like this I didn't really like. It's not your traditional type of carving and something you would see a little more specifically catering to the tourist trade. I did not like the color or the frame as a whole, but I do think I can make them look better. Here it is in the four pieces, top, bottom and sides:
I pried, cut, pulled, bit, pinched and scraped the pieces apart!! They had made this to stay together forever and it was not easy!! It also sucked as I was trying not to damage anything and also make sure I could use the pieces again if I wanted. Once I had them to the stage in the photo above, I realized that they wouldn't really work for me because of the back piece (the frame) that they were mounted to. It would make it to thick for my plan and made it harder to deal with. So I decided to take them off the backing and have just the Tikis by themselves. Another pain in the butt but it in the end it worked. Here is a shot of the Tiki on the left, removed from the backing:
Now I can use it to mount to the molding I would make. Now to remove the other and hopefully not break or crack it at all. I wanted sort of a Polynesian/Oriental feel to the molding so I decided to angle the ends and have the top wood hang over the sides.
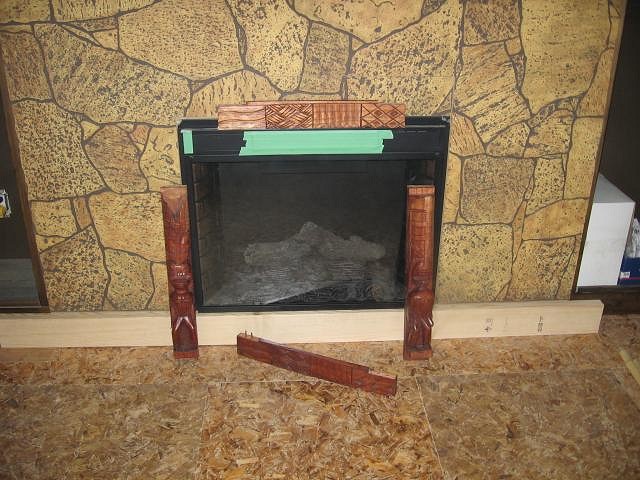
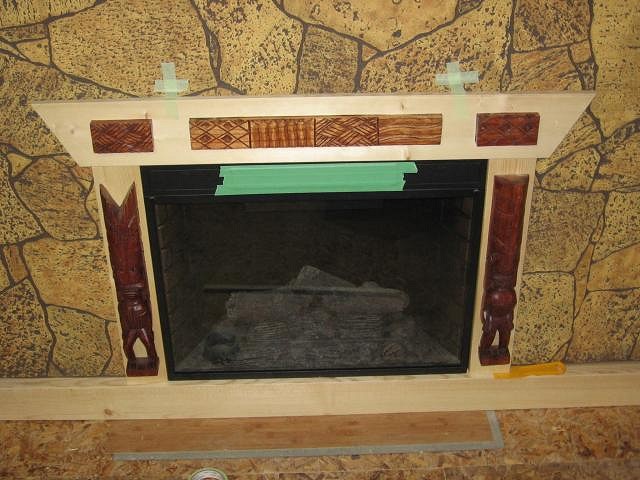
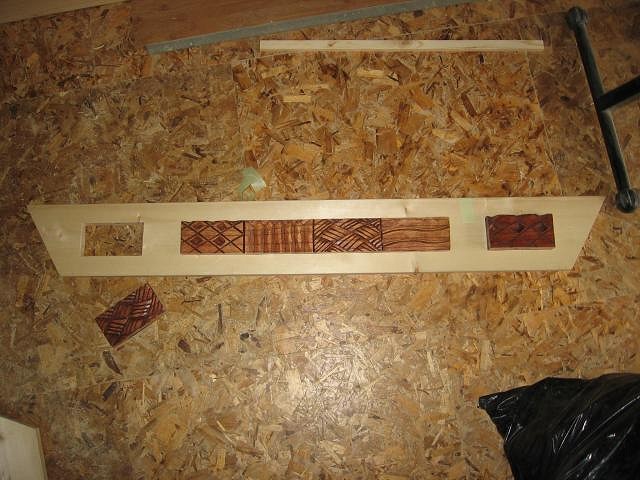
I would have two small angled pieces protruding up from the top as well which would line up with the sides. I also wanted to make use of the other carved pieces, besides the Tikis, so I figured I would mount the one section of carving to the center top and then add two others on the ends. Here is a picture of the pieces cut and taped to the base molding to see if I liked it:
After doing this, I figured it would work but thought It would be much better to have them not stick away from the wood so far. I ran into troubles here as it would have been very difficult to cut their thickness down. Too tricky to put through the thickness planer, or band saw. I was going to sand them to the thickness I wanted but that would have been messy, taken a while and I wouldn't be able to guarantee they would all be the same. So I decided to cut out my back molding and actually recess the carvings into the wood. Here is one shot of them just fitted into the holes I cut:
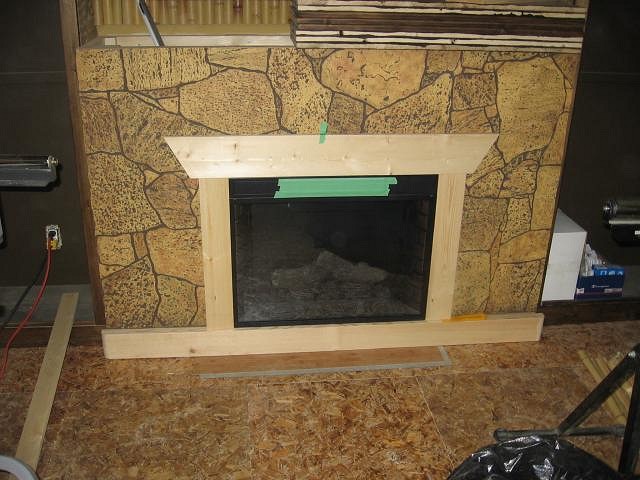
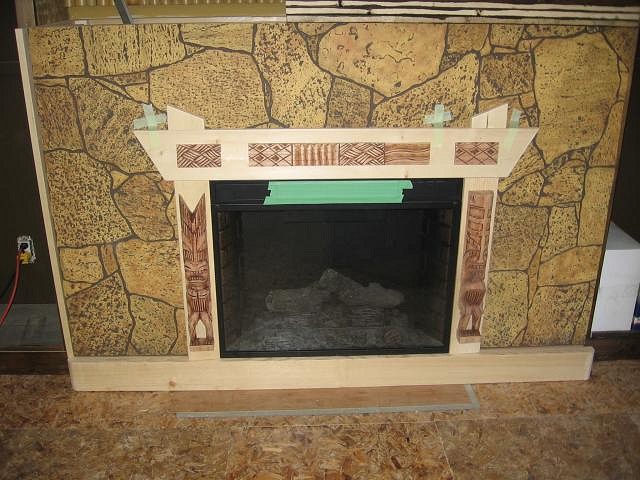
It gives them the thickness I want and this way they all stick out about a 1/4" from the molding. Here they are in place on the fireplace:
Now for the color. I sure don't like this sort of red/brown color so I gotta sand them down and they will be stained dark like the rest of my woodwork. Here is a shot of them sanded:
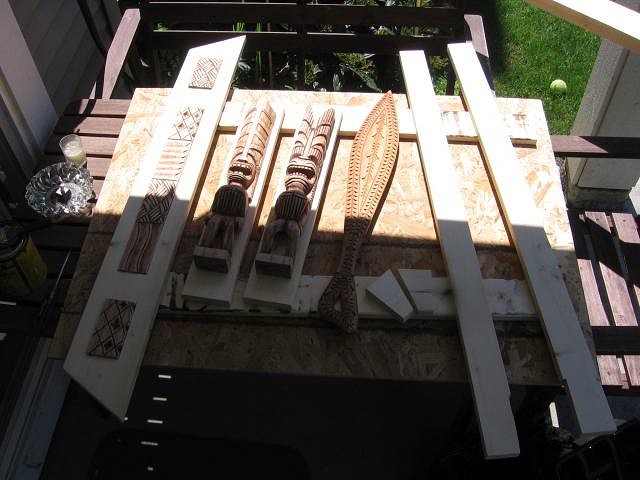
Sanding was a whole different ball game!! Really hard to sand them as they were finished quite well and I did not want to take any of the details away from the carvings. It took a few hours by hand to do all the pieces. I did use my power sanders when I could but alot of it was all hand. Here are the Tikis once they were sanded as well:
Next is shot of them all sanded and taped to where they will go on the fireplace:
Once the Tikis were mounted and the molding glued together, it was time to stain:
Here's me boy Bones checking on all the staining going on:
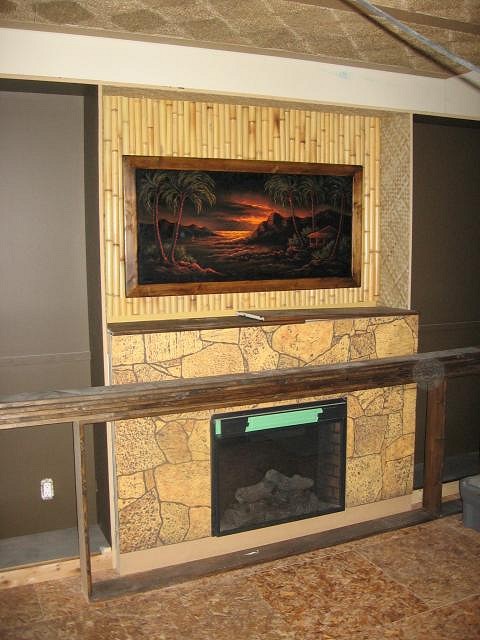
And now, after all the work, the pieces put together and around the fireplace:
I was quite happy with the outcome when I saw it all together. Once I stained the Tikis, the details really popped and they actually looked like a more vintage carving and really didn't look too bad anymore. They are not fastened yet as I will do that later. Here's one last shot of it all:
I still have the outer molding to do which will be a bit planer but they will seal the deal here. Thanks for looking and Mahalo!! [ Edited by: TabooDan 2009-02-17 18:17 ] |
|
SF

Slacks Ferret
Posted
posted
on
Tue, Feb 17, 2009 6:08 PM
Looking good. Thanks for the progress shots. |
|
S

sneakyjack
Posted
posted
on
Tue, Feb 17, 2009 6:13 PM
beauty work! - looks sweet - liking the wood stain and the faux rock stuff! niiiiccceee |
|
T
TabooDan
Posted
posted
on
Wed, Feb 25, 2009 5:55 PM
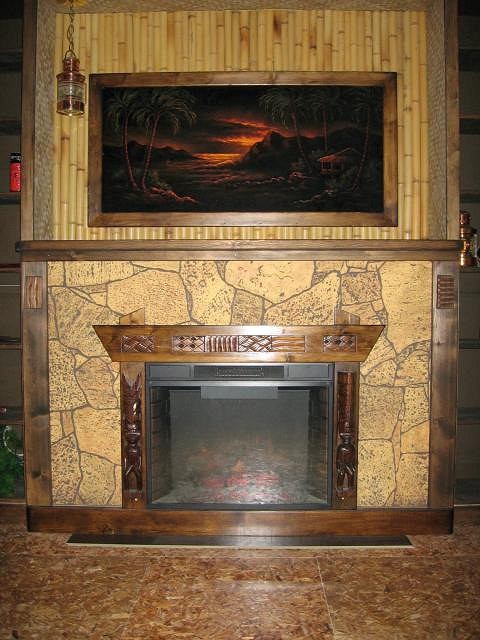
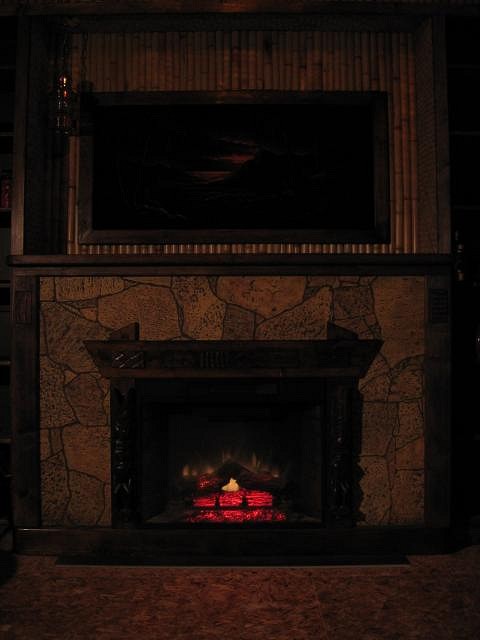
Thanks guys! Here's a couple more pictures of the fireplace which pretty much bring it up to date now. As of right now, the fireplace pieces are still not secured in place. I wanted to keep them off the fireplace until I get a little further in the room and get the varnishing done. I also would like to get the floor installed but don't want to do that until the varnishing on all the woodwork is complete. That will take some time as there's a lot of it! Here is a close up with the fireplace pieces varnished and with flash so you can see the colors and details better:
Here it is without the dreaded flash:
In the next shot, you can see that I have added the outer edge molding (left and right sides) which also has two of the decorative carvings recessed into it at the top. These pieces, unlike the carvings, are not varnished yet, which you can tell. I have also cut, sanded and stained the 1.50" thick mantel top. Beneath the mantel is another smaller strip to finish off the top edge:
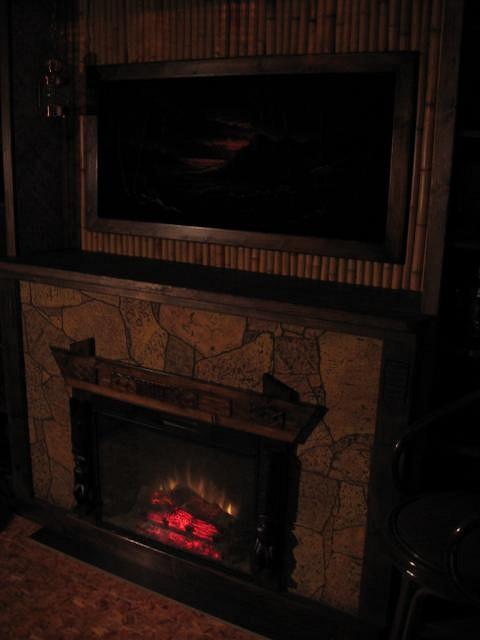
Without the flash:
Here it is a bit further back with all the pieces together:
Again, without the flash:
Here's a bit of a side shot:
A closer detail side shot:
The mantel is about 16" or so deep but it sure doesn't look like it in the photos. The front section lifts off to reveal a storage section that I can use if I have to. Not completed yet or decorated but it is slowly coming along. Still have quite a bit to do but can really see the finished outcome now! I really gotta get it done soon though so we can enjoy this space!! Mahalo, TabooDan |
|
BK

Big Kahuna
Posted
posted
on
Wed, Feb 25, 2009 6:22 PM
Very, Nice! I'd bring over a couple Mai Tais, but the ice would probably melt on the 3000 mile trip, so I'll just have to gaze longingly at the posts of your fireplace & sigh. Nice work! Mine's currently in cash flow hold. Should see some more progress in a week or 2. |
|
T
TabooDan
Posted
posted
on
Sat, Feb 28, 2009 12:20 PM
Aloha Rick! Thanks alot!! Bring those Mai Tais anytime!! Don't worry about the ice. I'll have some ready! I can just pull some off my Igloo and we are good to go!! Thanks for checking up! |
|
Z

Zeta
Posted
posted
on
Thu, Mar 19, 2009 12:30 AM
That fireplace is great! now finish the rest of the room and show us please. Tiki doesn't tolerate lazy temple building worshipers. |
|
SF
Slacks Ferret
Posted
posted
on
Sat, Apr 4, 2009 2:01 PM
Any updates? |
|
TBBMT

tiki beat by marcus thorn
Posted
posted
on
Sat, Apr 4, 2009 5:25 PM
that is perfection i love it can i come and live there |
|
TM
Tipsy McStagger
Posted
posted
on
Sun, Apr 5, 2009 8:53 AM
okay- not the kahiki fireplace but a damn good job......this turned out great!! well done!! |
|
T

TorchGuy
Posted
posted
on
Fri, Apr 17, 2009 5:16 AM
Bumping this - any updates. Absolutely wonderful work! This is a bar to really be proud of, and I was excited to see further work... |
|
K

kahalakruzer
Posted
posted
on
Fri, Apr 17, 2009 10:27 PM
Yea that place looks wonderful...Can't wait to see it finished. Great work! |
|
QK

Queen Kamehameha
Posted
posted
on
Sat, Apr 18, 2009 12:23 PM
I love the attention to detail, outstanding job! Amy |
|
T
TabooDan
Posted
posted
on
Sat, Apr 25, 2009 6:24 PM
Aloha everybody!! Thank you all for your kind words!! I still have some updating to put on here so I will get some posted in the next few days. Thanks again for all your comments! It makes me want to get in the Lounge and finish it all off!! A Big Mahalo!! TabooDan |
|
BK
Big Kahuna
Posted
posted
on
Sat, Apr 25, 2009 10:17 PM
Wait! Stop! Back-up! What old car? |
|
T
TabooDan
Posted
posted
on
Sat, Apr 25, 2009 10:53 PM
Hey BigKahuna, |
|
MPP

Mr. Pupu Pants
Posted
posted
on
Mon, Apr 27, 2009 11:46 PM
Hi Dan, any new pictures to post? I was really enjoying your thread and the beautiful construction of your Bar room. Would love to see more. Alo-o-o-o-o-o-ha! |
|
BK
Big Kahuna
Posted
posted
on
Tue, Apr 28, 2009 5:46 PM
Kool! I've got a '59 Impala mild custom. One of the guys in my car club built the orange '57 Fairlane Kustom that was on the cover of Rod & Kulture, Rolls & Pleats & Kustoms Illustrated. I sell traditional Kustom parts...skirts, dummy spots, wheel covers, etc. PM me if you need anything & get cruisin'! |
|
T
TabooDan
Posted
posted
on
Wed, Apr 29, 2009 5:14 PM
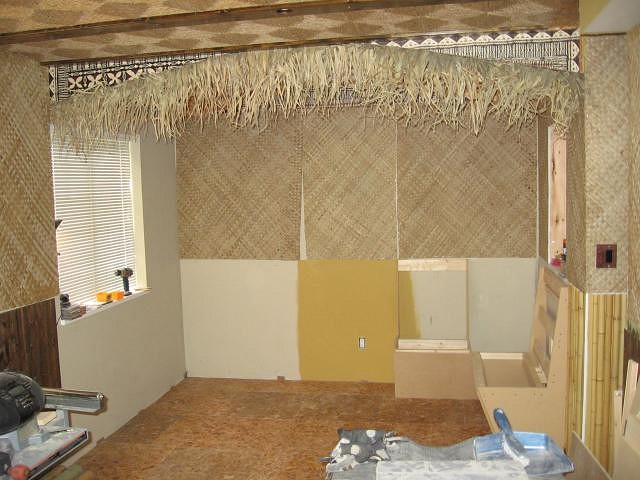
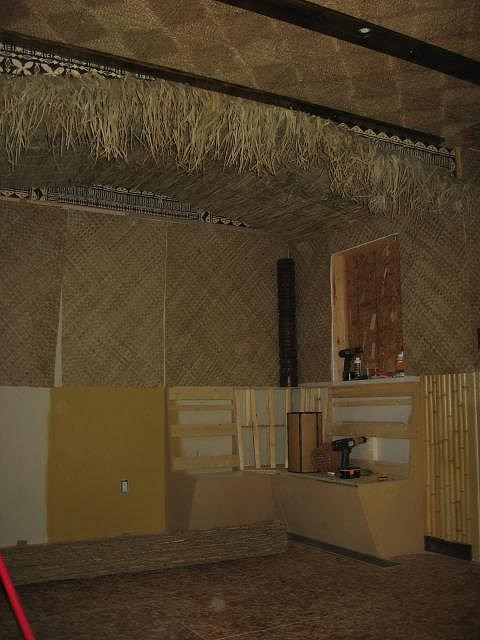
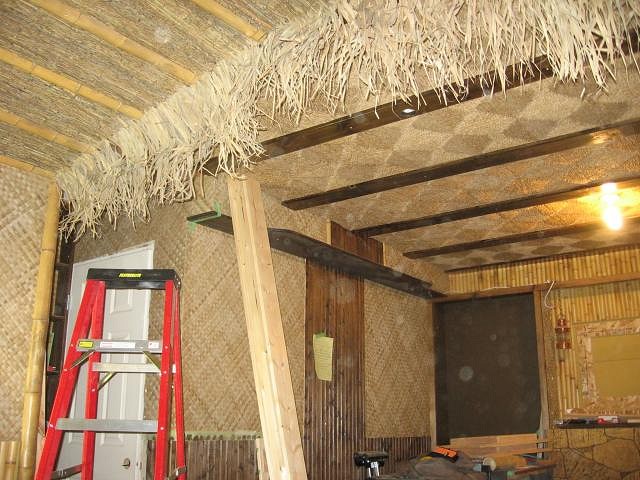
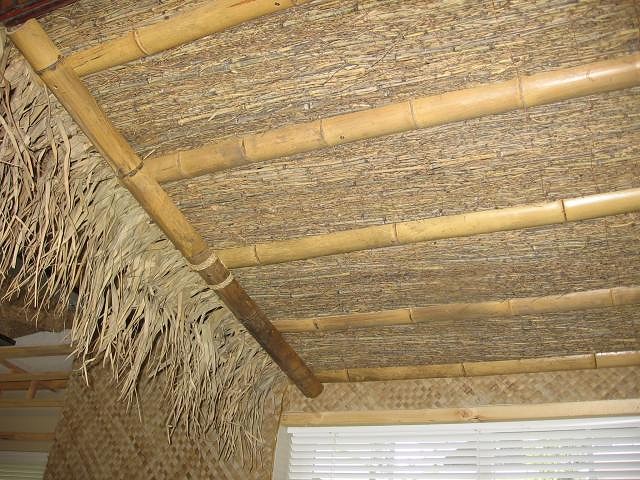
Okay, just to refresh us on the North side of the room where I built the angled ceiling and where the bar/bench area would be, here's an early one:
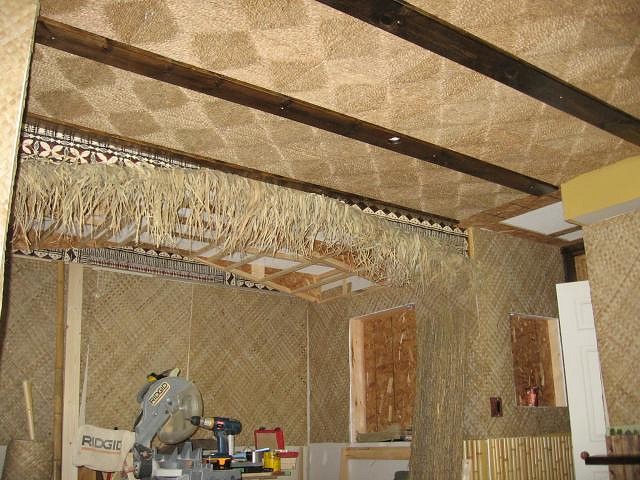
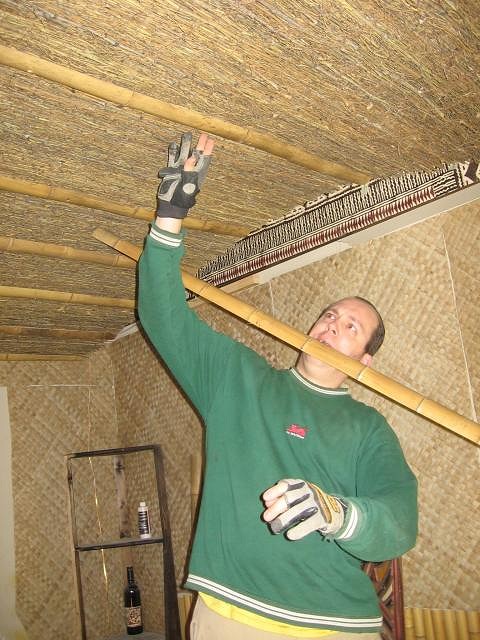
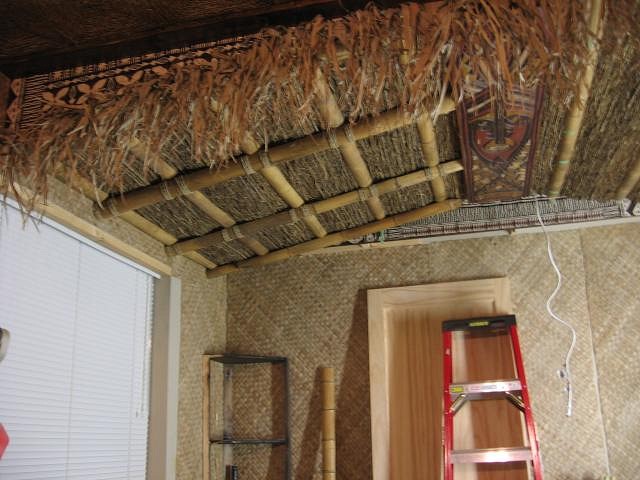
You can see the drop downs, matting up, cut outs in walls, Fijian Tapa Cloth up, and sea grass matting on ceiling. This one shows the first strip of thatching I added. This was mounted about 8" in on the ceiling side and then hangs over and down from the edge:
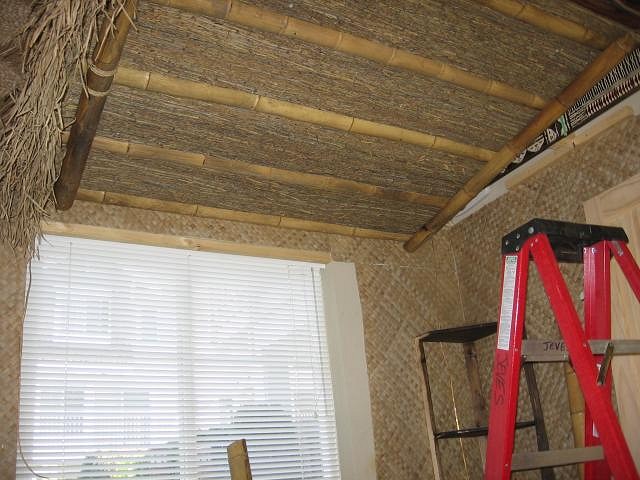
Here too, I have the dark stained beams up. To the right in this pictures, you can also see the material I will be using for the finished ceiling. At first I was going to use the same sea grass matting that was on the rest of the ceiling (as above). I had showed that style previously in the old restaurant postcards. Once I got going, I decided I wanted to use as many different materials as I could in this lounge so decided to change it up a bit. I went to our supplier and picked up some 'Heather' fencing. It is a really cool looking branch/bamboo fencing that is quite thick and is made up of lots of pieces woven together. The only problem with this (besides it being a real pain, messy and difficult to work with) is that there are small gaps between the pieces and I did not want to see the white ceiling above. I decided I would just attach regular thatching to the ceiling first and then cover it up with the Heather. It adds to the cost a little and is more work but it will really guarantee you will not see through the Heather. It will also prevent me from having to paint the ceiling which is fine with me. Overall, it will just make me feel better knowing it is there. Here's the left side with the sea grass up:
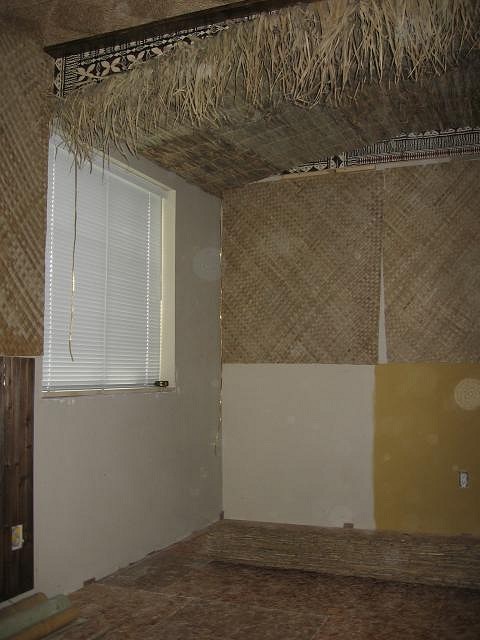
The next two photos kind of suck so I apologize ahead! Here it is from straight underneath, with the wall (with Tapa) on the left, looking straight up:
You can already see the white coming through in some spots. Once I'm done, these will be all gone and you won't see any white!! Here's one from underneath the roof looking out towards the rest of the Zombie Hideaway:
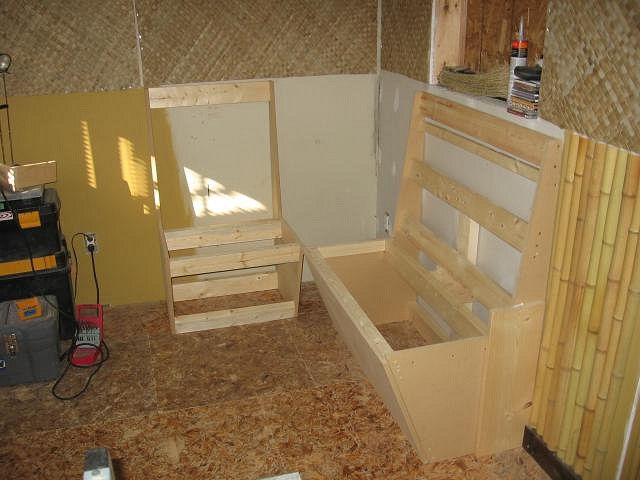
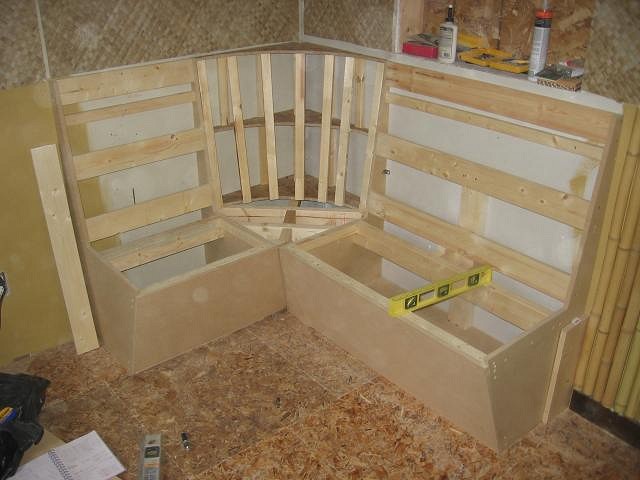
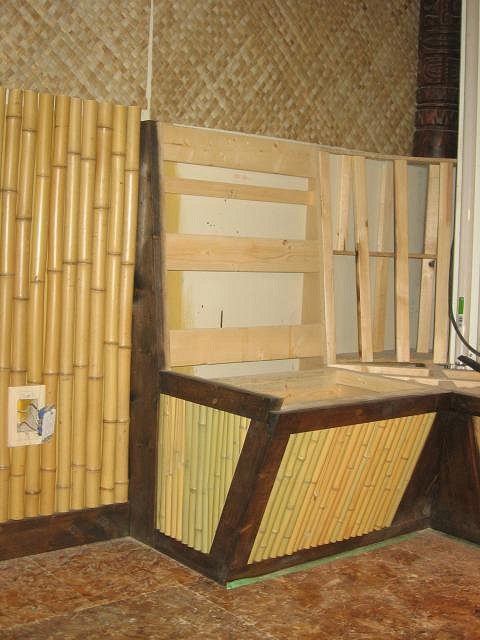
While all this is going on, I started to build the curved bench area that will be the booth area of the bar. I looked into purchasing one but they were quite expensive and the style, size and design, wasn't what I wanted so hell...if you can't get it, build it!! I started off with good old trusty 5/8" thick MDF. I cut the size and shape I wanted and then cut supports to hold it all together:
This was going to be a three part job. The two benches and then the curved corner area. I had not built this type before so knew it would be a bit challenging with design I wanted. It became a four part job after working on it!
Here is a little better shot as you can see the side and see my design a little better:
I wanted, from the seat, the front of the bench to taper in towards the floor. I also wanted the back rest to taper towards the wall from the seat. Here's one of the room so you can get an idea of the size/layout:
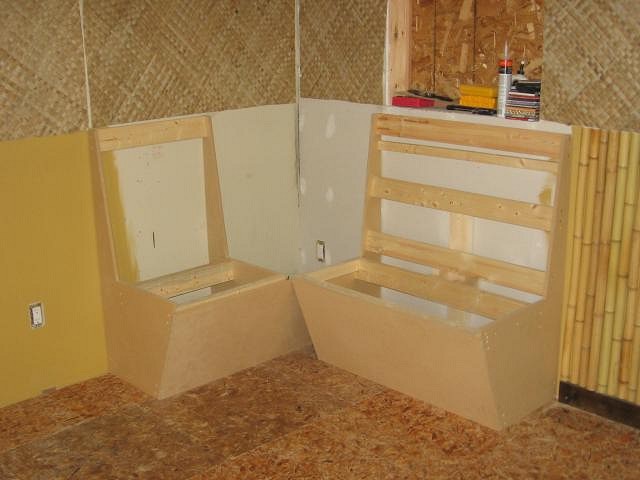
A closer view of the benches almost complete with their fronts on:
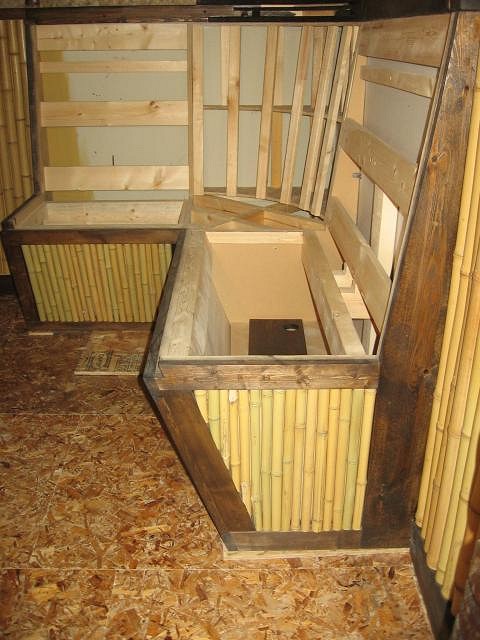
Here they are with the framing done and the lower corner area being added:
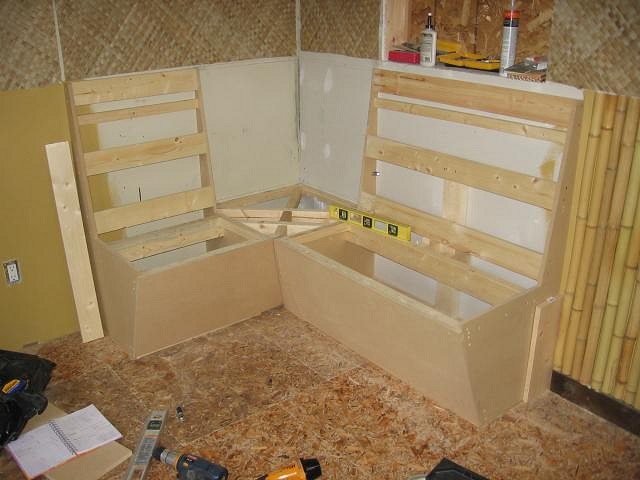
Next is with the curved upper framing done:
This was tricky as I have a 10 degree angle on the back support. Not only does the corner curve but but it has the sloped 10 degree's to it. Tricky but it worked out and will be really cool once the cushion is custom made. Next is a good side shot where you can see the idea of the design again:
I am sure I could have done this a hell of a lot more basic, like, minus the tapered pieces, just go build a straight box-like bench, but this is going to be a pretty important part of the room so it had to be done right. Alot of work but it should pay off. Here's looking from the left side:
You can see inside the benches here. I will have the surface piece, with the cushions, lift off and we'll have storage in both benches as well. This is kind of a cool shot showing the room:
In the corner, I made sure that I built the top corner section strong enough and the correct size as I have a specific Oceanic Arts Tiki Pole that will find it's home there. [ Edited by: TabooDan 2009-04-29 17:22 ] |
|
T
TabooDan
Posted
posted
on
Wed, Apr 29, 2009 6:17 PM
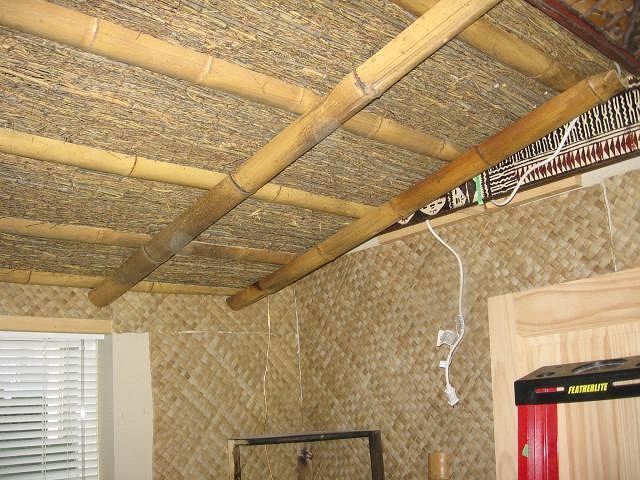
Okay, here's another view of the corner:
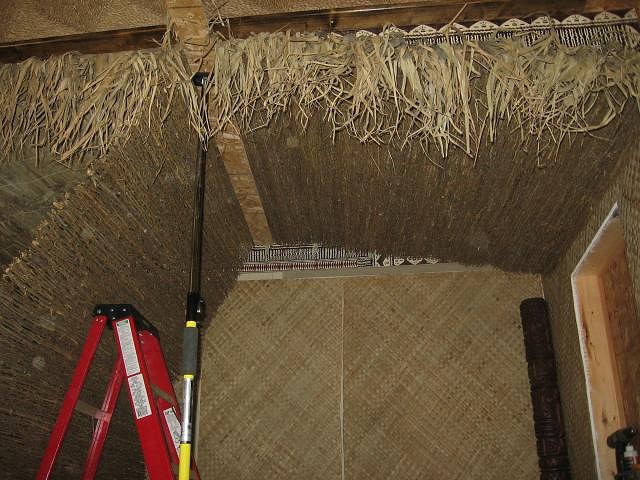
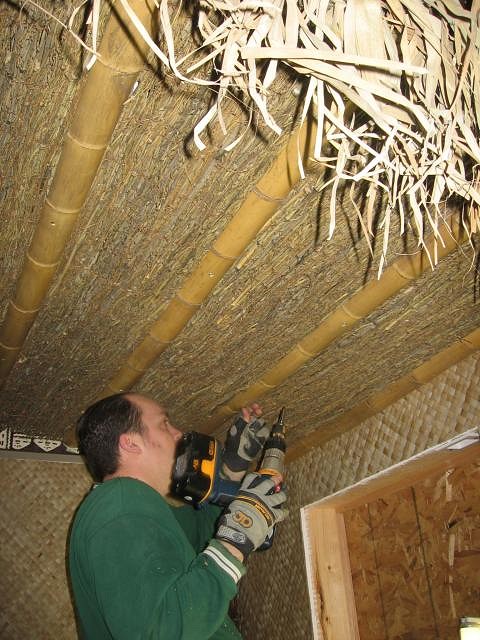
There's that Tiki again! In this shot you can see the sea grass on the roof a bit better. It looks good with just this but that Heather fencing will really make this roof pop! Here we are just starting to mount it after we had cut it to fit:
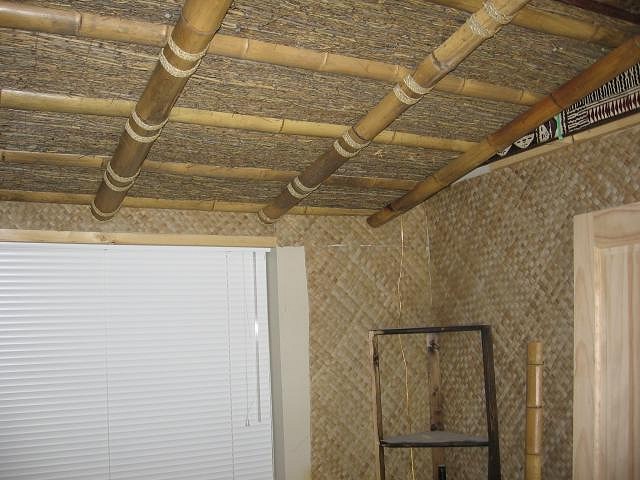
Quite awkward to do and you need at least two people to do this. Don't know how the great Bamboo Ben does it!! Working on the ceiling is one of the hardest and back breaking things!! Here is a shot of the left side:
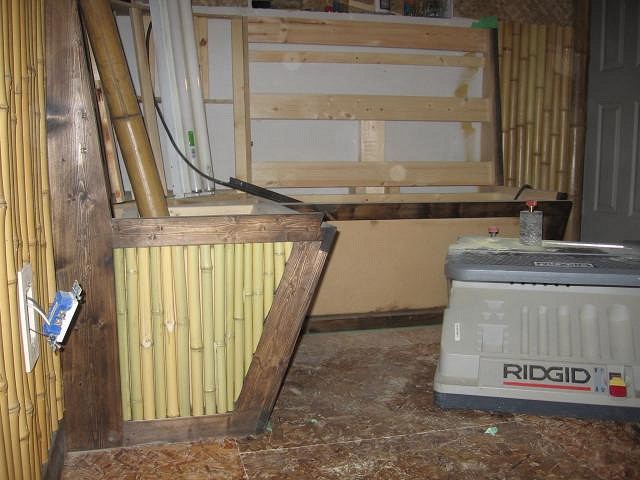
Kind of awkward to get a good shot of it but here is one of the right side once the Heather was mounted:
You also get to see the bench as well as the large bamboo that will go on either side of the doorway. I want the bamboo on the walls in this area, under the Hut, to go either side of the bench and meet up with the bar area. I wanted to carry this theme on with the bench design as well. I had done this same style on a previous bench and liked the way it came out. First I had to add wood that was going to frame the bamboo that would be mounted to the bench. I forgot to take a picture of the unfinished wood once it was all cut and mounted. Here is a shot of the wood mounted and stained:
In the plain, unfinished areas is where I will mount the bamboo. Like this:
You won't see any of the backing once completed. A few trick cuts and this end complete:
Alot of cuts but it comes out nice:
Here's the smaller left bench done along with the bamboo mounted on this side of the wall as well:
I went with a smaller bamboo just to break it up but also because I did not want to use a thick bamboo that stuck out past the finished wood. Another shot of the area not quite finished:
I will post some more shots soon. |
|
MPP
Mr. Pupu Pants
Posted
posted
on
Wed, Apr 29, 2009 7:32 PM
Beautiful, Dan. Just beautiful. |
|
T
TabooDan
Posted
posted
on
Thu, Apr 30, 2009 5:52 PM
Thanks Mr. Pupu! Here's are a couple crappy shots of the bench once all the bamboo was mounted:
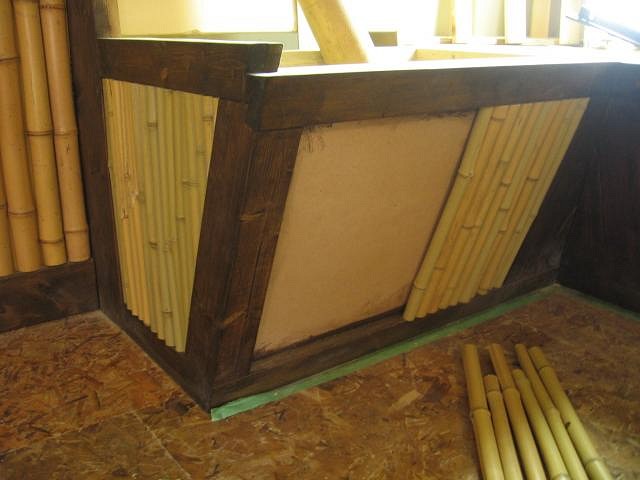
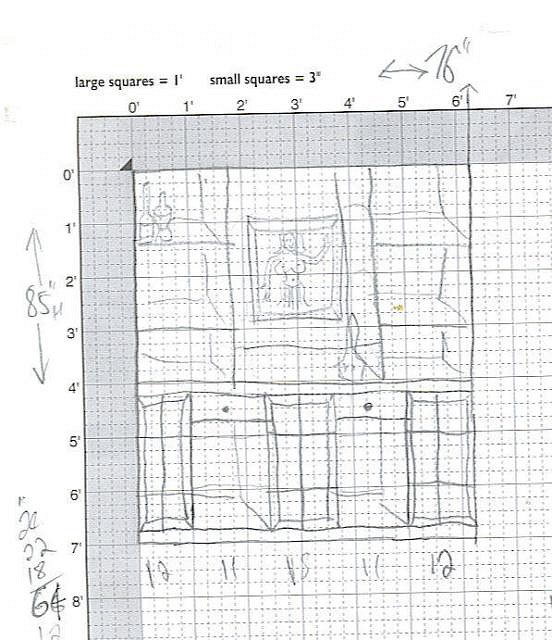
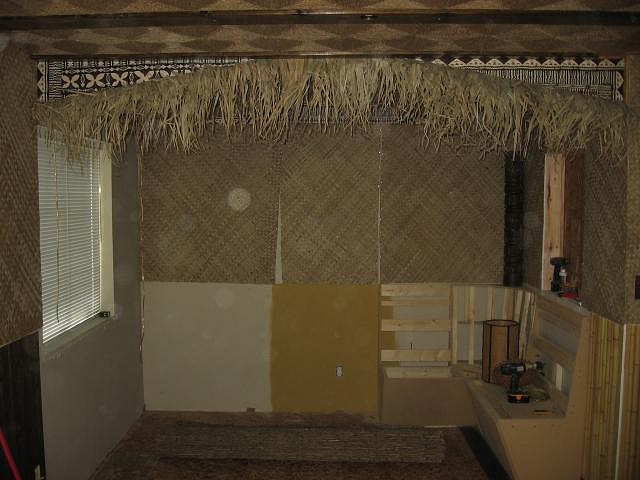
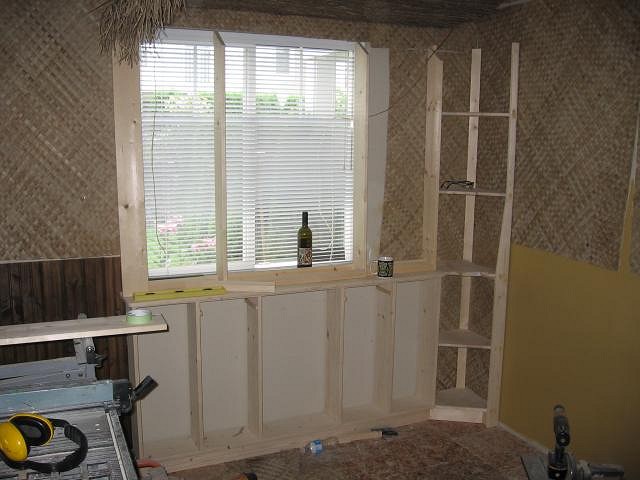
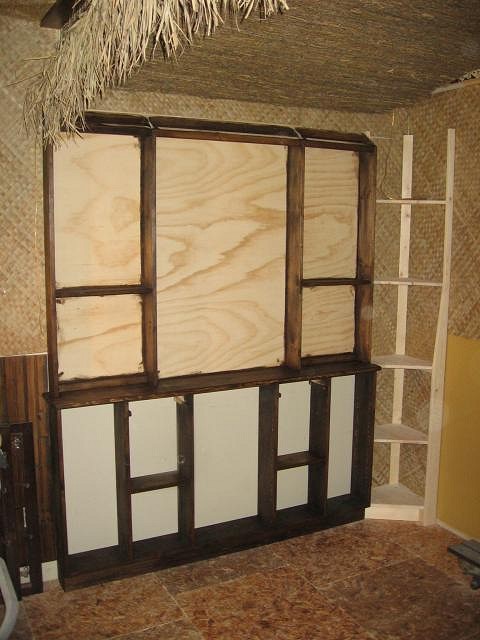
At the same time I'm doing the roof and the woodworking for the bench, I figured I would start building the shelf unit that will go behind the bar. I wanted something that had to be custom to fit my space. The room isn't too large so the depth would be important. The bar would be going in front of this unit so I had to keep that in mind. The key also is that I don't want a window in this room!! The Zombie Hideaway needs to be just that, a Hideaway! Any true Tiki Bar can't have windows. Well, dark as can be anyway. I guess some places it works, like with some of the newer Bars. But, if you have an authentic old one, no windows! Here's a rough drawing(actually, a work of art on it's own!!)of what I had planned:
I wanted to have cabinet space on the lower half with glass doors and extra storage. This was one of the few places I can actually get to have doors with some of the collection behind glass. Other areas of the room I will not be able to do it because of the over all look I want. The top half, left and right side, was being specifically made to house glassware and bottles on shelves. The center area was being built to display something specific in my collection. The goal here was to have a velvet painting in the center of the cabinet with a few small stylistic cut shelves either side. I have a rare velvet painting done by Frank Schirman. As you probably already know, he also made quite a few beautiful black coral pieces. I thought it would be interesting to have his velvet as the center piece and have a few of his coral pieces either side of it. Well, that's what I want to do anyway!! Okay, here's a shot of the area again with the window on the left wall opposite the bench area:
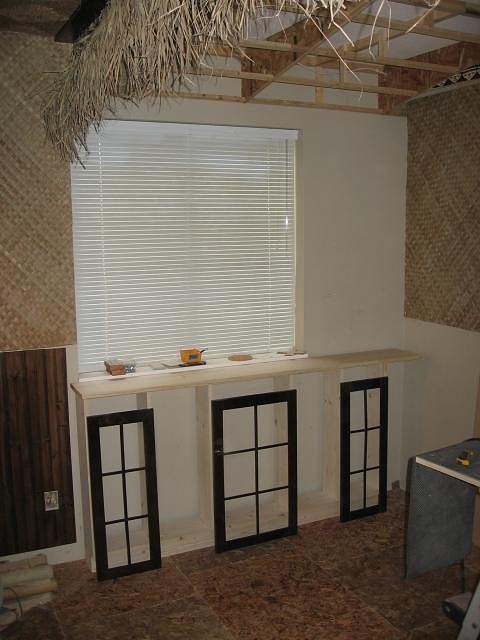
Rough lower cabinet assembled:
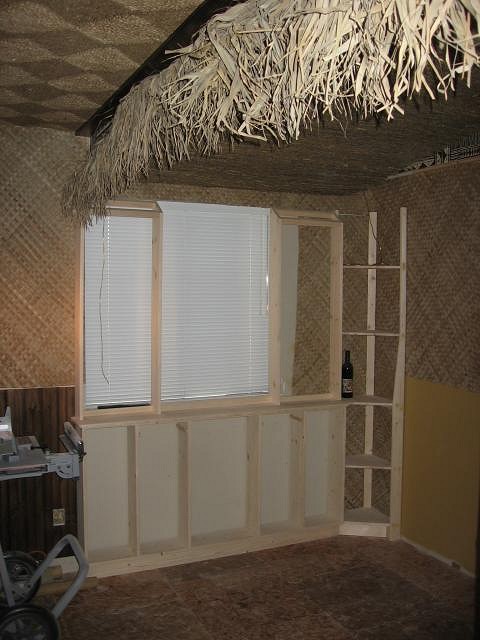
In this shot you can see the tongue and grove pieces on the wall. At first these were only about 14" or so down the wall until I changed that and mounted more so they ran right to the cabinet. Shot of the lower section built with cabinet doors checking sizing and rough counter sitting on top:
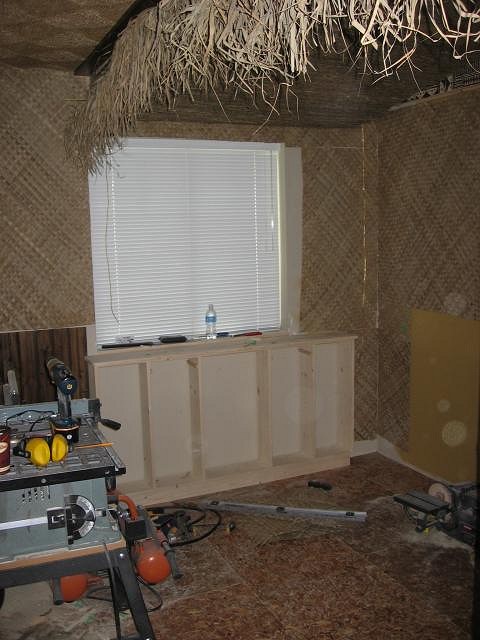
Room shot again:
Here you can see matting added to the wall area that may be seen and the counter top piece cut and shaped:
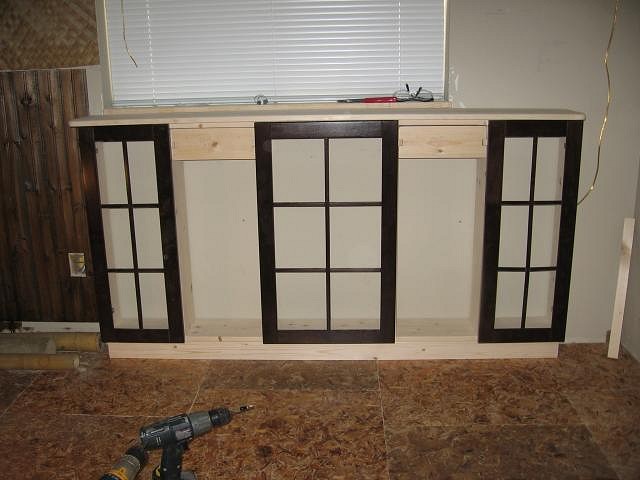
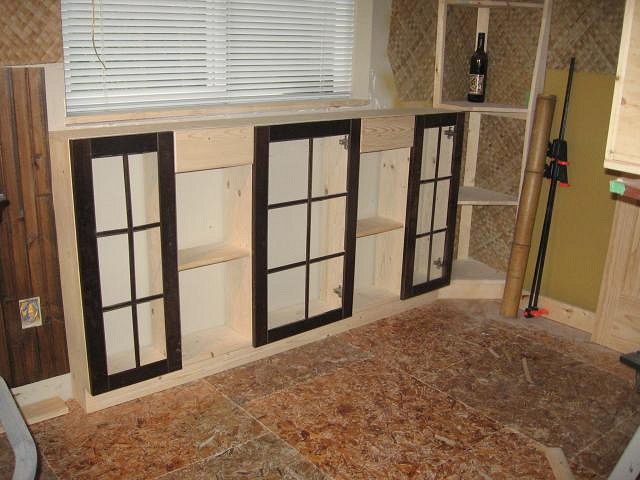
Cabinet door's mounted to base and two drawers made and in place:
Close shot to show detail of left drawer:
I like doing these kind of hidden tray's that fit into drawers! Kind of a neat detail. Perfect for stir stix, napkins or matchbooks! Top piece slides back and forth to reveal what's below. You can also do them as a tray that fits the whole drawer that way you have a hidden compartment. Gotta stash your stash somewhere!! You can also see the holes drilled for the adjustable shelving that will go inside. Here is a photo of the top section starting to get cut and sized up:
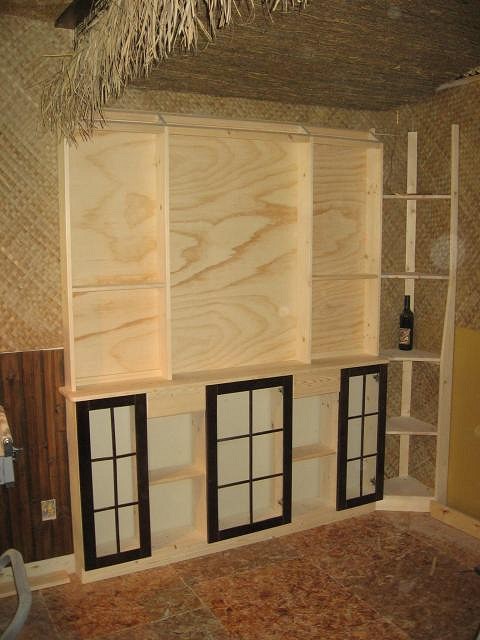
You can also see the corner shelf unit I started playing around with. Not sure how I wanted this to look but did want some small shelves for the corner possibly to display oddly shaped items like some bowls and the like. Photo of upper left and right sections assembled:
Shot's of lower section with doors, drawer faces and center mounted shelves:
Hey look......No window!!:
Once that window was covered up, the whole room took on another feel!! You can see the Heather mounted on the roof a bit better in these as well. Once the cabinet is all sanded up, nice and smooth, it's time to stain:
Still gotta add the lower section backing and the upper details. Man these posts take a while!! Gotta run now but more to come!! [ Edited by: TabooDan 2009-05-01 06:14 ] |
|
T
TabooDan
Posted
posted
on
Sun, May 3, 2009 4:06 PM
I just wanted to show this bench again after the wood and bamboo was attached:
I had done one of this style before where I did the bamboo surrounded by dark wood and we were quite happy with it. The dark wood and the lite colored bamboo really gave a cool color contrast. The bench that I had done before in my previous lounge inspired a cool custom frame that I had done for one of Heather Watts paintings. I figured I would show it here. In our old Tiki Lounge we had this bench which I had done like the one above except the bamboo went horizontal instead of vertical. Heather held the painting she had done on the bench and it looked really cool. The cedar wood stained dark gives it almost a red tinge and we knew it would work. Here's the frame all stained and ready:
And here's the frame with her piece called "Insert Coin":
This photo is of her piece hanging on the wall at the Roq La Rue Gallery in Seattle, Wa., where was on display for the Tiki Art Now III Show. It came out pretty good. The bamboo that she had painted in the background went with the bamboo on the frame. Man...I love her stuff!! Heather's colors are so vivid, great details, and there is always so much going on. Anyways, that's it for now! |
|
SG

Sam Gambino
Posted
posted
on
Sun, May 3, 2009 10:22 PM
What a place! Looking fine - Well done so far TabooDan! |
|
R

RevBambooBen
Posted
posted
on
Mon, May 4, 2009 9:47 PM
Quite awkward to do and you need at least two people to do this. Don't know how the great Bamboo Ben does it!! Working on the ceiling is one of the hardest and back breaking things!! Cheers Taboo! It hurts after a while. Then everything just goes numb. Killer room! |
|
T
TabooDan
Posted
posted
on
Tue, May 19, 2009 3:28 PM
Hey Gambino, Thanks for checking it out!! More to come so keep checking back man! Gotta get one of your pieces in here one day!! I'd like to feature a bunch of different artists in the Lounge and you are definitely on the list. Love checking out your always interesting and inspiring artwork!! Mahalo!! |
|
T
TabooDan
Posted
posted
on
Tue, May 19, 2009 3:41 PM
You're right about everything going numb! Started to do the bamboo on the roof and that wasn't much better!! Thanks for not making fun of anything I am doing yet!! The white and colored paint you see will all be gone!! Thanks also for the post RevBambooBen!! You have truly inspired more than just me with your remarkable and very talented craftsmanship!! Managed to get to Frankie's a few weeks back and the place looked great! Keep em' coming! Many Mahalos!!! |
|
QK
Queen Kamehameha
Posted
posted
on
Tue, May 19, 2009 4:08 PM
Dan, the room is looking great, keep posting! Amy |
|
IK

Iokona Ki'i
Posted
posted
on
Tue, May 19, 2009 4:58 PM
What an amazing job you're doing with this place! |
|
Z

ZuluMagoo
Posted
posted
on
Tue, May 19, 2009 6:40 PM
Excellent progress Dan! Looks fantastic. |
|
G

greentikipat
Posted
posted
on
Fri, May 22, 2009 4:57 PM
man, the Zombie Hideaway is looking so great! excellent craftsmanship Taboo. i enjoyed the shots of boards. that red per welinder was my first 'new' deck ever! man, good times. keep up the cool stuff! |
|
K
kahalakruzer
Posted
posted
on
Tue, May 26, 2009 5:56 PM
I still love how the fireplace turned out...very old-school oriental vibe. Looks like you've done a very thorough job on the craftsmanship of the bench and shelving units. I know how that can be overlooked sometimes, but you definitely took the time and it turned out awesome! Keep it up! |
|
K

Kon-Hemsby
Posted
posted
on
Wed, May 27, 2009 5:17 AM
Fantastic work. Great inspiration. |
|
T
TabooDan
Posted
posted
on
Wed, May 27, 2009 8:45 PM
Thank you all VERY MUCH for the kind words!! I appreciate you taking the time to post here and let me know what you think!! I hope that I can do at least a little to inspire some who check out my posts and maybe entertain a few while your surfing around here. You too, who post here, inspire me to do more and motivate me to pull the finger out and get this room done!! So thank you again! More photos too follow shortly!! |
|
SG
Sam Gambino
Posted
posted
on
Wed, May 27, 2009 10:09 PM
What a corner! Looking fine, Taboo! |
|
W

Wayfarer
Posted
posted
on
Fri, Jun 5, 2009 10:38 AM
I just picked this topic up today but I've been hooked since the first pics. I love what you've done so far. Do you do wood work professionally? [ Edited by: Wayfarer 2009-06-05 10:40 ] |
|
MPP
Mr. Pupu Pants
Posted
posted
on
Tue, Jun 16, 2009 10:16 AM
Hey Dan, anything new to report on your fantastic room? |
|
T
TabooDan
Posted
posted
on
Tue, Jun 16, 2009 4:26 PM
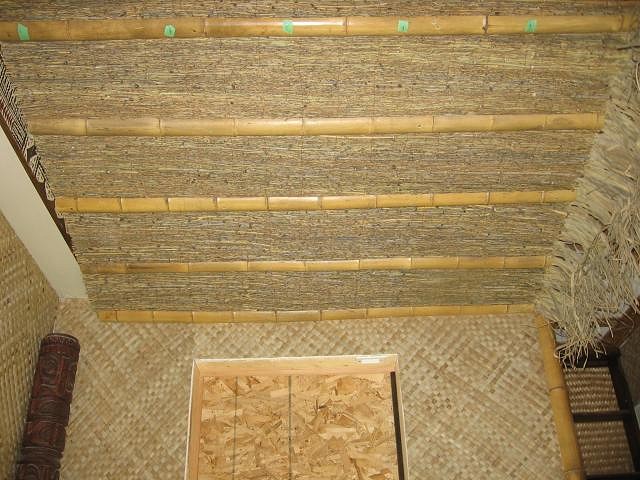
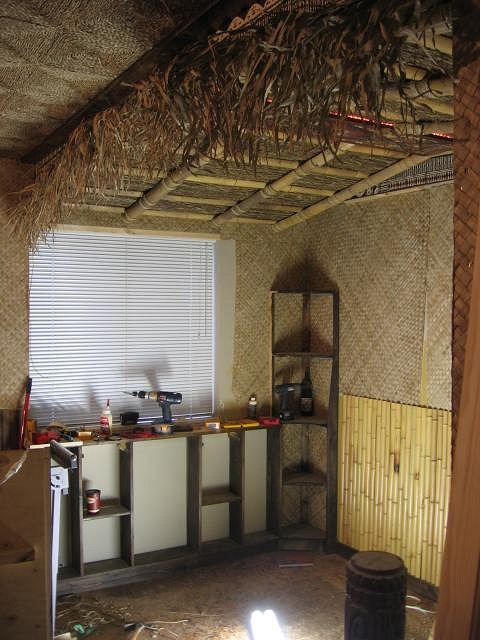
Thanks Sam!! Gonna post some more here for you to check out. Hey Wayfarer, thanks for taking a look!! Alright PuPu, I know it's time for an update so let's show some more! I left off where I was just building the cabinet that would hide the window and go behind the bar. At the same time I was doing this, I started to do the bamboo for the ceiling. Here is a shot of the room again and the roof area, or hut area, where I was going to add the bamboo:
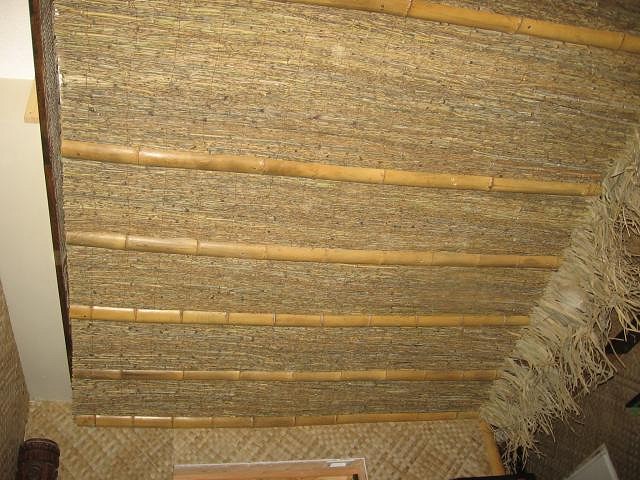
Here's a shot again of the left side with the beginning of the 2-piece cabinet and the roof. You can see the Heather now mounted over top of the Seagrass thatching on the ceiling:
My goal here is to have thick, old looking bamboo in a grid pattern where you have the lower pieces coming straight from the wall and up into the center of the roof. When coming from the wall and up, they look like they are coming out of the wall and also highlight the pitch or angle of the roof. With the ceiling bamboo pattern, along with the materials I was using, I wanted to mimic a ceiling from an old postcard I posted earlier but I will show again here. This is from the old Mauna Loa Lounge that was once in Portage La Prairie, Manitoba:
This type of design was used in several different Restaurants. Here's another type of style:
This one is from the Trader Vic's that was once in the Savoy Hilton in New York. Here is a shot of the first couple pieces of bamboo going up into position:
I got a bunch of old Bamboo that had been sitting in a nursery for a while that we dealt with. Not as good a score as Duke found with all that bamboo they managed to get from an old basement bar for his Lounge, but still pretty good. These pieces were 3-4.5" in diameter and were about 10' long. I only paid $7 each for them because they were "old and ugly"!! That was about $15-$18 cheaper for each one than what my supplier could do for the same size!! Plus, those would have been new and bright colored and I would have to spend time aging them. These ones, I wiped clean, and then mounted! They look like they came out of Trader Vic's themselves!! Because I didn't want them to come down from the ceiling too much, I split these and then mounted them. I was still mounting another bigger piece underneath these so again I didn't want them to hang down too much. If I had left them whole these would have come down about 7" or so once done! I managed to split them into three's so they worked good, stayed strong and I didn't as much. Here is the left side with all the first cross pieces up:
You can see in this shot the flat center part in the middle of the ceiling. The piece on the right is the beginning of the right side. That flat part in the center of the ceiling was making my head hurt! At about this time I got a phone call. Trader Vic's Bellevue.....was shutting down. They were having an auction. After I stopped crying, a week later, I took a trip down to Seattle to try and get me self some Trader Vic goodies!! Anyways..... Here's one where you gotta use what you can when your working on the ceiling!!:
The right side going up:
I was screwing through the bamboo (Pre-drill first!) right into my 1x2 frame underneath. This was a bit challenging as I could no longer see where my supports were so I had to measure and plan it out. Next time I would cover the frame work with plywood if I could. The screw holes will be covered up by the next layer of bamboo. Looking at the right side all mounted:
This is a good shot of where you can see the flat part in the center. Looking out from under the Hut towards the rest of the room:
This is looking up at the roof, standing just out from under it:
It was starting to take shape now but still lots to do. It was cool to see how the bamboo really gave a different look to the whole room. This was just the first little bit as well! |
|
T
TabooDan
Posted
posted
on
Tue, Jun 16, 2009 5:47 PM
Okay, here's the left side with the first addition of the main bamboo:
With the two outside pieces mounted:
You can see some of the seagrass cord that I was playing around with and would be eventually wrapping all the connections with. The next few pieces going up:
Once I started tying with seagrass cord:
At first I wasn't going to split this section of bamboo but decided I should because of the distance down from the ceiling it would hang. All four of my bigger pieces mounted and tied:
When completed, these will all have "X's" tied over the existing cord I tied. Bamboo Ben must drink alot of beer to get through all his ceiling work! A real pain in the back but what a awesome look when it's all done!! This is a baby compared to the great work that he does! I got through it with a little too much coffee! Not a pretty picture but I'll show it anyway:
As long as I got my boy Bones helping me out, I'm good! Here he is working the chop saw and wearing his ear protection:
Here's the right side of the Hut looking at the wall with the bench on it:
Here it is with the installed bamboo:
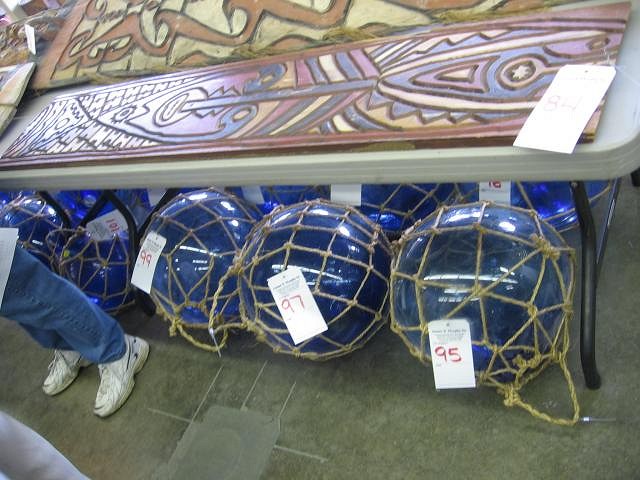
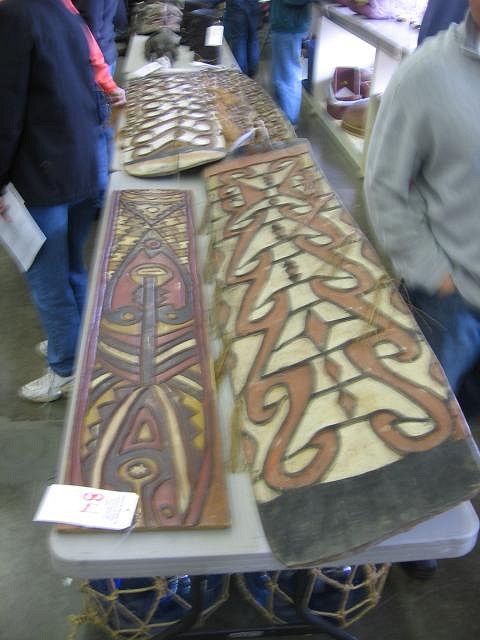
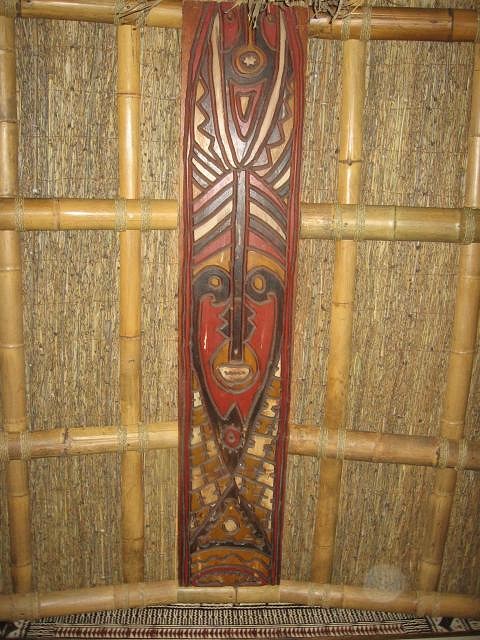
When I was in Seattle for the Trader Vic's auction, I saw this cool carved wall panel there on a table:
I was lucky enough to win the auction for this one! Pretty stoked!!
And here it is in a picture I had taken a year before at Trader Vic's with it hanging on the wall in the background:
It's kind of cool to get a piece like this from a great Tiki Restaurant. Hopefully I can display it properly and do it proud!! Well, that's where my problem with the center of the hut roof comes into play. Because I had pretty much divided all my walls in half (Top/Bottom) with either bamboo, matting or wood, I do not really have any where to hang a large piece like this. This panel is about 5' in length so it's a bit tricky to deal with. I decided to take it a bit further and drop it down a little to meet with the specifically cut bamboo and also so I could put some lighting behind it. I wanted to give the panel a look of it floating there. There won't be any light on the face of the panel just indirect behind it. Here's a shot of figuring it out and cutting the bamboo specifically to meet up with it tight:
Looking at left side, once mounted:
Here it is right from underneath:
Looking from the doorway:
Here you can just make out some of the light coming from above the carving. Much better at nighttime!
It's kind of hard to get the whole roof pictured and show the details but I am hoping in the final pictures to get some good shots. There is just so much stuff in there and tight angles to get some revealing shots. Thanks for looking and for all your responses so far!! |
|
SF
Slacks Ferret
Posted
posted
on
Tue, Jun 16, 2009 8:00 PM
Looking great! |