Tiki Central / Home Tiki Bars
Ki'o wai Lounge (bar construction page 3)
Pages: 1 2 3 4 5 6 7 8 338 replies
|
J

jimsflies
Posted
posted
on
Tue, Jul 9, 2013 7:06 PM
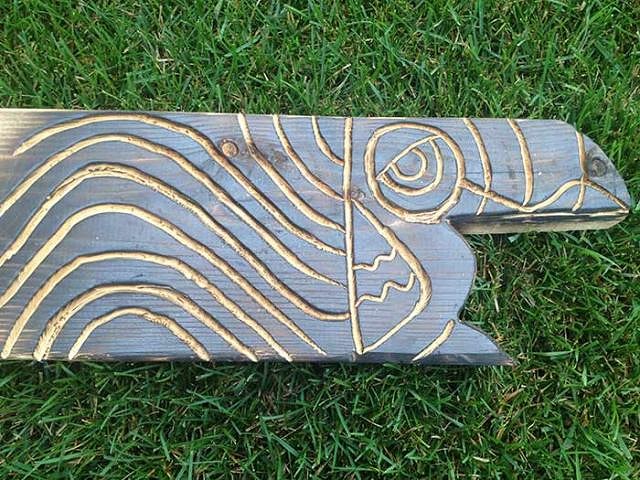
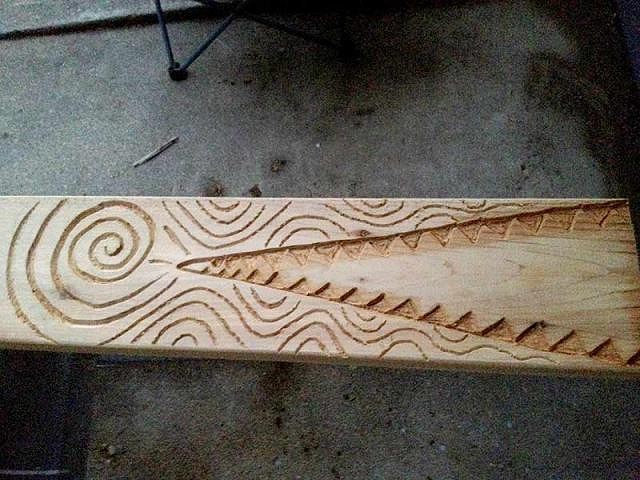
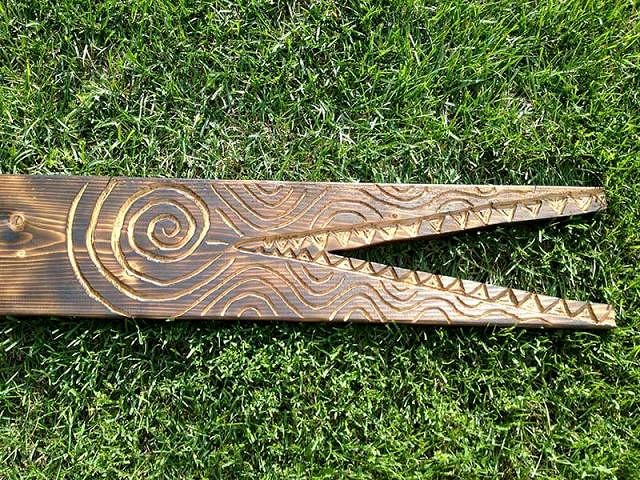
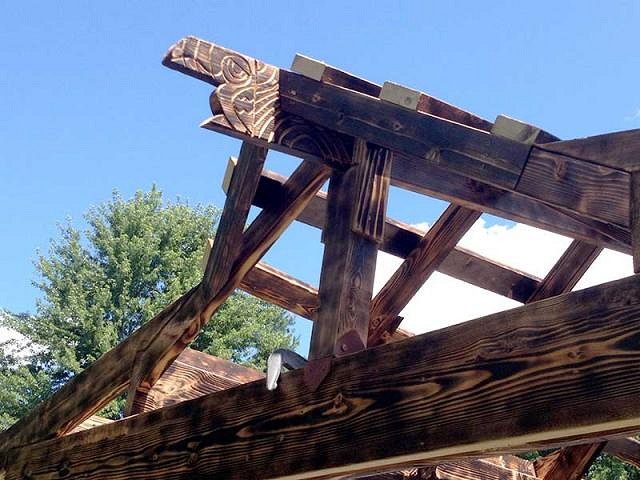
Thanks for weighing in. Yeah, I think I am going to try for the angled ridge. So far my structure is pretty true to the last sketch I posted. The past couple evenings I have been working on carving the exposed ends of the ridge beam. I thought it would look kind of cool and fun to make the ends look like "native" animals. This is my first attempt at carving with a router (or otherwise)....its a far cry from the skills of others here but fortunately my lack of skill works to make it look more primitive. The far end ridge has a bird: The near end is a croc (not completed yet, I ran out of daylight again before I could cut out his mouth and hit it with a torch). |
|
J
jimsflies
Posted
posted
on
Wed, Jul 10, 2013 6:03 AM
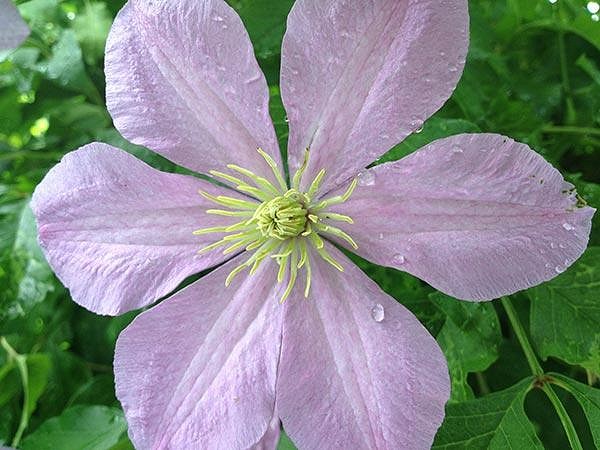
Took a few shots of the flora and fauna around the Ki'o Wai Lounge this morning after last night's rain. These were taken with my iphone.
I also ordered 4 banana trees yesterday. It's later in the season than I intended to start them, maybe I will try to leave them in pots for this season and see how they do. [ Edited by: jimsflies 2013-07-10 06:04 ] |
|
BB

Bruddah Bear
Posted
posted
on
Wed, Jul 10, 2013 2:56 PM
Jim, I've been meaning to ask if you were going to do something about the starkness of that brilliantly (by contrast) white fence in the background? Maybe paint/stain it some shade of brown or cover it with reed fencing so that it helps to bring the space together? Nice job on the build so far, I really like the added details of the ridge pole end figures. Keep it up. |
|
J
jimsflies
Posted
posted
on
Wed, Jul 10, 2013 6:52 PM
The original plan for the fence was to paint a mural (see page 1 of this thread). My wahine however, doesn't think it will last that long in the Michigan elements before looking bad. She's probably right..I've been watching another mural on a commercial building in town and have come to realize that they have the painter come back every year to touch it up. I hate maintenance and am trying to avoid things that won't last. I haven't focused on the white fence as much since starting the bar. But will need to revisit it after the bar structure is complete. The fence that forms the back wall of the new bar/hut will have lauhala matting and other backbar elements covering it up. Here is the completed crocodile for the top end of the ridge beam: I hung the ridge beam temporarily this evening. But need to lower it before permanently setting it tomorrow. |
|
T

TikiRetardo
Posted
posted
on
Wed, Jul 10, 2013 9:26 PM
That looks great |
|
B

bigbrotiki
Posted
posted
on
Wed, Jul 10, 2013 11:32 PM
...and that's a great TC name, T.R. ! :lol: Wondeful flora & fauna pics, Jim. |
|
J
jimsflies
Posted
posted
on
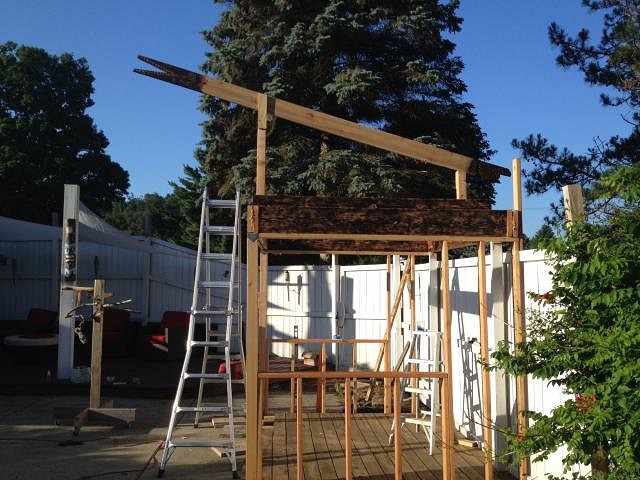
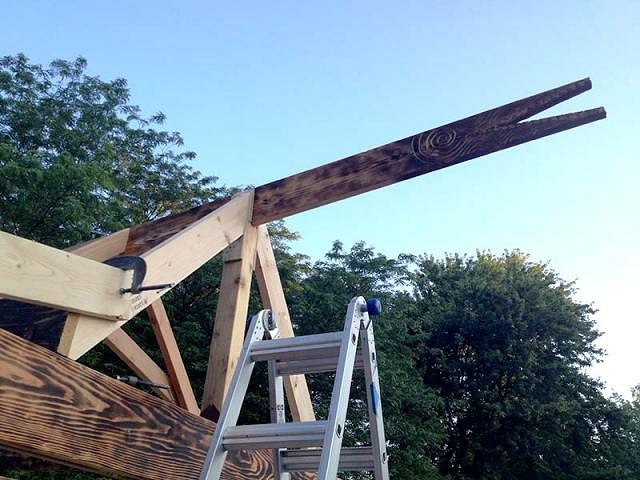
Thu, Jul 11, 2013 6:15 AM
Thanks guys! Here is the temporary ridge beam setting. I wanted to get it up and see how the angle and height would look. In this photo it is at a 15-degree angle. I think I will flatten angle to 10-degrees and lower it by a foot.
|
|
T
TikiRetardo
Posted
posted
on
Thu, Jul 11, 2013 7:24 AM
That looks great ....cant wait to see your progress |
|
BB

Bongo Bungalow
Posted
posted
on
Sun, Jul 14, 2013 11:20 AM
Jim, that's gonna be one popular bar you're puttin' together there... prepare for large crowds! |
|
J
jimsflies
Posted
posted
on
Sun, Jul 14, 2013 12:58 PM
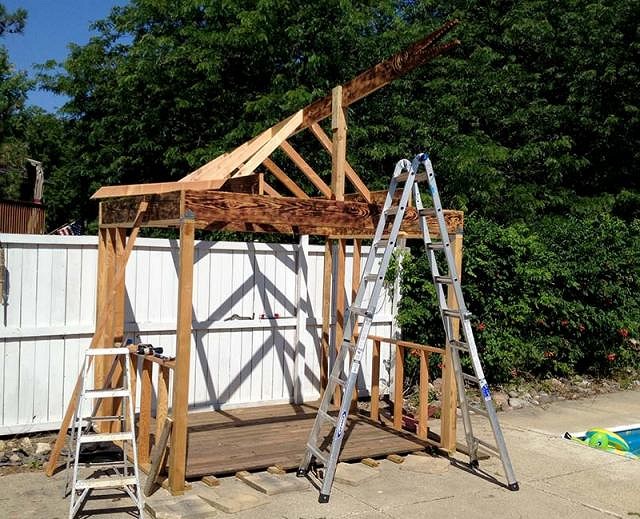
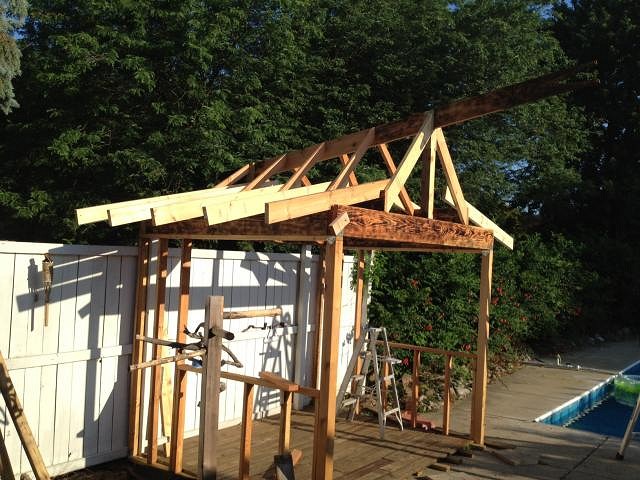
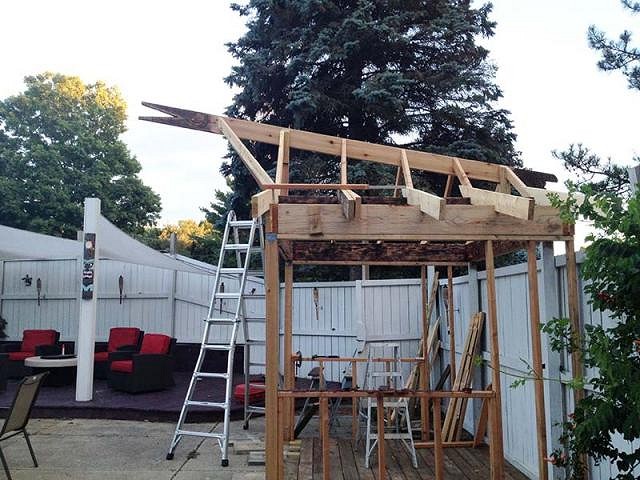
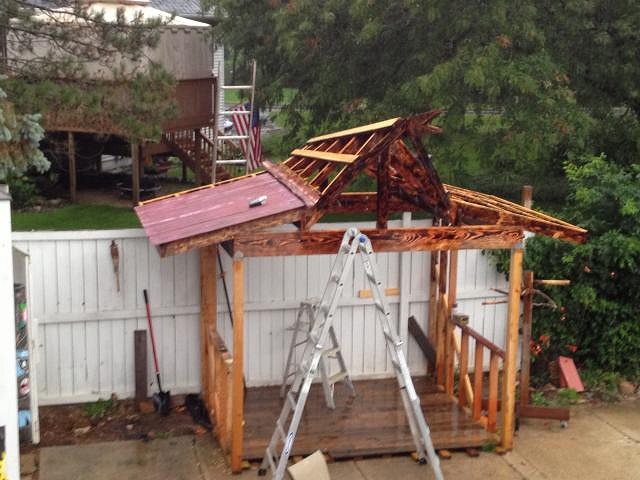
Hopefully it will get some good use! I'm taking a break for a few minutes here from working on framing the roof...its hotter than Hades outside today. I'm embarrassed to admit how much time I have into hanging these rafters. That sloped ridge beam kicked my butt yesterday. I finally have had a little more luck with the angles thanks to a level app I downloaded on my iphone. Using the app, I can position my long (light weight compared to a board) level in the same place a rafter needs to be and then hold the phone next to it and get the angle. Who would have thought a phone could help build a tiki bar! Here is a progress photo:
I also received my banana trees in the mail yesterday. I need to review what others have posted about what has worked with over-wintering them in cold climates. I decided for now to just put all of them in a big 20" pot. My current thought is to bring them in for the winter since I doubt they will get too big with the late start this year growing them.
|
|
J
jimsflies
Posted
posted
on
Mon, Jul 15, 2013 4:40 AM
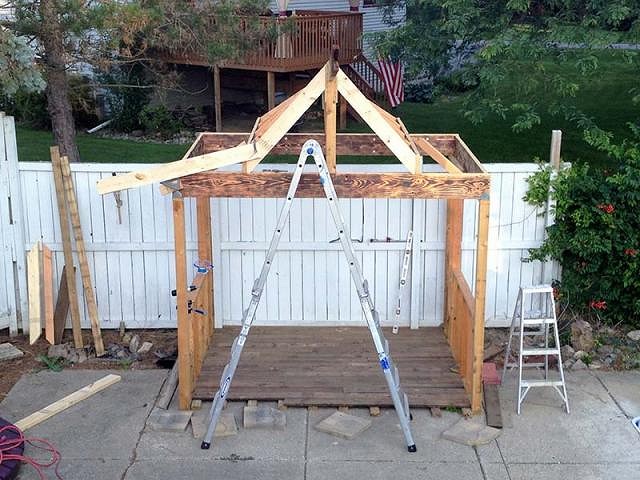
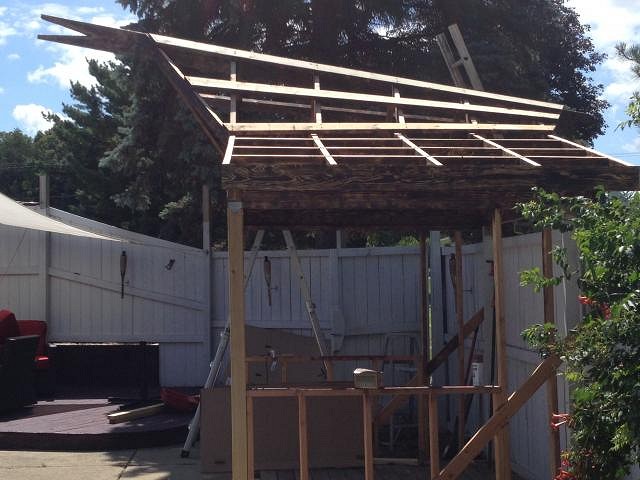
Work on the roof rafters continues... trying to figure out the overhang and slopes on the lower rafters. As it is here, there is a 2-foot overhang which I think would put one just under the roof if sitting on the side of the bar. I'm not sure if I like the profile or not relative to the steeper part of the roof. Any thoughts?
A few more photos of progress:
|
|
Q

Q-tiki
Posted
posted
on
Mon, Jul 15, 2013 7:45 AM
It's looking really good! I love what you've done with the bird and croc on the beam. Very interesting and original. Are you going to hang a float from the croc's mouth? Keep up the good work and mahalo for posting. Cheers and aloha! |
|
J
jimsflies
Posted
posted
on
Tue, Jul 16, 2013 1:58 PM
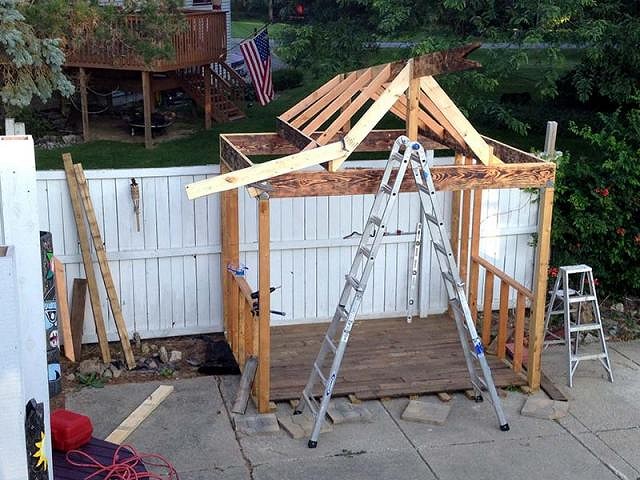
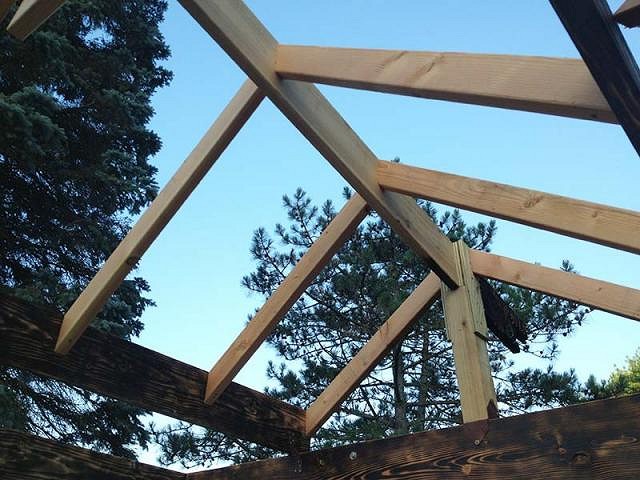
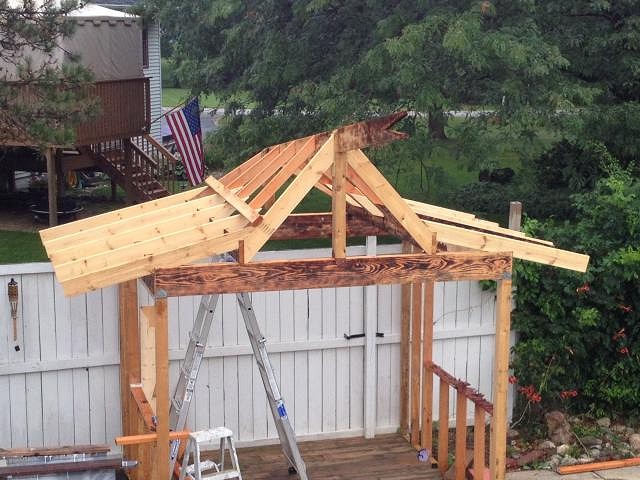
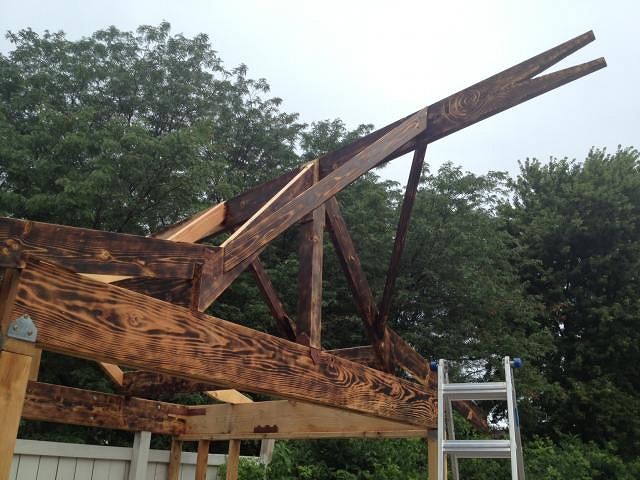
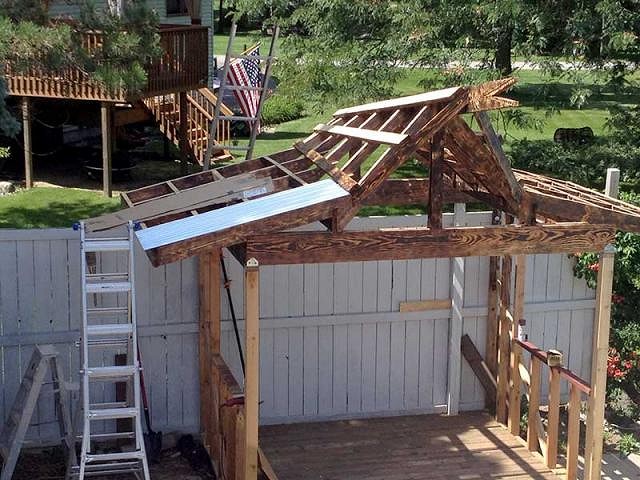
Now that I am into this sloped ridge, I am really skeptical how it is going to work out when I put the corrugated metal roof on. Not to mention how difficult double notched rafters are to match up to the changing angles. If you look at this head on photo, you can see how the angles change on the rafters. I'm not sure how the corrugated metal will be able to stay straight and look good as there is a "bend" effect to the variable angled rafters. Also, will the ridges and valleys match up correctly with the lower section of the roof? Anyone with thoughts on this...wondering if I should redo the ridge now or keep plugging along with my fingers crossed?
|
|
J
jimsflies
Posted
posted
on
Thu, Jul 18, 2013 6:04 AM
I'll bore you guys with some more updates...at some point, some one as crazy as me might want to build a weird roof like this and maybe these updates will help. :wink:
With any luck by this weekend, I can move on to construction of the actual bar while I wait for the roofing to come in. Who would have thought that corrugated metal roofing like you see at every run down farm in the country is a special order! |
|
T
TikiRetardo
Posted
posted
on
Thu, Jul 18, 2013 10:26 PM
It looks amazing .............I wanted to do something like that but it is way beyond my meager woodworking skills .........Cant wait to see the finished product |
|
THI

Thurston Howell IV
Posted
posted
on
Fri, Jul 19, 2013 4:52 PM
Really loving your space and the detail. The Mark Ryden image on the fence is great - one of my favorite tiki theme paintings ever. I've included some pics of a pump house I built to hide our pool pump and to make it look a bit more tikified. The photos are taken 2 years apart. Might give you some ideas.
|
|
V

VampiressRN
Posted
posted
on
Fri, Jul 19, 2013 11:58 PM
That is some great tropical fauna ya got going on there!!! Looks fabulous. |
|
Q
Q-tiki
Posted
posted
on
Sun, Jul 21, 2013 1:48 PM
It's really looking great jimsflies. I look forward to seeing how you do this. Great job! |
|
J
jimsflies
Posted
posted
on
Mon, Jul 22, 2013 6:31 AM
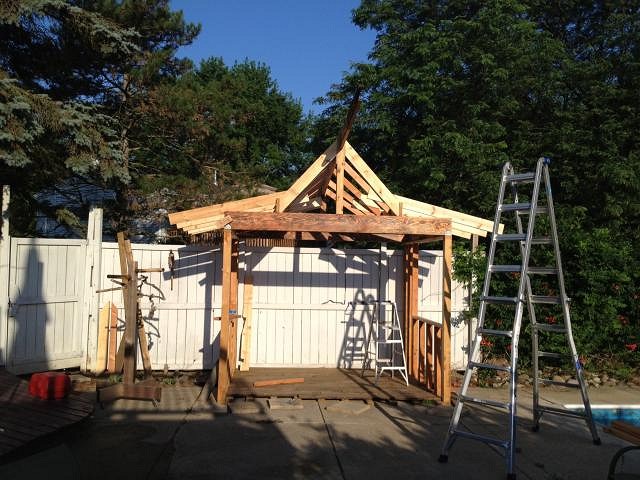
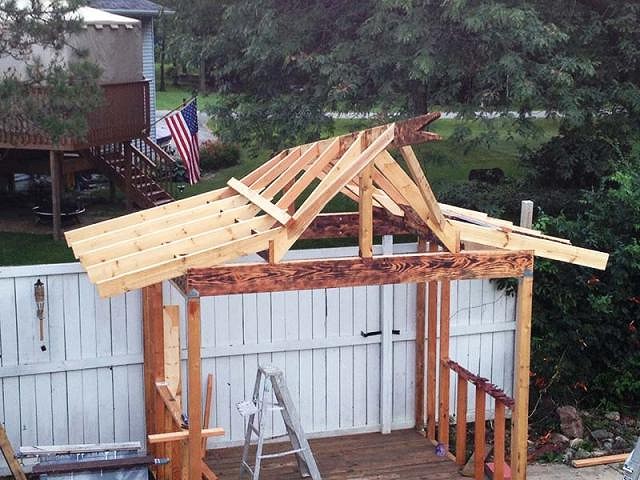
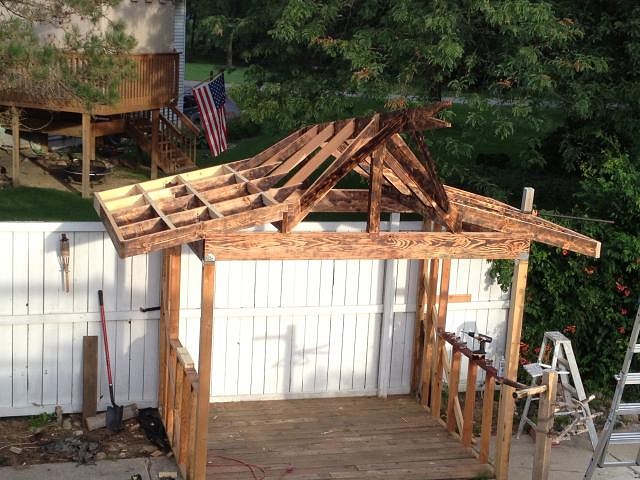
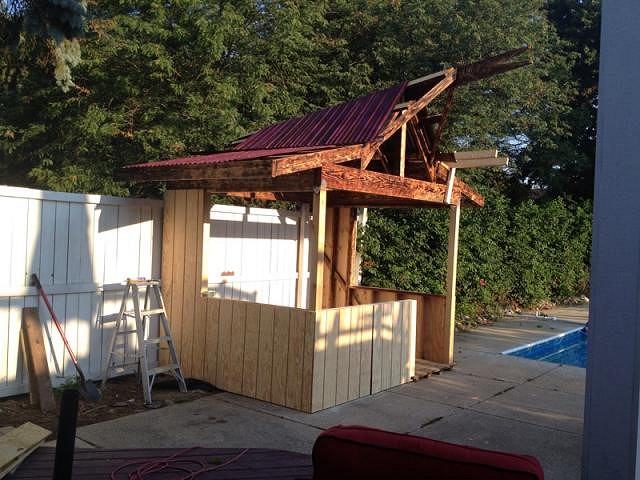
I can't recommend constructing this style roof to anyone...the extra work this has taken was under estimated. I just spent the entire weekend cutting lower rafters so they sit correctly. I still have a decent amount of work to do on the roof structure, including the front and back overhang rafters (compound cuts). Here it is as of this morning...
|
|
J
jimsflies
Posted
posted
on
Mon, Jul 22, 2013 6:34 AM
@Thurston Howell IV that's some nice fauna. I wished those things would grow around here. I love the pineapple...is that real? |
|
THI
Thurston Howell IV
Posted
posted
on
Mon, Jul 22, 2013 4:39 PM
Yep, the pineapple is real. We have a similar climate to Hawaii so like the song goes, "We've got mangoes and bananas you can pick right off the tree". But hey that pool side garden of yours looks great as does the construction. Full marks. |
|
J
jimsflies
Posted
posted
on
Mon, Jul 22, 2013 6:57 PM
You're pineapple has inspired me...I think I may have just the spot for a "plant" or two once I'm done with the build. |
|
V
VampiressRN
Posted
posted
on
Mon, Jul 22, 2013 9:59 PM
Ooops...sorry for my fauna fopah!!! That roof, even though it was difficult, will certainly be unique!!! |
|
T

Tiki-kitty
Posted
posted
on
Tue, Jul 23, 2013 7:01 AM
Looks great! I love the fire-pit! :) |
|
THI
Thurston Howell IV
Posted
posted
on
Tue, Jul 23, 2013 4:08 PM
The pineapples I've planted are simply the tops cut off those bought from the local fruit shop. Strip a few rows of leaves, let it dry out for a week and plant. They're not too fussy about soil quality but should have good drainage. Here's another pic showing local fauna as distinct from local flora (couldn't resist):
|
|
J
jimsflies
Posted
posted
on
Tue, Jul 23, 2013 6:37 PM
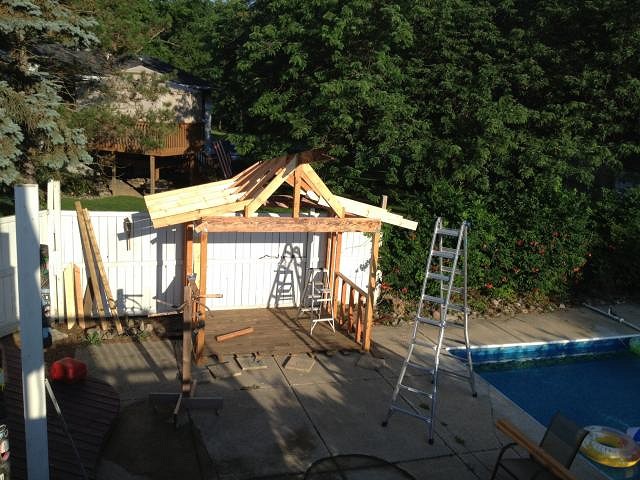
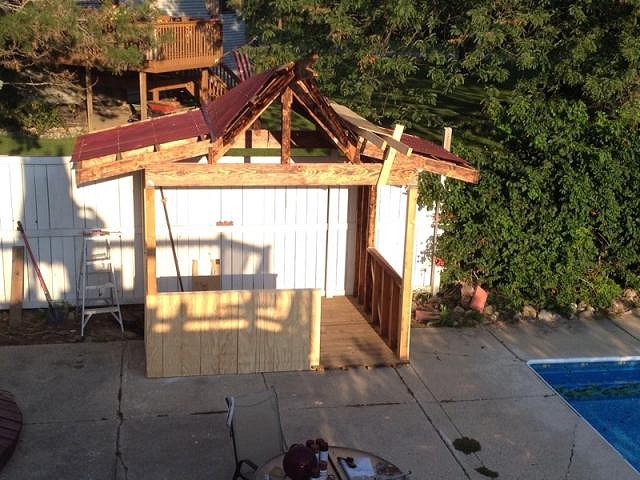
I wonder if kangaroos are as much of a nuisance for you as deer are for me? Do they like to play tag with cars? While I'm posting a couple updated photos showing the framing front gable of the roof.
|
|
V
VampiressRN
Posted
posted
on
Tue, Jul 23, 2013 7:20 PM
Uh oh...busted twice...I meant flora. But Thurston...your fauna are danged cute!!! I got waskally wabbits and rootin tootin racoons that keep my dogs busy in my canyon. Wow that side view really shows the angles on that roof...it is going to be great. |
|
THI
Thurston Howell IV
Posted
posted
on
Wed, Jul 24, 2013 4:26 PM
My apologies Jimsflies for taking your posts off subject. I'm envious of that roof construction, nice work. As to the questions about how the roofing will fit, I reckon as long as the lower sections run several inches under the gable with maybe some flashing to increase the length of the overlap it should be perfect. And no the 'roos don't play tag with cars they're pretty skittish and if you get too close they take off into the bush. Nice to have 'em around here though - as it must be for deer. [ Edited by: Thurston Howell IV 2013-07-24 16:28 ] [ Edited by: Thurston Howell IV 2013-07-24 16:29 ] |
|
J
jimsflies
Posted
posted
on
Wed, Jul 31, 2013 6:17 AM
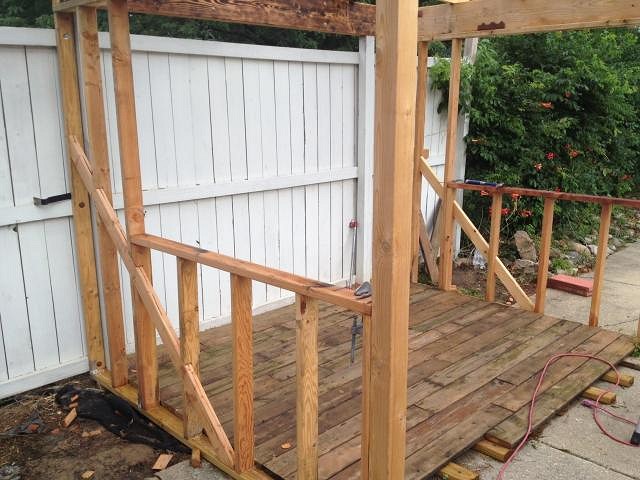
No problem Thurston Howell. I enjoyed all the photos. I am half way to having my own pineapple bush now. I picked up my corrugated metal roofing last night. I thought I would have a longer wait to get the metal from Menards, the website said 12-21 days but it came in less than a week. I was shocked at how thin the metal is. If it doesn't work out for a roof I might be able to wrap up left over dinner in it. This is a long shot...but if anyone has any tips for putting a metal roof on, please share. My current plan is to make templates from a big piece of cardboard and then cut the metal. With all the crazy angles, I can't think of any other good way to do it. As for cutting, not sure if turning my skill saw blade backwards to cut it is the way to go or get some electric shears. Given how thin it is, if the saw blade catches it, I think it will really mess it up. The weather wasn't very cooperative last weekend to get much done. Since I thought I had longer before the metal would be here, I took a few minutes to add some bracing to the sides of the structure. It helped stiffen it up quite a bit.
Also started burning the roof rafters. I'm planning for the underside of the roof and rafters to be exposed so am taking time now to "finish" them so I don't have as much to do after the roof is on.
|
|
L

LoriLovesTiki
Posted
posted
on
Sun, Aug 4, 2013 9:42 AM
Good move finishing the roof rafters while they're exposed! I learned that lesson the hard way.... |
|
J
jimsflies
Posted
posted
on
Mon, Aug 5, 2013 6:51 AM
I didn't get as much done this weekend as I had hoped. Our primary refrigerator failed yesterday and spent the majority of the day dealing with that. I made some headway on the lower purlins as seen in the photo below. I'm also burning rafters when I only have a few minutes here or there to work on the build. Hopefully I can get the purlins on this week after work so that next weekend I will be ready to install the roof.
|
|
J
jimsflies
Posted
posted
on
Sun, Aug 11, 2013 4:50 AM
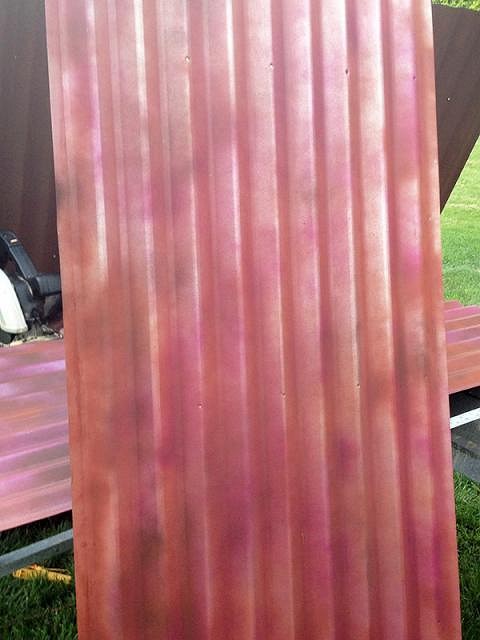
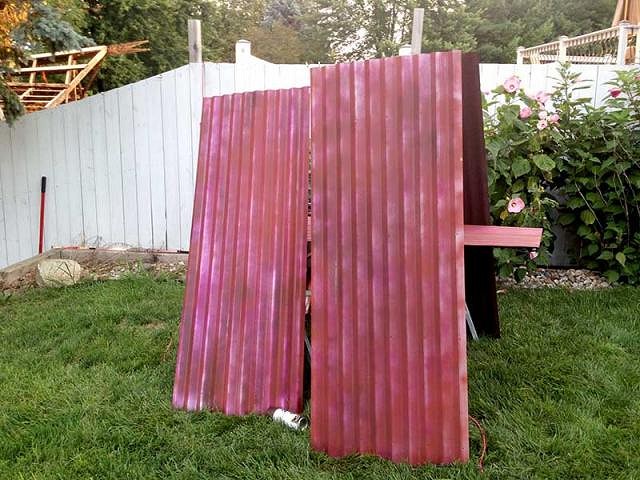
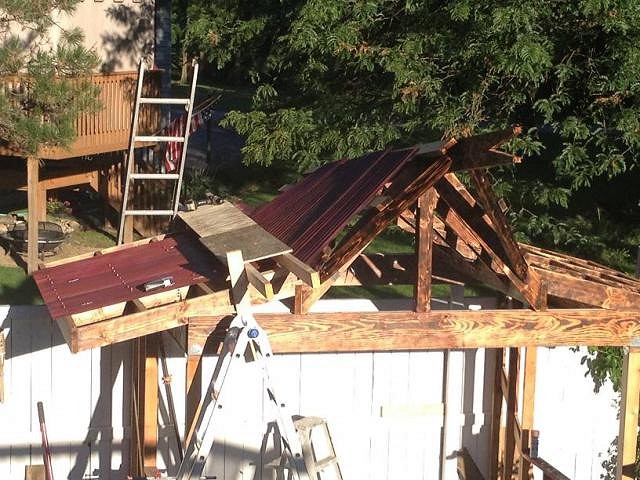
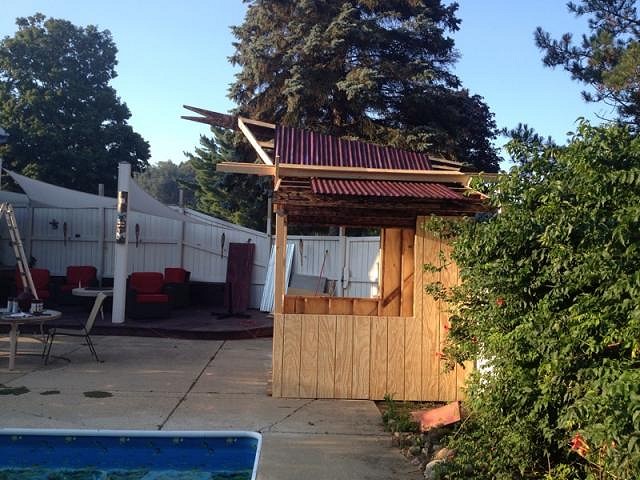
A little more progress. Finally finished the rafters and roof structure and started working on the roofing. I think I am doing something wrong... I've read several build threads here on TC and many mention their build being completed in a weekend ...I feel like this thing has taken me forever! Standing in Front: What the back side of the roof looks like right now: Finally starting to get the roofing up there: Here is my attempt at making the corrugated metal look rusty:
|
|
J
jimsflies
Posted
posted
on
Mon, Aug 12, 2013 11:28 AM
More progress.
This photo shows off the roof lines with the purlins in place:
[ Edited by: jimsflies 2013-08-12 11:28 ] |
|
Q
Q-tiki
Posted
posted
on
Mon, Aug 12, 2013 11:38 AM
I really like the shape of the roof and your treatment of both the rafters and the roofing metal. Are you going to coat it with polyurethane or something similar? I'm curious about that after having read about rusty water coming off of the metal roofs and staining concrete below. Yet another thing to think about. Keep up the good work! |
|
J
jimsflies
Posted
posted
on
Mon, Aug 12, 2013 12:12 PM
For my roof, I just used Rustoleum spray paint over the galvanized metal. I decided I didn't want to deal with stains. But I think for those that have non-galvanized roofs, after it has the amount of desired rust, you could clear coat over it to minimize the rust stains. I suspect my painted rust will wear off over time, but hopefully by that time it will retain the older less shinny look that brand new metal roofing has. My current dilemma is working on the upper roof with the lower roof installed with out damaging it. The roof is so thin, it crushes very easily. I will likely do the other side differently, but I'd like to avoid uninstalling the lower roof that I already have in place. I think I am going to try to lay a 2x12 plank across it to disperse the weight. I had my son get up there to do something yesterday in a spot I couldn't reach and even with his light weight, it still crunched it in a couple spots. |
|
N''

nui 'umi 'umi
Posted
posted
on
Mon, Aug 12, 2013 10:32 PM
Is it possible to work on the upper roof back to front and from the inside? Hard to tell how much space you have between the rafters. |
|
J
jimsflies
Posted
posted
on
Wed, Aug 14, 2013 5:56 AM
Some of it can be done from the inside. I also came up with this scaffold so I should be able to get up there if I need to now. Reaching the top is still not easy from this scaffold. So I will likely have to do it from the inside and put each piece down one at a time.
I ordered the ridge cap yesterday. It is being custom fabricated with the change in slope 14/12 on one end and 8/12 on the other. It will be a couple weeks before that is done now. I may have to attach that in the center from the inside as well so I am thinking I need to get all the roof pieces cut and ready for install and then screw everything down as I move across the structure. |
|
J
jimsflies
Posted
posted
on
Sat, Aug 17, 2013 8:52 PM
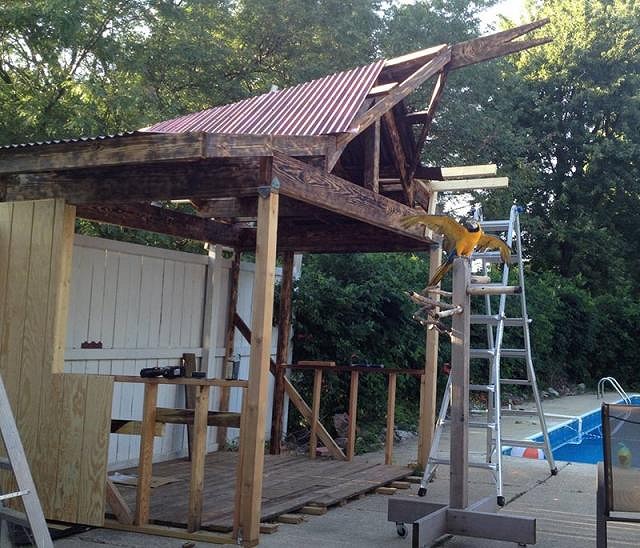
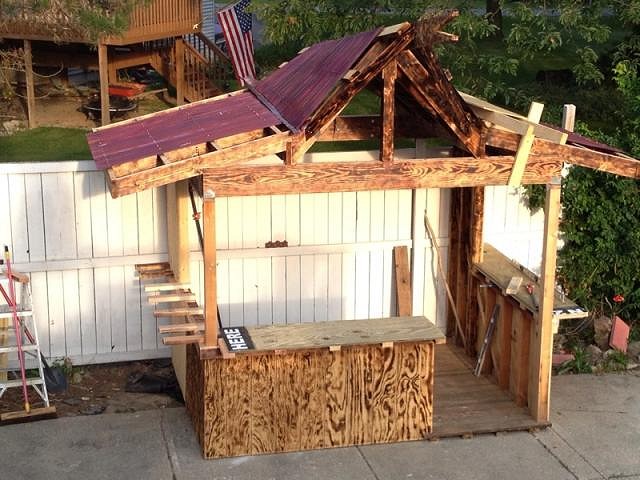
Making some headway this weekend. The roof is mostly done. The scaffold works great! My construction pal approves:
I need to get this wrapped up...we're having a party in a few weeks. :o
Its probably tiki sacrilege to combine a party with a football watching party. [ Edited by: jimsflies 2013-08-18 03:30 ] |
|
T

tikiskip
Posted
posted
on
Mon, Aug 19, 2013 6:02 AM
Nice start! Sooo what is the temp of your pool? Where is this global warming I keep hearing about? Good luck! |
|
J
jimsflies
Posted
posted
on
Mon, Aug 19, 2013 8:41 AM
I think our pool got up to about the same temp. I don't really care for it to be warmer than that...stops being refreshing at about 85. I'm sure it will be chilly by the time the party comes around...although this week is supposed to warm up again so who knows. Usually only a couple peeps get in the pool at our evening parties anyways. I'll have the hot tub going so they can warm up. A little more progress yesterday...here are a few photos:
|
|
F

freddiefreelance
Posted
posted
on
Mon, Aug 19, 2013 12:09 PM
Produce a Rich Rust Patina on Iron and Steel, Safely and Quickly, Using Common Household Chemicals
I'd think acid staining the concrete first would help with that? With the added benefit of making the concrete look less like new, raw concrete. |
|
J
jimsflies
Posted
posted
on
Mon, Aug 19, 2013 12:15 PM
Not sure I could "rust" the metal roof now using that technique. But that is a great link. When I get some time, I will try that on a piece of roof scrap and see what it does. It may not work that well because the roof has an acrylic coating and is galvanized. But it will be interesting to see. The painted roof is acceptable I think. It looks better in person I think than the photos show. I also got a little better at painting rust as I went along. |
|
J
jimsflies
Posted
posted
on
Tue, Aug 20, 2013 7:15 AM
Progress from yesterday:
|
|
P

pablus
Posted
posted
on
Tue, Aug 20, 2013 2:19 PM
Nice to see all that attention given to the roof. Place is looking dandy. Thanks for posting the pics. |
|
J
jimsflies
Posted
posted
on
Thu, Aug 22, 2013 6:14 AM
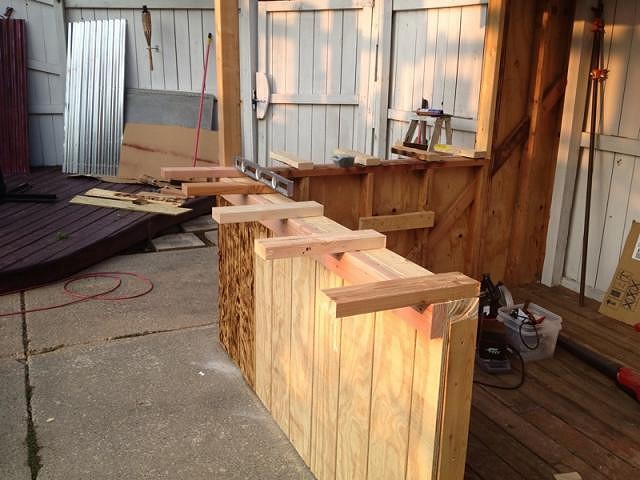
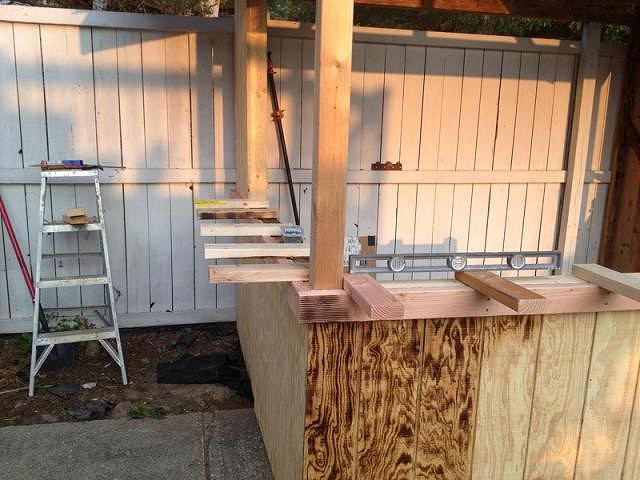
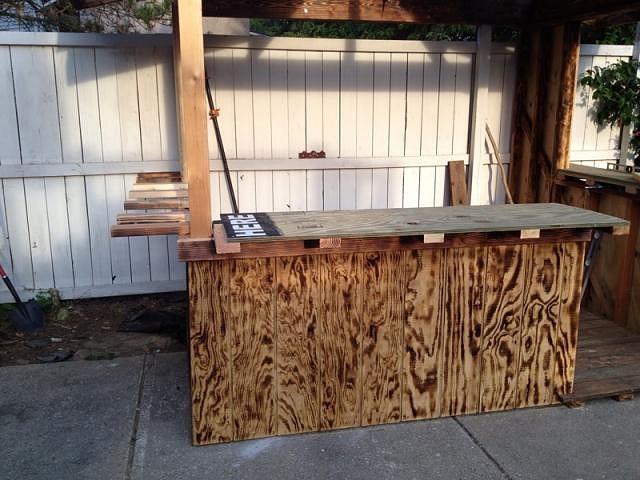
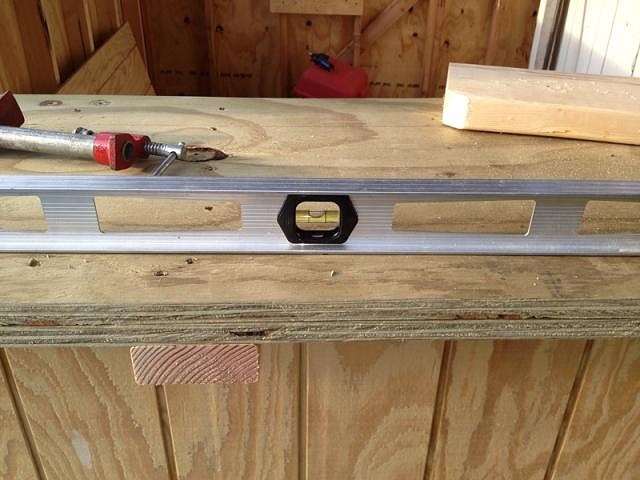
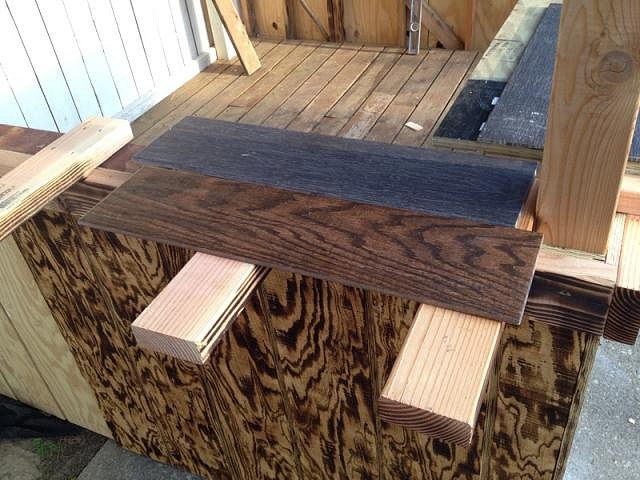
Thanks Pablus. I've been happy not working on the roof this week. But the ridge cap is ready, so will be getting back to finishing the roof this weekend. I've made some progress on the bar tops. Hoping to get the rest of the plywood down today and backer board tomorrow.
I repurposed a couple sheets of plywood that were used for a sign. It took some time, but I think its pretty level. Trying to decide which tiles I like better. I think the brown matches better, but not a crazy about the oak look. The grey would likely blend in a little more with time as everything ages. What do you guys think?
[ Edited by: jimsflies 2013-08-22 06:19 ] [ Edited by: jimsflies 2013-08-22 06:20 ] |
|
T
tikiskip
Posted
posted
on
Fri, Aug 23, 2013 8:52 AM
I like the grey best. Building looks good. |
|
J
jimsflies
Posted
posted
on
Fri, Aug 23, 2013 10:32 AM
What is Big kronkie wood? |
|
T
tikiskip
Posted
posted
on
Fri, Aug 23, 2013 11:00 AM
Wow that link is big. |


