Pages: 1 2 3 4 5 6 7 8 9 10 11 12 534 replies
|
G

GMAN
Posted
posted
on
Tue, Jul 17, 2007 2:59 PM
Dude, You've got this guy in the bag mang. Very nice. Yeah, you could dig in deeper on the legs and then round them in a little more - use the flat chisels to get in there. I think they'll look great. Awesome job so far Boss. Bettcha learned a bunch now didn't you? Your next one is gonna be smokin'! Just think what you'll learn tomorrow? Keep thinking and tweaking and push deep into that wood. Now you can start racking style points. You've got my attention.....you're a natural! DON'T RUSH IT. -G |
|
G
GMAN
Posted
posted
on
Tue, Jul 17, 2007 3:11 PM
Oh yeah, and use that big old new V-liner to cut that brother a butt crack. Round that crack into his thighs. PM me or look at the last post I did on my thread to see a butt in progress. -G |
|
T

tikifreak1
Posted
posted
on
Tue, Jul 17, 2007 3:34 PM
Cool, thanks G! Thats going to help a bunch. If it wasn't for you I wouldn't have even dare tried this for my first attempt, and you're right I am learning a lot. Thanks for sticking w/ me! Any thoughts of what I should do w/ all that extra wood under the butt?? It's kinda hard to get to. I might need to get some more tools. Files/rasps??? |
|
G
GMAN
Posted
posted
on
Tue, Jul 17, 2007 3:59 PM
Make his butt first and then see where we are with the rest of that wood. It can be easily removed if needed. I imagine if you cut in on an angle from the top and the bottom going to V with your straight chisles you won't see it much at all. Just remember to leave enough wood on both sides to give his feet some width. You know, his heels and ankles and all.... -G http://www.oceanandislandarts.blogspot.com/ [ Edited by: GMAN 2007-07-17 16:00 ] [ Edited by: gman 2007-07-17 16:13 ] |
|
T
tikifreak1
Posted
posted
on
Wed, Jul 18, 2007 4:33 AM
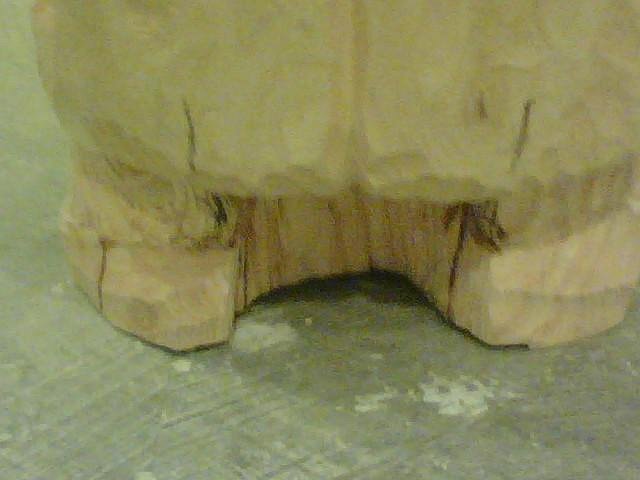
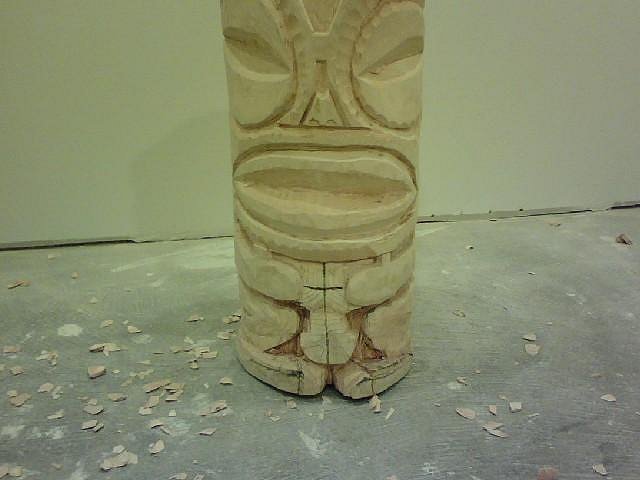
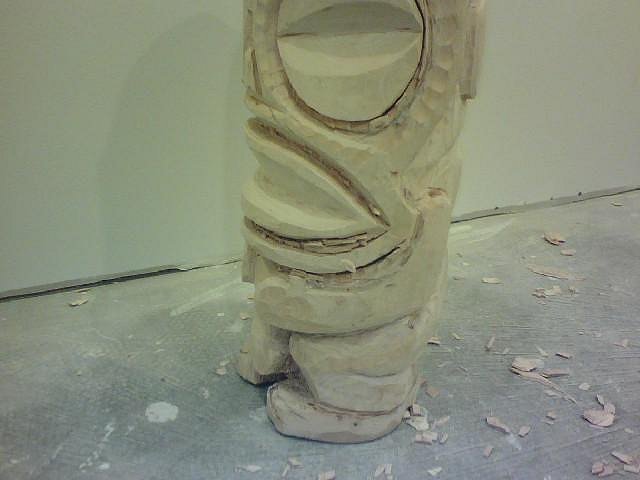
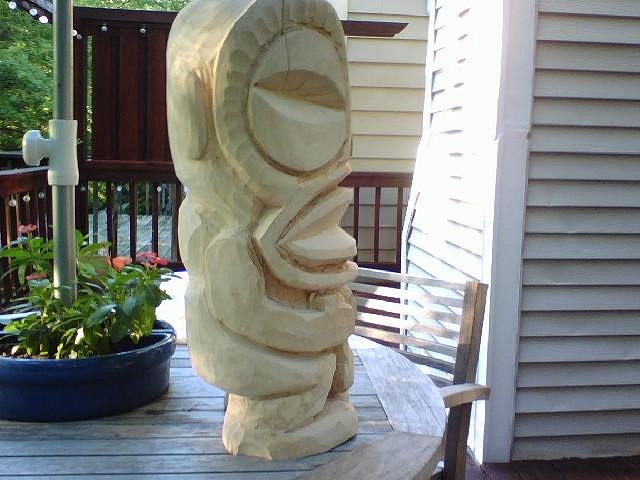
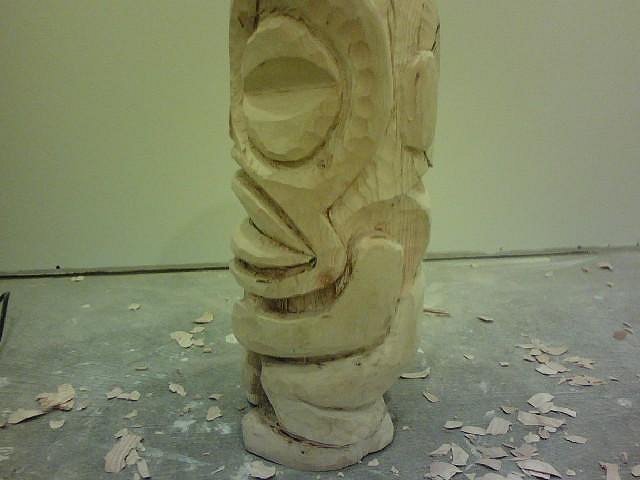
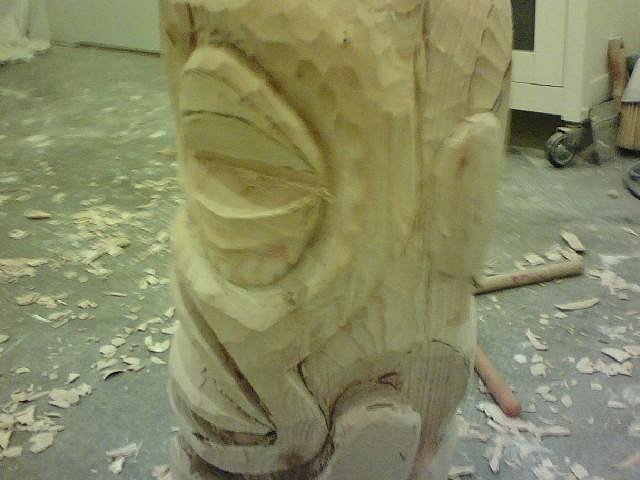
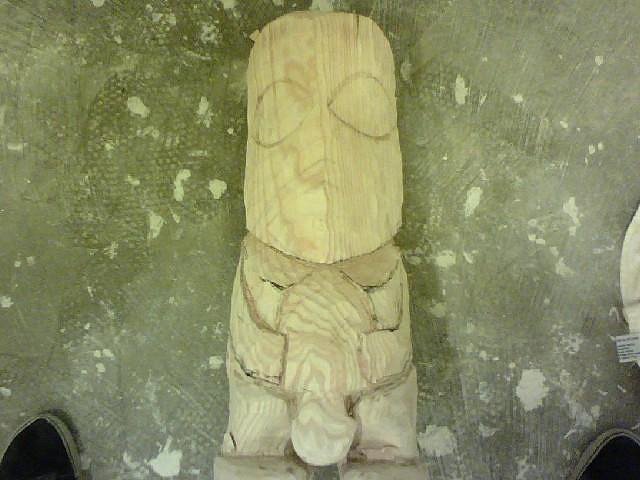
Major accident last night!! I was working on the legs and feet and a huge chip knocked out of the base. So this is the only thing I could think of to fix the problem, plan B! [ Edited by: tikifreak1 2007-07-18 06:32 ] |
|
T
tikifreak1
Posted
posted
on
Wed, Jul 18, 2007 6:53 AM
Now looking at my mess up, I am seeing a new idea! I think I am going to risk taking his feet all the way to the floor, to make them bigger. This should also allow me to make the lower leg a little thicker too. It should not look like there is a base anymore if I do this. GMAN do you think this is a good idea or no. Do you think it will make him too weak? It looks like there will still be a good amount of wood to support him??? |
|
G
GMAN
Posted
posted
on
Wed, Jul 18, 2007 1:20 PM
Sounds like a great idea. Without using/having a small base, it's the next best option. Looks good. Carve them feetz! -G |
|
B

Benzart
Posted
posted
on
Wed, Jul 18, 2007 1:43 PM
Yeah, Carve'um up. If they break, they break, just have super glue handy. You won't be the first I Promise. Working yourself out of jams teaches you More about carving than the Whole rest of the piece! Don't forget that. |
|
O

ootwoods
Posted
posted
on
Wed, Jul 18, 2007 1:48 PM
And, debonder. Any time you use superglue, make SURE you have a can of accellerator and a can of debonder handy. It helps when, after you are SO careful not to glue your fingers to the piece, you later discover it ran down the joint, and your THIGH is now glued to it. (been there, done that, got the contact burns) |
|
T
tikifreak1
Posted
posted
on
Wed, Jul 18, 2007 2:07 PM
G, Benz, & Oot thanks for the tips! G, I'll try to give you a buzz tonight. I forgot my kids have swimming lessons at 7. It might be too late to call you after??? Craig |
|
T
tikifreak1
Posted
posted
on
Wed, Jul 18, 2007 6:55 PM
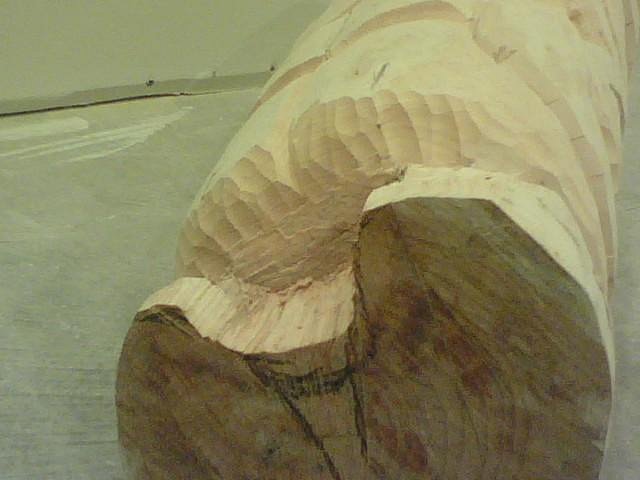
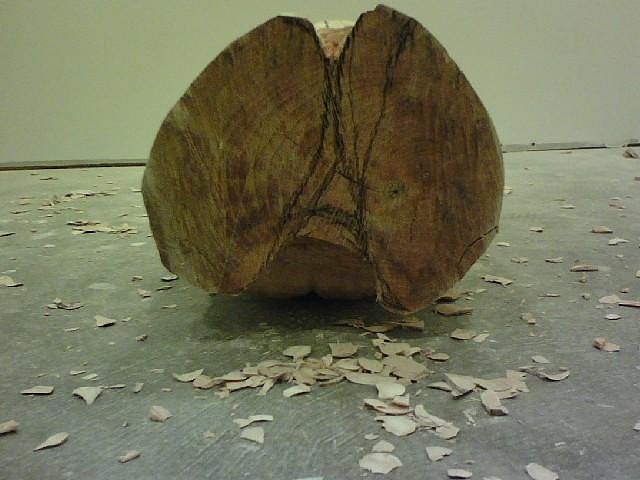
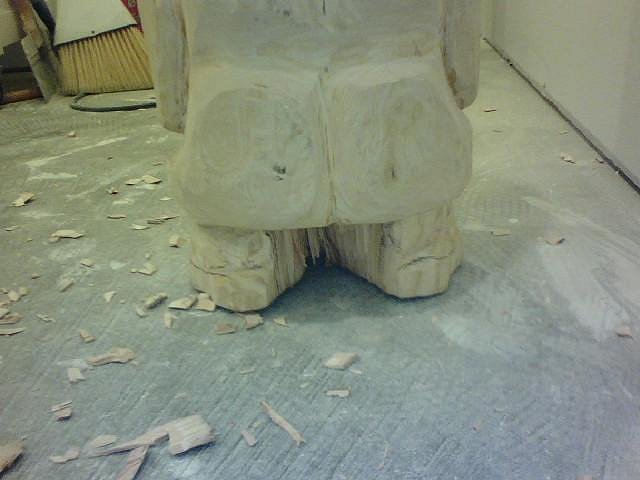
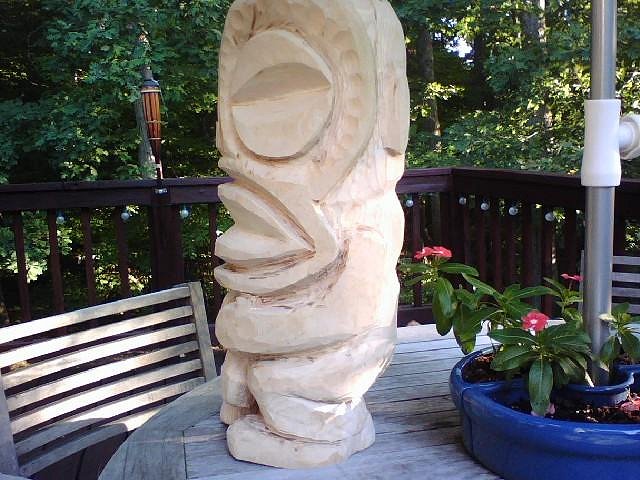
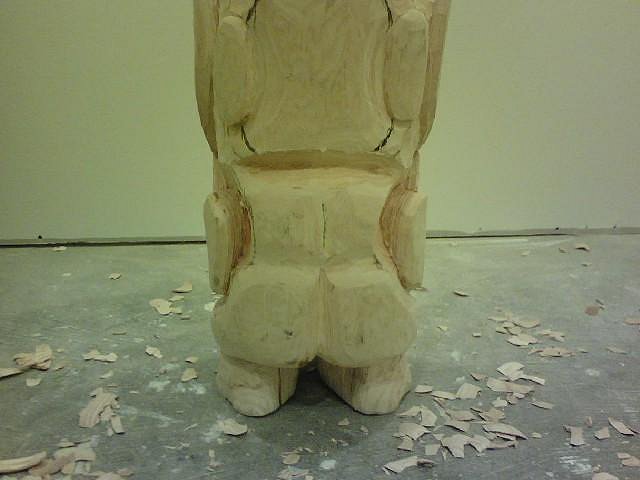
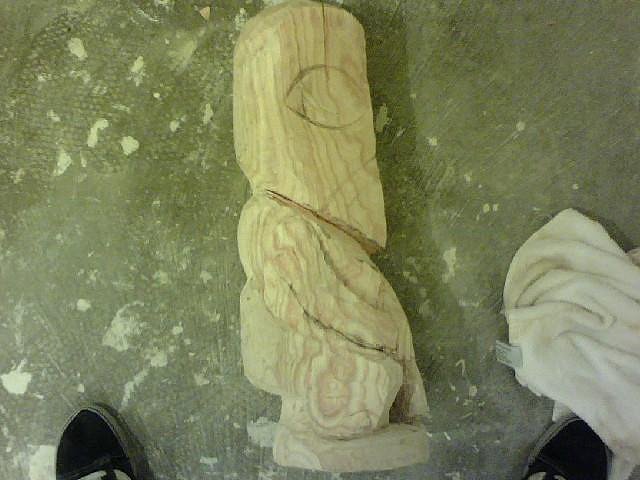
trying to fix the legs and feet!!! Bottom feet
I don't know if you can tell but I blended in the old leg into one and used the old base as the new foot. Side profile I think looks better???? Still rough cuts!!!! [ Edited by: tikifreak1 2007-07-20 04:12 ] |
|
M

McTiki
Posted
posted
on
Fri, Jul 20, 2007 2:57 AM
Coming along nicely. Tougher design to start with, so, Props to ya! Mahalo McTiki |
|
T
tikifreak1
Posted
posted
on
Fri, Jul 20, 2007 4:36 AM
Thanks McTiki! Yeah it's been a challenge. Still struggling with the legs! |
|
T
tikifreak1
Posted
posted
on
Mon, Jul 30, 2007 2:55 PM
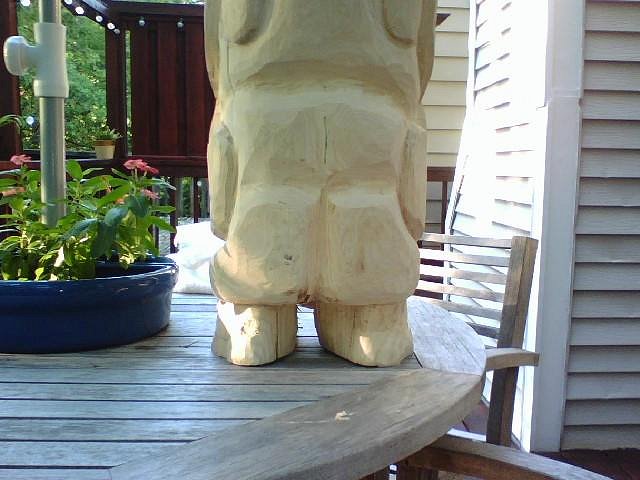
Starting to go deeper and a little more progress on the legs and feet, but not much. It probably looks the same as all the other pics!!
|
|
G
GMAN
Posted
posted
on
Mon, Jul 30, 2007 3:19 PM
Yeah man, he looks great! I can see where you've been working and it is moving along nicely. It looks like you have the feet all sorted out too. Great job! Now that you have him all figured out all you need to do is everything else :wink: Keep going, he's gonna be the shitz. You've learned a ton already. Good stuff!!! -G |
|
T
tikifreak1
Posted
posted
on
Tue, Jul 31, 2007 4:29 AM
Thanks G! My goal is to try to wrap him up by Sunday, but we'll see how that goes! Craig |
|
T
tikifreak1
Posted
posted
on
Tue, Jul 31, 2007 4:35 PM
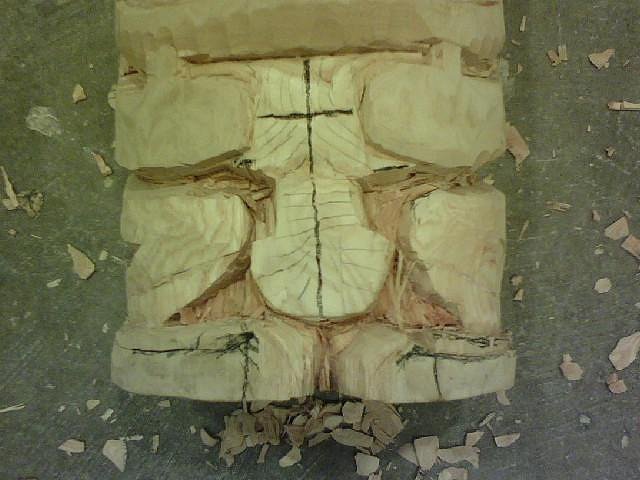
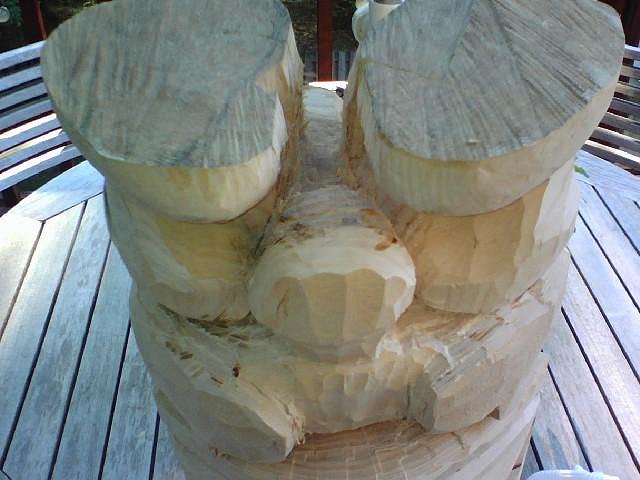
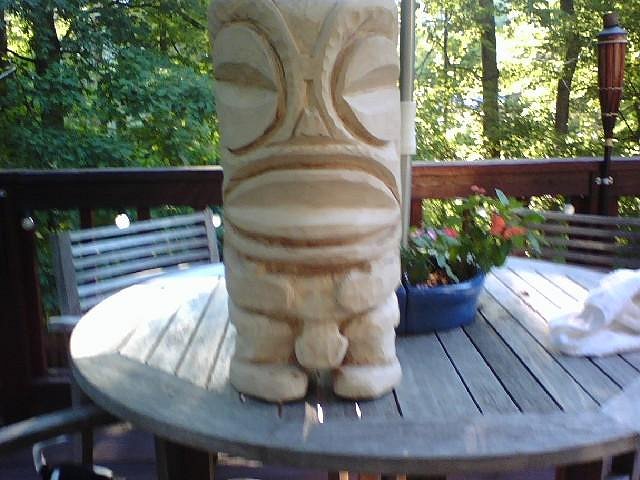
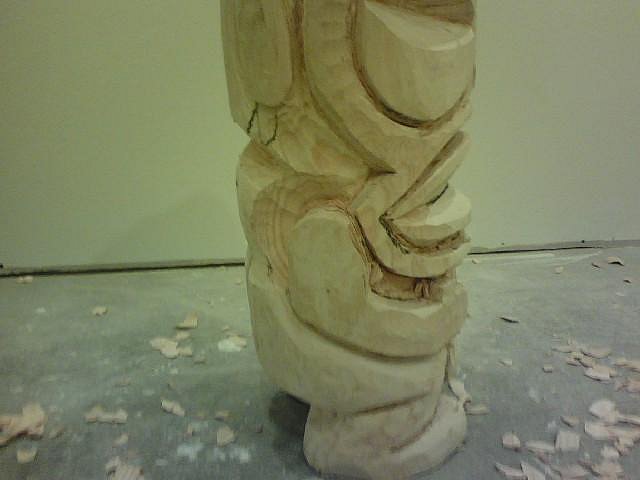
I thought I would change up the scenery a bit. I know it doesn't look like a lot, but it took me a long a$$ time knocking out that wood in between his legs! Also, trying not to break anything! |
|
G
GMAN
Posted
posted
on
Tue, Jul 31, 2007 5:51 PM
Easy there cowboy! Take your time and do him right. You can still put a lot of time in on him after you think he's done. You will be amazed at how much nicer you can make him. A little here....a little there.... You've done a great job so far, don't skimp on the fine-tuning and sanding. |
|
T
tikifreak1
Posted
posted
on
Tue, Jul 31, 2007 6:20 PM
You're right G, I just feel like it's taking me forever to make any progress on this guy! I do think he is looking a little better everyday though. Thanks for the advise. Craig |
|
S

Sneakytiki
Posted
posted
on
Tue, Jul 31, 2007 7:21 PM
Great first! |
|
T

Tamapoutini
Posted
posted
on
Wed, Aug 1, 2007 2:17 AM
First carve? Great job! I cant claim to be any expert with wood so would advise you listen to Gman. The difference between an 'ok' carving and a really quality piece can be in getting those final depths right, fine-tuning your shaping and crisping (or softening..) edges/ridges etc. This is where your patience and 'eye' are put to the test. Tama :) |
|
B

benella
Posted
posted
on
Wed, Aug 1, 2007 2:44 AM
Hello, your first one is very cool. I agree with G-: take your time. Tell you that everything you're doing that makes you waste a lot of time is a benefit for what will come next, it will built your experience. Great job on your piece. How will you finish it? Stain, natural, paint, wax? Benjamin. |
|
M
McTiki
Posted
posted
on
Wed, Aug 1, 2007 3:22 AM
Patience Patience Patience. Sand Sand Sand, and when your done sanding. Sand some more. This is a beautiful first carve so far. Don't short change it's quality for the sake of time invested. Just keep at it. We'll wait patiently. :) Very nice Mahalo McTiki |
|
T
tikifreak1
Posted
posted
on
Wed, Aug 1, 2007 5:08 AM
Hey everybody, thanks!!! Sneakytiki- I haven't seen any of your stuff, so when you posted I checked out your thread and you have some really cool paintings & other crafts!!! Do you have a website to purchase, or do you even sell???? Tama- I never posted on your thread but I go there all the time, Your jade/greenstone carvings are awesome! I want some of your stuff too someday! Benella- Very cool carvings, I think page three is my favorite. The moai w/ the shells is looking really cool too. I'm planning on staining it but I need to ask for advise when I get to that point. Mctiki- thanks man! You're a good motivator. Mertiki turned out really cool! And yes GMAN has been a great help, and has been been sticking with me from the start. I really appreciate all the advice he has giving me and will continue to take it! Thanks G! Again thanks to everybody Craig |
|
B
Benzart
Posted
posted
on
Wed, Aug 1, 2007 9:51 AM
Excellent work TF, and you're getting some Excellent advice too and it's all Right on. Just take your time as the last bit of carving makes or breaks a carving. If you quit cleaning up too soon the quality suffers. You COULD stop now and have a respectable tiki, but if you continue to clean it up you will end up with an Awesome piece. In Any case he is Excellent especially for the first. Not many people get this good from the first. I remember my first was Terrible, worse than Anything you see around here. |
|
T
tikifreak1
Posted
posted
on
Wed, Aug 1, 2007 10:08 AM
Thanks Ben, that means a lot coming from you! You have given me great advice too. I not gonna give up on this guy! |
|
T
tikifreak1
Posted
posted
on
Wed, Aug 1, 2007 6:37 PM
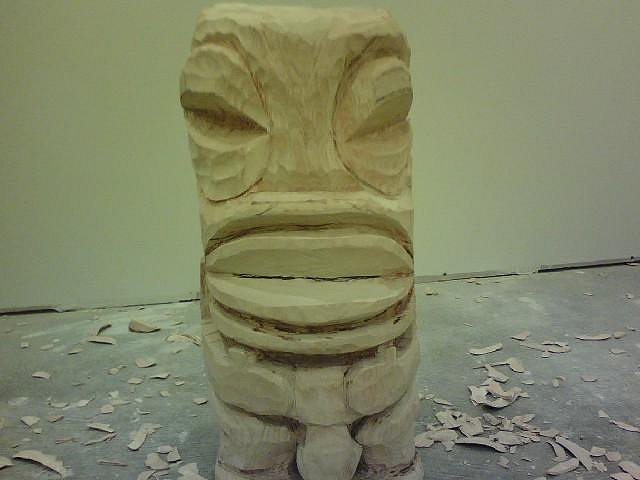
Shaved the sides of the mouth a little bit. It seemed to give it more shape and make the shoulders pop out more? Still need to fix the mouth. |
|
T
tikifreak1
Posted
posted
on
Thu, Aug 2, 2007 3:51 PM
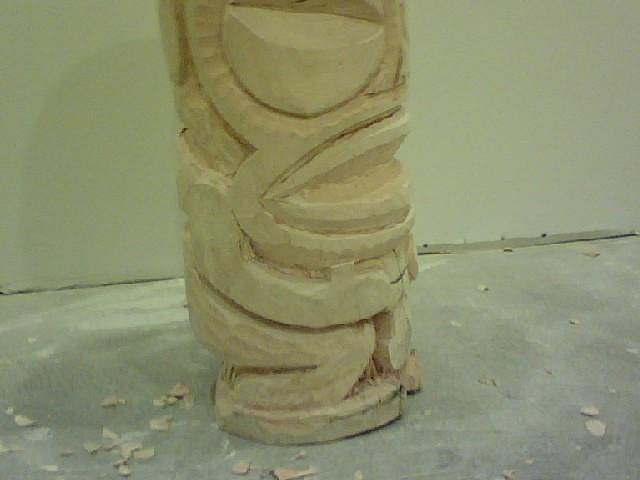
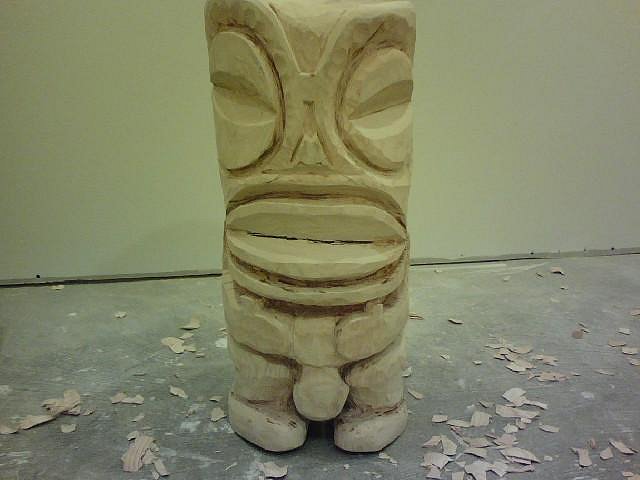
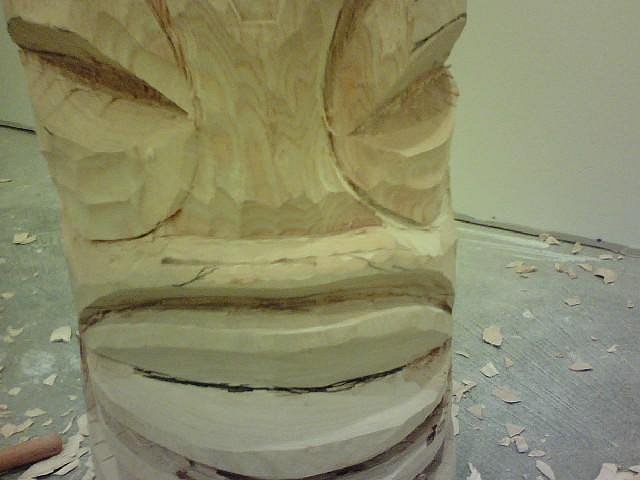
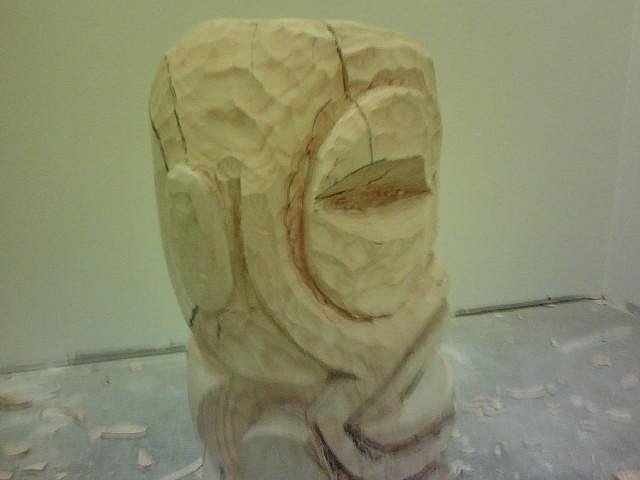
Well another huge chip came out above his right eye, so I am now trying to fix that problem! I was really pissed at first but now I think I figured out what layering is all about? I hope I can get it back to pretty much the same shape. It's a mess right now but hopefully it will turn out okay? My plan is to shave the eyes down more and then get them deep again, if that makes any sense! I also might be able to give it a better upper lip (which I started a little)
The things around the eyes I might change up a bit and have them flush on the sides of his head and try to scoop it really deep into the eyes??? I want to try this to get rid of the funny shaped head. And now it is a really funny shaped head!!! Damn I have a lot of work to do! |
|
B
Benzart
Posted
posted
on
Thu, Aug 2, 2007 4:42 PM
Lookin good, keep chipping away and before you know it he'll be Done. :) :) :) |
|
C

congatiki
Posted
posted
on
Thu, Aug 2, 2007 4:55 PM
Good adjustment TikiFreak...I think you've stumbled on one of the major revelations early |
|
B
benella
Posted
posted
on
Fri, Aug 3, 2007 12:03 AM
The head and face are getting better and better. It will be a very nice piece. Benjamin. |
|
G
GMAN
Posted
posted
on
Fri, Aug 3, 2007 2:51 AM
Craig, You know what you want and mostly know how to get there. This is good. Think about what you are doing and try to remove smaller amounts of wood so you don't lose huge chunks. If you do pop a big piece off cause your tool was dull or the grain was in a bad way, just glue it back on with superglue gel. You can then go back and work the area carefully again. No worries, you are doing great! -G |
|
T
tikifreak1
Posted
posted
on
Fri, Aug 3, 2007 4:29 AM
Benjamin- Thanks man! Although, I think right now it looks worse than it did before but that's just the beginning of fixing it. It should look way different shortly. I appreciate it though. Gman- I was a little careless. I wasn't rushing but I thought I was in a flow. I think the wood was just really weak where that natural crack is above his right eye? I hope it's not my tools since they are fairly new. But that wouldn't supprise me since I have no idea what I'm doing and probably tearing them up? I feel you on the gluing, but something just tells me this will be for the better (I hope). I can visualize a new idea and we'll see how it turns out? Thanks! [ Edited by: tikifreak1 2007-08-03 06:30 ] |
|
R

Robin
Posted
posted
on
Fri, Aug 3, 2007 9:24 AM
Right there with ya on the carving....dealing with stuff that is gone, and making adjustments. It's fun though huh? A different way of thinking. Like GMan said knowing where you're going seems to be half the battle. I guess knowing how to get there is the other half...and dealing with the surprises/accidents and making necessary adjustments. Pretty steep learning curve. Wondering if that gluing idea works with jade? :lol: I could use that! Looks good though...good on ya. The heads not that funny...just a work in progress. Good luck. Looking forward to seeing how it comes along. |
|
I

insanetikiers
Posted
posted
on
Sun, Aug 5, 2007 6:56 PM
tikis lookin great craig! how much has that dude split? i did one in green cherry awhile back & it split like a muther! pissed me off. wife still likes it though. keep the chips & dust flying! |
|
T
tikifreak1
Posted
posted
on
Sun, Aug 5, 2007 7:31 PM
Thanks man! Too bad it doesn't even look close to that anymore! I'm pissed! I'll update soon, it's such a mess right now I need to clean it up a bit. It's going to look a lot different. I think more like your standard "tang"???? It's hard reworking over stuff you already did! Craig |
|
T
tikifreak1
Posted
posted
on
Mon, Aug 6, 2007 9:58 AM
Well, I hate to say it but this attempt is over. I have messed it up too bad to do anything else with it. Everything is uneven and the depths of the cuts are way to deep now! I'm waiting on another log now and give it another go! It sucks I messed it up so bad, I think I was off to a good start but it was a good learning experience for the future! Thanks for everybody helping me out with this! Craig [ Edited by: tikifreak1 2007-08-06 10:00 ] |
|
G
GMAN
Posted
posted
on
Mon, Aug 6, 2007 10:01 AM
Not a chance! Post some pics. It can always be fixed. Don't stop now. |
|
T
tikifreak1
Posted
posted
on
Mon, Aug 6, 2007 10:23 AM
Here you go G! I just feel I have taken off way to much for any recovery! [ Edited by: tikifreak1 2007-08-06 10:24 ] |
|
S

Swanky
Posted
posted
on
Mon, Aug 6, 2007 10:47 AM
Bad move man. You gotta finish the other one and learn. You'll just make more mistakes on this one and not be where you want. That other one is really fixable. Just go deeper. Work a bit slower (take less off with each chisel mark) and you'll be okay. Go back to the other one and go deeper on those cuts. Finish it. Then, if you feel like it, start over and use the experiences to make it better... |
|
J

JohnnyP
Posted
posted
on
Mon, Aug 6, 2007 11:04 AM
You are not as bad off as you think you are. This one is fixable. Take small cuts, work on both sides back and forth so you can see the progress and even things out side to side for symmetry. Keep going- You are on the right track, you'll be surprised where you end up after working on it for another hour or so. |
|
B
Benzart
Posted
posted
on
Mon, Aug 6, 2007 1:19 PM
What you did is make the shoulders and arms pop out. Consider it just being roughed out, now continue as planned. The only error you bade was cutting in too much details before the whole piece was ready to detail. We All do that one time or another and what happens is when you go to get the piece all rounded and smoothed, you find some of that detail was in the way and had to go. Just keep chipping at it, you will find your tiki still in there. |
|
G
GMAN
Posted
posted
on
Mon, Aug 6, 2007 3:49 PM
Yeah, what they said. I'll send you pics.... -G |
|
T
tikifreak1
Posted
posted
on
Mon, Aug 6, 2007 4:02 PM
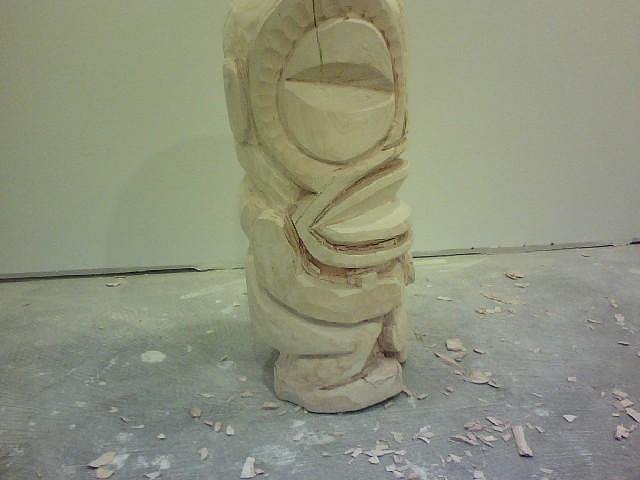
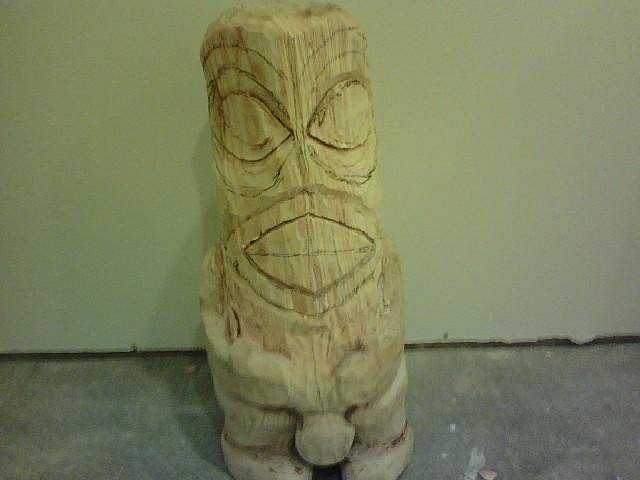
Alright guys! Thanks for keeping me in the ballgame! I spent some time after work on him cause I couldn't stand knowing that piece of poo poo was in my basement! Not that this is much better, but this is it so far. I want to shave in his legs and butt a little bit more, keep his belly nice and big, and smooth out his face really good before I start putting in the facial features! Thanks everybody who told me not to quit on this guy and gave me input! Craig
|
|
I
insanetikiers
Posted
posted
on
Mon, Aug 6, 2007 4:33 PM
keep on goin man! hell, when i'm turning on my lathe if i get a catch or some little defect i just turn it out & keep on gettin it. tiki is starting to come back to life now. whittle on! lookin good. |
|
I
insanetikiers
Posted
posted
on
Mon, Aug 6, 2007 5:20 PM
right on man. i love that style. hows them flexcuts doin for ya? looked at a set the other day at wood craft. very nice! |
|
B
Benzart
Posted
posted
on
Mon, Aug 6, 2007 7:18 PM
HappyHappyHappy |
|
T
tikifreak1
Posted
posted
on
Tue, Aug 7, 2007 5:46 AM
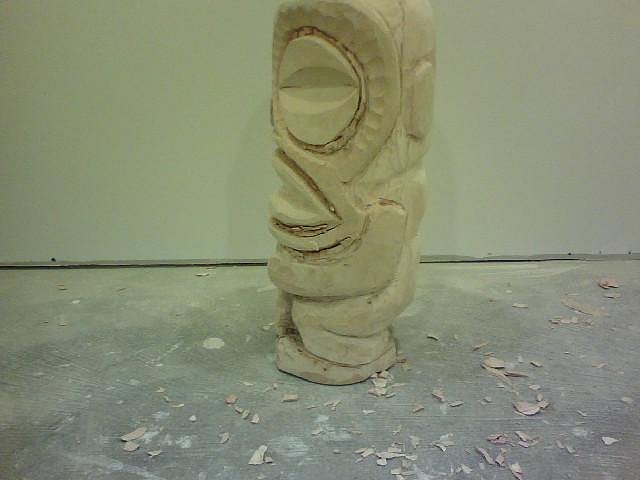
I plan on putting a belt sander to the face today after work. I want to try to even it out and get the ridge line better and get it more symmetrical. Please let me know if this is a bad idea or if I should just do it by hand??? Thanks, [ Edited by: tikifreak1 2007-08-07 05:53 ] |