Tiki Central / Home Tiki Bars
Lagoon of Mystery
Pages: 1 2 3 4 5 6 242 replies
|
H

hang10tiki
Posted
posted
on
Fri, Jun 29, 2018 6:47 AM
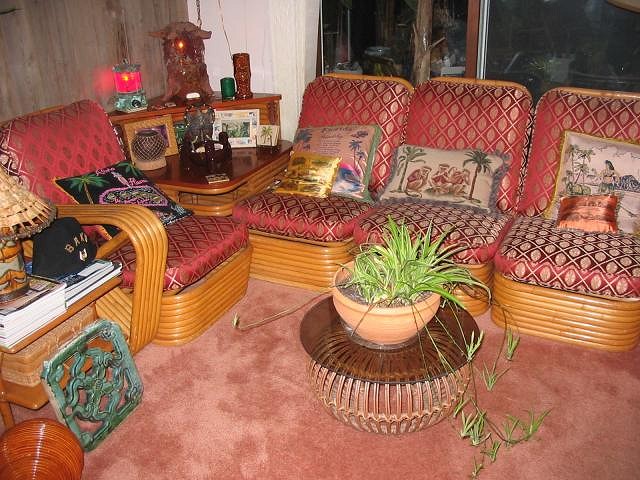
That clam shell sink is over the top Love the drive in Cheers |
|
PP

Prikli Pear
Posted
posted
on
Tue, Jul 3, 2018 8:43 AM
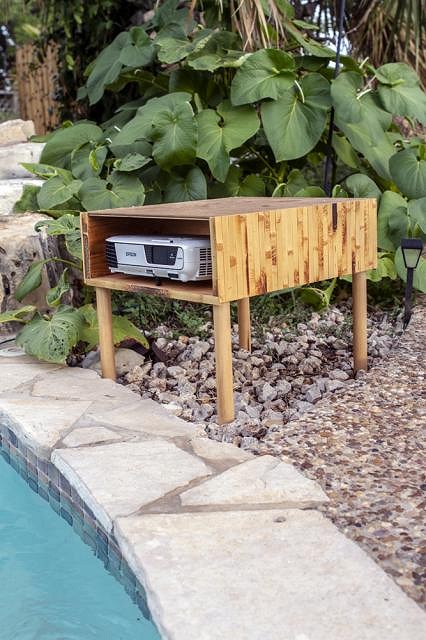
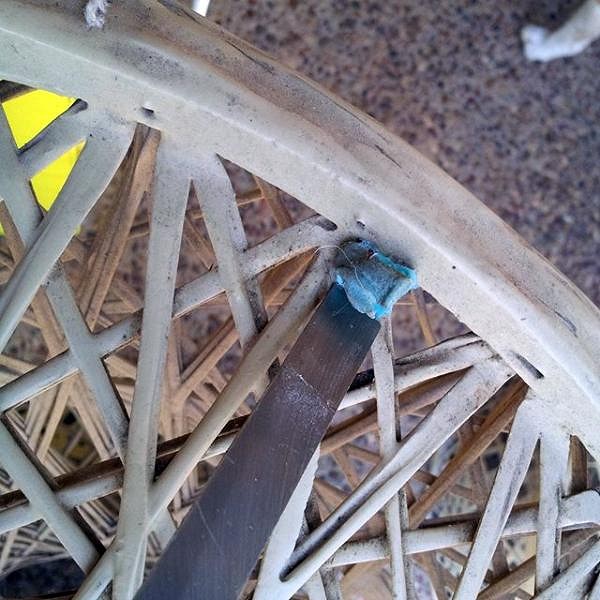
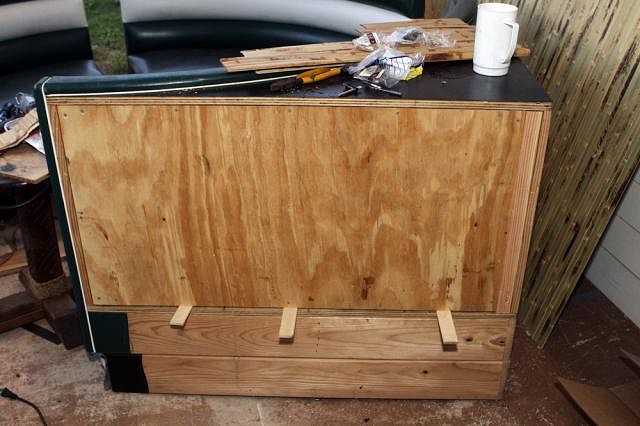
Work on the Lagoon of Mystery continues, but it's not terribly high-profile. These are projects that need to be done to enhance the experience. Like everything, they're all time-consuming projects, some moreso than others. I'm going to start with one that, surprisingly, wasn't a convoluted mess. As I posted above, we throw a series of Dive-In movies every summer. Trouble is, the projector is set up near the pool. All the electrical is safely out of the way so that stuff falling into the water isn't a concern, but the projector is within the splash zone. Sometimes our kids can get a bit rowdy even with warnings, and a blast of water woudn't be good for the projector. So I did what I intended to do last summer: Build a projector box/table to protect it from random splashes. I put it together in just a couple of hours, and scrap makes up 90 percent of the build. Once I put on the bamboo tambour paneling on the side, it took on a MCM vibe and blends in nicely with the bar. It's got plenty of airflow and works well. When not in use for movies, it makes a passable side table.
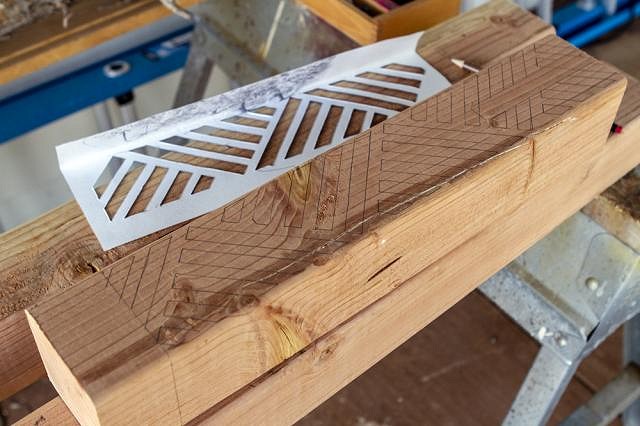
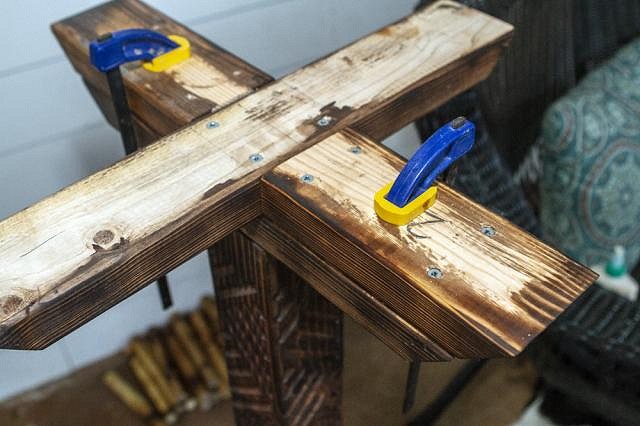
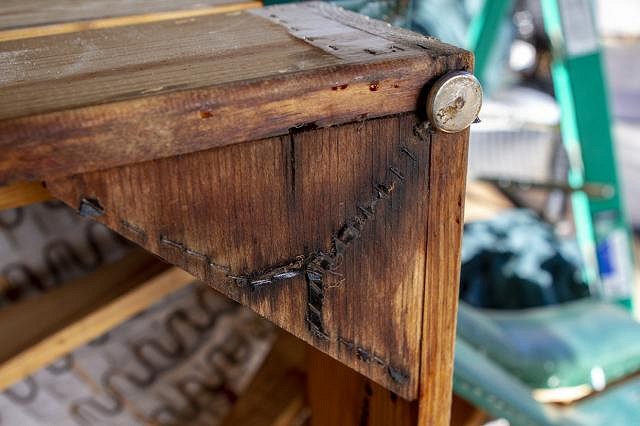
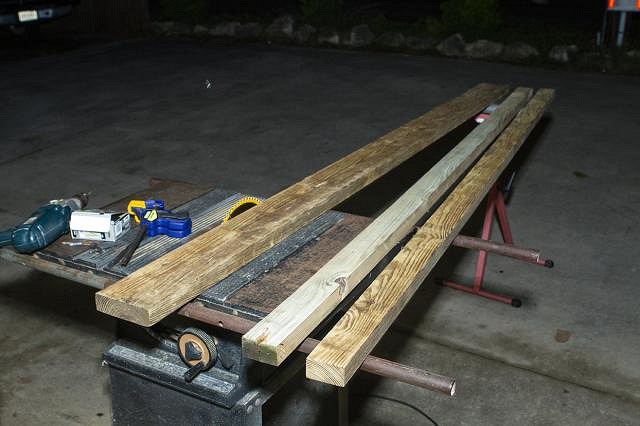
During the occasional shindigs we host, The Wife noticed guests will stand around, locked in deep discussion, but have no place to set their drinks whilst doing so. She's a professional photographer, and does a lot of weddings. "We need some upright cocktail tables," she said, noting that these are common at wedding venues and get a lot of use during the social hour. A quick search online revealed 1) that none of the commercially-available tables of this nature (which don't seem to have a uniform name--cocktail table is more likely to turn up old Ms. Pac-Man games than anything else) are tiki appropriate, and 2) are affordable. So I decided to make my own. How hard could it be? Not terribly hard, but very time consuming. I picked up a 4x4 post and cut it into two 38" lengths, with a 20" length left over. I stenciled that alternating triangle pattern on them, partly because that will link them aesthetically with the rest of the bar, and partly because I already had the stencil available.
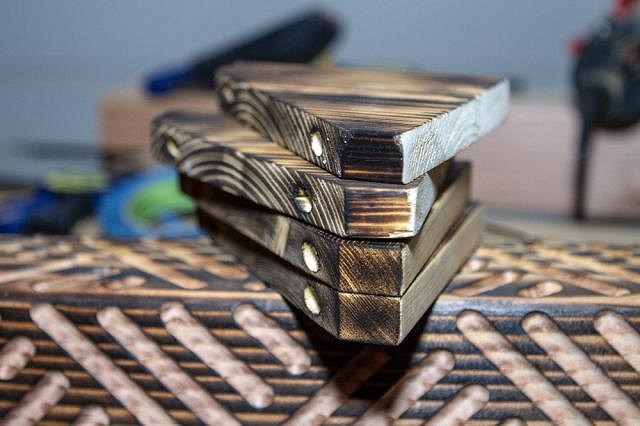
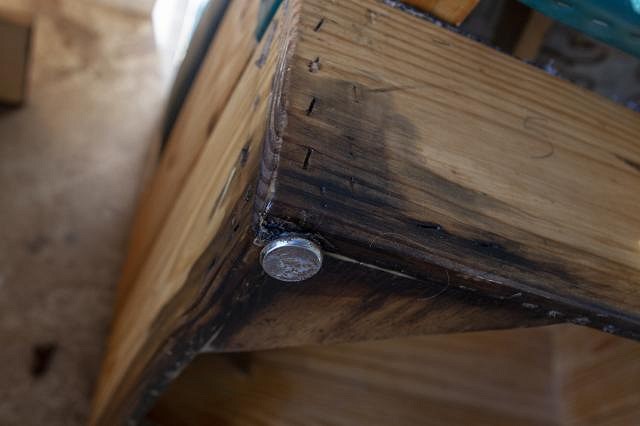
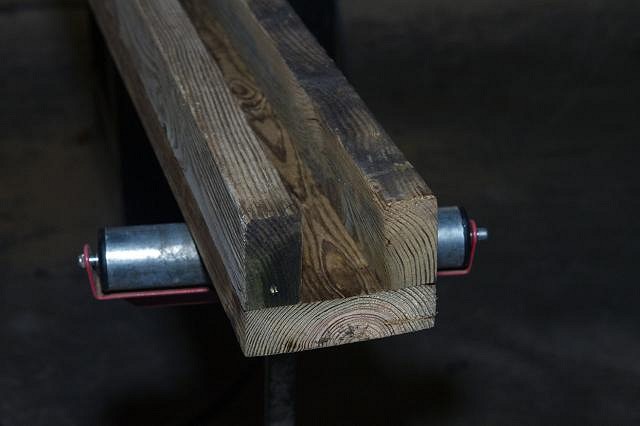
I routered the pattern out on the post/pedestal. Then I cut four triangular buttresses from a 1x6 board. I'll use these (plus pocket holes-with-screws) to attach the table top. Then I flame-treated everything. I normally hit it with a wire brush afterward, but this time I chose to leave the scorched wood untouched. Let's see how that turns out.
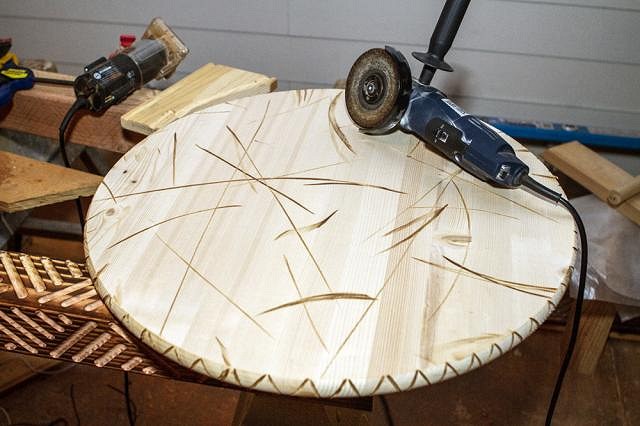
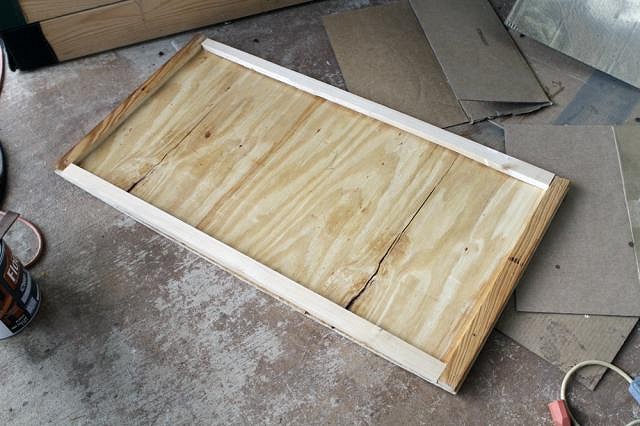
The table top is a 24" circular pine piece from Lowe's. I took the grinder to it to distress the wood. Then I lightly flamed and applied the wire brush to create the illusion of age. All the wood them got a coat of Minwax Special Walnut, and the distressed table top got a second coat of Minwax Dark Walnut for added contrast and deeper color in the gouges and grooves.
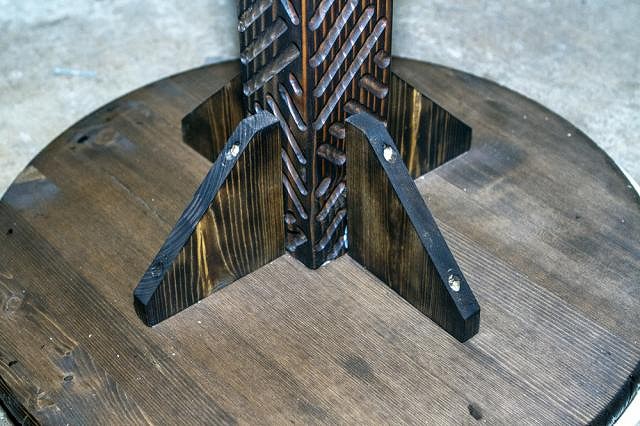
The base is pretty solid. It's made from two layers of 2x4, cut to fit crosswise. Each main cross piece is glued and screwed to the pedestal, then smaller pieces are cut, glued and screwed to the cross pieces to even everything out. It's a little clunky, but super-solid. These being outside most of the time, I thought that an effective approach.
I attached the table top to the pedestal with glue and screws through pocket holes in the pillar. Then I reinforced that with the buttresses I'd cut earlier, attaching those with glue and screws. The buttresses cover up the pocket holes in the pedestal.
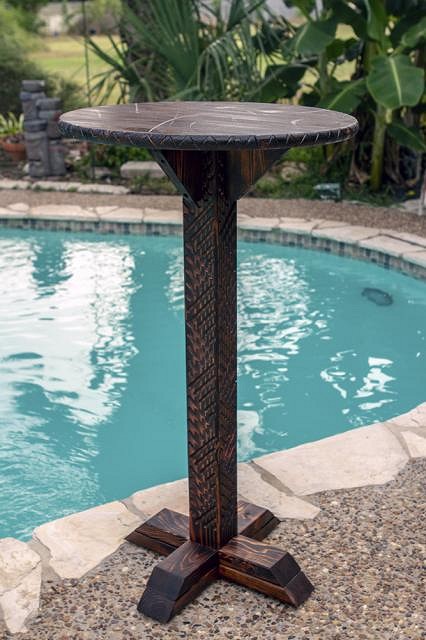
And the final product. I was quite surprised with how well it turned out. Even The Wife allowed that it was far nicer than she'd envisioned. I'm currently finishing up two more with the other wood pieces cut from the original 4x4 post. One will be identical to this, and the other, from the 20" piece, will be a short table for our rattan peacock chairs.
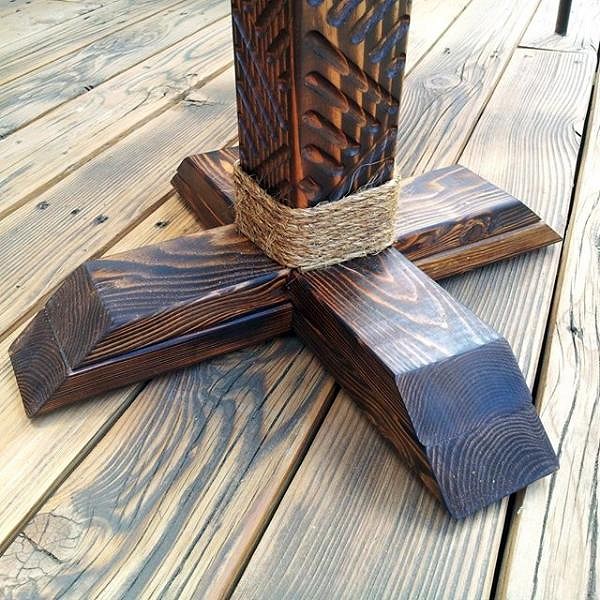
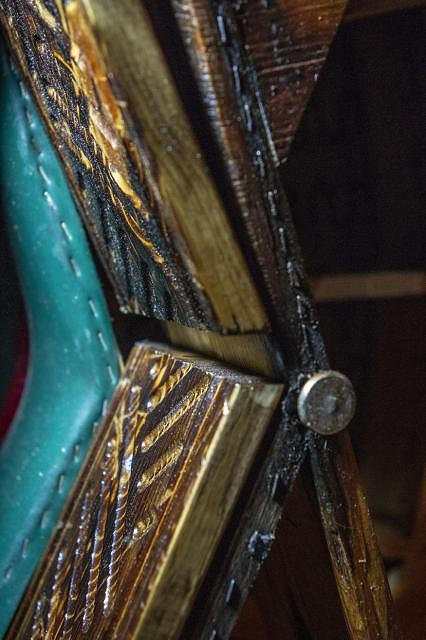
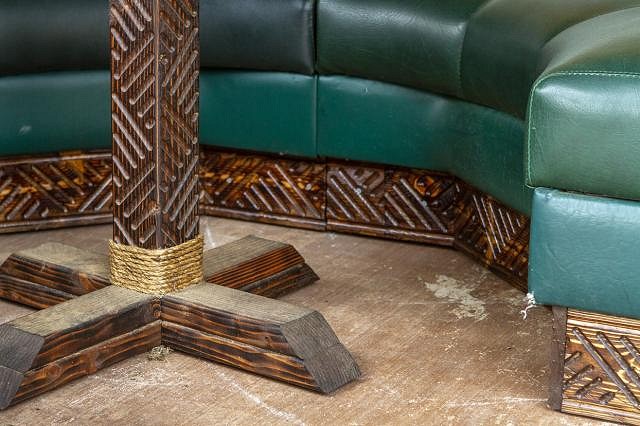
I didn't realize it until after I took the previous photo, but I forgot to apply the final piece of trim--Manila rope wrapped around the base. I think it's a nice accent.
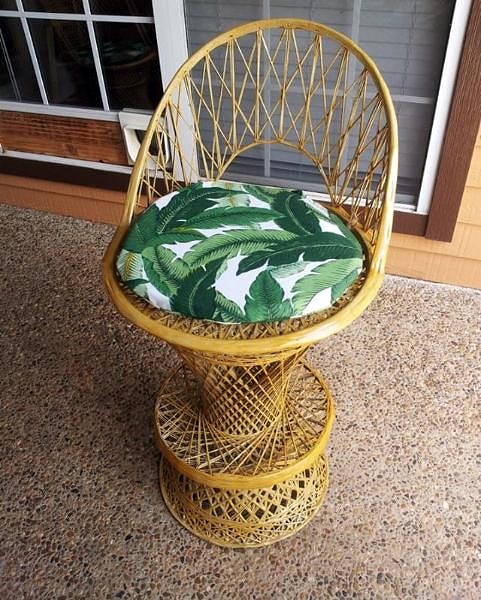
One more project before I let you go. It's an overlooked fact that my bar had no barstools. That's not been a huge issue, but still. Most barstools I've seen are either too expensive, not tiki enough, or I just didn't like. A couple of months ago, two vintage Russell Woodard spun fiberglass barstools showed up on Facebook Marketplace for cheap. Real cheap. And they were in the town I live. I saw them, but was unfamiliar with Woodard pieces at the time. They were listed as wicker barstools. I took one look at them and dismissed them as being fragile and on their last legs. It was Mike Hooker who messaged me and suggested I take a closer look, that he suspected they weren't wicker, but rather fiberglass. That changed the calculus considerably. Turns out they were indeed spun fiberglass, and a tenth the price these usually go for. I snatched them up. They were filthy, though. Not sure what they were used for, or where they were stored. It took me quite a bit of effort to remove all the caked-on gum, paint and glue globs. They were so grimy even power-washing struggled to remove some of the crap.
Eventually, I got them clean. The dull gray paint was super-ugly, and not tiki approved. This was a job for amber shellac!
Amber shellac's not the easiest thing to work with, especially when it's super-hot out and the stuff dries on the brush as fast as you can apply it. But for giving something a tikified bamboo/rattan appearance, there's nothing better. The Wife sewed the cool tropical cushion with some outdoor fabric I picked up, and voila! we have a pair of MCM tiki barstools!
A more detailed writeup may be found on my blog. ~Jayme Lagoon of Mystery [ Edited by: Prikli Pear 2018-07-03 08:46 ] |
|
M

MadDogMike
Posted
posted
on
Tue, Jul 3, 2018 7:45 PM
You've got some good stuff going on here Jayme, I need to spend some time reading in here.
|
|
C

creativenative
Posted
posted
on
Tue, Jul 3, 2018 9:28 PM
Yes, great stuff. One suggestion to do rear projection and your projector is safely inside. |
|
M

mikehooker
Posted
posted
on
Wed, Jul 4, 2018 10:59 AM
Having read Jayme's comment on your page Mike, this made me LOL. Good one. |
|
PP
Prikli Pear
Posted
posted
on
Wed, Jul 4, 2018 8:00 PM
I accept deliveries on Thursdays, Fridays and Saturdays! :wink: |
|
PP
Prikli Pear
Posted
posted
on
Wed, Jul 4, 2018 8:03 PM
Interesting idea! I confess I had not even considered rear projection. The downside is that I'd have to get an actual screen--right now I'm just using a cheap canvas dropcloth! First class all the way! |
|
BS

bamboo stu
Posted
posted
on
Fri, Aug 24, 2018 7:49 PM
I can't think of anything better than watching a campy old movie with friends while floating in a pool drinking a mai-tai. |
|
PP
Prikli Pear
Posted
posted
on
Mon, Aug 27, 2018 9:24 PM
Indeed, Stu! It's great fun. We had our last showing of the summer two weeks back--Gidget was on tap. Boy, that Moondoggie sure is a scamp! :wink: |
|
PP
Prikli Pear
Posted
posted
on
Wed, Oct 3, 2018 9:07 PM
Who's ready for an update? I am! The Wife gifted me with this beauty for my birthday, which spurred me into completing the next section of the Lagoon:
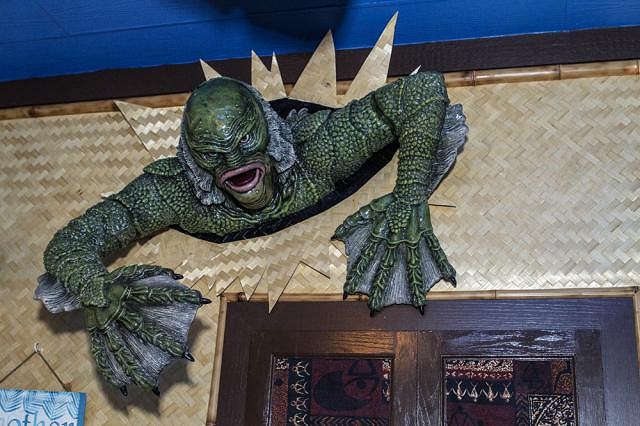
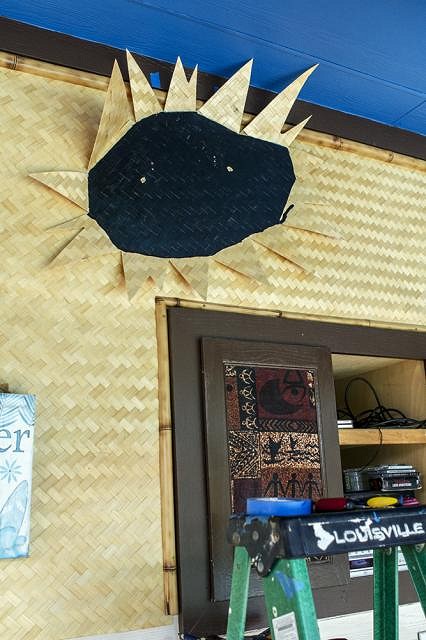
I wanted to have a bursting-through-the-wall effect, so after putting up the bamboo weave panel, I cut some leftover scrap to suit. I painted the center black and stapled to the furring strip beneath the panel. I then drilled in two hooks to anchor the Gill-Man to the wall.
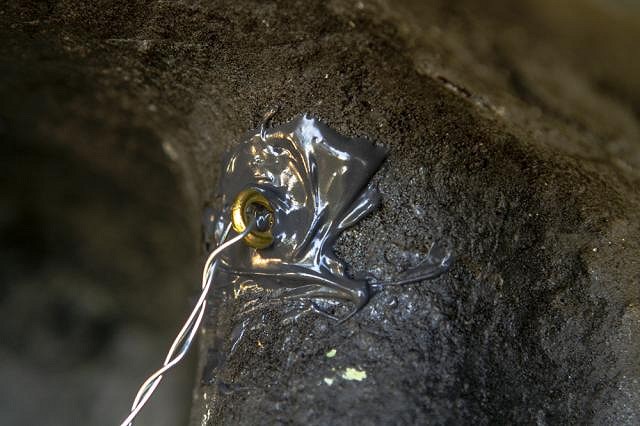
The Gill-Man is molded polystyrene. It's pretty dense, but there's no natural way to mount it hanging. I set two eye screws into the hollow back side, securing them with epoxy. Then I ran galvanized wire between the two screws.
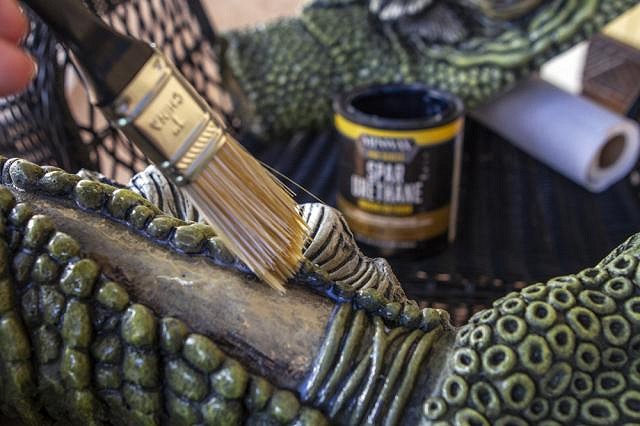
Because the Lagoon of Mystery is an outdoor bar, even though it's sheltered, I've learned from experience reflected UV is still a concern, and it would chew up the polystyrene. Also, I wasn't sure what the wild humidity swings would do to the Gill-Man, so I applied several coats of water-based spar urethane. Why water? 1) because it is thinner and easier to apply to the detailed surface (seriously, look at that detail!) and 2) it dries clear, whereas oil-based urethane has an ambering effect. So now he's protected from the elements as best I can manage.
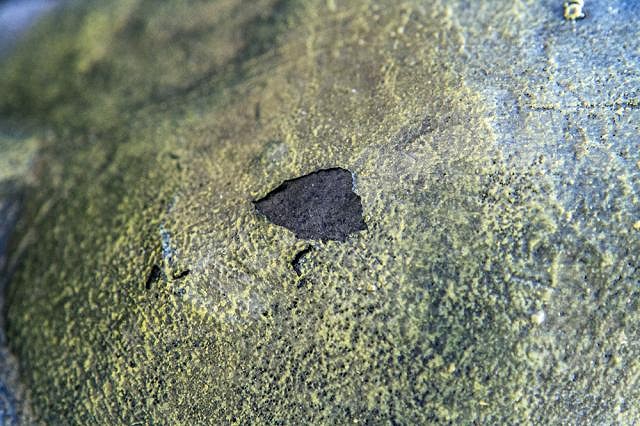
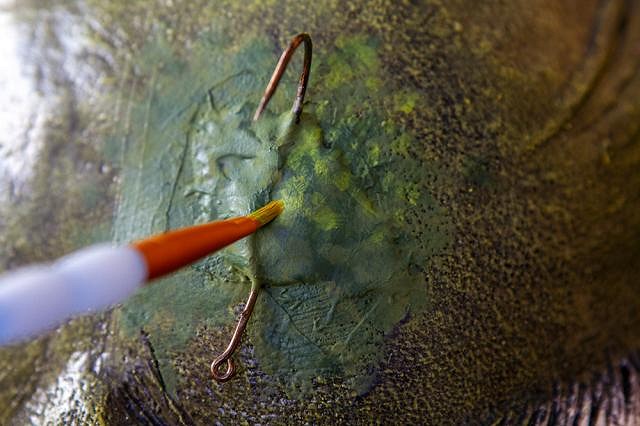
Unfortunately, he came with a section of paint peeling away from the crown of his head. Rather than send him back and eat the shipping cost, I thought I could repair it on my own.
I cut away the damaged paint with a razor, then epoxied a fish hook over the vacant space. Using several different shades of acrylic paint, I replicated as best I could the mottled skin texture. It's not a perfect job, but the colors blend better than they appear in this photo. When he's mounted on the wall with mixed lighting, the repair is nigh invisible.
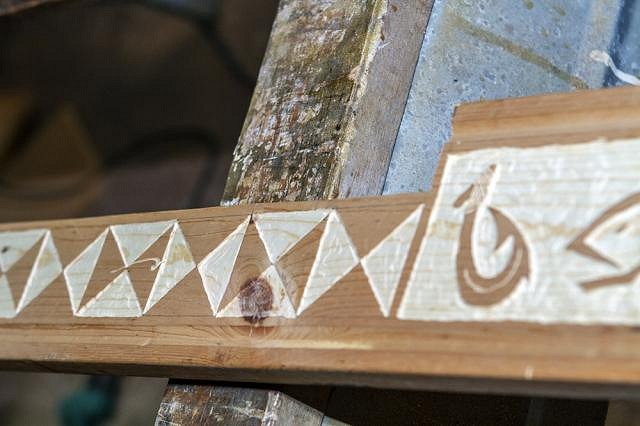
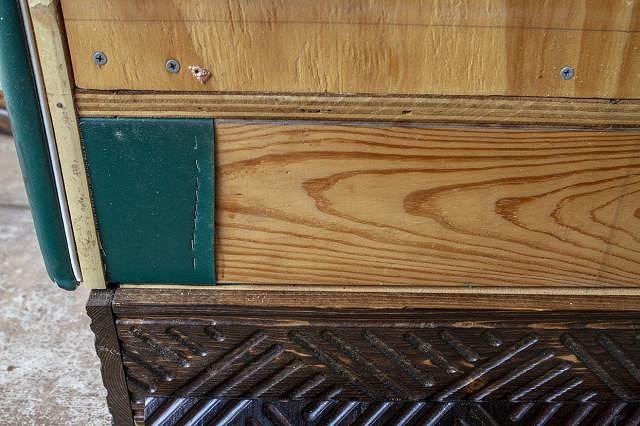
Mounting the Gill-Man spurred me to complete this section of the wall. I'd started on this trim piece last year, but set it aside for other projects. A section needed a cut-out to fit around the built-in stereo cabinet. The jig saw cut I made wasn't perfect, so I smoothed it out with a belt sander.
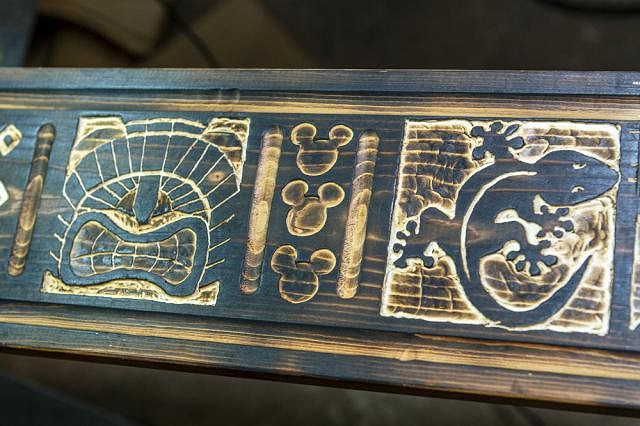
Then I torched, wire brushed, stained and sealed the trim with spar urethane--the oil based type this time.
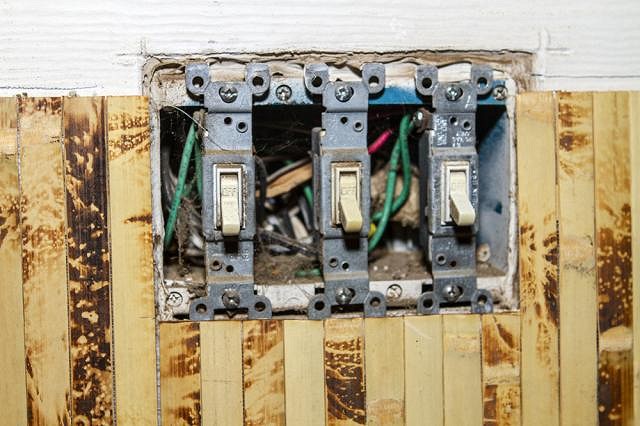
After mounting the vertical tambour panel, I used a Dremel cutting disc to open up a space for the light switches in the wall.
And this is how it looks with everything in place. I've since replaced the white switch plates with dark brown ones.
|
|
PP
Prikli Pear
Posted
posted
on
Wed, Oct 3, 2018 9:20 PM
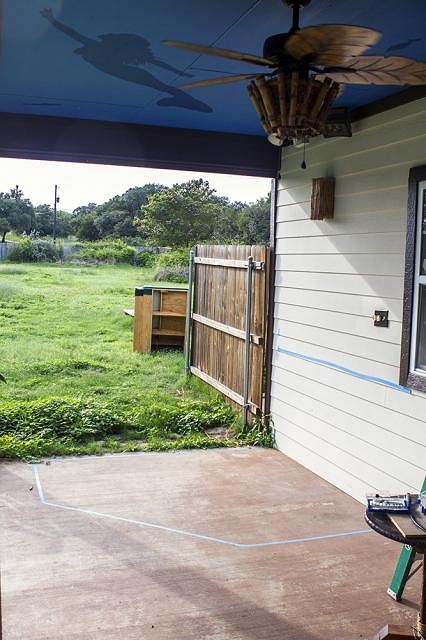
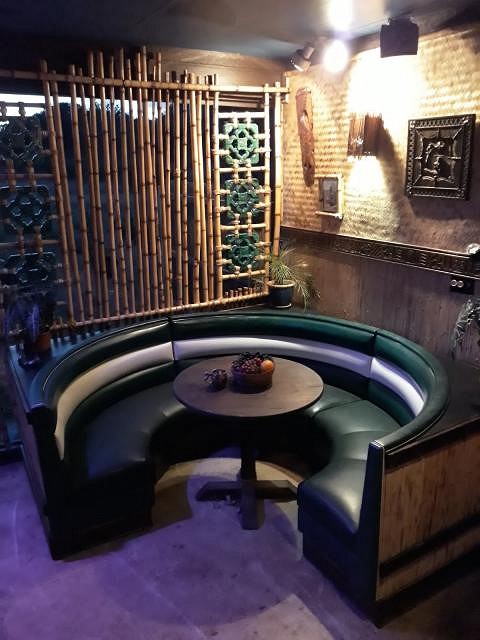
The Lagoon of Mystery is primarily occupying a 65' covered patio. Thus far, we've tikified about half of that covered space. The farthest end, below, remains mostly untouched. I use it for my work area and it's normally somewhat cluttered. When we have gatherings, nobody goes there, because there's no reason to. My grand vision, however, was to have this as the "cool spot" to hang out. I call it "Mermaid Cove" because of the silhouette painted on the ceiling. I wanted to install a circular restaurant booth here as a sort of physical statement "This is the end of the tiki bar." The only trouble was that new booths are crazy expensive. I'd resigned myself to build one, but I couldn't find any plans online that matched what I envisioned. Even with plans, the build would tax my modest carpentry and upholstery skills.
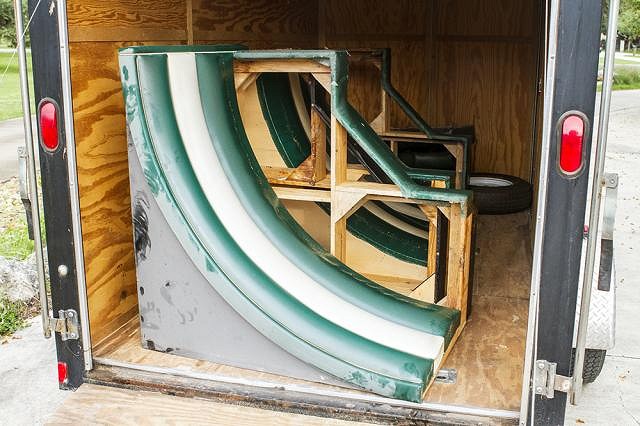
By sheer, dumb luck, I discovered a recently-closed Fuddrucker's in Houston (I love their burgers, so a location closing is kind of bittersweet) was selling off their restaurant booths. What's more, their asking price was less than the cost of lumber to build my own. Wow. So last Saturday I drove shuttle run, borrowing my brother's trailer and heading to Houston and back, having logged approximately 500 miles. I ached. But I had my booth. Totally worth it!
This is how it looks in situ. I am currently building a table in the style of my previous cocktail tables for the booth, which will look spectacular once in place. I've decided to build a (modestly) raised deck for the booth to rest on to enhance the sense that Mermaid Cove is a distinct location unto itself. What to do with the opening to the yard beyond is starting to come together in my mind, involving a combination of bamboo poles, thatch and Chinese jade breezeway tiles. All of that lies in the future, however. Currently I am weatherproofing all the wood surfaces with my go-to sealant, Flood CWF-UV (natural clear). Those open areas around the back of the booth? I plan to close those in and turn into storage cabinets through the strategic use of hinges and magnet locks. I've done some measurements and sketches, and am convinced I can thoroughly tikify this booth before I even think of replacing the vinyl with tapa pattern (which, initially, I thought I would have to do first thing).
The downside is that this was a restaurant booth. There was all sorts of foodstuffs, grease and grime embedded in every nook and cranny. I will spare you the photos of that. A pressure washer and several hours of scrubbing with 409 removed the vast majority of gunk, and the booth is now cleaner than it has been for 20 years. As always, more photos and a detailed, step-by-step writeup may be found on my blog. |
|
E

EnchantedTikiGoth
Posted
posted
on
Wed, Oct 3, 2018 10:29 PM
I love the Creature! That's a great piece! |
|
PP
Prikli Pear
Posted
posted
on
Thu, Oct 4, 2018 11:25 AM
Thanks, EnchantedTikiGoth! As a kid who grew up with crappy, cheap Halloween decorations in the 70s and 80s, I'm just blown away by how well done this sculpt is. The details is simply amazing. My only complaint is that the arms and shoulder sockets simply don't match up very well. I had to glue them in place lest they fall out. Other than that, this is a bust to rival the original costume in realism. |
|
U

uk_chris123
Posted
posted
on
Sat, Oct 6, 2018 1:55 AM
Hi, I don't usually respond to postings although I do read every day after my morning walk with a cup of coffee. I just had to say that I love your bar area and what you are doing to it. The booth seat is also outstanding. If only I had the space. My modest bar and the lack of 'Tiki' in the UK makes it just a dream. Keep showing your pics, they are appreciated even if not replied to all the time. Chris |
|
PP
Prikli Pear
Posted
posted
on
Sun, Oct 7, 2018 9:22 PM
Thanks for the comments, Chris! I can sympathize with lack of space--although I hadn't discovered tiki yet, our previous house was too small for me to do many projects I'd hoped to. Making the most of what we have available, within the existing constraints, is the best anyone can do. I know I'm very fortunate to have lucked into this house with its outdoor space custom-made for entertaining. We were literally two weeks away from being homeless when it fell into our lap (had to walk away from a house we had under contract because of serious problems discovered during inspection--and our old home had already sold!). The Wife and I were discussing just this last month, how this house directly led us to tiki. Had the previous house under contract not proven to be a disaster in the making, or we ended up in one of the many other places we considered, it's doubtful we would've discovered tiki. Which would be a shame, since we enjoy it, and the people we've met through it, so much. Life is strange sometime! :) |
|
PP
Prikli Pear
Posted
posted
on
Tue, Nov 13, 2018 12:28 PM
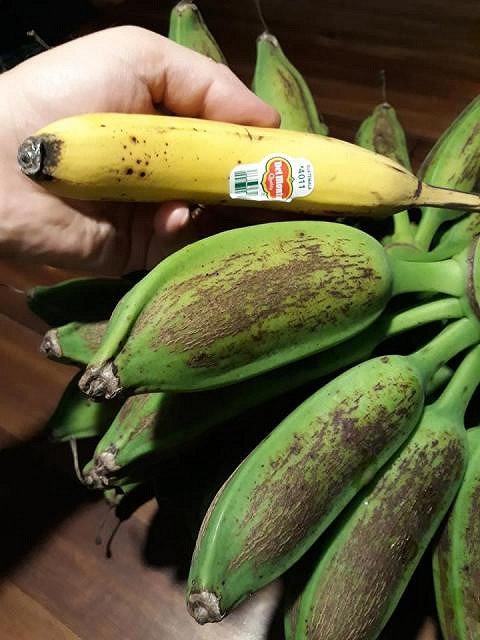
The first real cold front of the season blew through last night, so I set about protecting the tropical landscaping that is so much a part of the Lagoon. Mostly, I try to plant hardy tropicals or their temperate relatives (I'm looking at you, hibiscus and passiflora!) but the in-ground Bird of Paradise and my bananas got covered with frost cloth. I've learned from experience that fruit is much less durable than the banana plants themselves, so I harvested a mostly-mature bunch from my dwarf Orinoco:
Dwarf Orinoco is a plantain hybrid. It can be cooked as any other plantain, but if allowed to get fully ripe--we're talking black peel that looks almost rotten--then the fruit inside softens and gets very sweet. It makes a flavorful dessert banana. Here's the bunch with a store-bought Cavendish type for comparison.
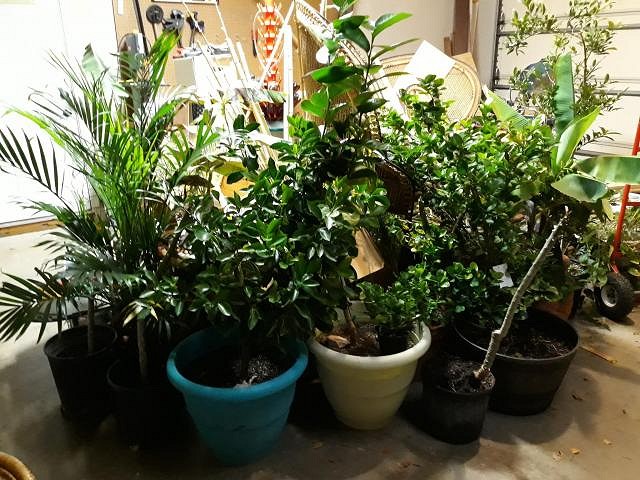
And then my potted citrus and frost-tender tropicals all migrated to the garage. Our freezing spells don't normally last longer than a few days here. Friday I'll move them back out onto the south-facing lanai where they'll soak up the sun for the next few weeks. Long-range forecast doesn't hold anything lower than the mid-40s through the end of November. It's not as much moving as it looks, but as an incentive, I found a few limes I'd missed when I picked them a few weeks ago. Score!
|
|
T

tikiskip
Posted
posted
on
Tue, Nov 13, 2018 12:57 PM
Looking good. I would wrap that booth in plastic and throw a bug bomb or two in there and let it sit for a long time. Then I would wait a good month or two and do it again to kill any eggs that may hatch in the mean time. Only then would I take it inside, or outside for that matter. They also make roach baits that will work some too. |
|
T

tikitube
Posted
posted
on
Tue, Nov 13, 2018 4:42 PM
The fish hook fix is hilarious. Great job. :) Awesome booth, too! I once picked up 20 working par fixtures from a shuttered Fuddruckers for like $25 on eBay. The seller was apparently upset that they sold for so little, so he just rammed them into a water heater box sans any padding and with very minimal packing tape. By the time they arrived, there were wires falling out the bottom of the box and you could hear everything just rattling around. The UPS guy looked worried, but I just had to laugh. You're right, though...they always had good burgers. Can't wait to watch the rest of your tiki space expansion. |
|
PP
Prikli Pear
Posted
posted
on
Thu, Nov 15, 2018 8:26 AM
Skip, good advice! But it's not going inside. The Lagoon is strictly an outdoor operation, and that's where this booth stays. I've taken it apart to weatherize it and done some rebuilding. Most hitchhiking critters have fled to the surrounding vegetation. Those that haven't will make a nice snack for the scads of geckos and anoles we have living here. There were a bunch of geckos living here when we moved in, but my tiki build efforts have given them a lot more sheltering options. I their numbers have exploded so much that I jokingly refer to one original cocktail recipe I'm tinkering with as "Mind the Gecko." :lol: Tikitube, yikes! Amazing those lights weren't smashed beyond all use! I wish there were a Fuddrucker's closer to me. Have to drive 45 minutes into San Antonio for the nearest one. I love their elk or bison burgers, but not all locations offer those exotic meats. Some used to offer ostrich, but that was a legacy of the short-lived ratite craze that swept Texas a couple decades ago. Talk about a bubble economy! |
|
T
tikiskip
Posted
posted
on
Thu, Nov 15, 2018 3:47 PM
Having a restaurant in the past it's the first thing I think of. Have been to parties that I did not want to sit anywhere as I might take something home with me. One line lady at OSU said she found a bunk bed at the curb and took it home. Hey one more thing now that you said you had Geckos. Man I wish I had put metal under there before we put that thing in it is a total war trying to keep them out. Good luck, it's a very cool booth. |
|
PP
Prikli Pear
Posted
posted
on
Thu, Nov 15, 2018 6:02 PM
Thanks, Skip. Man, I am always worried about bedbugs hitching a ride home whenever I stay in a hotel. I always keep the suitcases closed up and elevated. Yuck! We don't have chipmunks in Texas, at least none of the parts I've spent time in. I've always wondered why. Plenty of grey squirrels and occasional ground squirrels around our part of the state, although our beagles and cats keep them at bay. Opossums and armadillos don't generally fare so well, either, come to think of it. The biggest critter problem I've encountered thus far are barn swallows trying to build their nests under the patio roof (cool birds, but too messy to coexist with a tiki bar) and paper wasps that want to build everywhere else. Gotta stay on top of those--I've learned the hard way that a nest can go from zero to sixty in just a few days. Ouch! Oh! We had roof rats in our palm trees, and later, under the patio. The infestation developed while the house was vacant and on the market for an extended period. The landscaping was so overgrown it gave them tons of cover. We couldn't bait them because of our pets. Took two years of clearing out brush, trapping and cat predation to finally wipe 'em out. For a while, the cats' favorite game was "catch and release" in the house. Hilarity ensued, as I'm sure you can imagine. |
|
D

Donovan
Posted
posted
on
Tue, Dec 11, 2018 3:28 PM
Thank you for the kind review of the Cannibal Club. Your project is every bit imaginative as it is amazing. Awesome transformation. Can't wait to see what's next. |
|
PP
Prikli Pear
Posted
posted
on
Wed, Apr 17, 2019 2:17 PM
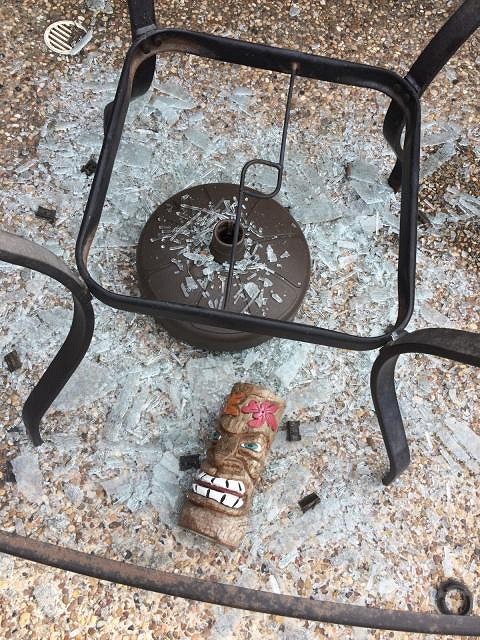
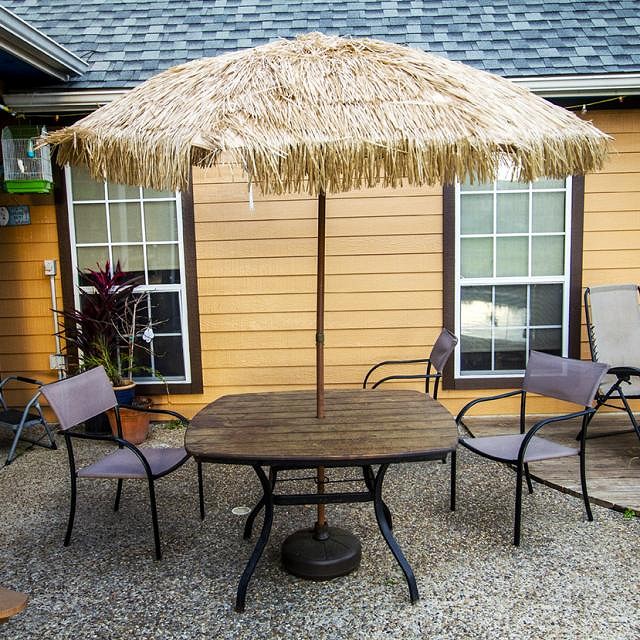
There's a reason why we don't allow glass in the Lagoon of Mystery. Last fall, a thunderstorm with gusty wind picked up our patio table via the big umbrella, then slammed it back down, shattering the tempered glass top. Glass pellets were everywhere, even the pool. It took far too long to clean that mess up. Afterward, we were lacking a table, and we used that table a lot.
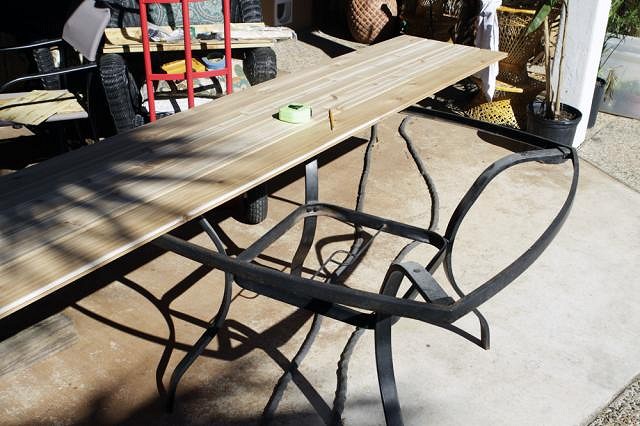
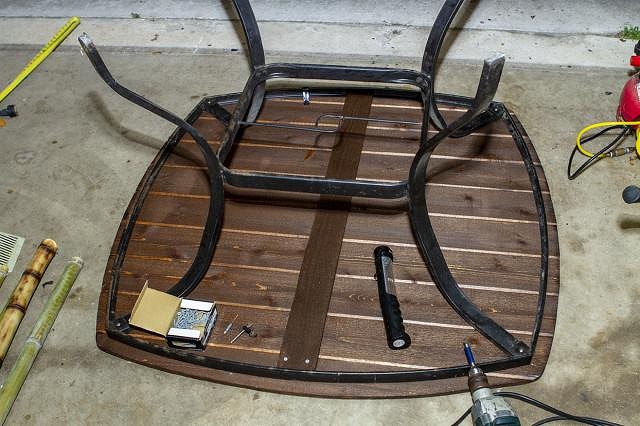
We weren't thrilled with the idea of shelling out a lot of cash for a replacement, so I did what I always do--figure out a slightly-less-expensive-but-way-more-time-consuming alternative. The table's metal frame remained intact, so all I needed was a new top. My primary concern was that the replacement table be shatterproof, with "filling into the tiki vibe" a close second. After some thought and price shopping, I settled on tongue-and-groove western red cedar planking. The tongue-and-groove would offer stability and the western red cedar is fairly light and resistant to decay.
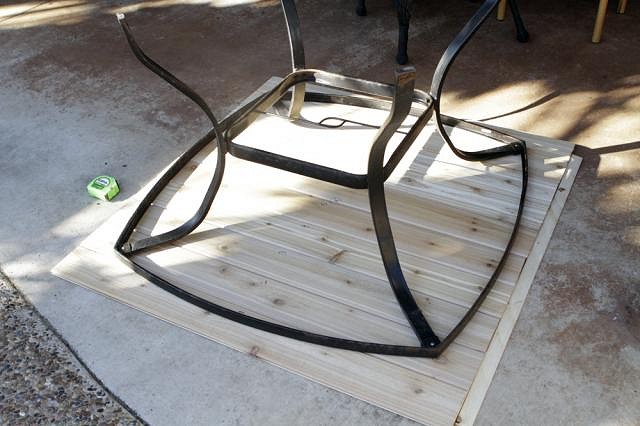
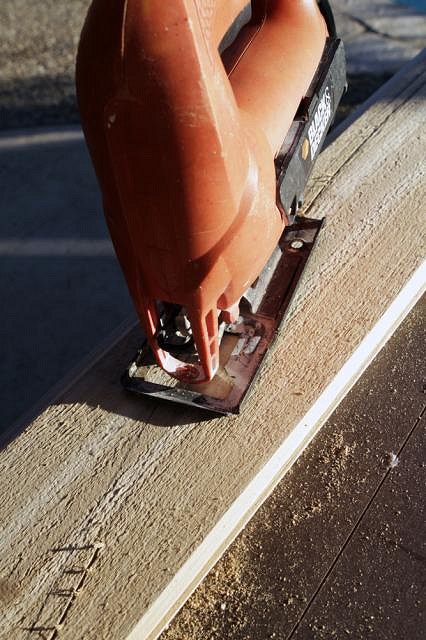
Since the cedar planks were 8' long and the table less than 4' across, I cut the planks in half then used a jig to trace a 2" (give or take) lip around the frame. The glass set within the circumference of the frame, but making the wood fit inside would be nightmarish. My solution would be to set the wood on top of the frame.
I cut the boards to shape with a jig saw, then used a router to bevel the edges. I learned from my porthole build that beveled edges make things look less "slapped together."
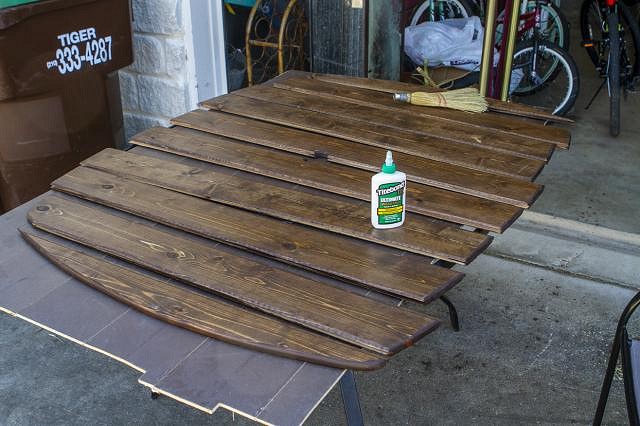
I stained the wood using Minwax special walnut, my go-to stain for most applications. Once dried, I applied several coats of Flood UV, because the table's going to be outside 365 and although cedar is decay resistant, it's not invulnerable.
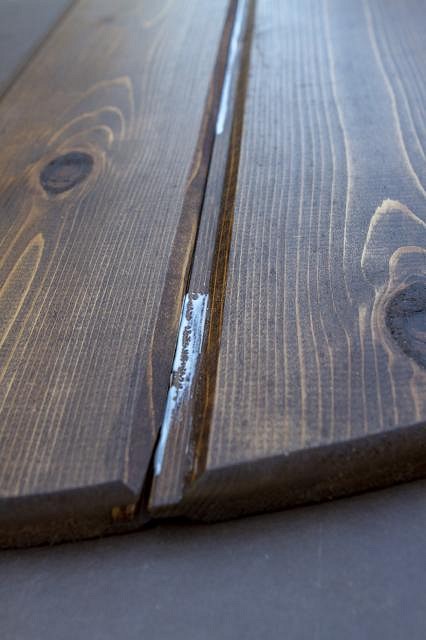
Next, I used Titebond III to glue the tongues into the grooves. Because the planks, when fitted together, were a lot looser than I was comfortable with.
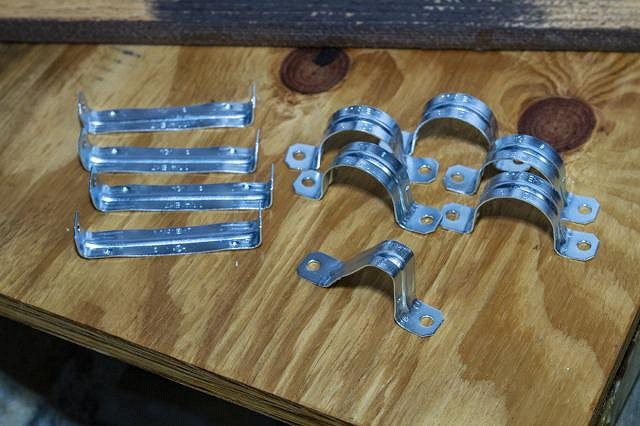
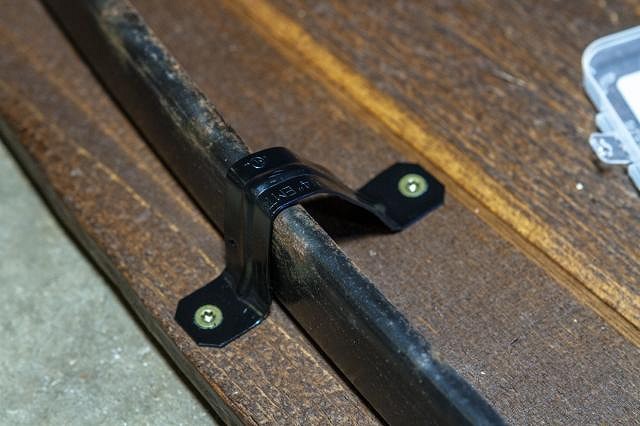
But now the $64 question: How to anchor the wooden top to the steel frame? I hit upon using brackets--conduit straps--to attach the top to the frame. The brackets didn't come in the proper shape, but they were easy enough to hammer flat, then use pliers to work them into the proper angles.
As I didn't want shiny silver metal (or even dull silver metal) attracting attention, I put the brackets into a box and spray painted them matte black.
Much to my surprise, my bracket scheme worked pretty well. Using a power drill, I quickly went around the table and had it solidly secured in no time. In fact, I moved a little too quickly--you can see some rust spots on the frame. I'd intended to sand those spots down and apply a new coat of paint. That would've been the responsible thing to do. But I just wanted to get the darn table fixed, so I skipped that part. Maybe I'll get back to it someday.
Once I got it back out by the pool, it only took a few moments to position the umbrella base and slot the tiki umbrella through the center hole. It turned out better than I expected, although the grooves where the planks come together seem to be dust magnets. This is more tangential to my bar build than most of my posts, but it needed to be done and someone might find something useful here. I've got more interesting stuff coming soon.
|
|
E

eroc
Posted
posted
on
Wed, Apr 17, 2019 4:01 PM
Looks good. I'd take that table over a glass top any day! I see you said the T&G was a little loose. Question: did you look into blind nailing the T&G? The reason I'm asking is that I was thinking of doing that on my plank bar top, but wasn't sure if it was a viable technique. |
|
PP
Prikli Pear
Posted
posted
on
Wed, Apr 17, 2019 7:58 PM
Thanks for the kind words, Donovan! Much appreciated!
Good question, eroc. I didn't seriously consider blind nailing because 1) the planks were less than 1/2" thick (and even less where the tapered tongue and grove met, and 2) I expected my brackets to hold everything securely once I got them screwed in. The brackets turned out to hold the planks to the table frame more tightly than I expected, so yay, win! But I realized I left out one additional step. Because of the looseness of the planks, I started worrying the table might sag in the center, particularly where I cut the umbrella hole. So I got a cheap cedar fence plank, cut it to size, slapped on several coats of Flood UV, then screwed it onto the two end pieces. This holds them into position so the tongue-and-grooves don't separate, and also lends stability across the grain. Here's a photo:
|
|
PP
Prikli Pear
Posted
posted
on
Wed, Apr 17, 2019 9:31 PM
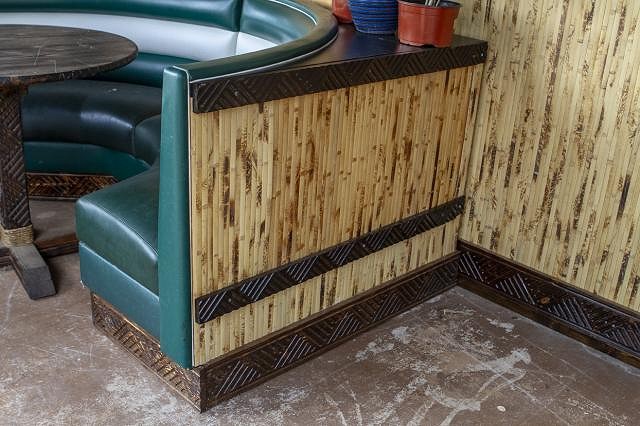
Here's where TikiSkip gets to tell me "I told you so." My booth I got from Fuddrucker's back in September? I made a mistake. A big mistake. Remember how nasty the booth sections were back when I got it? There was grease and grime and food particles all over that I spent a day hosing off and scrubbing down. The bottom most section of the booth had old, black vinyl covering it, and at the time I decided to leave that intact, thinking the vinyl offered some degree of protection to the wood. Wrong! What I failed to take into account was how ripped and damaged that vinyl was, and in fact, it had been catching grease, dirt and--worst of all--moisture and holding it there against the wood. When I finally peeled away that old vinyl months later, I found a disgusting, moldy mess. I'm telling you folks, it was bad. The photos below are the after shots, once I'd hit the fuzzy stuff with multiple waves of Mold Armor and bleach, and exposed it to the cleansing UV rays of the sun. And attacked it with a wire brush. I wasn't playing around, working on this problem off and on for a week. A lot of bleach went into this. A lot of Mold Armor.
But I got them cleaned up, and sealed against mold and wet and other environmental disasters with Flood UV. That allowed me to replace that nasty vinyl with wooden trim pieces, routed, burned, stained and sealed to match the baseboards I made for my tiki bar. The booth sections have two 45 degree angles on the interior, so I measured and made 22 degree cuts in the baseboard sections. The pieces fit perfectly, although 22+22 does not equal 45.
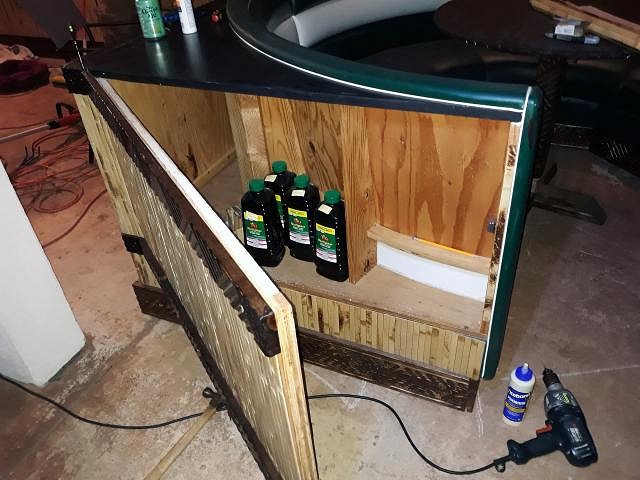
The booth sections were never meant to be free-standing, so I had to shore up the thin boards supporting the back corners. For this I used basic 2x4s, weather treated, anchored to the bottom with screws through pocket holes. On top, I peeled back the laminate and drilled straight through the plywood.
I cut thin sheets of plywood to fit the openings in the sides, them framed them with scrap wood to give them rigidity.
The easy thing to do would be to seal off the back, but in my outdoor tiki bar, storage is scarce. I decided to turn the empty space in the booth into storage. I used shims to position the door while I marked the position of the hinges. I also installed magnetic cabinet latches to ensure the doors stayed closed.
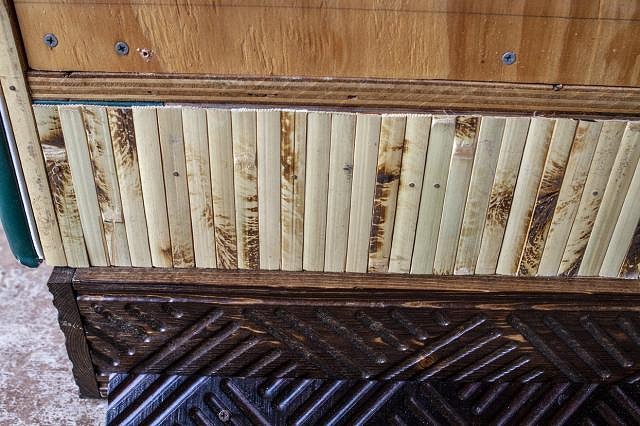
Once all the baseboards were screwed into place (countersunk and camouflaged with a drop of brown paint applied with a Q-tip) I had to address the bare wood. Very untiki. I had some tortoise shell bamboo tambour panels left over from covering the wall, so I decided to use that. This, coupled with the baseboards, would give a coordinated appearance--as opposed to random and haphazard--and create the illusion that I planned all of this from the beginning.
I cut the tambour to the appropriate height then applied Titebond to the backs. I attached it to the booth section using small paneling nails, which would hold the bamboo tight against the booth until the glue set.
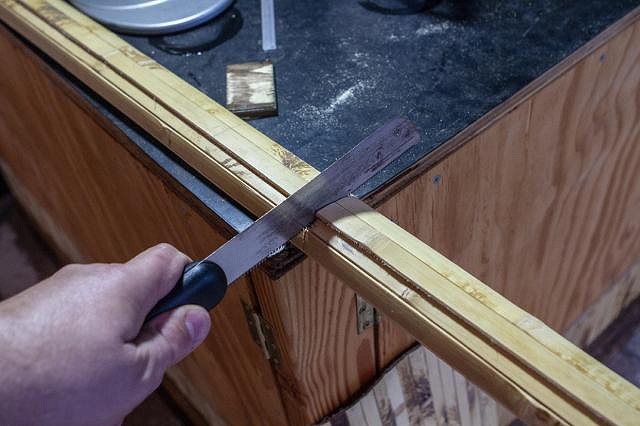
For the storage doors, I rolled up my largest remaining sections of tambour, measured the proper length, then used a fine-tooth saw to cut to size. Yeah, elbow grease. Using a jig saw or table saw causes the bamboo to splinter. My band saw works well, but unfortunately these pieces were too big to fit into it. Fortunatley, bamboo cuts easily so this didn't take terribly long.
I applied glue, then attached the sections to the doors by first drilling pilot holes then anchoring the tambour using paneling nails. Here's something I don't see mentioned online about bamboo tambour--it bows outward. I had to go through my wall covering and add a bunch of nails because the tambour started sagging badly. It looked like a pot belly sticking out. To prevent that from happening on the cabinet doors, I rigged up this scaffolding of boards and clamps to press the center strip of tambour tight against the plywood door until the glue set. If you think it looks inelegant, trust me, it's far more clumsy in reality. It did not get easier with each subsequent door.
To finish off the doors, I added routered trim half the width of the baseboards, still using the alternating triangles pattern. These serve as both a stop to keep the door from going in too far, and a convenient handle for opening.
Look! I'm already putting that new storage space to use!
Cunningly, the booth also matches the motif of the cocktail tables I made for the Lagoon.
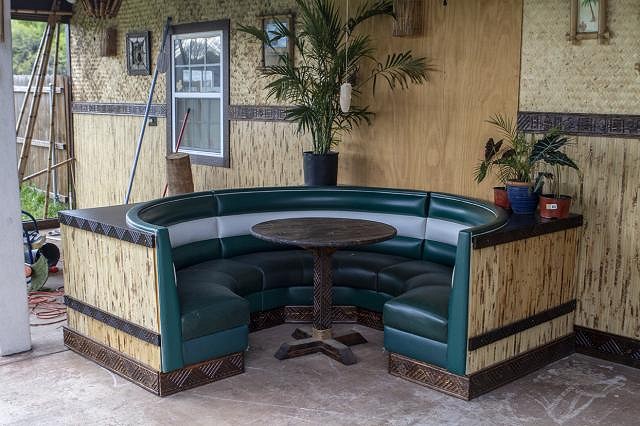
And the finished product. I'm very happy with how it turned out. The white stripe is a little off-putting and I haven't decided what to do with it yet. I have many options. Eventually I expect we'll re-upholster the entire seating area with some sort of tapa pattern, but for now I am content with what I have.
As always, I have a more detailed build-along post available on my blog. Mahalo! |
|
L

littlegiles
Posted
posted
on
Thu, Apr 18, 2019 5:17 AM
Love the new tabletop and the booth makeover is epic. I wonder if you could temporarily glue a piece of appropriate fabric over the white strip. If the pleat is deep enough you could glue a finished edge down into it. Might work for a patch until you could get the whole thing reupholstered. Thinking more....could the white be stained? I'm sure you can stain vinyl and that might be worth looking into. |
|
T
tikiskip
Posted
posted
on
Thu, Apr 18, 2019 5:47 AM
Hey it looks great! I don't know what you paid for that booth but the re-upholstering will be Waaay more than that. Another thing there is a grinder disk that fits on your Dremel tool that will cut bamboo nicely. Good luck! |
|
JD

Johnny Dollar
Posted
posted
on
Thu, Apr 18, 2019 5:52 AM
for the white strip, i might be inclined to try adhering some barkcloth with some heavy duty spray mount. of course it would be tricky to mask everything off so the adhesive goes only where you want. looks good! |
|
PP
Prikli Pear
Posted
posted
on
Thu, Apr 18, 2019 9:11 AM
Thank you, littlegiles! And Johnny, too! The white's not urgent. I've thought about gluing tapa on, or using vinyl paint on it, etc. I'm hesitant to use actual barkcloth as it's outdoors and even the reflected UV is pretty brutal. If I'm investing in barkcloth, I'd want it for the inside (and my track record with containing spray adhesive isn't the greatest). I don't want to botch it and I don't want to rush it. I'm going to let my subconscious chew on it for a while as I move on to other projects in the Lagoon (like, finishing out that final 15 feet so I can move the booth into its permanent position). That stripe might be the very last thing I come back to. Time will tell, to coin a phrase. Skip, you know it. And I would do the re-upholstery work myself (madness) but even so, the outdoor tapa-print fabric (or whatever I eventually decided on) I'd need to recover the booth would cost more than the booth did. When I have everything taken apart, I can see the different layers of vinyl from previous re-upholstery, since it looks like they didn't take the old stuff off (one incarnation of this booth was red). Not something I look forward to, but something I can accomplish myself with a lot of time and a lot more cursing. And yes, that Dremel cutting disk works well on the tambour. I've used it multiple times on sections I've already mounted to the wall but need to cut out detailed areas for light switches, etc. I've broken an alarming number of them when trying to cut through the rolled tambour, though. For whatever reason, they keep binding no matter how I approach the cut. Just simpler and quicker to use that fine-toothed saw. |
|
T
tikiskip
Posted
posted
on
Thu, Apr 18, 2019 3:52 PM
I would not re-upholstery that thing till it was faded and I had to do it. I gave my wife a six band rattan set, the godfather rattan for Christmas one year and it took forever to get the guy to finish the re-upholstery job and was very costly. What you need is a cool table lamp or a hanging light to center on that table.
|
|
PP
Prikli Pear
Posted
posted
on
Mon, Apr 22, 2019 11:43 AM
That's a fine-looking rattan set, Skip! I've seen one or two show up on CL around here the past 2-3 years. Not terribly common, but it'd be nice to get something like that someday. Nice upholstery job--sorry it was so much trouble to get done. Sometimes life just likes to torture us for no good reason. Once the booth is in its final location, I do intend to add a hanging lamp over it. In fact, that's my next phase once the bones of the place are all completed. I need a lot more hanging lights for the full-on tiki experience. I'll probably start tackling that in the fall. And yeah, we're already on the lookout for vintage ash trays, etc. The Wife is kicking herself for passing on one a while back. She went back for it and of course it was gone. That's the way it goes. |
|
W

W8N2Surf
Posted
posted
on
Wed, Apr 24, 2019 8:45 AM
Really nice to see the update on the booth, and the completed picture. Great job, and the white stripe looks cool. |
|
T

TikiDad
Posted
posted
on
Sat, May 4, 2019 6:37 AM
What a great project! Thanks for the documentation of the build! |
|
SF

Slacks Ferret
Posted
posted
on
Tue, Jun 4, 2019 9:31 AM
Wow! So much work...but so worth it! It looks fantastic. I'm super jealous. I always wanted a booth in my tiki room. The white stripe didn't really bother me until you mentioned it. If you feel inclined, just do like you said; find some good vinyl paint and make your own tapa patterns over top. I'll bet that would look great. |
|
PP
Prikli Pear
Posted
posted
on
Wed, Jul 31, 2019 10:39 AM
Saturday, September 14 at the Lagoon of Mystery, New Braunfels, Texas.
|
|
C

Commodore
Posted
posted
on
Wed, Jul 31, 2019 11:15 AM
That's awesome |
|
PP
Prikli Pear
Posted
posted
on
Fri, Oct 18, 2019 12:36 PM
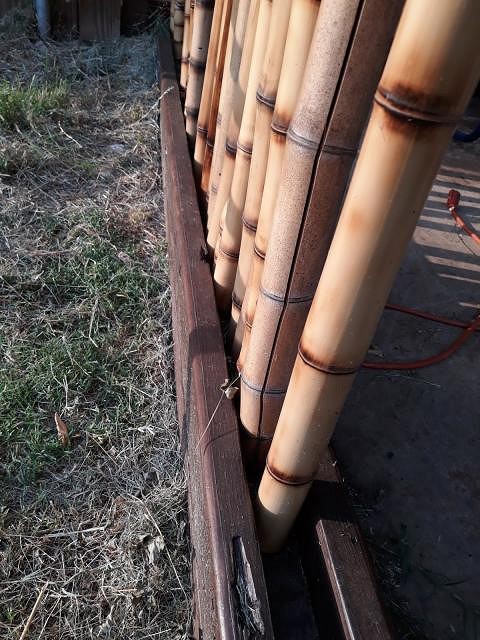
Hey! Look! It's a build update! When you look at these images, realize this particular part of my build started a year ago. Literally. My progress on any particular project is low, moving forward in fits and starts, but when one stumps me I shift to another and back again. Eventually I finish, but it's tedious along the way. This part began last October, and actually earlier if you count my efforts at harvesting bamboo. I always intended to have a bamboo screen marking the far end of the covered patio that is the Lagoon of Mystery, and when I lucked into the booth from Fuddrucker's, that prompted me to start to get serious about finishing off that end. I took some of the wood salvaged from my deck rebuild and cut two boards to length, then split one lengthwise:
I attached the split pieces to the larger one with outdoor wood screws to form a U. I stained and weather treated the assembled piece, and added furniture footers underneath to separate the wood from direct contact with the concrete of the patio to avoid moisture wicking and reduce the potential for rot. The wood's western red cedar, which resists rot, but even with weather proofing, continuous wet can ruin any wood.
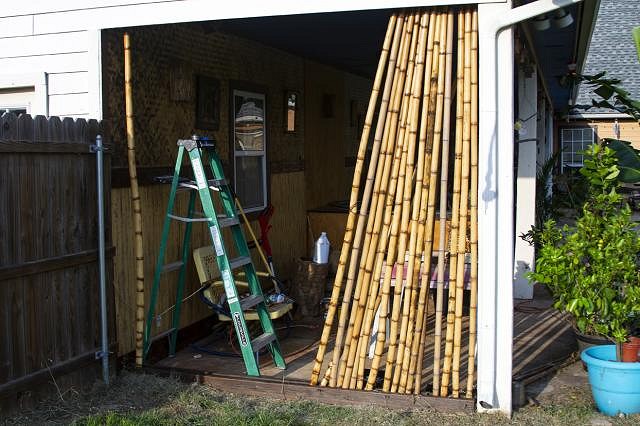
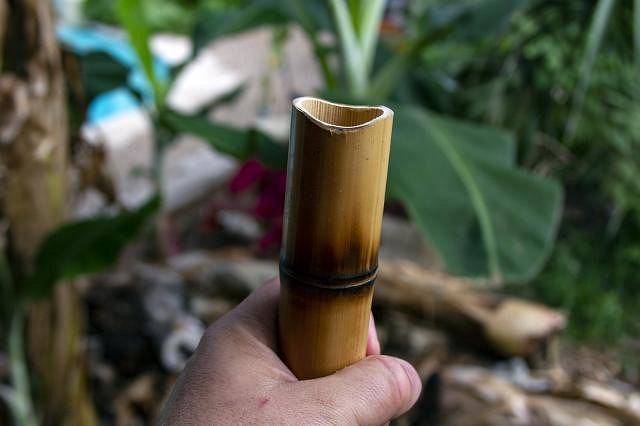
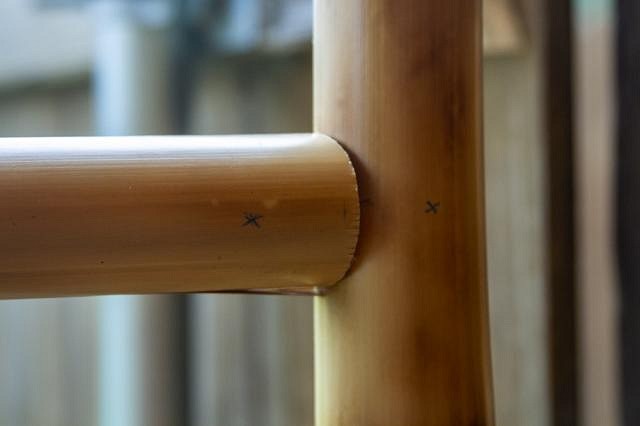
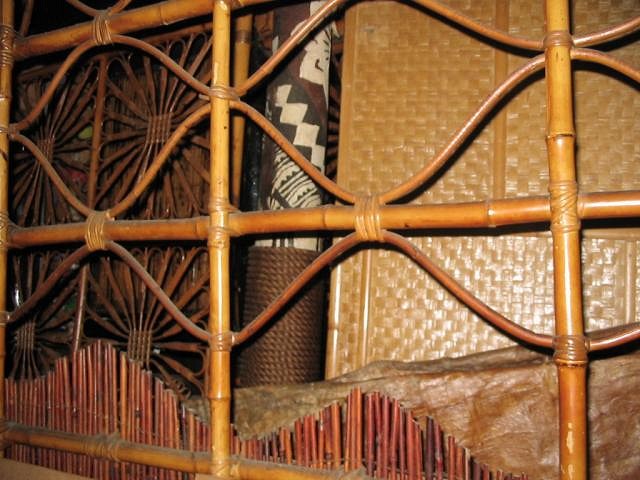
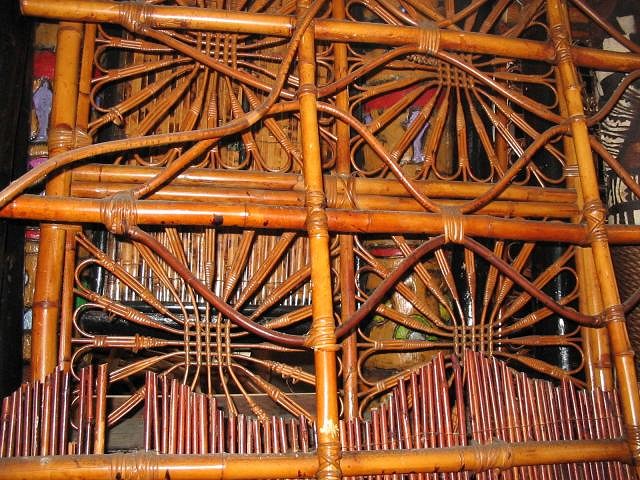
The bamboo culms I'd harvested and torched slotted into position. The culms average maybe 2" or less in diameter, 8'-8'6" in length.
This is what it looked like from the outside. Not a whole lot of anything, beyond a mess.
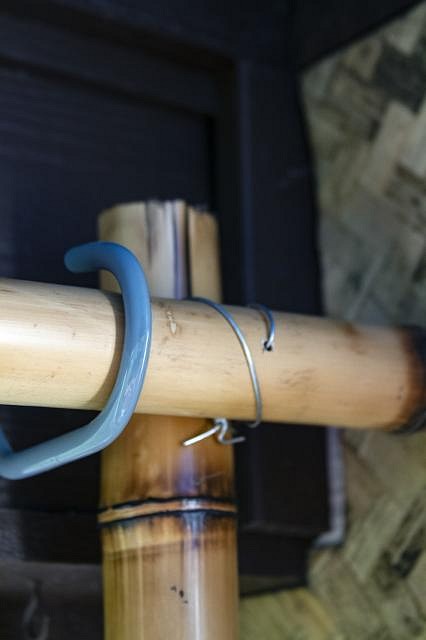
I used a bicycle hanging hook up top to support an 8' bamboo cross beam, then drilled and wired a vertical culm to it. I repeated this on the opposite side as well.
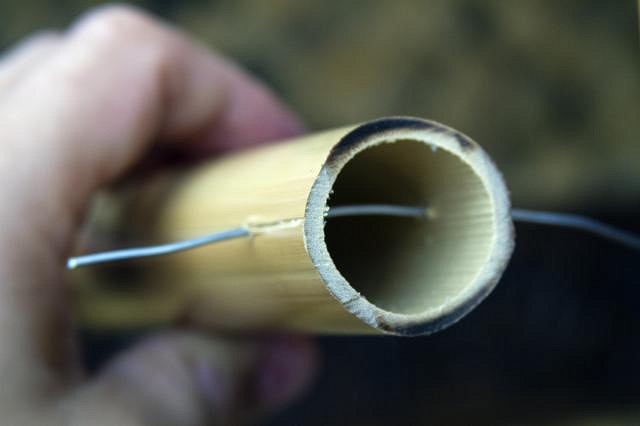
I quickly realized drilling the remaining culms would be overkill (not to mention time consuming) so I opted just to wire them in place. The wire's galvanized, rated to hold 20 pounds. Basically the cheap fencing wire you can get from any hardware store.
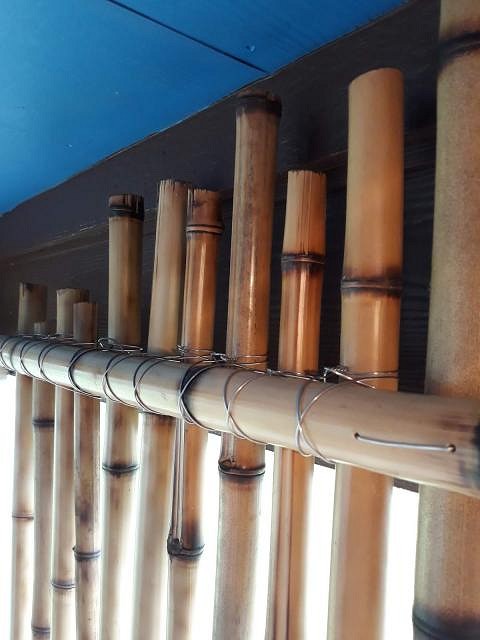
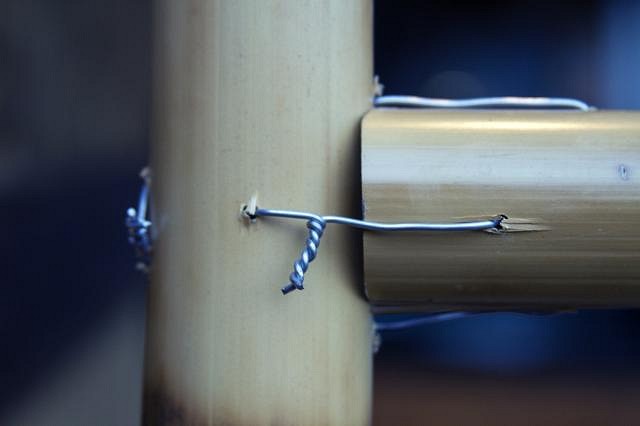
Next, I cut some cross pieces to length, and used my belt sander to grind out a concave depression in each end.
I marked drill holes through which I'd wire the cross pieces to the vertical culm.
Here's the tie wire running through the cross piece.
Here are the bamboo culms wired together. I used two wires on each side to double the strength. I still wouldn't recommend trying to use this as a ladder, though.
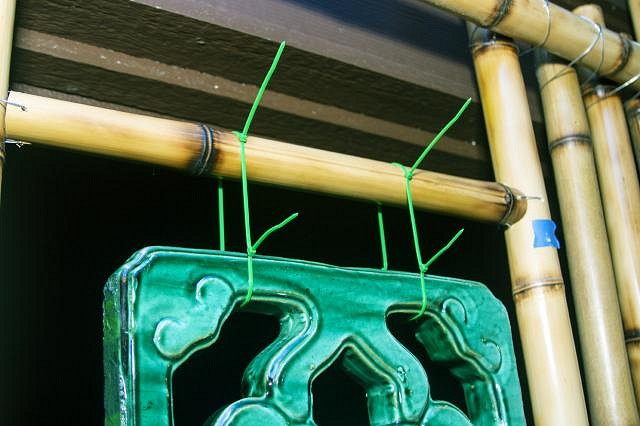
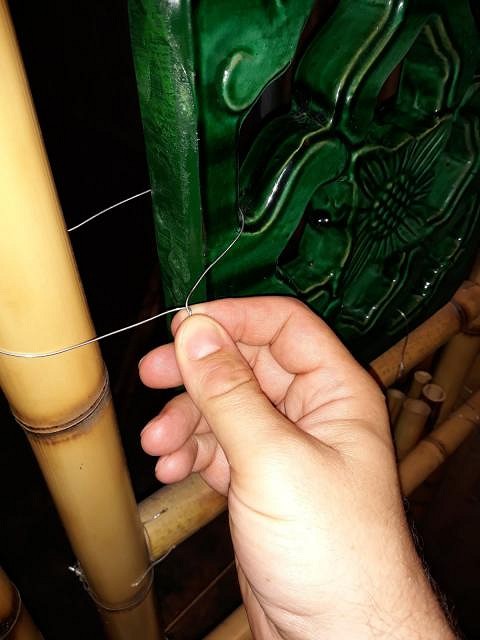
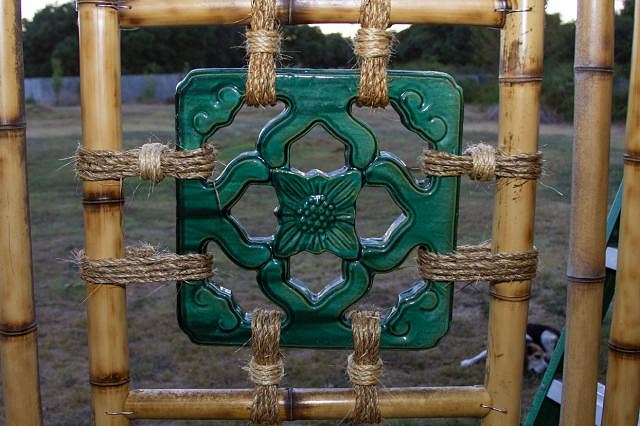
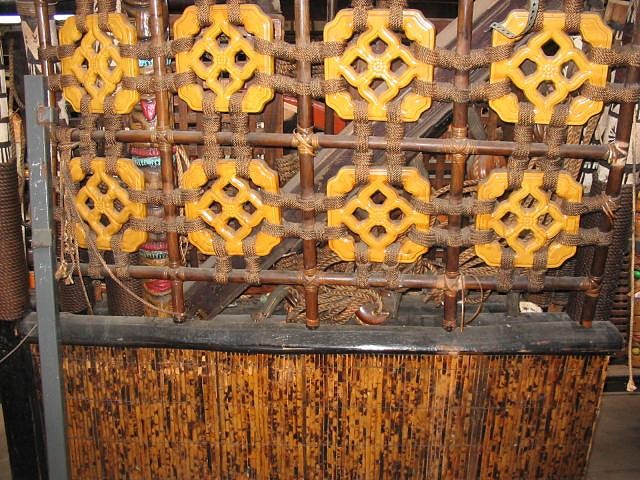
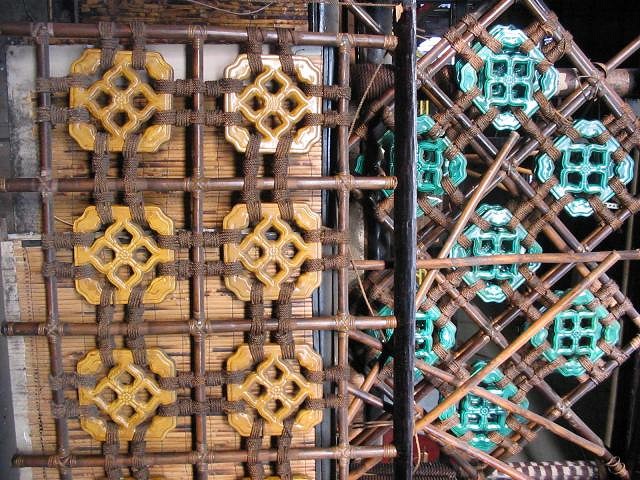
Now, to install the jade Chinese breezeway tiles! Did I mention I had tiles? No? Well, no tiki bar is complete without them, or somesuch nonsense. This is another reason it took me a long while to finish this--tiles are expensive. I got mine from those folks in Florida who've posted here on occasion. With shipping (these tiles are heavy) I could only afford to get a pair every few months, once extra cash became available. I used zip ties to hold the tile in place as I wired it securely.
I ended up using three wires through each of the openings on top to secure the tile, with a single wire through each remaining opening for the sides and bottom. I tried looping the wires around the bamboo and tiles, and cris-crossing them, but in the end just a straight, circular loop and twist at the end proved most effective. The wire's just there to hold the tikes secure. No need to overthink it.
Here's a tile wired up, with my first stab at rope wraps added.
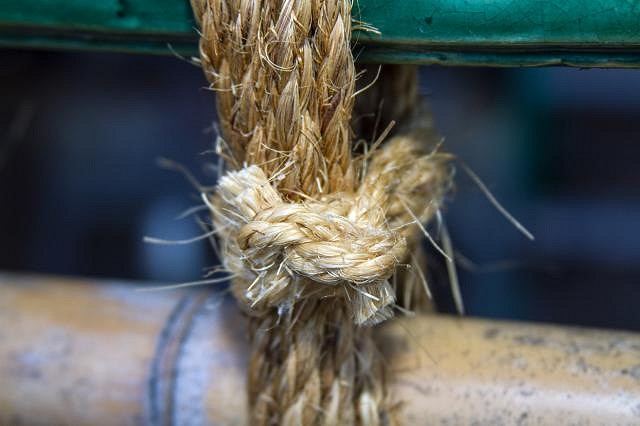
Despite all the photos online of jade tiles tied up to bamboo grids, all you see is the front, which is designed to be the most aesthetically pleasing. For the life of me, I could find no reference anywhere to how these ropes are actually tied, what knots are used, etc. What followed was several days of me trying to figure out how to make this work and not look terrible. I tried several variations--some quite clever, if I do say so myself--but nothing that rose above "Good in theory, terrible in practice." I eventually settled on a basic square knot on the inside of the initial wrap. I tried to wrap the rope around the bamboo and tile four times before tying it off. I used Manila rope for this, for it's superior water tolerance.
To secure the square knots so they wouldn't work loose, I applied Shoe Goo to each knot. It's a strong glue similar to rubber cement. It oozed into crack and is relatively waterproof, so it seemed like a good choice. I have no idea how it will hold up to the elements, but I guess I'll find out sooner or later.
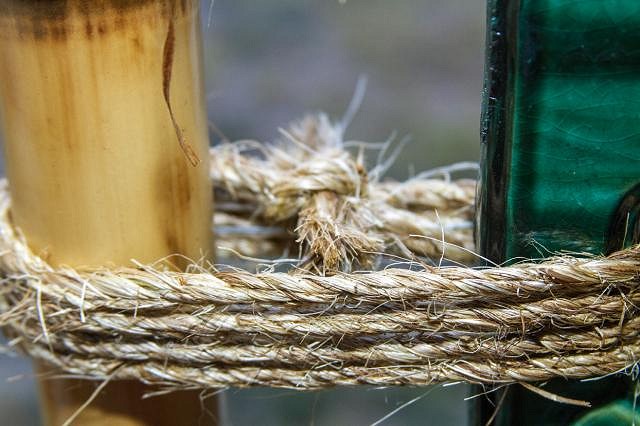
I did a secondary wrap of the Manila rope with sisal rope, because the cross-wrap is a common decorative detail seen with jade tiles. I also found it tightened up any slack in the Manila rope. Unfortunately, there was not room inside the ropes to tie it off in the interior, so my ties were exterior. I located the knots (again, square) on the out-facing side and applied Shoe Goo again. Once it dried, I used tin snips to cut off any excess rope. Why did I use sisal? To be honest, it's because I ran out of quarter inch Manila and the sisal was handy (and cheaper). In retrospect, the lighter color of the sisal makes for a nice contrast with the Manila, but I didn't notice that until after.
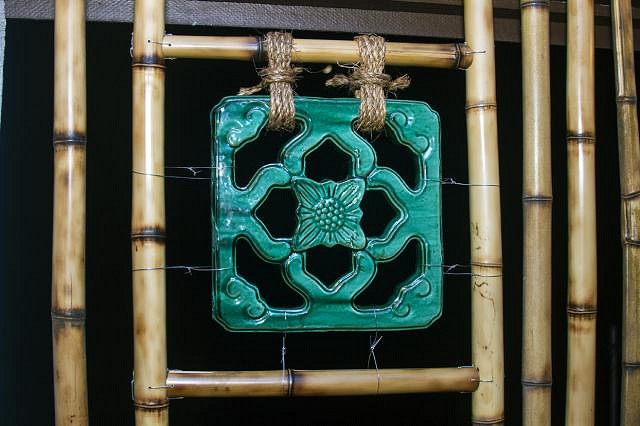
Here's a jade tile tied (mostly) in place. I've since coated the rope with Flood CFW UV, a weather protectant that's normally used on fences. It should help the rope survive exposure to the elements (at least, that's my hope). While the rope is holding the tiles securely, I want to point out that the rope's main role is decorative, covering up the wire underneath that's doing the real work.
Here's the bamboo screen and jade tiles in place with the booth adjacent. I need a mask or shield or some other element to go in the center of that screen. I also plan to build a floating deck to elevate the booth and get it off of the concrete, and also to serve as a transition (tiki bars are all about transitions, right). I'm happy with the final product, as the screen is very close to what I envisioned. At night, it effectively separates the booth area from the outside world, while allowing plenty of airflow. Alas, there's very little roof overhang on that side of the house, and rains in recent days have shown that area is not protected at all. I need to build a thatch awning to guard against rain and hail and other hazards from the sky, something I hadn't originally planned on. But I say the space dictates the build, and that's what's happening here.
As always, more detailed build-along notes (and more photos) are available on my blog. Edit: Wow! Just learned Mark Sellers bought a metric crap-ton of these same tiles for his Grand Rapids tiki palace, and that they originated with a mansion in Shanghai. So now I can say I have the same tiles as Max's South Seas Hideaway! ~Jayme Lagoon of Mystery [ Edited by: Prikli Pear 2019-10-18 13:19 ] |
|
W
W8N2Surf
Posted
posted
on
Mon, Oct 28, 2019 6:47 AM
The Jade tiles look great, and my favorite thing you've done still remains the refurbished round booth seating, I love that thing. |
|
H

hiltiki
Posted
posted
on
Mon, Oct 28, 2019 8:55 AM
Love the round booth and bamboo and green tile combination, great job. |
|
M

MaukaHale
Posted
posted
on
Mon, Oct 28, 2019 10:47 AM
Wow, amazing work and classic design. I like it. |
|
J

jimsflies
Posted
posted
on
Thu, Oct 31, 2019 6:53 AM
Tiles look great. I'm considering stopping by the Florida tile source next month when I'm down there and doing something similar in my bar. I agree it seems that most tiki bars have the tiles. If you have any other tips for building the frame and mounting, I'd like to hear them. I checked out Mark Seller's bar in GR a few days ago. The Florida source said she delivered 500 of them to the bar! (Bamboo Ben put them all together.) [ Edited by: jimsflies 2019-10-31 06:56 ] |
|
PP
Prikli Pear
Posted
posted
on
Thu, Oct 31, 2019 12:59 PM
W8N2Surf, thanks! I'm still kinda stunned how it just fell into my lap. I was fully resigned to building one on my own, which as a practical matter, means I wouldn't be anywhere close to having one yet! :lol: Hiltiki, much appreciated! To be honest, that color coordination is a fortuitous happenstance. There were several booths to choose from at that Fuddrucker's. There was a gorgeous maroon one I would've gotten, except for the fact it was in questionable condition. Structural issues, etc. There was a red booth that was in great shape, but it looked way too 1950s. The green was my default, since green is more of a tropical/tiki color. Maybe my subconscious was already planning this? I dunno, but it makes me look all clever and stuff. :wink: MaukaHale, appreciate the kind words! I think that corner is the most old-school part of my build. Once I get the floating deck built and awning up, it think it's gonna be out of this world! Jimsflies, picking them up in person is the smart way to do it. You'll save a ton on shipping that way. I don't have much additional advice beyond the fact that these are the real deal, and as such, are heavy. Hanging and working with them was awkward without a second pair of hands, which is why I came up with the temporary zip tie placement. I needed something quick, strong and adjustable so I could ensure the placement was correct (and the tile didn't fall and break! :cry: ). The zip tie accomplished that, whereas when I tried to tie it up with wire to start with... well, that was awkward and I knew pretty quickly I'd need to figure something else out. Laying the bamboo frame flat on the floor, fastening everything together, then moving into the upright position might be an easier alternative for some, but for me it wasn't in the cards. But overall, the tiles add a certain gravitas to the place I hadn't anticipated. There's something about them that is more substantive than bamboo or torches or whathaveyou. I'd absolutely find a place for a dozen more if I had 'em, which I don't. I wish I'd paid more attention to the mounting of them at the Mai Kai. My knotwork is okay, but could definitely be better. ~Jayme Lagoon of Mystery [ Edited by: Prikli Pear 2019-10-31 13:02 ] |
|
J
jimsflies
Posted
posted
on
Thu, Oct 31, 2019 8:04 PM
Here is a photo with some at South Seas Hideaway. Yours look good.
|
|
PP
Prikli Pear
Posted
posted
on
Fri, Nov 1, 2019 6:30 AM
Bamboo Ben just posted a whole lot of jade tile photos from Max's over on his FB page. He allowed that it "got tedious" hanging so many of them! :lol: |
|
M
MadDogMike
Posted
posted
on
Fri, Nov 1, 2019 11:31 AM
Jayme, that all looks great. I only hung 8 or 10 tiles and it was a pain in the butt :lol: |
|
T
tikiskip
Posted
posted
on
Sat, Nov 2, 2019 2:13 AM
"I could find no reference anywhere to how these ropes are actually tied," One more thing if you wet the rope or Binder Cane you tie this with it will stretch and then (this is the good part) shrink after you put it on when it dries. Bottom of the page.... It's all right here on TC ya just gotta get yer head in the right thread and stop looking at sunsets and tiki Bob so much. TONS of info here.... [ Edited by: tikiskip 2019-11-02 03:05 ] |
|
T
tikiskip
Posted
posted
on
Sat, Nov 2, 2019 2:19 AM
The Ashley Book of Knots... I paid $80.00 for this book at $45.00 ya gotta buy it. This is the definitive book on knots. Here are approximately 3900 different kinds, from simple hitches to “Marlinspike Seamanship.” Mr. Ashley has included almost everything there is to know about them. Precisely named and classified (some new ones for the first time officially), they can be easily found in the big index. He tells when they appeared, something about their history, and what they are good for. Above all, Mr. Ashley gives explicit directions on how to tie them. He describes each step simply and clearly in the text and has penned right alongside some 7000 drawings to make it still more graphic. This book and a piece of cord will open a new and challenging world of practical adventure to readers of all ages. Mr. Ashley has devoted eleven years to writing this book, and it is based on forty years of looking for, trying out, and thinking up new knots. His drawings abound in humor and the text is full of colorful anecdotes. The Ashley Book of Knots will make a unique and permanent addition to any library.
[ Edited by: tikiskip 2019-11-02 02:44 ] |