Tiki Central / Other Crafts
Big Bang Creations - new Yipwan Drum Mug pg 86
Pages: 1 2 3 4 5 6 7 8 9 10 11 12 13 14 15 16 17 18 19 20 21 22 23 24 25 26 27 1,290 replies
|
R

Robin
Posted
posted
on
Thu, Apr 3, 2008 5:46 PM
Well... you're really showing that clay what's up! This is so cool to see. |
|
B

Babalu
Posted
posted
on
Thu, Apr 3, 2008 9:39 PM
Thank you Kahu...The stage I'm at in this project is where I have the most fun playing in clay. For me wet, and leather hard clay has the best feel - look to it. Love it. Mudslinger....thanks for following along...I'll either spank this clay, or it will spank me....ya never know what the limits are unless you push them. peace
|
|
BTC

Billy the Crud
Posted
posted
on
Thu, Apr 3, 2008 10:26 PM
This thing is goddamned CRAZY, man! Keeps getting crazier, too. |
|
C

Clarita
Posted
posted
on
Fri, Apr 4, 2008 8:39 AM
Uh! amazing project, is looking great!!
|
|
B
Babalu
Posted
posted
on
Fri, Apr 4, 2008 10:51 PM
Well, it's Billy the Crud! My cosa your cosa brother. I hear tell you just picked a shit load of 6'ers up...sorry I missed that run man... Clarita, Why sure I would love to have you over to the studio to play in some clay any day. You really do need to get over here for a visit to this Country. I think you would have a blast...I know that Simon would LOVE to have you over too! Built just a little more tonight, spent time taking off clay on the inside of the creatures. The goal is to make them look heavy when they are really light...if the birds can be thinner. Less weight on the rim.
Thought you might find this interesting. In order to make this clay easier to work and keep it moist on the bottom without worry, I decided to line the plastic form bowl with a trash bag. Then I placed the (now smooth underside) clay bowl back into the form. Now I can work the top side and not have to worry about the bottom side. There is a hole in the bottom of the form big enough to allow the base to hang through...I then suspended the whole thing on top of this glass bowl so that there would be no pressure at all on the base while I am working he top section. Top and bottom will both need to dry together.
More progress later on.... |
|
H

Hiphipahula
Posted
posted
on
Sat, Apr 5, 2008 1:36 AM
AMAZING! I am Stoked! :) I wish I could understand the process better, I need to get busy & study. What a honor for sure & do want to actually use this one. When it's done I would like to come down, hang & fire up one massive cocktail with the gang, possible? Thanks again Rick, Vision come true & then alot more! |
|
M

MooneyTiki
Posted
posted
on
Sat, Apr 5, 2008 4:37 AM
Babalu that Bowl is killer!!! You have some very cool art going on here my friend! Aloha, Mooney |
|
R
Robin
Posted
posted
on
Sat, Apr 5, 2008 4:55 PM
This isn't spanking...this is love...you are romancing this clay....unless you're into that kind of thing...oops...what am I saying! You really know your material Babalu.....very fine work on a very difficult piece. |
|
V

VanTiki
Posted
posted
on
Sat, Apr 5, 2008 8:00 PM
AMAZING bowl! Henrik |
|
B
Babalu
Posted
posted
on
Sat, Apr 5, 2008 8:02 PM
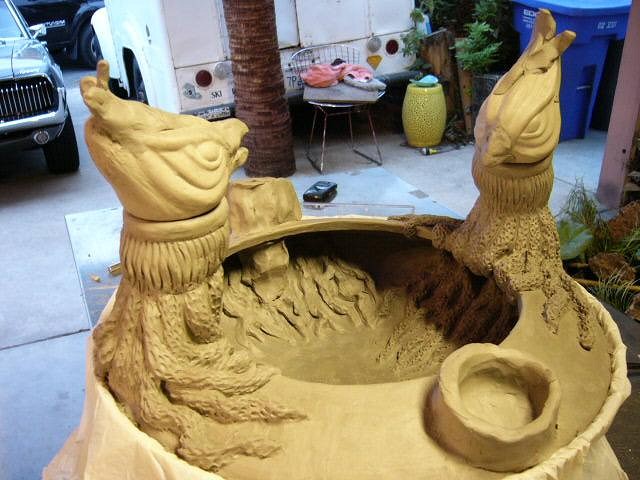
Hey Mooney, big thanks for bouncing in man! Your carving is rocking the house! keep up the great work. Mudslinger, I am very honored that someone with 20+ years working in clay would like what I'm up to...Keep following, hopefully it will get even better. Kelly, You know, for the most part, I gave up drinking about 15 years ago. However, If this bowl makes it through the drying and the 2 firings...I may just have to celebrate. :) Your Paradise Bowl will have 4 independent war bird mugs attached to the rim with removable heads (straws needed)...so basically, you are going to have to figure out a drink recipe for the mug areas on the bowl, and also the main bowl area...2 types of drinks - one bowl. Sounds fun huh? It's hard to go into all the details here on ceramics, but two main things to remember are...1. No air in the clay. One must work all of the air out of the clay while forming with it, or when firing, the trapped air in the clay will force it's way to the surface of the clay work causing a crack. 2. When joining two pieces of clay together, you want to try to use clay of the same moisture consistency (if you can), and score the clay (1st picture) so that the 2 pieces will adhere better.
I'm adding little buttresses under the rim where the main weight will be...
|
|
T

Tiki-Kate
Posted
posted
on
Sat, Apr 5, 2008 8:17 PM
Yeah!!! I wish I lived closer so I could just pop over and do some glazing. I hope we can work out a day sometime in my ridiculously busy future that I can stop by. This bowl is getting more and more unbelievable everytime I check the thread. I've got a million questions. |
|
H
Hiphipahula
Posted
posted
on
Sun, Apr 6, 2008 1:30 AM
Fantastic! I will need a lesson on use when your done. It keeps getting better every day :) |
|
H

hewey
Posted
posted
on
Sun, Apr 6, 2008 2:13 AM
This bowl is amazing! Great work! |
|
O

OceaOtica
Posted
posted
on
Sun, Apr 6, 2008 5:06 AM
Hey Babalu, have not checked your thread out in a while, some beautiful glaze work you've been laying down on those man o war! |
|
B
Babalu
Posted
posted
on
Sun, Apr 6, 2008 10:19 PM
Hi Henrik - Sorry I missed your post yesterday, it looks like we were posting at about the same time...wow, very honored you stopped in, and yes, it will most certainly it will be an epic journey through dry-out land and the great kiln. I'm pushing my own limits on this one...the construction does not bother me too much, it's the unknowing of how this clay will react to it that causes me concern....all I can do is both dry and fire this guy real slow. Really man, thanks so much for stopping in...I'm a big fan of yours. Kate - We will have to do another Trailer Trash Chop this summer! We will have the backyard open for carving and the studio for clay work. Anytime you want to come over in the mean time your more than welcome to. If you have any questions, please feel free to ask away...who knows it may be a question someone else was wanting to ask too? Kel - I was going to really put a good day in on your bowl here, but Amy's boss called and gave us free tickets to the game today...had to go for it...check out the seats :)
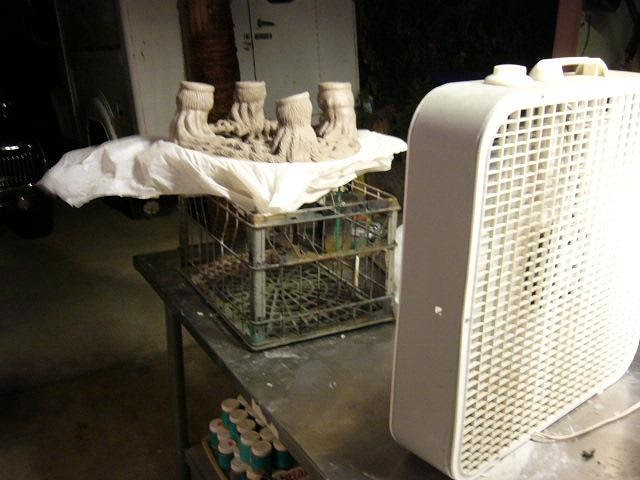
Hewey - Thanks for the kudos mate. If this guy makes it, I've got a good idea for a bamboo built pedestal to put it on....we'll see. OceaOtica - It took me a moment to get to where I wanted those glazes...I can still see other areas I would like to experiment. I still have a few left that I have to make for a couple of folks...I'll post the results if they turn out. Wow, you have been on TC for awhile now - 2003! Your one of the old timers here. Thanks for bouncing in, I appreciate that. Well, despite have a killer time at the game, I still got a little work in....also stuck a couple pictures of my crazy shop in too. It ain't much, but it's the center of the universe for me.
|
|
P

Paipo
Posted
posted
on
Sun, Apr 6, 2008 11:11 PM
Very cool work space - that reminds me I have some pics of mine to post up too. I wish I had an A-frame in my shed! |
|
C

Cammo
Posted
posted
on
Mon, Apr 7, 2008 7:30 AM
Home bars are great, but Babs' Polynesian Home Studio is da bes'. I think a whole house should be built with garage doors on every side that you can roll up on nice days.... |
|
O
OceaOtica
Posted
posted
on
Tue, Apr 8, 2008 5:26 AM
Babalu, |
|
T
Tiki-Kate
Posted
posted
on
Tue, Apr 8, 2008 5:48 PM
Okay. I just bought 25 lbs. of clay. Now what? Just kidding. How long do I need to let it air out for before it's workable? Also, I'm assuming that you've been working on this bowl over the course of many days. How long can you keep adding to it before it starts getting too dry? |
|
B
Babalu
Posted
posted
on
Tue, Apr 8, 2008 9:47 PM
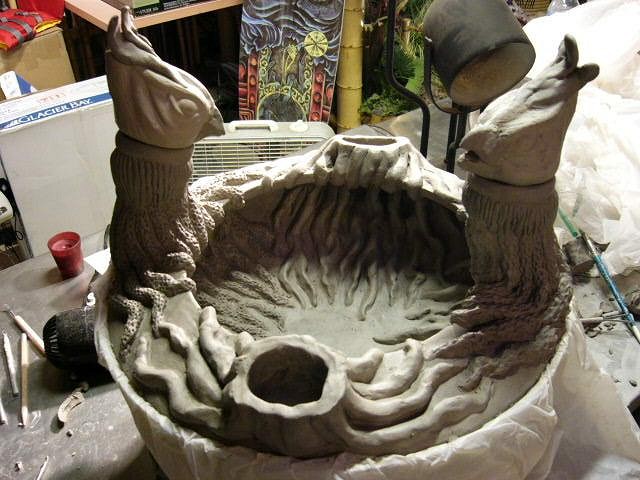
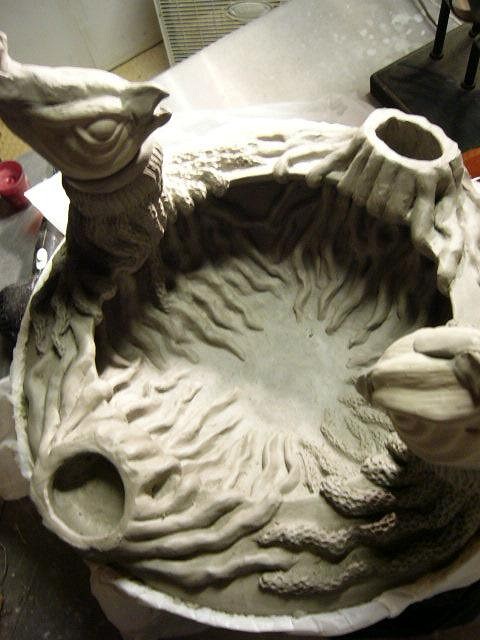
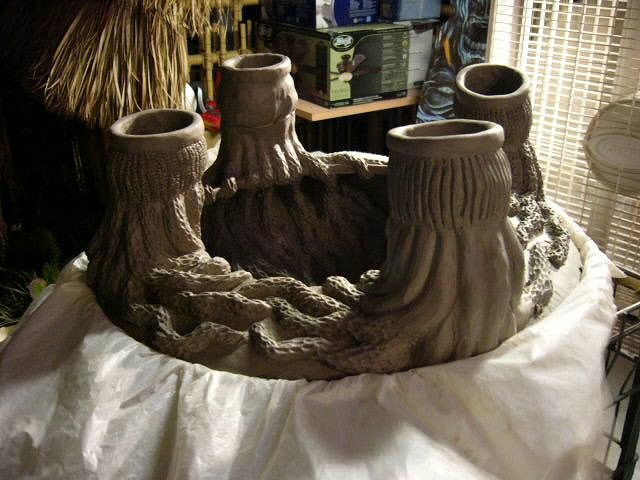
Had to do my taxes yesterday, hence no clay work...tonight, however, I was able to texture all of the tentacles. The inside of this bowl is done. Now I can build up those last two mugs on the rim. I kept myself from building those last two mugs so that I could have more hand and arm room to reach around on the inside of the bowl and add the texture.
Paipo - Thanks man. I'm dying to see a couple pictures of your shop too...pleeeease post! :) Cammo - Still gots some Oki's over here for you to glaze brother...come over and play. OceaOtica - Thanks, my studio has been fun for me. As you can see, I'm into light. Where everyone else collects mugs around here, I have been collecting cheesy lamps for years. The electric bill is a little higher from burning bulbs all around my house all the time, but like one feels the need to spend the little extra to take long hot showers...I feel the little extra $ spent is totally worth it. Maybe I should start a "show off your lamps" thread over in Bildge? I bet lot's of TCers have some cool lamps? Kate - Yay...you have some clay! Open the bag and dig in lady! Did you play in the mud as a kid? same thing really...this is dirt. Have fun! What type of clay did you buy? You can keep your clay work workable for a long time....keep the work moist as you go with a water spray bottle. Wrap your work in a plastic trash bag...double bag the work in the beginning as you put it away to rework later. Do you have any tools? If not, run down to Michaels, or someplace like that, and get one of their little beginner kits. You will get some wood tools and a wire to slice though the clay...If you don't have tools right now, that's ok...just dig into that bag of clay anyway. What would you like to build? maybe I can give you some pointers? Here are a few of my favorite tools... Paipo, if your out there, I more or less use these same types of tools to work in that oil clay too.
|
|
R
Robin
Posted
posted
on
Wed, Apr 9, 2008 2:13 PM
Thanks Babalu...that was sweet of you to say. I've got nothing on you as far as working with clay goes except a couple of years. This bowl is fantastic. I wish I could watch you work on it in real time. You should have been a teacher the way you're covering this construction method. Right on Babalu! I'm making a kiln god and goddess for the firing. Gotcher back. MS |
|
T
Tiki-Kate
Posted
posted
on
Wed, Apr 9, 2008 2:42 PM
I bought some low fire white body clay with grog. I've got a few tools that you gave me last year, but I definitely need a few more. I'm going to be making a bowl. It's a little ambitious, but I've been wanting to try it for about two years. And yesterday, when I was driving home, I had a complete revelation about the theme of the piece. I'll be keeping my fingers crossed that I can successfully execute it. I'm sure I'll be bugging for advice though. I'll keep you posted. |
|
SG

Sam Gambino
Posted
posted
on
Wed, Apr 9, 2008 10:03 PM
What beautiful detail work on that bowl.... Very nice, Babalu! |
|
TK

Tiki Kaimuki
Posted
posted
on
Thu, Apr 10, 2008 6:47 PM
Wow! Can't wait to see this beast all glazed up. All the sharp details should punch very nicely through the right glaze. |
|
B
Babalu
Posted
posted
on
Thu, Apr 10, 2008 9:50 PM
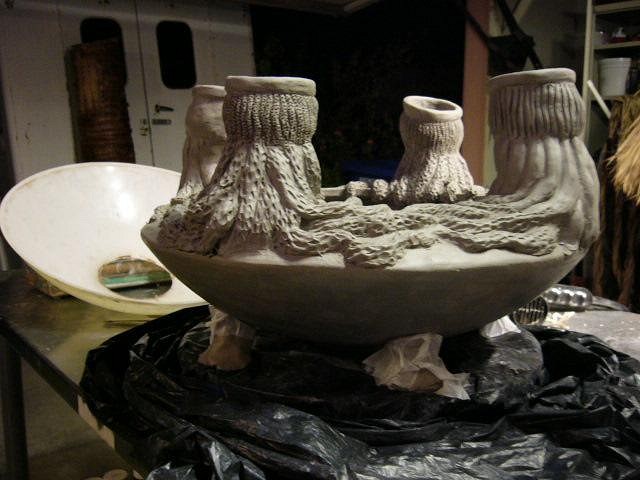
Well, I finished building the mugs...still have to texture 2 of them.
In order to release this bowl from the form, I cut away the trash bag area around the base, and turned the fan on it to harden the clay up just a little more around the base.
I sat it on an old 6" long aluminum tube I had laying around that was the same diameter as the base (not shown)...the plastic form could then drop away from the clay bowl.
YEAH BABY!!! She stands alone :)
Later, I added some little clay support on the outside just for extra support...these won't stay...they are just temporary support.
It's time to finish this bowl...I can't keep the clay workable long now. Next, more outside decoration on the lower area. Robin - You really rock! If you make the kiln god and goddess, I give this bowl a much bigger chance of surviving. Kate - YES! Dig in! It's bowl time! happy, happy! Sam - Thanks for jumping in. That "Got Boots" painting of yours in now my new favorite...man, you are incredible! Kaimaki - Thanks mucho...I am going to use about 17 different glazes on this...if I make it to that far... :) |
|
H
Hiphipahula
Posted
posted
on
Fri, Apr 11, 2008 1:16 AM
Babalu you are crazy genius! mind blowing! don't fire it up without me! Kate? are we gonna hear your idea on your bowl yet? |
|
P
Paipo
Posted
posted
on
Fri, Apr 11, 2008 3:05 AM
Crazy genius alright! I can totally feel the tension in that shot. You clay guys have a lot to contend with (in terms of what can go bung) compared to us carvers. |
|
R
Robin
Posted
posted
on
Fri, Apr 11, 2008 11:30 AM
This bowl is downright giving me chills! And that cool feeling in the solar plexus when something wonderful is happening. I feel so involved! Damn fine work Babalu. |
|
B
Babalu
Posted
posted
on
Fri, Apr 11, 2008 10:47 PM
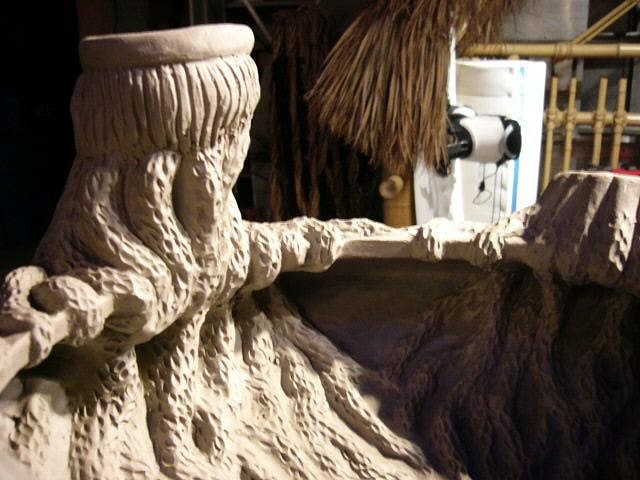
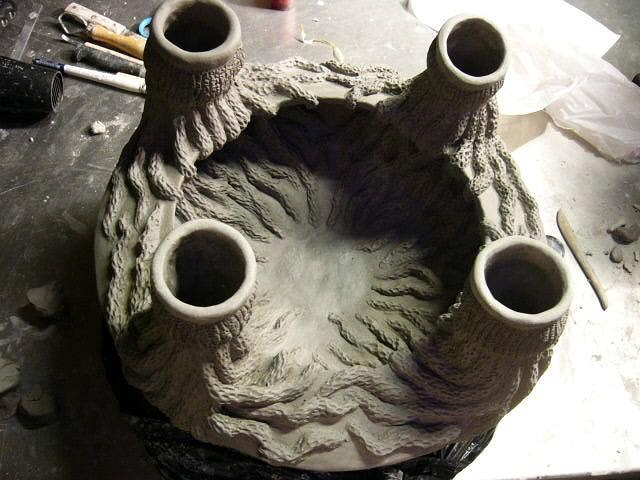
Thanks you guys! Well, I finished the bowl part. Kind of hard to shoot, but those tentacles come down and wrap around a little birdman face in 4 areas around the bowl below the mugs.
Finished just in time...I have to bounce for 10 days for the other job. I will finish the bird heads when I get back. Junping over to one of my favorite cities in the world...
Peace, Love, and Rock the Far East |
|
P
Paipo
Posted
posted
on
Sat, Apr 12, 2008 2:37 AM
:music: :music: :music: :music: :music:
:music: :music: :music: :music: :music:
|
|
TSA

Tiki Shark Art
Posted
posted
on
Sat, Apr 12, 2008 12:46 PM
Babalu - It's amazing! I thought it was great, then I saw that shot showing the inside - totally wonderful work! ...and Paipo, U r too much! |
|
M
MooneyTiki
Posted
posted
on
Sat, Apr 12, 2008 1:09 PM
Aloha Babalu!!! |
|
B
Babalu
Posted
posted
on
Sun, Apr 13, 2008 6:29 PM
Well, woke up in Hong Kong this morning. Damn that's a long flight...I've never gotten use to it. The boss will be meeting me out here this time, so we gets to stay in a swanky hotel this time :-) Paipo - You are too much brother! Thanks so much for hanging out on this thread with me. I've never done a clay demo online before...it's been fun! Brad - Man, that's really cool that you bounced in. I really appreciate the input. Your painting has been just way over the top! You rock the house! Mooney - Thanks man, You are one very talented individual. I would love to see you play in clay sometime. Well, I have to walk several shows while I'm over here...the electronics show, the houseware show, etc. I've read on other posts where some artists have been knocked off in other lands lately. I will keep my eyes open for China knock offs, and if I see anything...mugs, carvings, whatever...I will take pictures and get manufacture information together to give to the original artist so that you can at least call them and give them hell. Let's hope I don't see anything....that would be the best news. So, you think I can find a tiki bar over here? I think that might be hard pressed. We'll see... Peace! |
|
LLT

little lost tiki
Posted
posted
on
Sun, Apr 13, 2008 7:50 PM
You're a MADMAN Babs! |
|
C
Clarita
Posted
posted
on
Mon, Apr 14, 2008 9:41 AM
Ha! Amazing amazing!! Now i get it! you had some help from outer space!! that's not fair :D! no seriously, you have an out of this world talent !! Thanks for sharing it a little, is a total pleasure to watch you working! |
|
B

Bowana
Posted
posted
on
Tue, Apr 15, 2008 8:46 AM
If a Poly-Pop museum springs up sometime in the future to archive this period, this piece will surely be one of the crowning attractions. Go Babs, go! |
|
R
Robin
Posted
posted
on
Tue, Apr 15, 2008 8:09 PM
Yahooooo on the bowl Babalu. Pretty funny stuff there Paipo. |
|
BTC
Billy the Crud
Posted
posted
on
Wed, Apr 30, 2008 8:38 PM
You are one of the most talented people I know, Babs. I'm lucky to call you a friend! |
|
B
Babalu
Posted
posted
on
Wed, Apr 30, 2008 9:55 PM
Hey, thank you guys so much for your teriffic comments. They feel really good. The progress on this bowl has not been much lately as I'm drying it real slow...that's kind of like watching grass grow :) Still, all is going well...no cracks so far. The first firing will most likely be the tell all. Uhhhh, this thing is going to hold lots of booze. I have started on the heads. After I have finished the heads, I will finish drying the bowl right in the kiln. I will put a little bit of sand on the kiln shelf that it will sit on during the firing. As the bowl drys more, it will shrink more. The sand will act like little ball bearings under the bowl. This way the bottom area won't catch on the kiln self causing it to crack. I will also fire it with the little braces I made for it in place as added support. They will not be needed for the 2nd glaze firing.
|
|
TK
Tiki Kaimuki
Posted
posted
on
Thu, May 1, 2008 7:48 AM
Looking great! The slow drying and the bisque firing is that crucial scary part. I've filed the sand idea in my brain for future use on larger pieces. Good luck on the bisque! |
|
K

Kahu
Posted
posted
on
Thu, May 1, 2008 12:04 PM
Man that is just an amazing piece to look upon! |
|
V
VanTiki
Posted
posted
on
Thu, May 1, 2008 1:48 PM
Love this thread! Babalu - a question about the sand. I've been wanting to do this to avoid splitting on the bottom of my mugs (which can get rather heavy), but I have a few questions. First - what kind of sand do you use? And I am guessing it bonds with the clay - do you then sand it off after the firing? And finally, do you use the sand on both the bisque and the glaze firing? A big mahalo for sharing your knowledge with the TC gang! Henrik "VanTiki" |
|
B
Babalu
Posted
posted
on
Thu, May 1, 2008 3:59 PM
Why thanks Kaimuki and Kahu! Hey Henrik, For the bisque firing, I'm firing to cone 04. I can get away with using regular ole play sand under the work at this temperature. I won't need sand for the glaze firing as I will only be firing to cone 06 (not as hot as cone 04). However, If I remember right you are low firing your bisque, and then taking your glaze firing up to cone 6...is that right? If so, your work will still continue to shrink in the glaze firing. I would use silica sand, or grog (finely ground bisque clay) in the glaze firing instead of the play sand. Both of these can most likely be purchased where you are buying your clay. You should not see any fusing of the sand to the bottom of the work. Always keep a nice layer of kiln wash on your kiln shelves..I have to rewash mine now, it's been awhile...Hope all this helps. Man, those last 2 mugs of yours are to die for :) |
|
R
Robin
Posted
posted
on
Thu, May 1, 2008 7:40 PM
Welcome home Babalu. Great to see more progress on your magnificent bowl.....and the no cracking report is really good news. That sloooooow drying is the ticket eh? |
|
B
Babalu
Posted
posted
on
Thu, May 1, 2008 10:36 PM
Hey Robin...whoa, is it nice to be back! I might have let this bowl dry out a little quicker, but I knew I still needed to build the bird heads when I got back from the trip so I wrapped her up tight before I left. She seems to be drying out pretty evenly. Honestly, I have no clue how this low fire clay will react to this design? If I were using the cone 6 clay with grog, that I normally use for sculpture, there would be no worries. For those of you that might be following along that don't understand the whole drying out thing that Robin and I are talking about... When you make something out of clay that has areas that are thicker than other areas, the thinner areas will tend to dry faster than the thicker areas do. The thin area shrinks..the thick area does not...this causes cracking in the clay. If you dry the piece out slowly the work will dry more evenly. The more sculptural clays with grog or sand in them tend to be much more forgiving with the whole thick and thin area thing.
|
|
B
Babalu
Posted
posted
on
Mon, May 5, 2008 8:23 PM
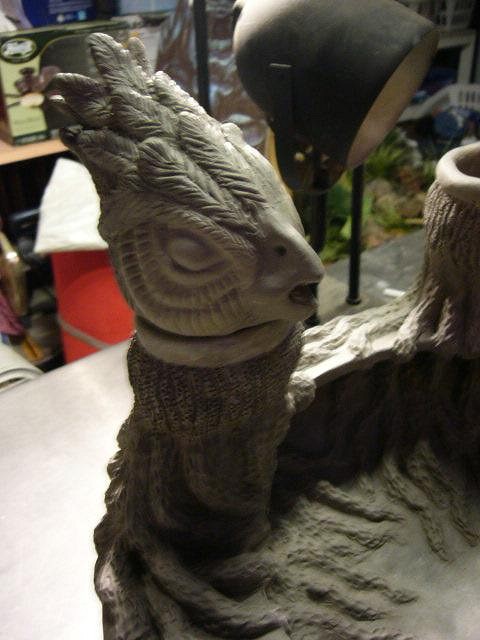
Didn't have the chance to touch this for a couple of days...third head done Kelly..only one more to go...she's drying up nicely now.
|
|
H

harro
Posted
posted
on
Tue, May 6, 2008 7:28 AM
Wow babs this is one monster of a project!! This thing is humungous. How is it going to function once its all done? Its like a big bowl, with 4 receptacles (?) with lids... scuse my ignorance but i'm confused...!! I can just picture a circle of people staring at it full of a tasty tropical libation and tripping over themselves trying to get at it first! good luck with finishing it all off. |
|
R
Robin
Posted
posted
on
Tue, May 6, 2008 10:23 AM
Hey Babs...I love the way the heads turn in different directions. What a great looking piece...it just keeps getting better and better. I've built larger slab work with this clay, and it was tricky. I could get this clay with grog, but it left to much grit on the surface, and with translucent glazes, you could sometimes see it. I sometimes would wedge fine white sand into it to add strength and that was better. Seems to me you're pulling out all the stops to get this one through the process.....my feeling is that the kiln gods and goddesses are with you. Beautiful piece..... |


Pages: 1 2 3 4 5 6 7 8 9 10 11 12 13 14 15 16 17 18 19 20 21 22 23 24 25 26 27 1290 replies