Pages: 1 2 3 4 5 6 7 8 9 10 11 12 13 14 15 16 17 18 19 20 21 22 23 24 25 26 27 28 29 30 31 32 33 34 35 36 37 38 39 40 41 42 43 44 45 46 47 48 49 50 51 52 53 54 55 56 57 58 59 60 61 62 63 64 3,035 replies
|
H

Hamo
Posted
posted
on
Sat, Aug 12, 2023 4:27 PM
in reply to MadDogMike
For someone who's not yet retired, you are still more productive than me. Great work as always! |
|
D

danlovestikis
Posted
posted
on
Sun, Aug 13, 2023 9:40 AM
Where is the volcano going to be set up? Love those waterfalls with the little palm trees. Sawfish nose! Wow. |
|
M

MadDogMike
Posted
posted
on
Sun, Aug 13, 2023 6:43 PM
Thanks Hamo LOL Creating "art" is my form of relaxation |
|
H

hang10tiki
Posted
posted
on
Sun, Aug 13, 2023 7:47 PM
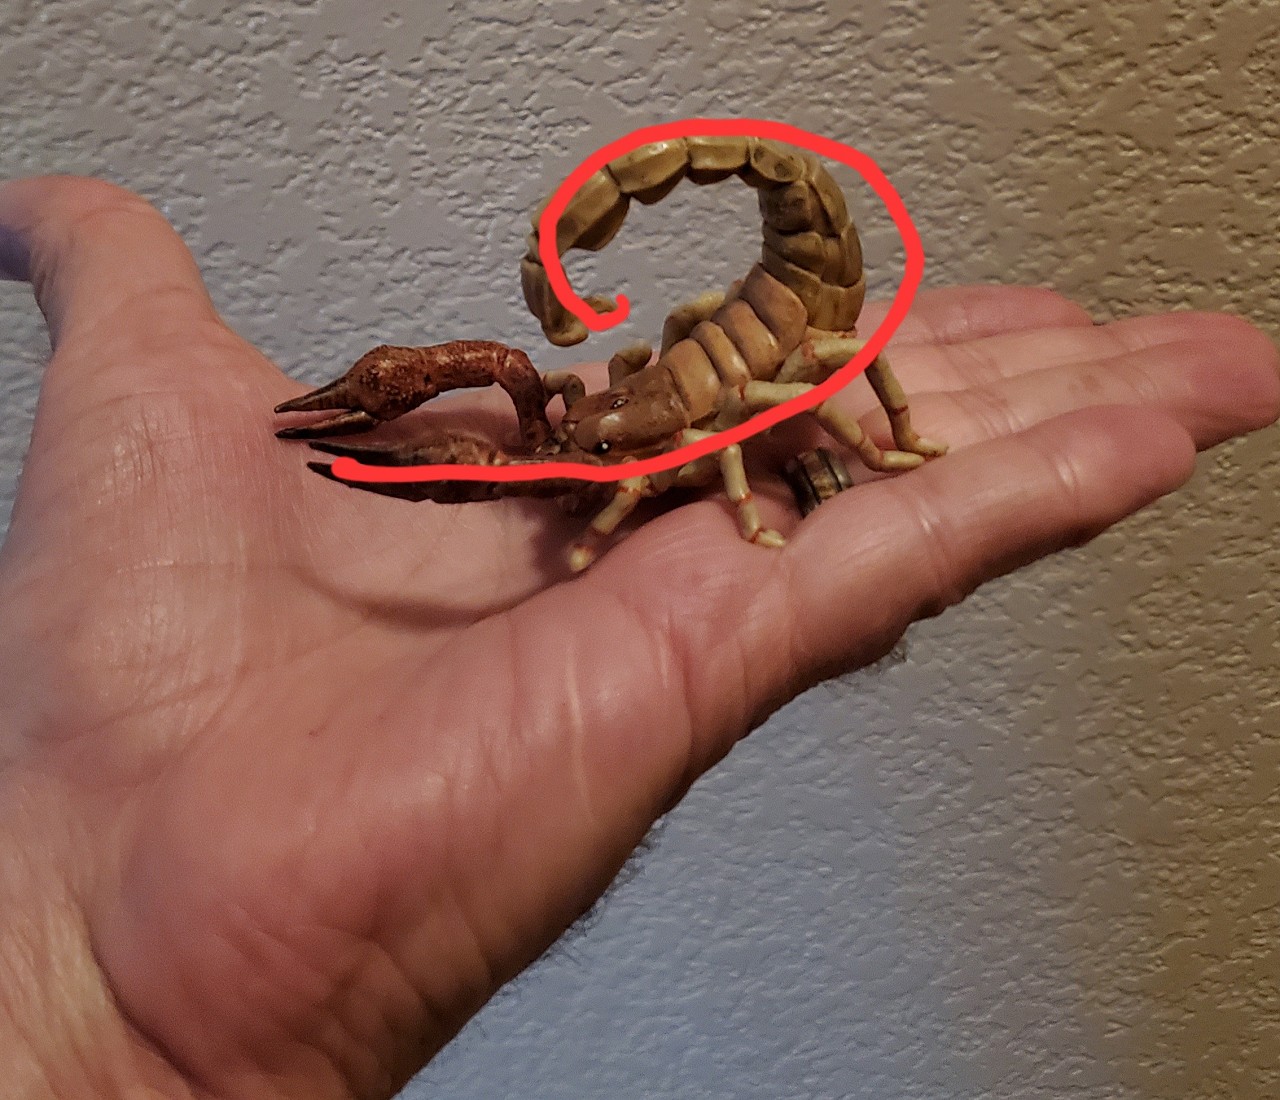
Volcano looks very nice, hope we get to see it in action. And I’m glad you decided not to cut the nose off of a Carpenter shark and make your own. Lol
[ Edited by hang10tiki on 2023-08-13 19:50:46 ] |
|
M
MadDogMike
Posted
posted
on
Mon, Aug 14, 2023 7:21 AM
in reply to hang10tiki
Thanks Jon. There won't be any "action" with the volcano. Because of the location and proximity to little rug rats, I had to skip the smoke, explosions, and burning sulfur :( LOL As far as the carpenter sharks, those are a protected species - having a real one can get you several thousands of dollars in fines! |
|
M
MadDogMike
Posted
posted
on
Mon, Aug 14, 2023 12:11 PM
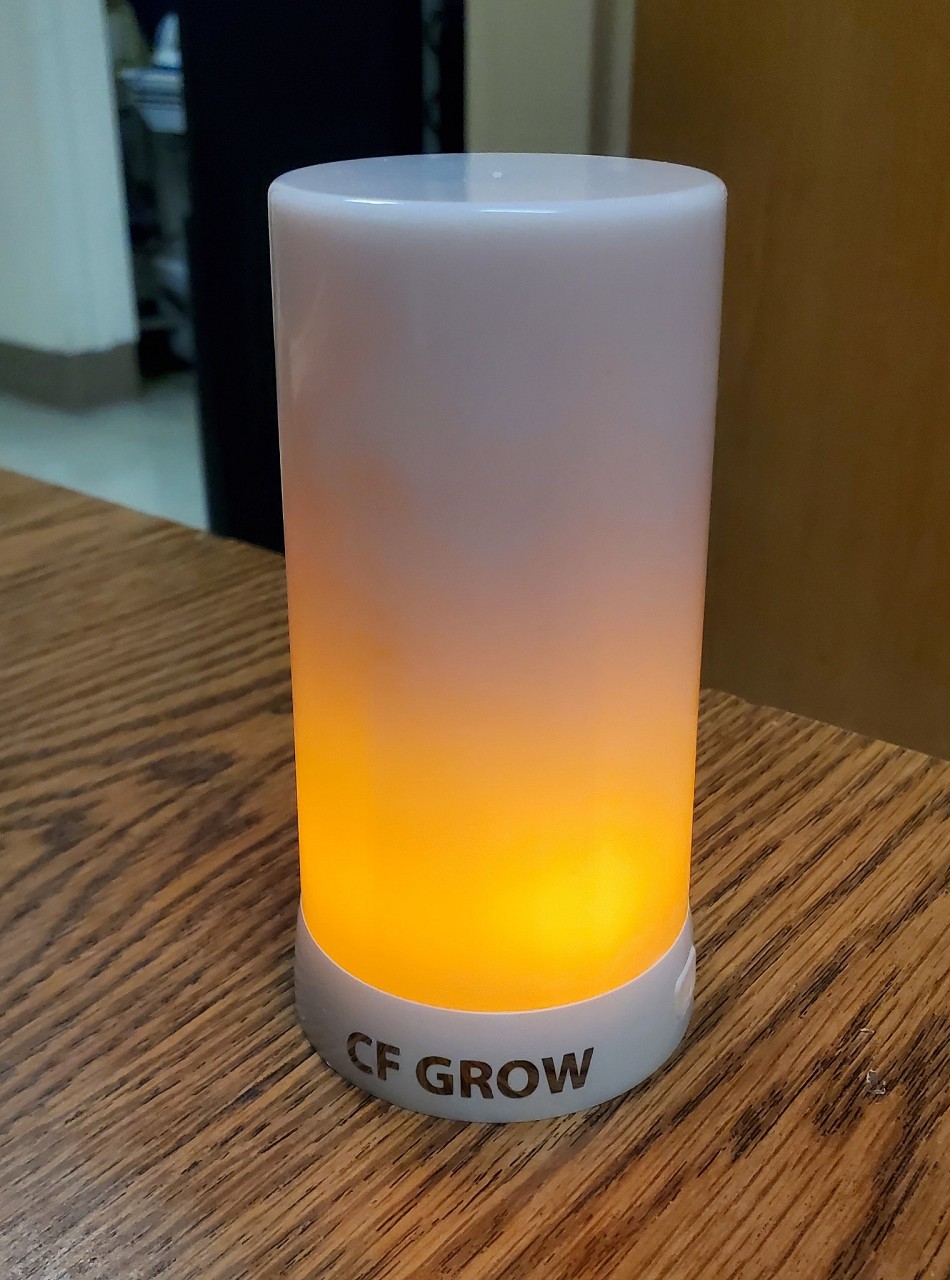
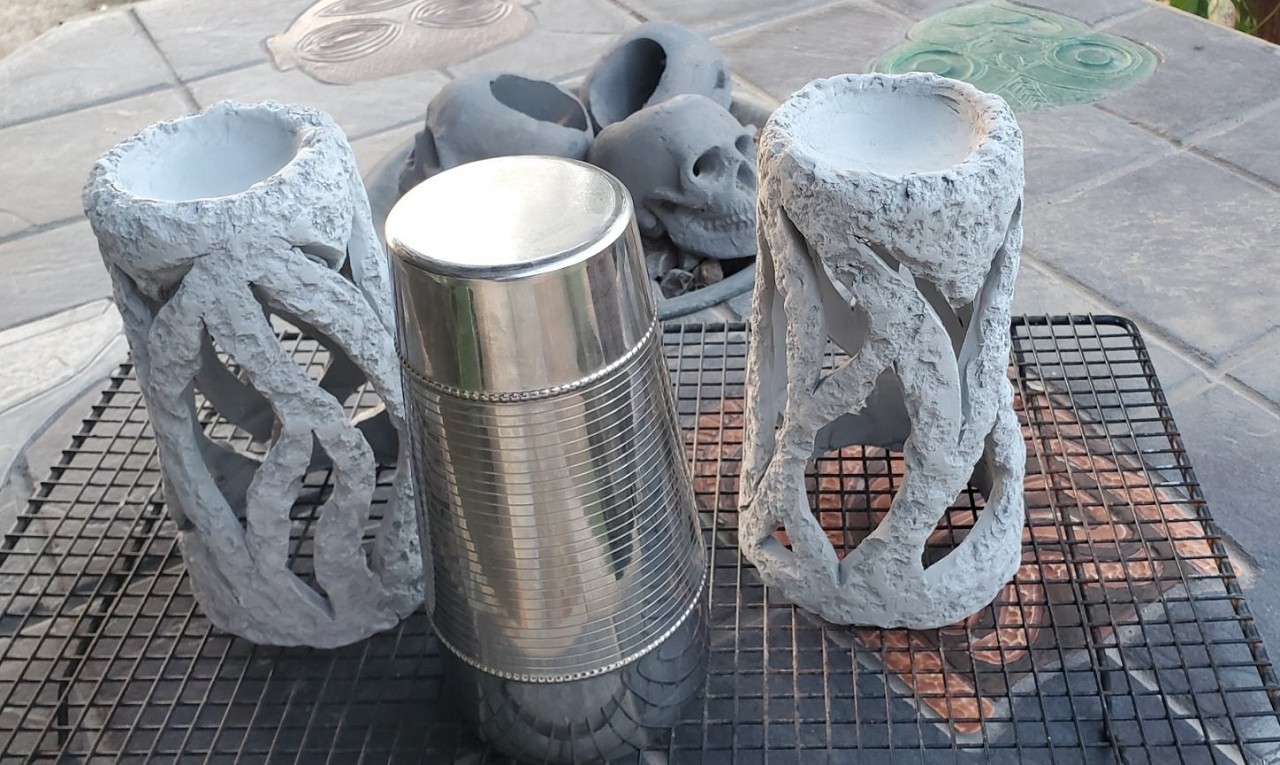
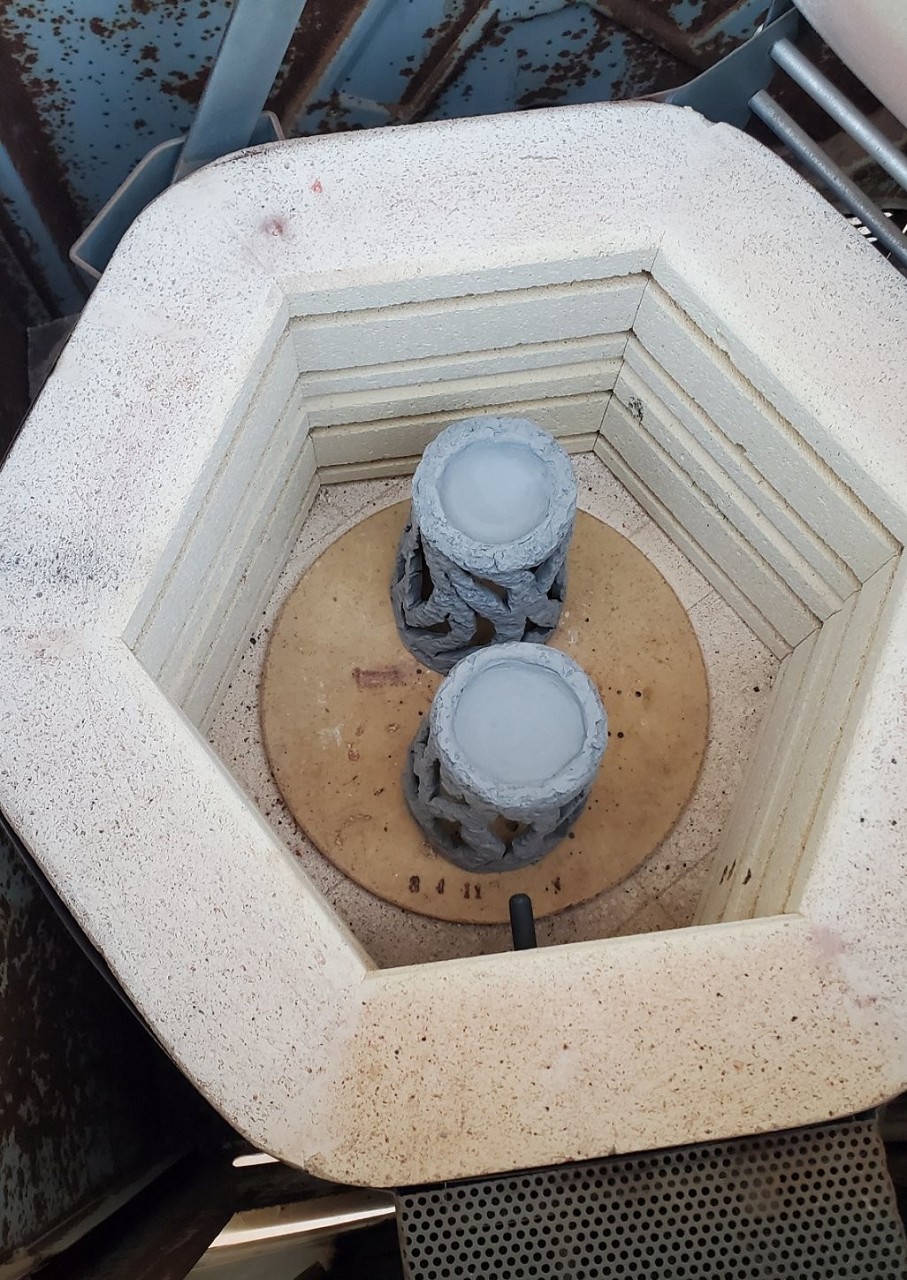
OK Hamo, on to the next project The Royal Hawaiian had these cool rechargeable lamps on the table so I ordered a couple from Amazon. 3 modes including a flame mode but they didn't look very "Tiki". So I decided to fix that. No pics of the first few steps but I rolled out a slab of clay and wrapped it around my cocktail shaker (right size and shape), cut out the holes, textured it with a lava rock, let it dry a bit to firm up, and removed it from the shaker. Into the kiln Out of the kiln and ready to glaze Ready to fire again |
|
H
hang10tiki
Posted
posted
on
Mon, Aug 14, 2023 10:20 PM
Verrrrrry niiiiice |
|
T

TikiFan
Posted
posted
on
Mon, Aug 14, 2023 11:39 PM
I haven't been around here in like 10-15 years or something. I remember when this thread started and I just spent the night reading all 61 pages. I just demo'ed my basement with plans for a bar and came to get inspiration. The stuff you're making is amazing. |
|
WC

Will carve
Posted
posted
on
Tue, Aug 15, 2023 5:07 AM
Fan man, you went right to the top for a good dose of inspiration. It doesn't get better than MDM & all his pupule. |
|
M
MadDogMike
Posted
posted
on
Tue, Aug 15, 2023 11:15 AM
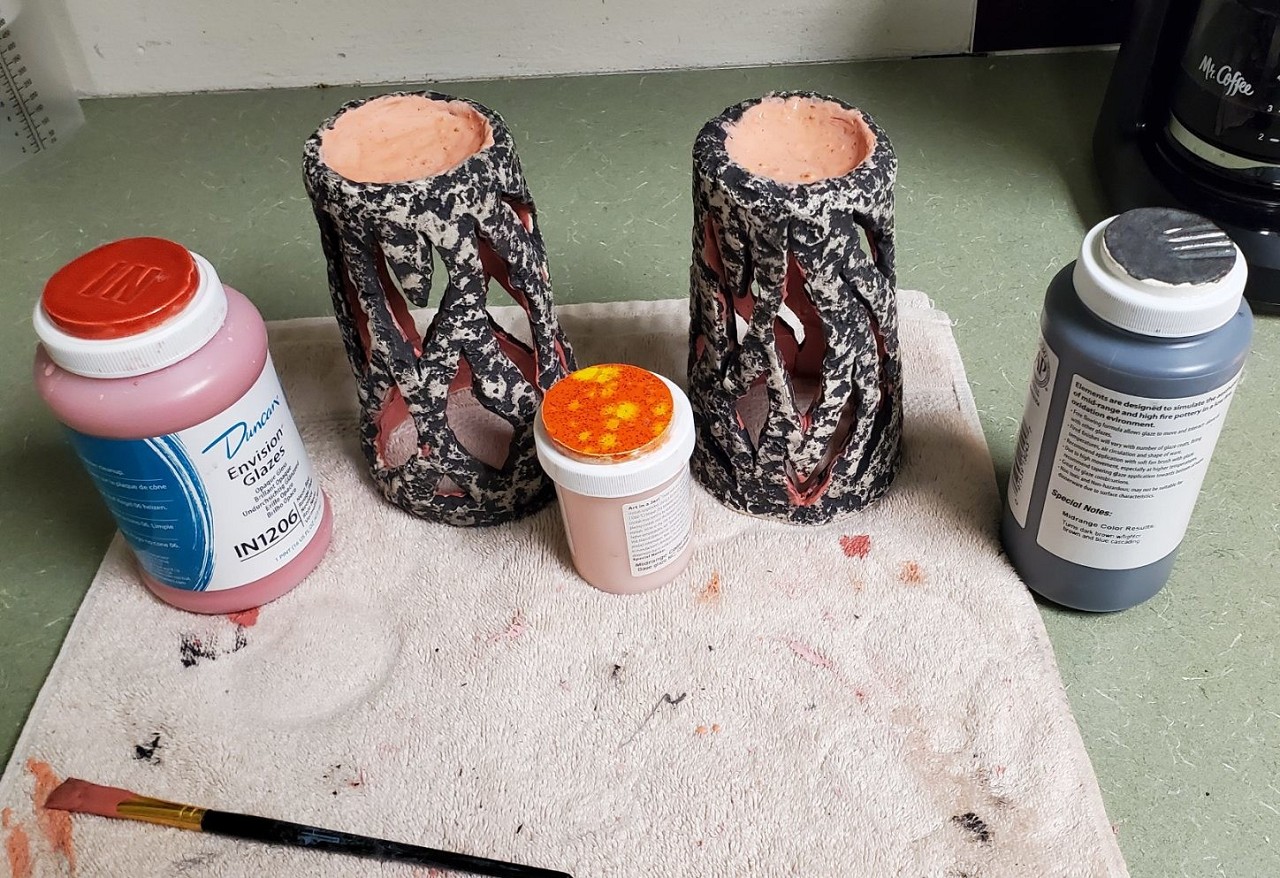
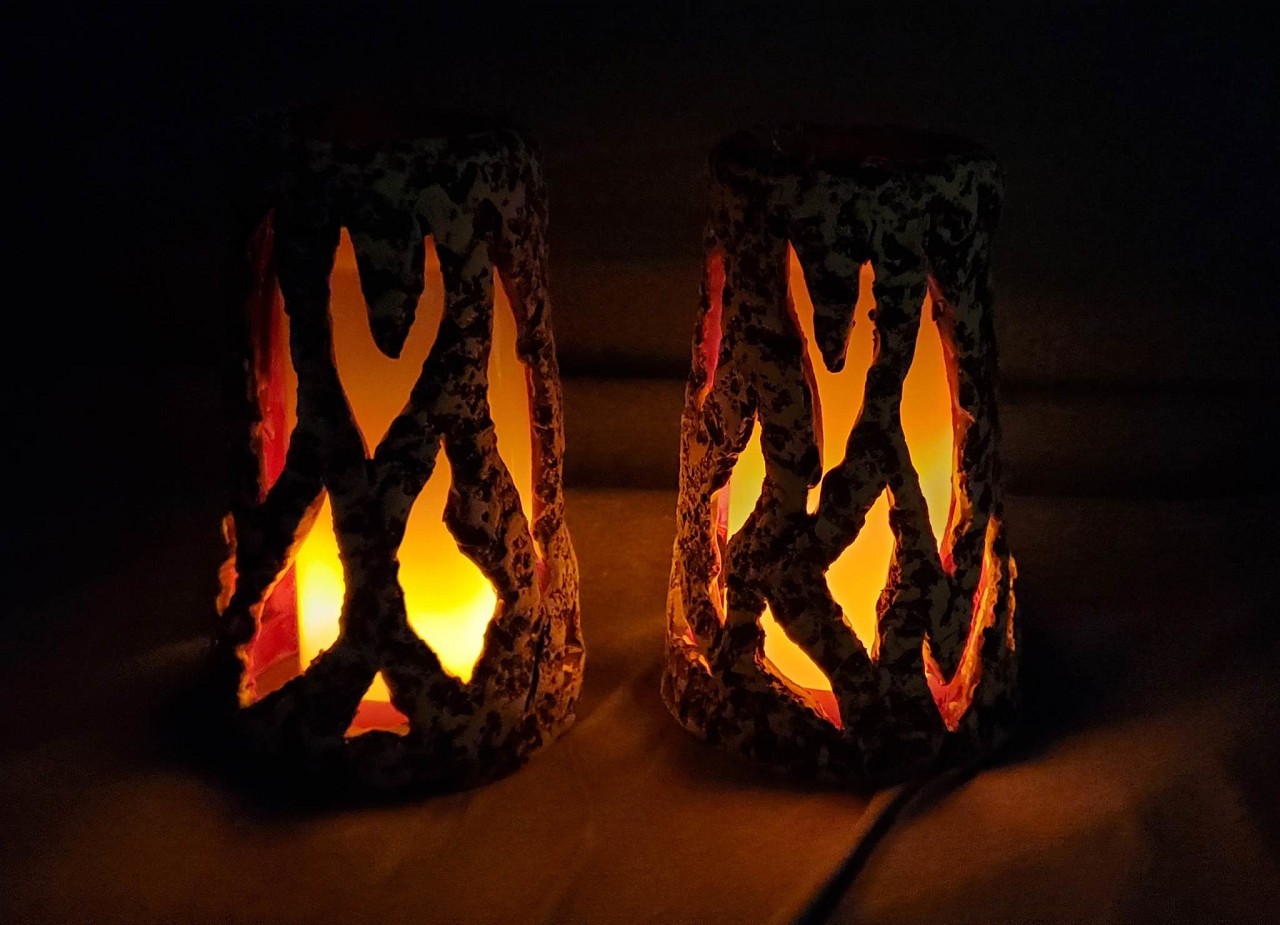
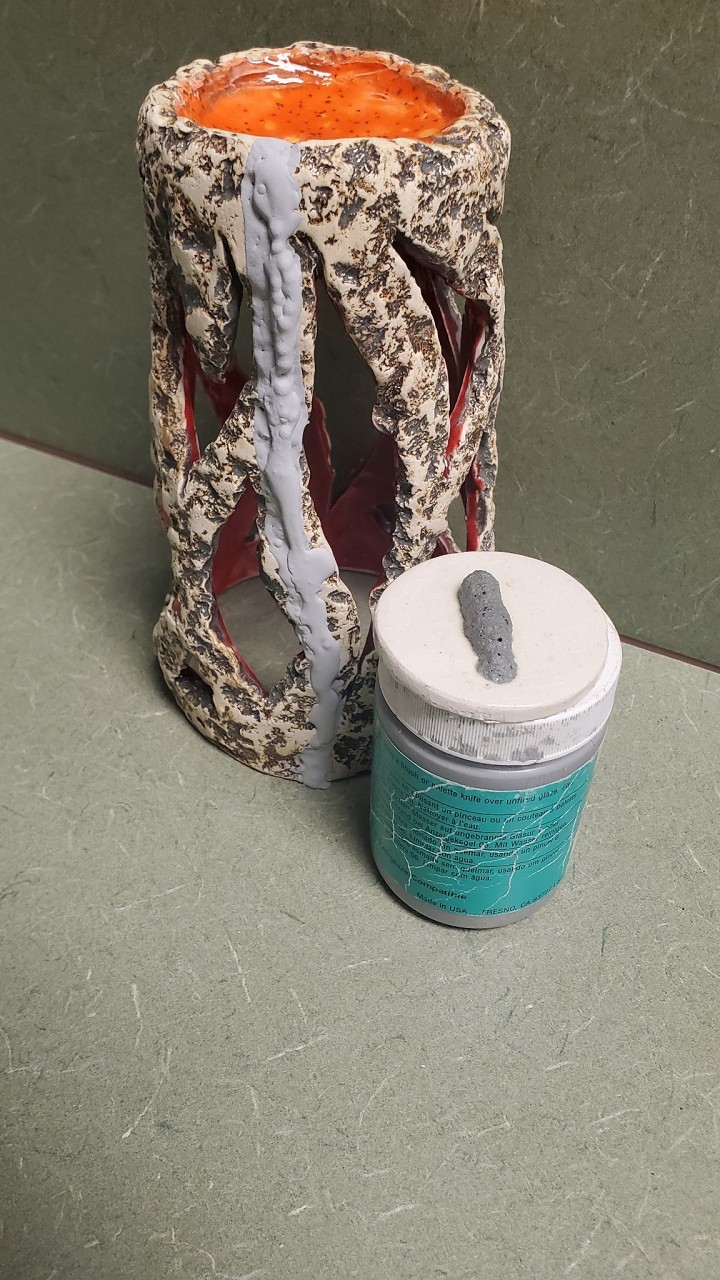
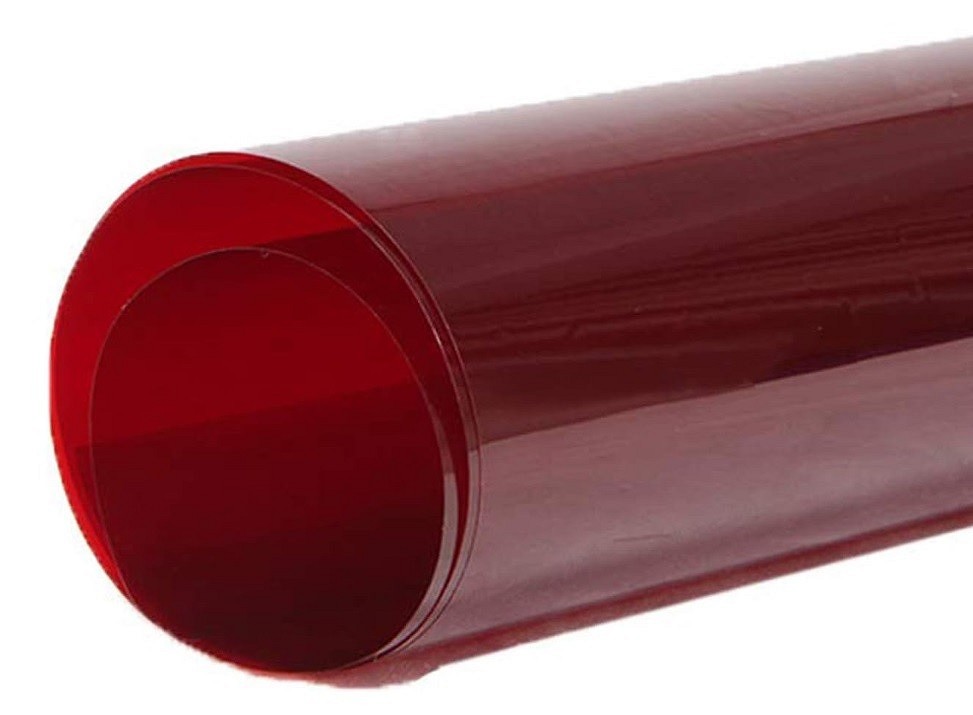
hang10tiki and Will carve thank you very much, you are gentlemen and scholars! TikiFan welcome back after a long absence! You are too kind, I hope you found some entertainment and inspiration. My Tiki table lamps are out of the kiln. 2 last finishing touches and they will be done. Added some cooled lava down the side. When fired it should foam up like the stuff on the jar lid And I ordered a sheet of red acetate to wrap around the lamp to see how it looks red |
|
M
MadDogMike
Posted
posted
on
Wed, Aug 16, 2023 8:06 AM
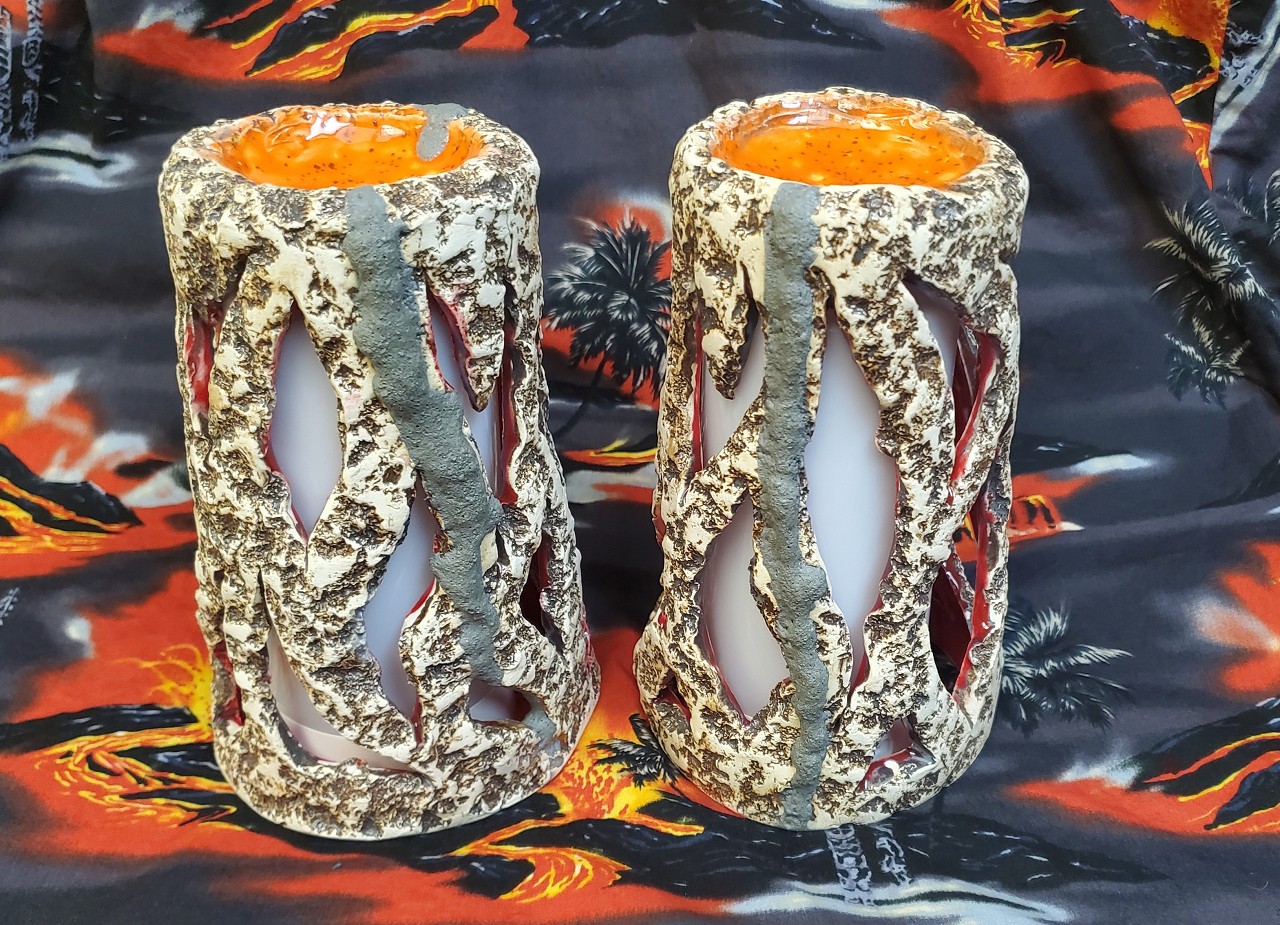
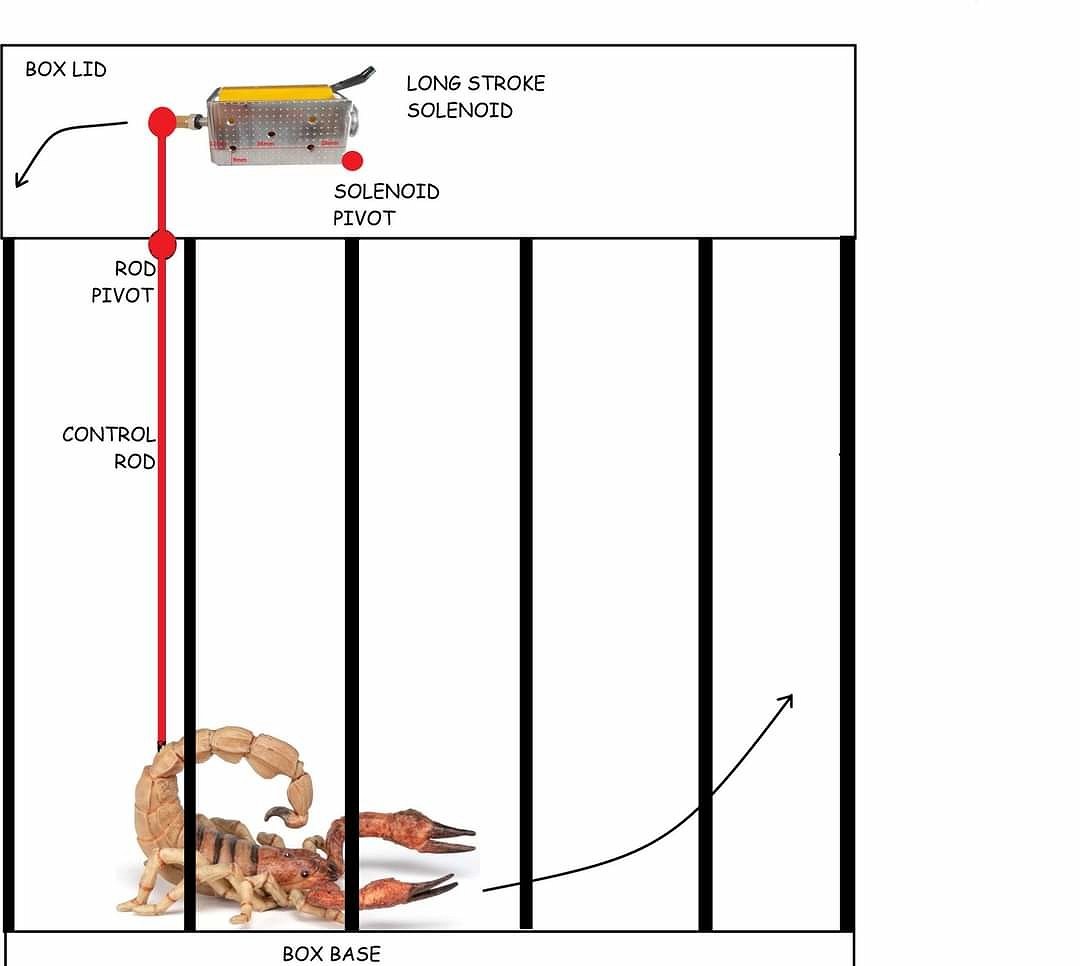
One last photo of my table lamps. The dimensional cooled lava came out OK but not as raised as I had hoped. On to the next project Hamo LOL. Here is my plan. A solenoid pushes the control rod which swings the scorpion forward againt the bars of the cage. For now I'll control it with a SmartSwich and my phone. Eventually I'd like to add a tap sensor and a relay so he jumps it you tap on the cage. Parts are arriving daily, I'll keep you posted [ Edited by MadDogMike on 2023-08-16 08:08:00 ] |
|
D
danlovestikis
Posted
posted
on
Thu, Aug 17, 2023 7:42 PM
That is so creeepy goood! |
|
H
hang10tiki
Posted
posted
on
Tue, Aug 22, 2023 8:50 PM
See lots of those in people’s shoes here in Vegas |
|
H
Hamo
Posted
posted
on
Tue, Aug 22, 2023 10:03 PM
Whew--I'm tired just looking at all you've accomplished in the last couple of weeks.... |
|
M
MadDogMike
Posted
posted
on
Wed, Aug 23, 2023 8:20 AM
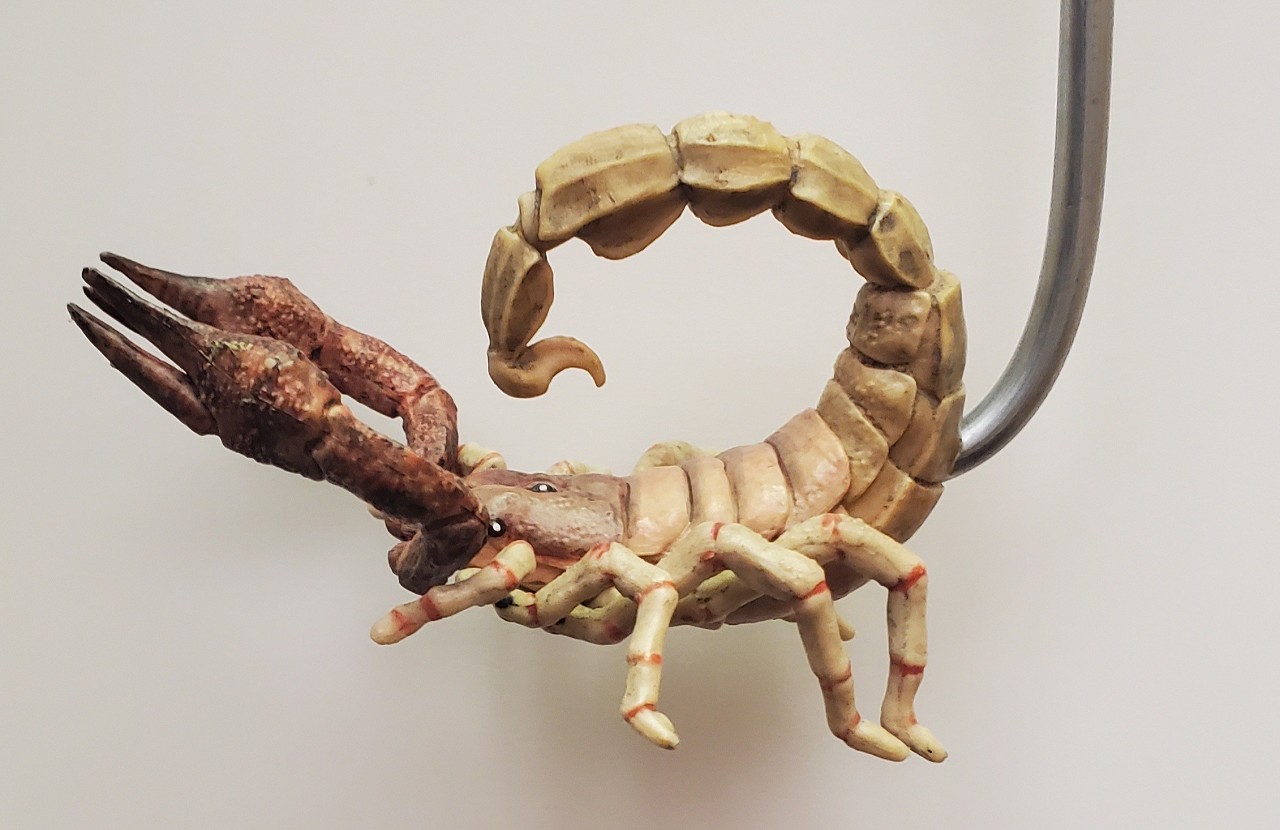
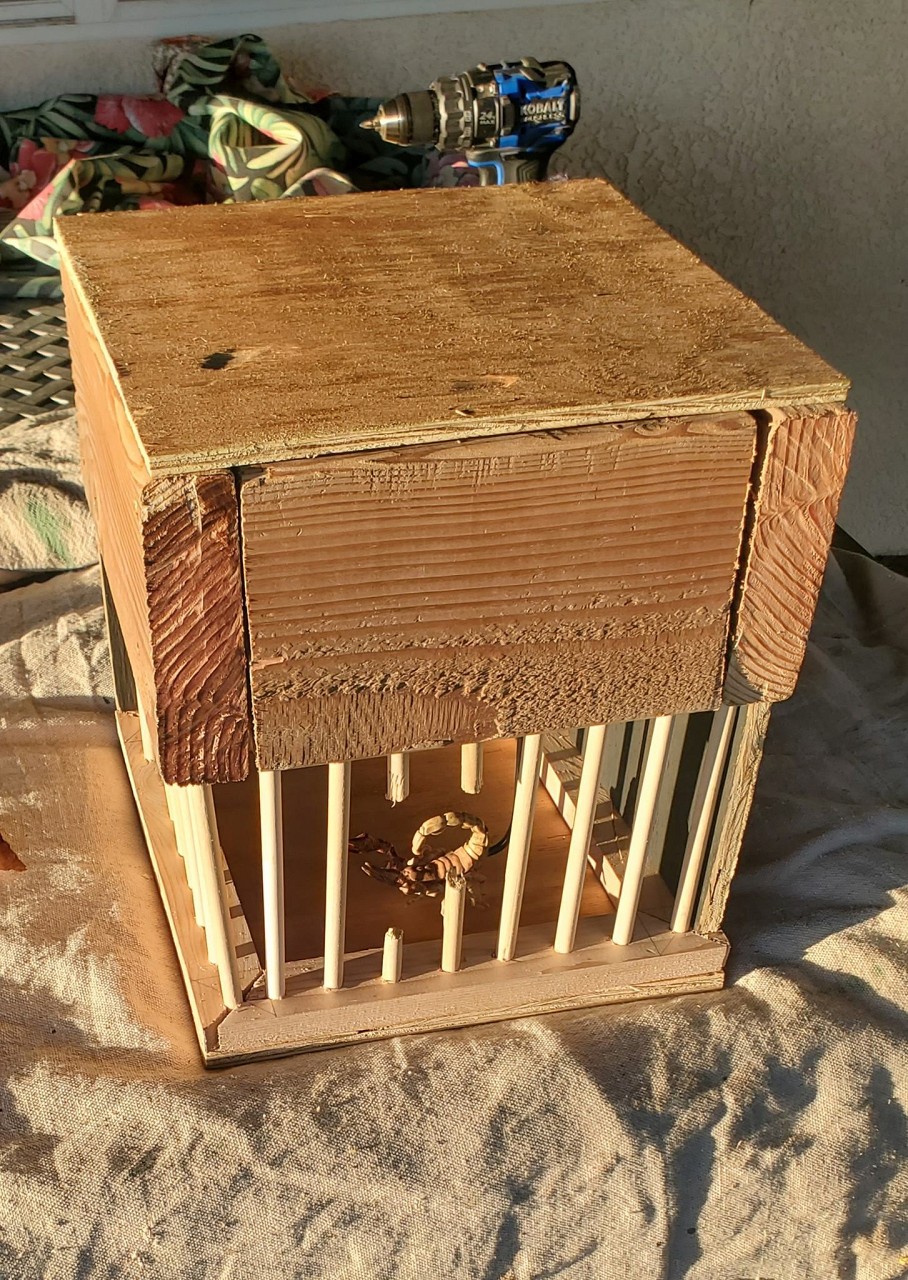
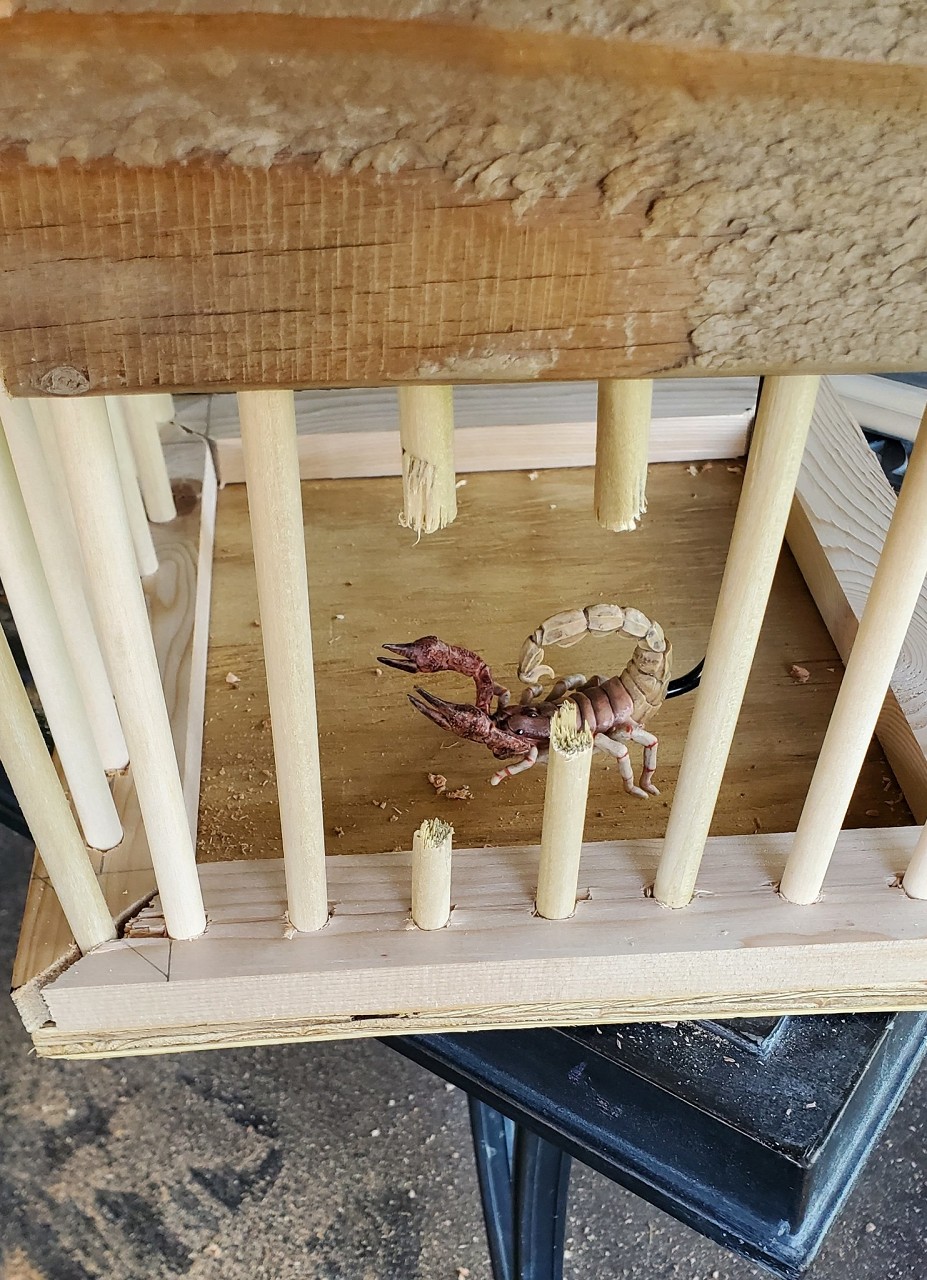
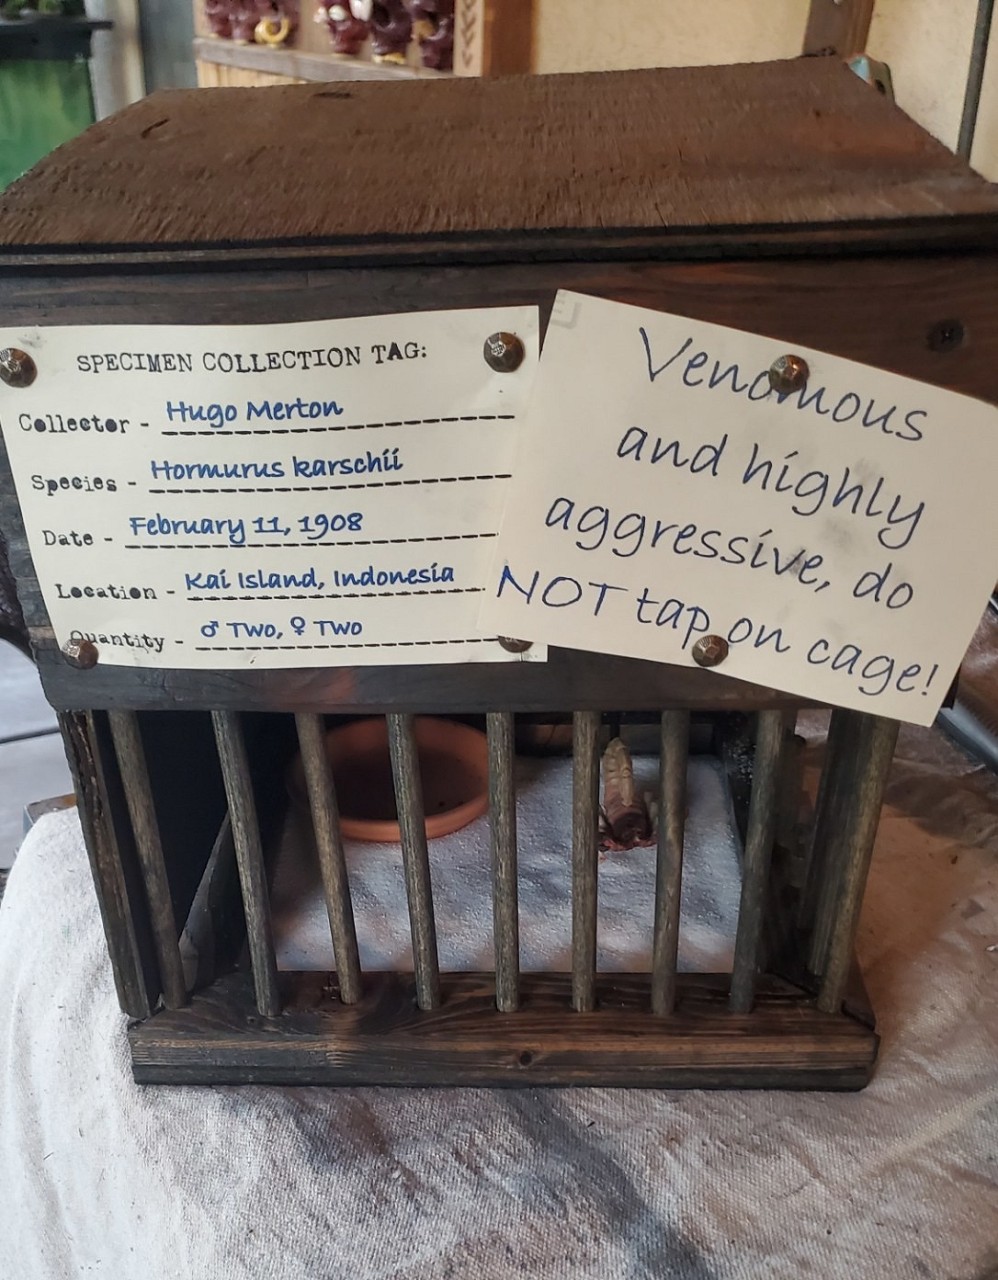
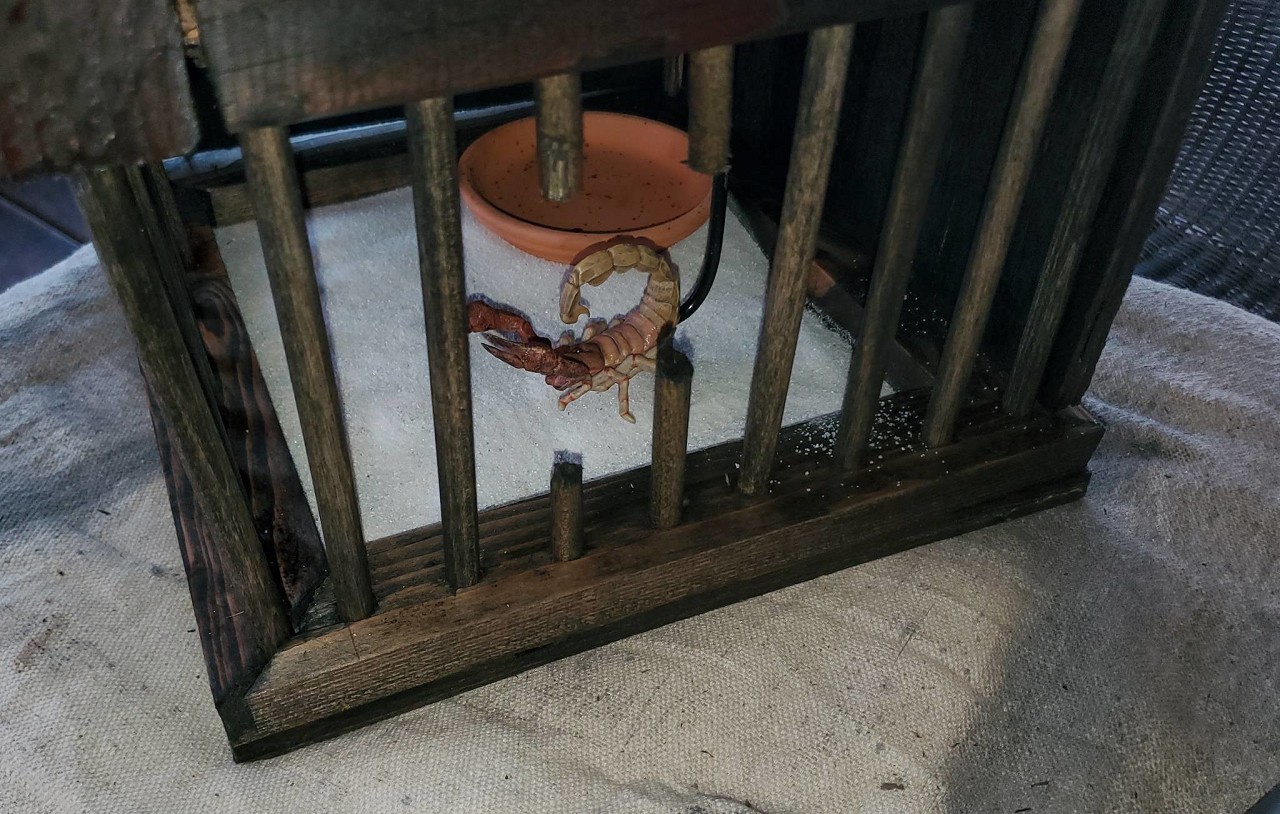
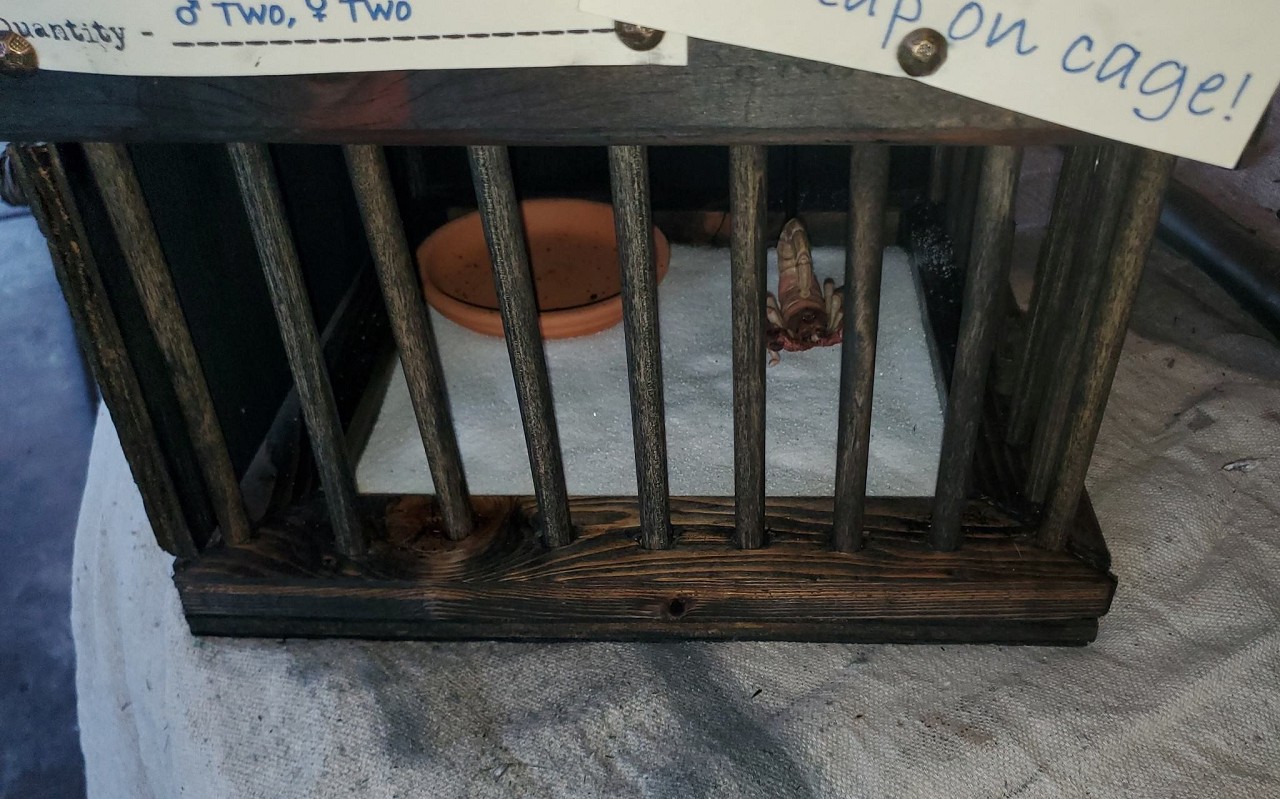
danlovestikis that was the goal :D A little more work on my scorpion box. Here is a short video of the mechanism in action Working on the actual box/cage. I wanted it to look aged and rustic so I used old lumber (where possible) and didn't worry about making it fit like fine furniture. This specimen collection tag will go on the box, printed on Manilla cardstock. Does the tag say 4 specimens? I only see 1? Damn! There are 3 of those buggers on the loose! LOL Up next some dark stain for the box, sand and rocks on the bottom of the cage, maybe a feeding tray in the cage with some plastic crickets or mealworms? I ordered a power supply and a tap sensor to active the scorpion when someone taps on the cage but those are coming on a literal slow boat from China :( |
|
M
MadDogMike
Posted
posted
on
Thu, Aug 24, 2023 10:12 AM
Just about done! Need to mount it to a pillar face-high in my patio and finalize the activation once my tap sensor switch comes in. And a couple pics |
|
B

BlackWater
Posted
posted
on
Sat, Aug 26, 2023 8:10 AM
Spectacular! |
|
M
MadDogMike
Posted
posted
on
Mon, Aug 28, 2023 10:18 AM
in reply to BlackWater
Thank you sir! |
|
D
danlovestikis
Posted
posted
on
Mon, Aug 28, 2023 6:12 PM
This looks so real. I bet everyone will tap. I hope that boat starts moving faster. |
|
H
hang10tiki
Posted
posted
on
Thu, Sep 7, 2023 6:30 PM
Awesome Mike Should I send you the anti-venom? |
|
D
danlovestikis
Posted
posted
on
Thu, Sep 7, 2023 7:45 PM
That's a real scorpion that's been preserved? I think you've made a scary contraption. The next video should show a person who doesn't see that coming. Love the first one. |
|
M
MadDogMike
Posted
posted
on
Thu, Sep 7, 2023 9:06 PM
hang10tiki is that anti-venom topical because I'm NPI (nothing by injection) LOL danlovestikis he does a good job a scaring people LOL And he's mounted to a pillar just a face height to really maximize the effect 😁 There are some real, preserved crickets in his food dish (I dipped dried crickets in 2 part resin, I don't know if they will last or not?) but he is made of plastic. Ordered from Amazon (the retailer company, not the river/rainforest ;😉 ) [ Edited by MadDogMike on 2023-09-07 21:09:55 ] |
|
M
MadDogMike
Posted
posted
on
Sat, Sep 9, 2023 4:25 PM
A little video of my scorpion https://youtu.be/BuVslkrZZEM?si=7kM64Nemhjr2M_ob |
|
M
MadDogMike
Posted
posted
on
Tue, Sep 12, 2023 1:48 PM
Last year I made a faux neon sign that was inspired by the on on top of my father-in-law's Tiki restaurant in the 60s. I used EL Wire, it was easy to work with but the light it put out was underwhelming. Here is a pic of the EL Wire, it shows much brighter than it really was. I discovered LED Neon that is SO MUCH brighter! But so much harder to work with. It wasn't nearly as flexible so I couldn't use one piece like I did with the EL Wire. It needed to be cut into 9 segments and each of the segments had to have wire leads soldered onto tiny little terminals on plastic ribbon. I suck at soldering LOL Managed to get it all soldered up and I am much happier with it. The EL Wire put out a faint glow, the LED Neon actually puts out a bright light as you can see by the light shining on the ceiling. [ Edited by MadDogMike on 2023-09-12 13:49:19 ] |
|
D
danlovestikis
Posted
posted
on
Tue, Sep 12, 2023 8:34 PM
I know how much El Tiki means to you and Teresa. I think this is wonderful. You are a terrific man. |
|
M
MadDogMike
Posted
posted
on
Fri, Sep 15, 2023 4:00 PM
in reply to danlovestikis
Yes, El Tiki is definitely a big part of our genesis story. El Tiki inspired "artifacts" make Teresa happy and that makes me happy <3 |
|
H
hang10tiki
Posted
posted
on
Tue, Oct 3, 2023 11:57 AM
Good job El Mad Dog |
|
M
MadDogMike
Posted
posted
on
Fri, Oct 6, 2023 11:03 AM
in reply to hang10tiki
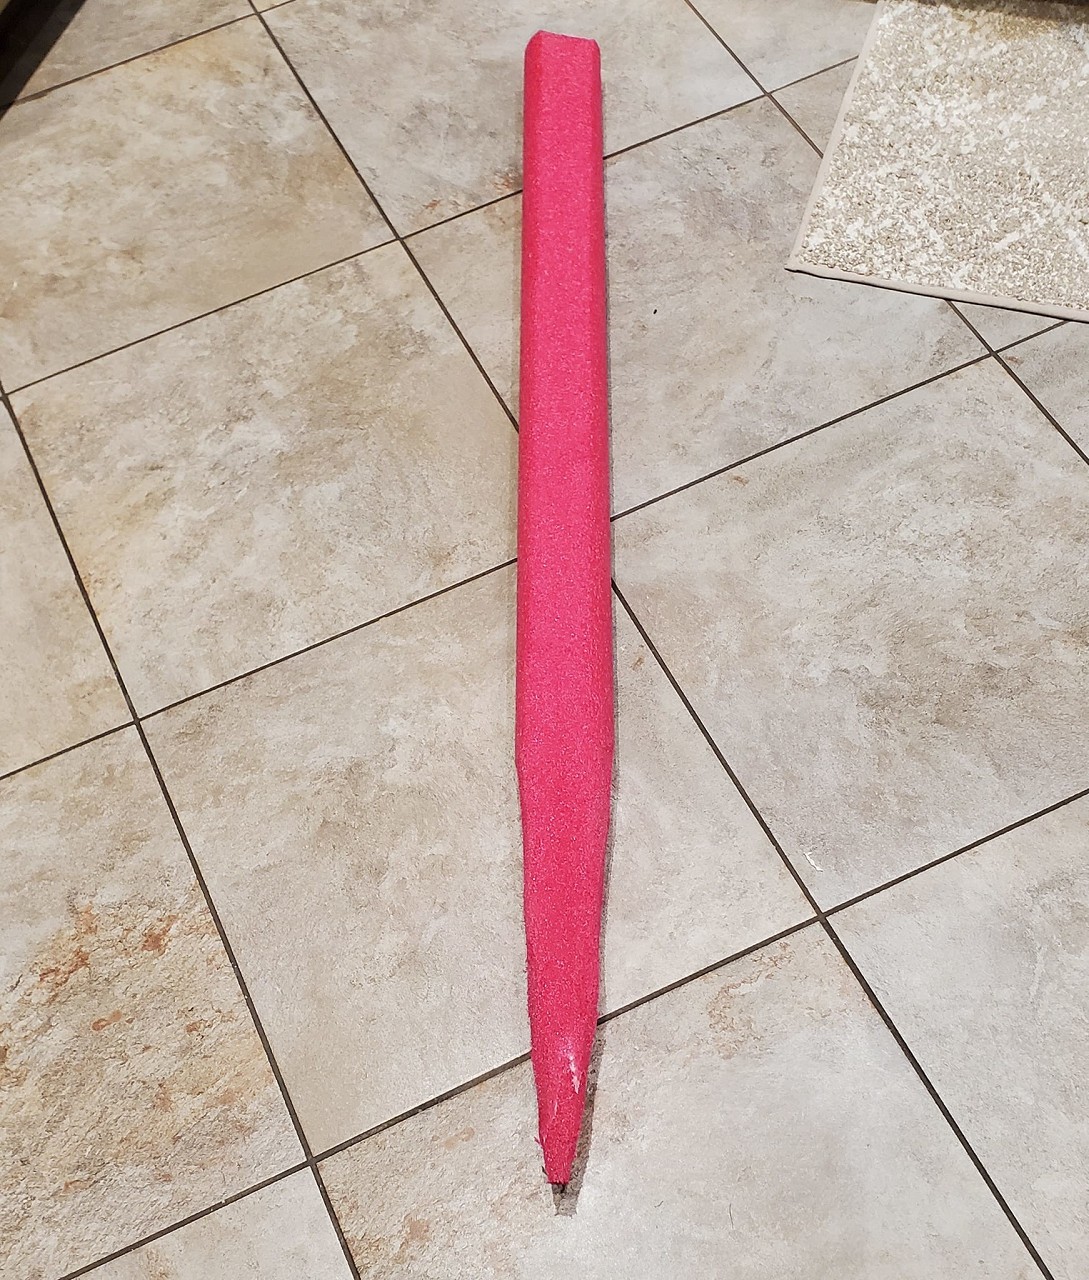
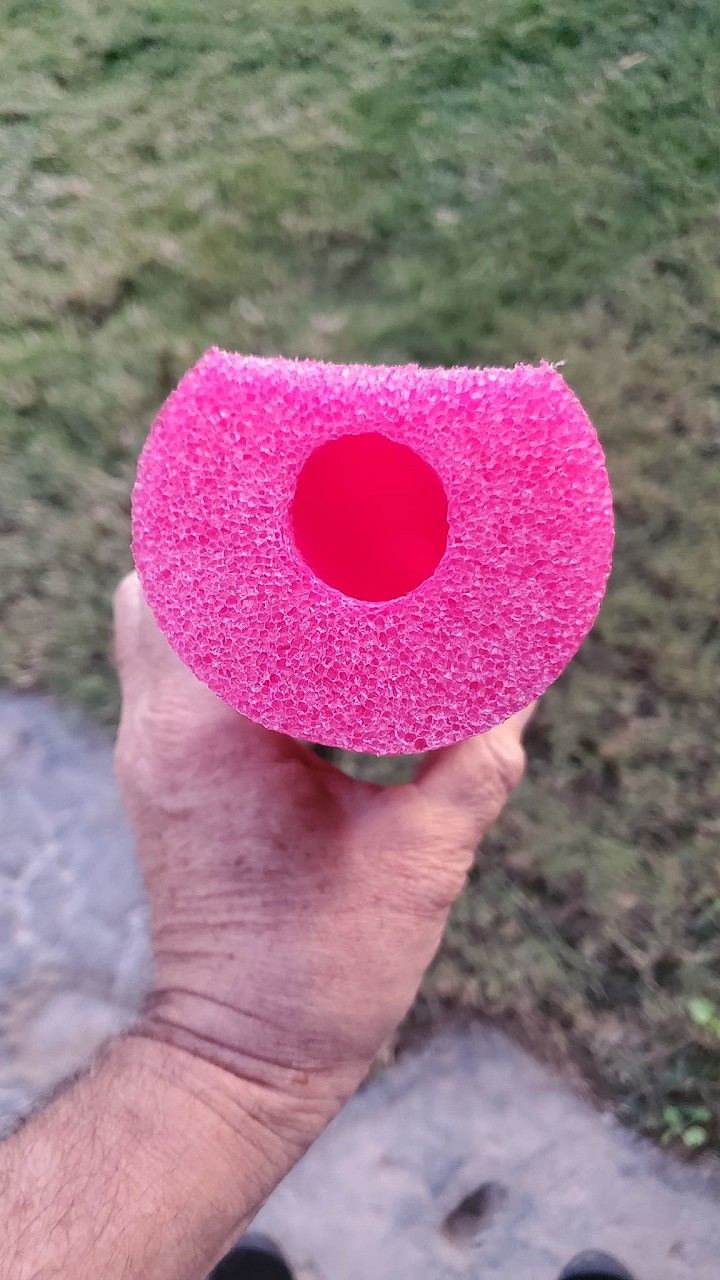
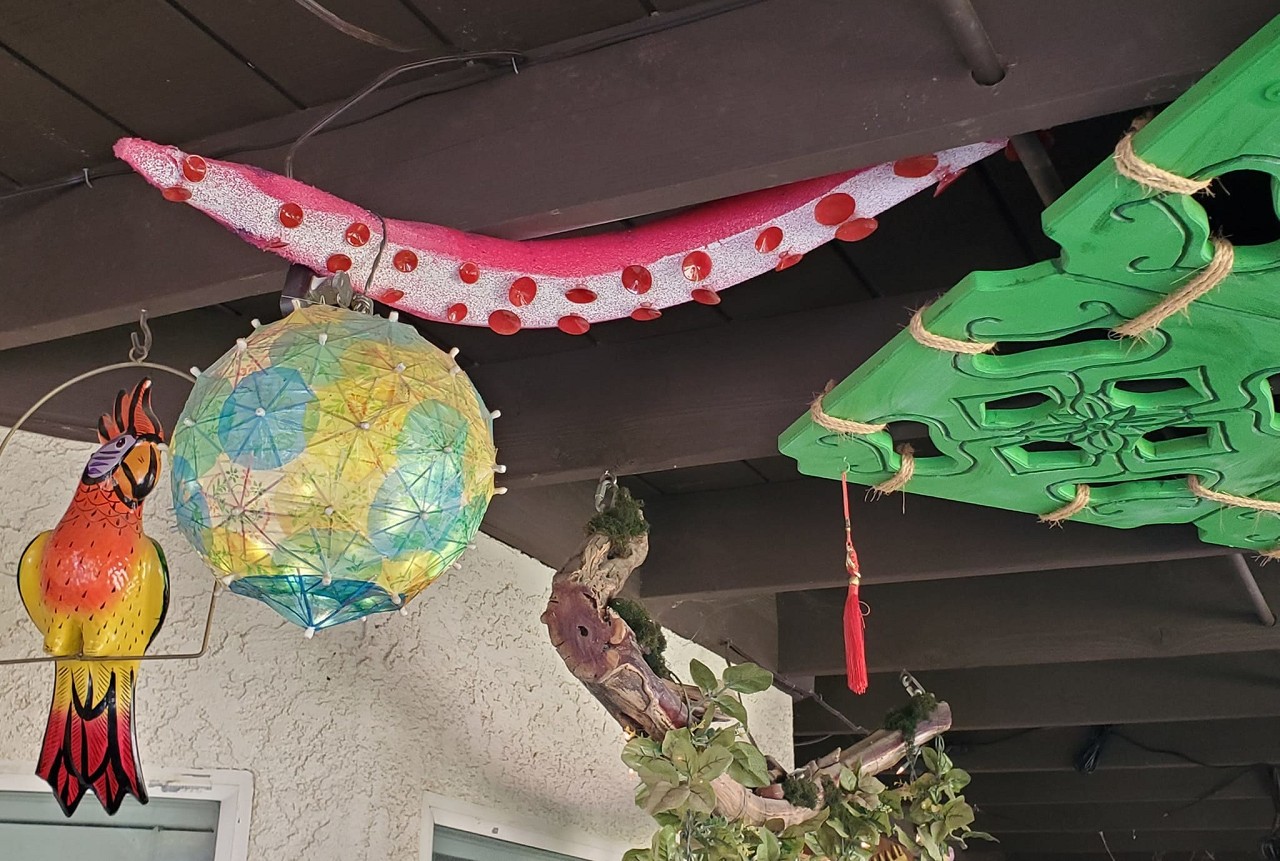
Thank you Hang10! I saw a pool noodle octopus arm posted somewhere so I thought I would make one.
|
|
D
danlovestikis
Posted
posted
on
Fri, Oct 6, 2023 7:24 PM
That's really cute. What did you use for the suckers? |
|
M
MadDogMike
Posted
posted
on
Sat, Oct 7, 2023 10:26 PM
in reply to danlovestikis
Thank you Wendy, the suckers are plastic suction cups |
|
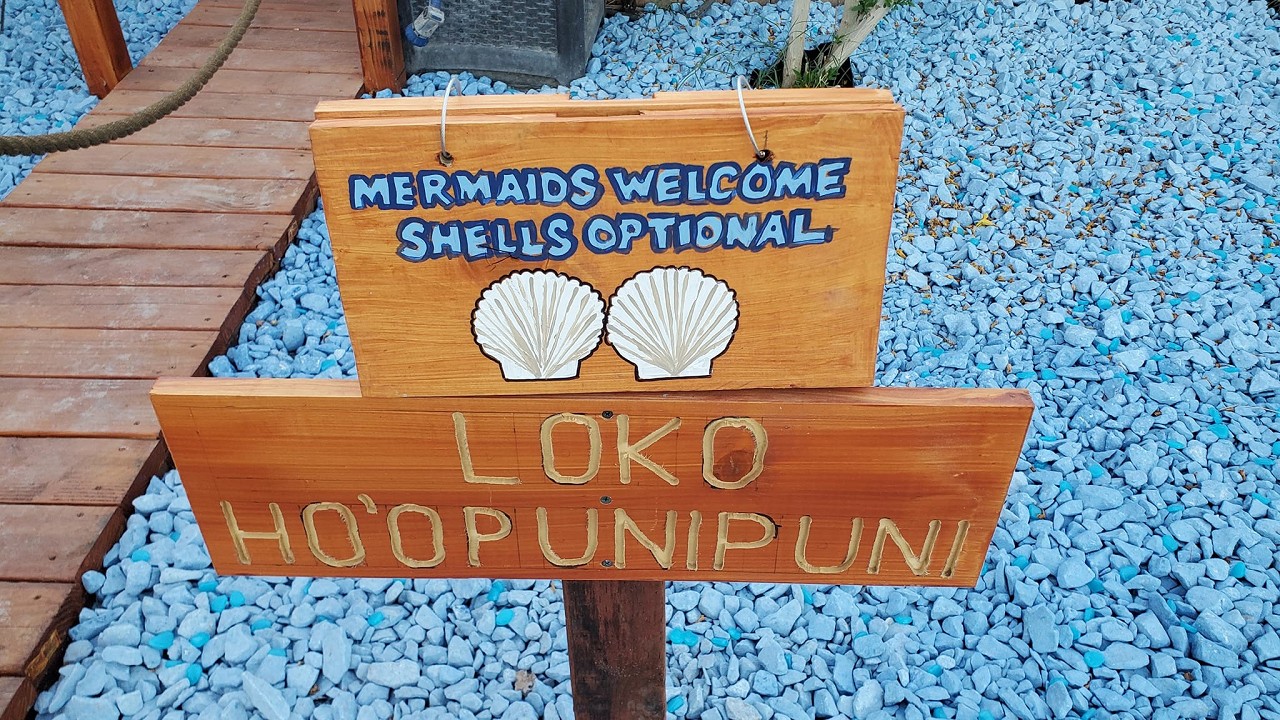
M
MadDogMike
Posted
posted
on
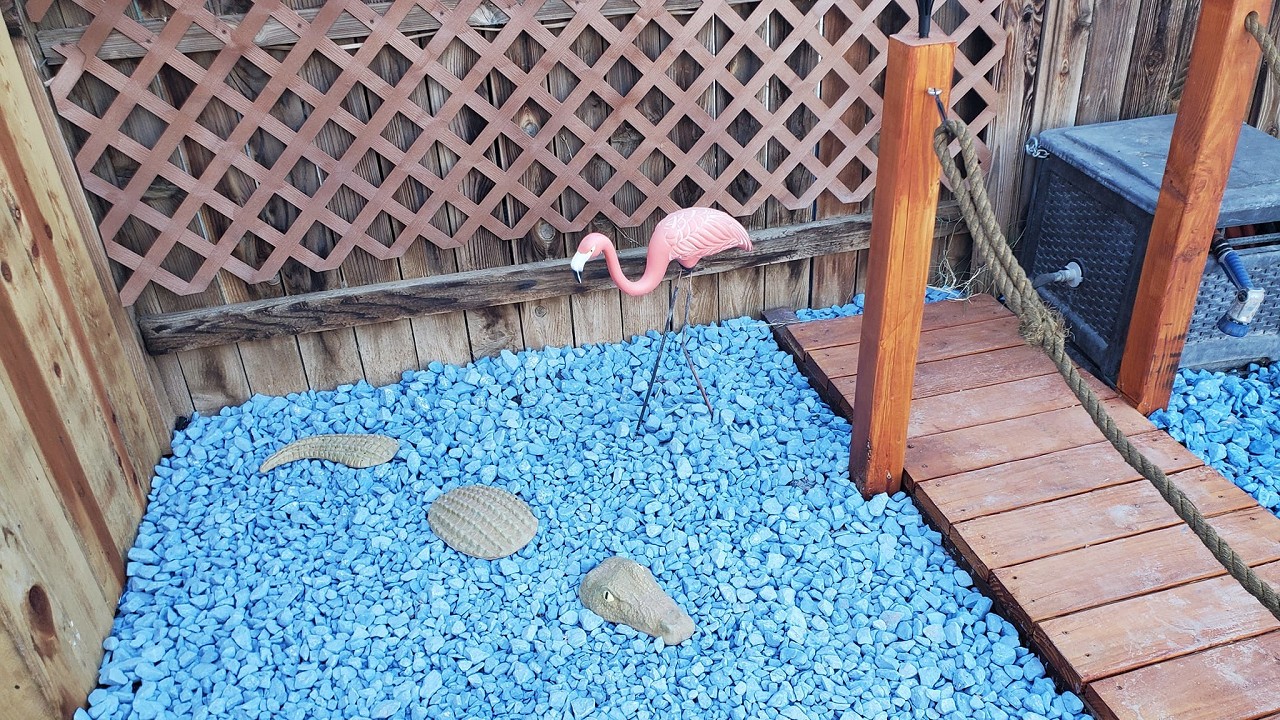
Sun, Oct 8, 2023 7:00 AM
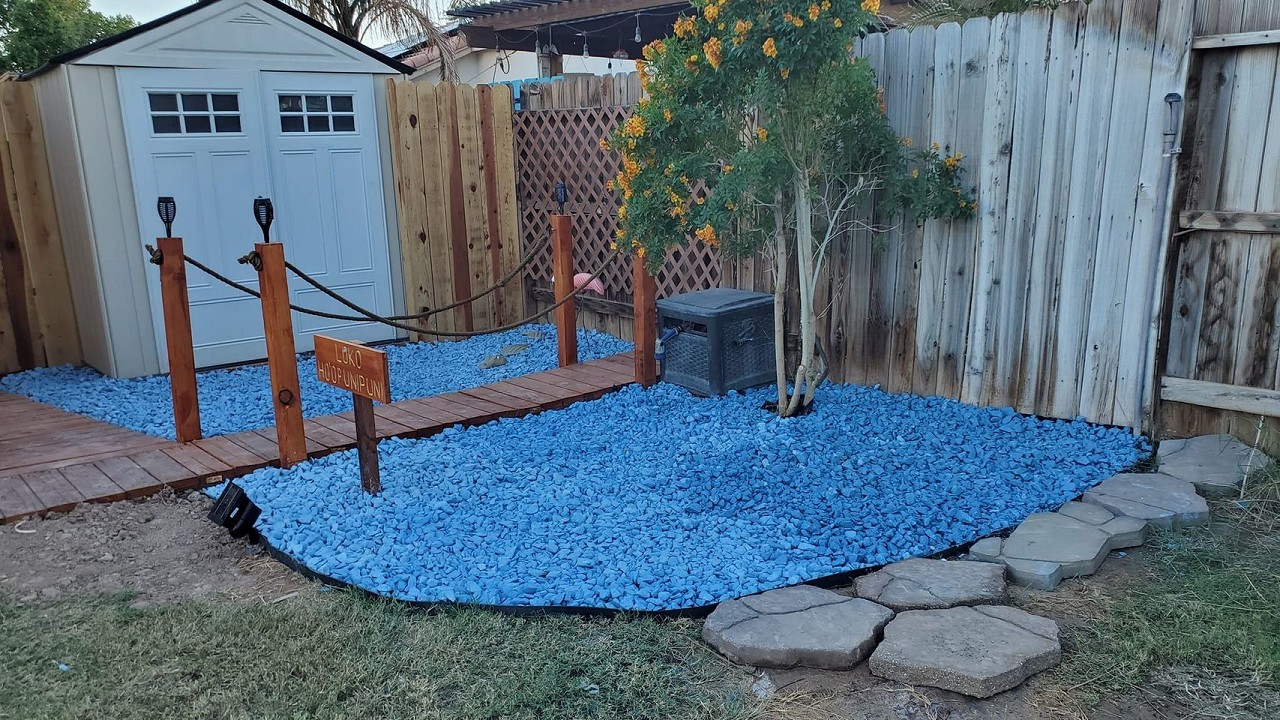
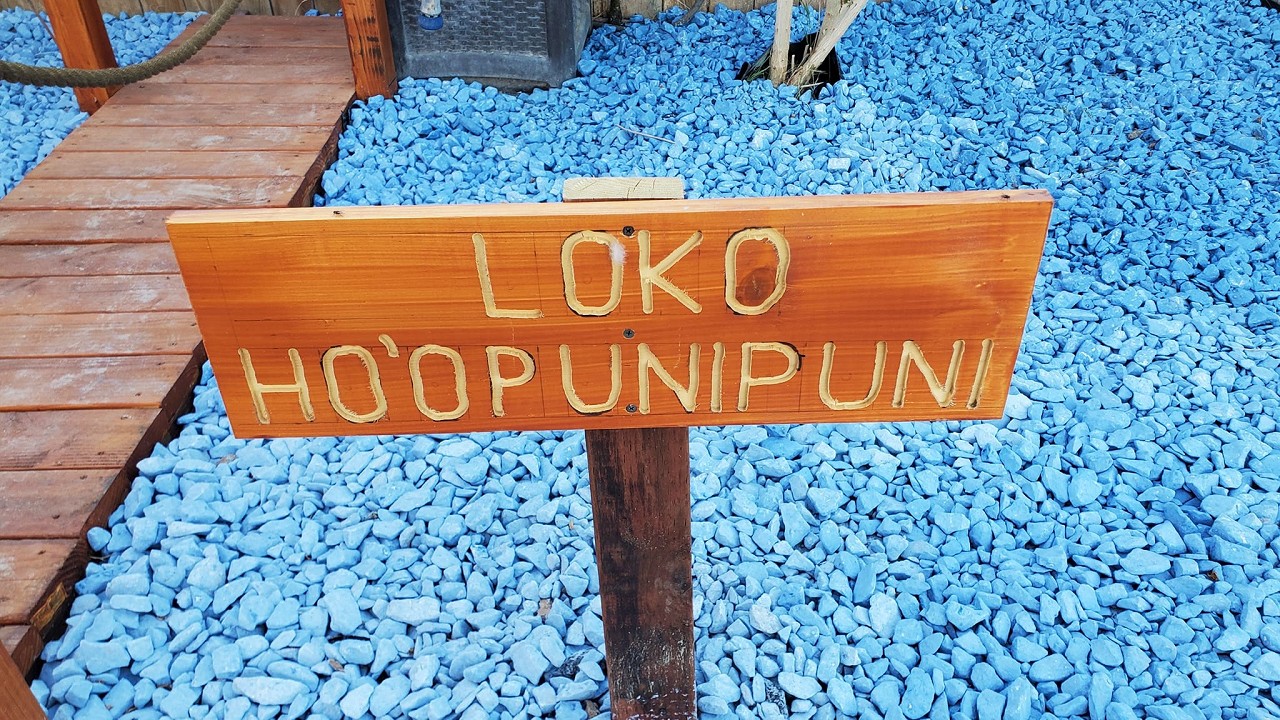
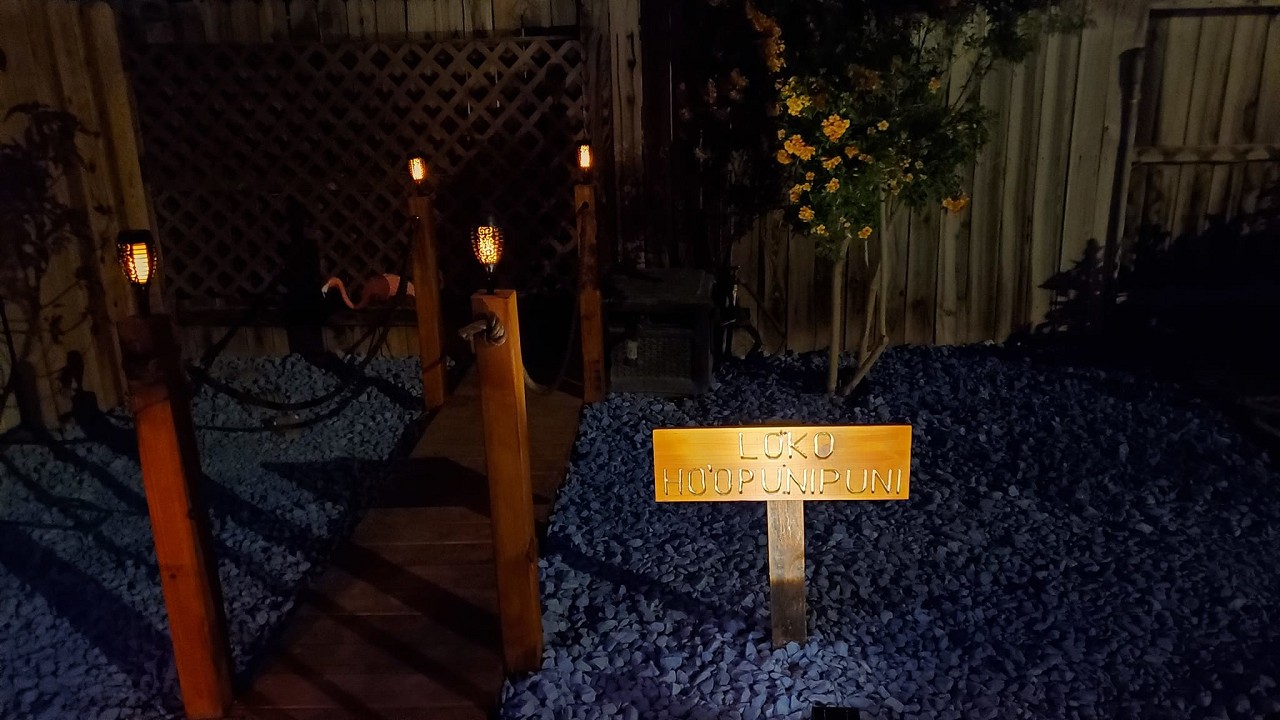
I've been working on a "lake" made from blue rocks. More pics in the Pele Bar thread in the Home Tiki Bars section Finished Hawaiian for "Fake Lake" Nighttime view Some residents of the lake |
|
WC
Will carve
Posted
posted
on
Sun, Oct 8, 2023 7:06 AM
Nice project. Good job too. Bet you are the only one in your neighborhood with one. |
|
D
danlovestikis
Posted
posted
on
Sun, Oct 8, 2023 8:09 AM
When I was a kid, I found some green oil paint and painted a green square. I thought I could play pool. Only there were not holes for balls to fall in. Also, the paint didn't dry for a year. Not good for a storage closet, my mom was not happy. So, my suggestion is that you don't wade or dive into your new pool even though it looks so inviting. Love it. |
|
M
MadDogMike
Posted
posted
on
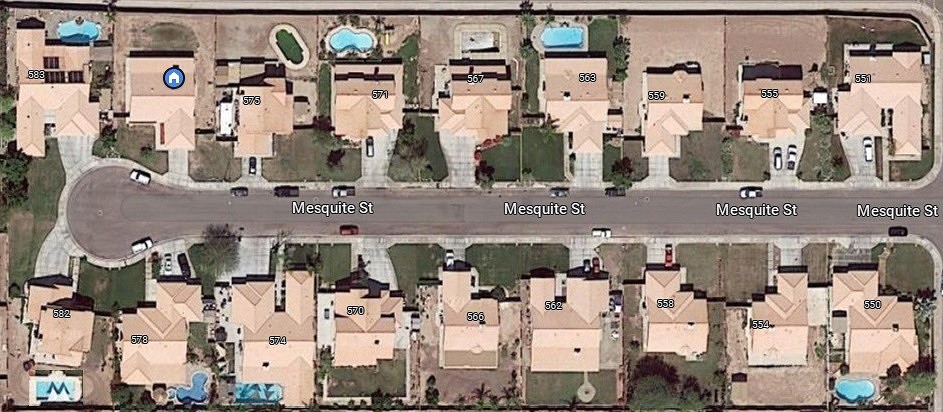
Mon, Oct 9, 2023 8:38 AM
in reply to Will carve
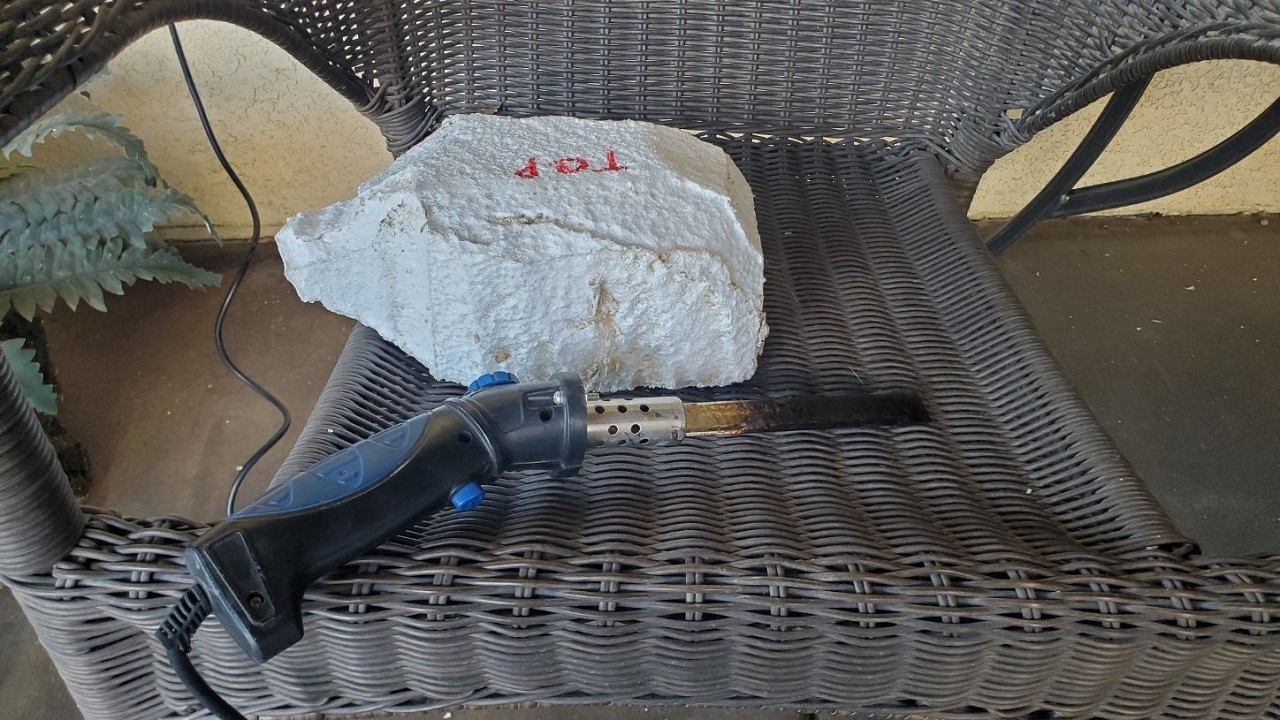
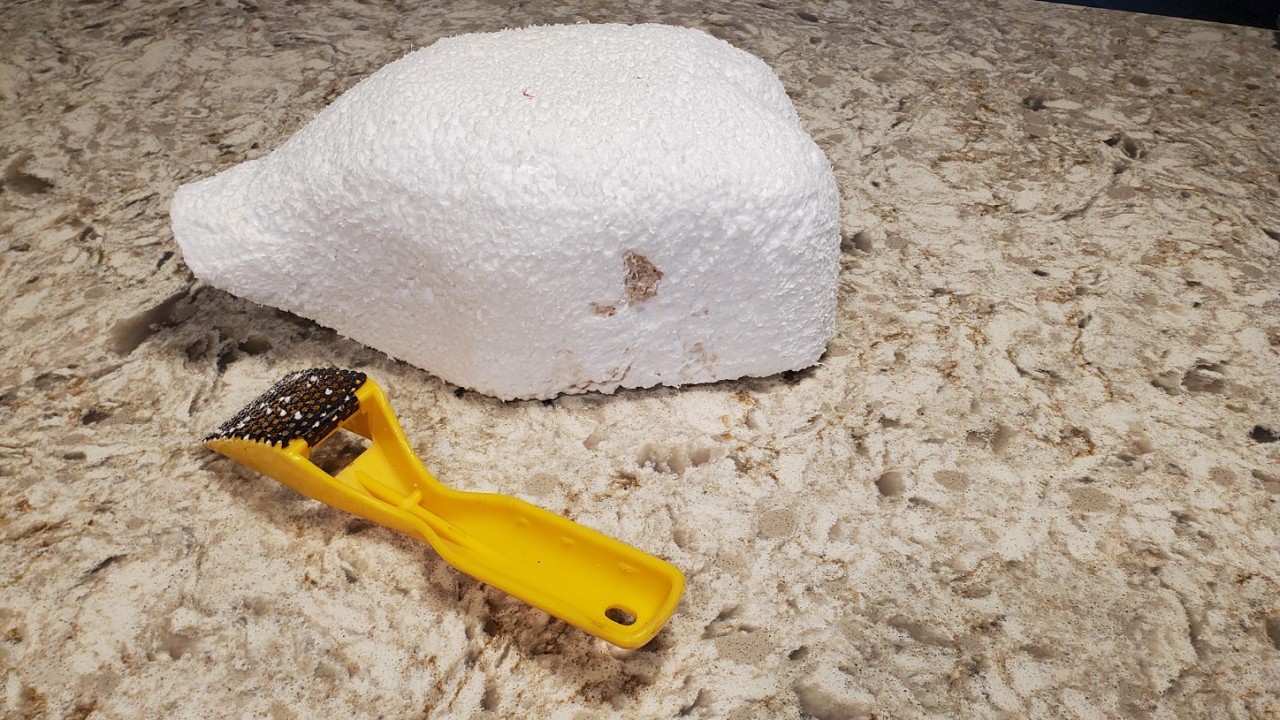
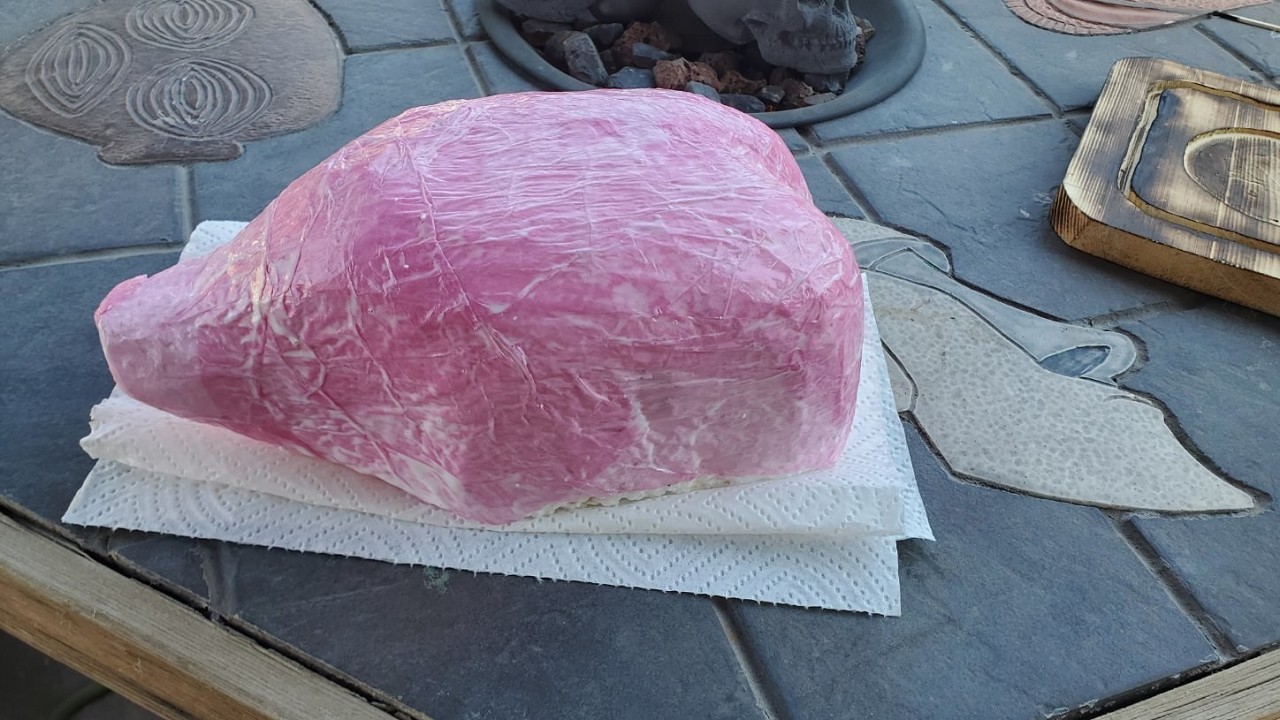
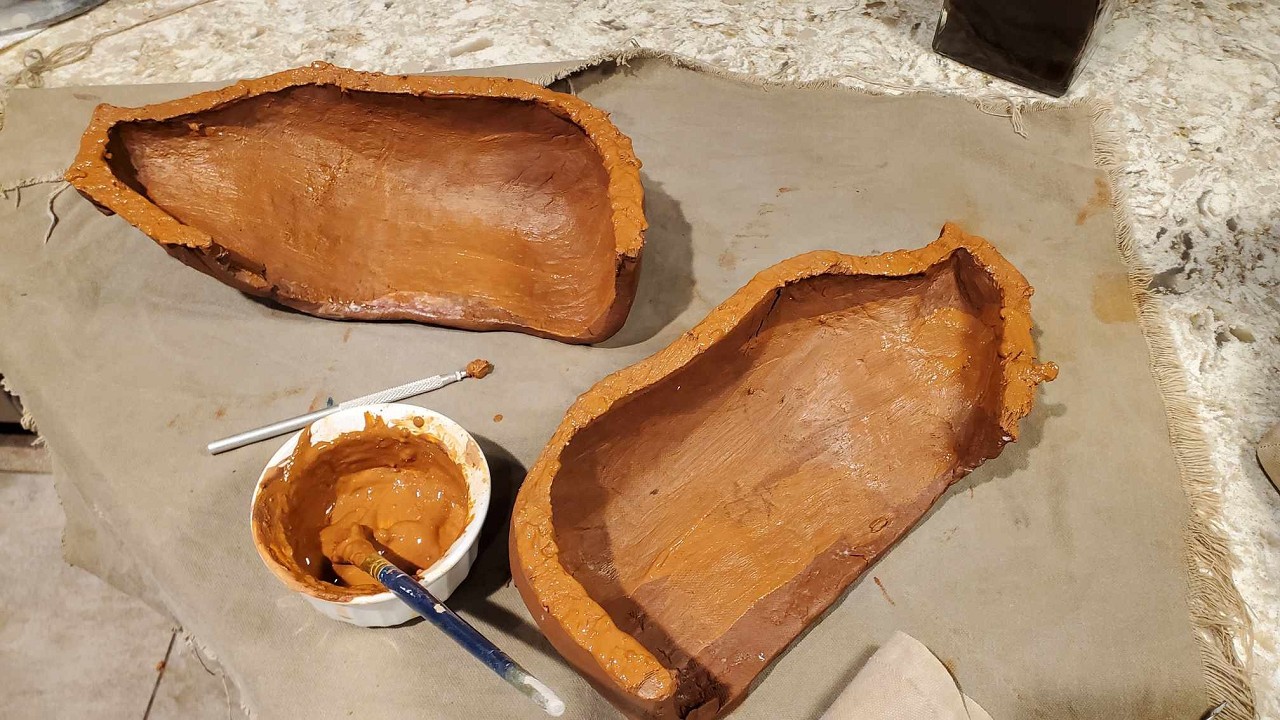
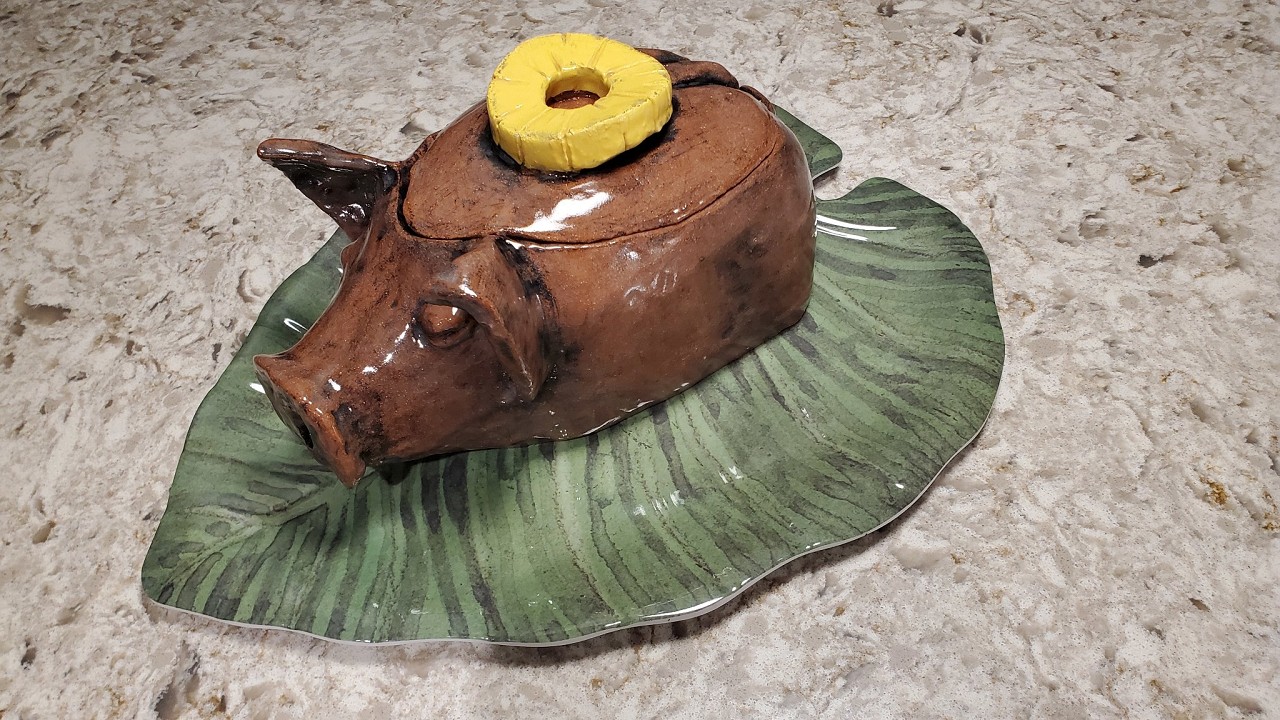
Thank you Will and danlovestikis. Will, there are 9 pools on my block (including one empty and one green) but no one has a lake like mine LOL New Project - a pig shaped ceramic dish for Kalua Pork Rough cut with a hot knife Smoothed and shaped with a rasp Covered with tissue paper and ModgePodge to smooth it more. Slabs of clay will be laid over this form to make a pig shape.
[ Edited by MadDogMike on 2023-10-09 08:39:00 ] [ Edited by MadDogMike on 2023-10-10 07:42:49 ] |
|
D
danlovestikis
Posted
posted
on
Mon, Oct 9, 2023 7:31 PM
This is already fun to watch! |
|
M
MadDogMike
Posted
posted
on
Wed, Oct 11, 2023 10:35 AM
in reply to danlovestikis
Thank you Wendy <3 Hopefully I will get more done this weekend. |
|
M
MadDogMike
Posted
posted
on
Sun, Oct 15, 2023 11:07 AM
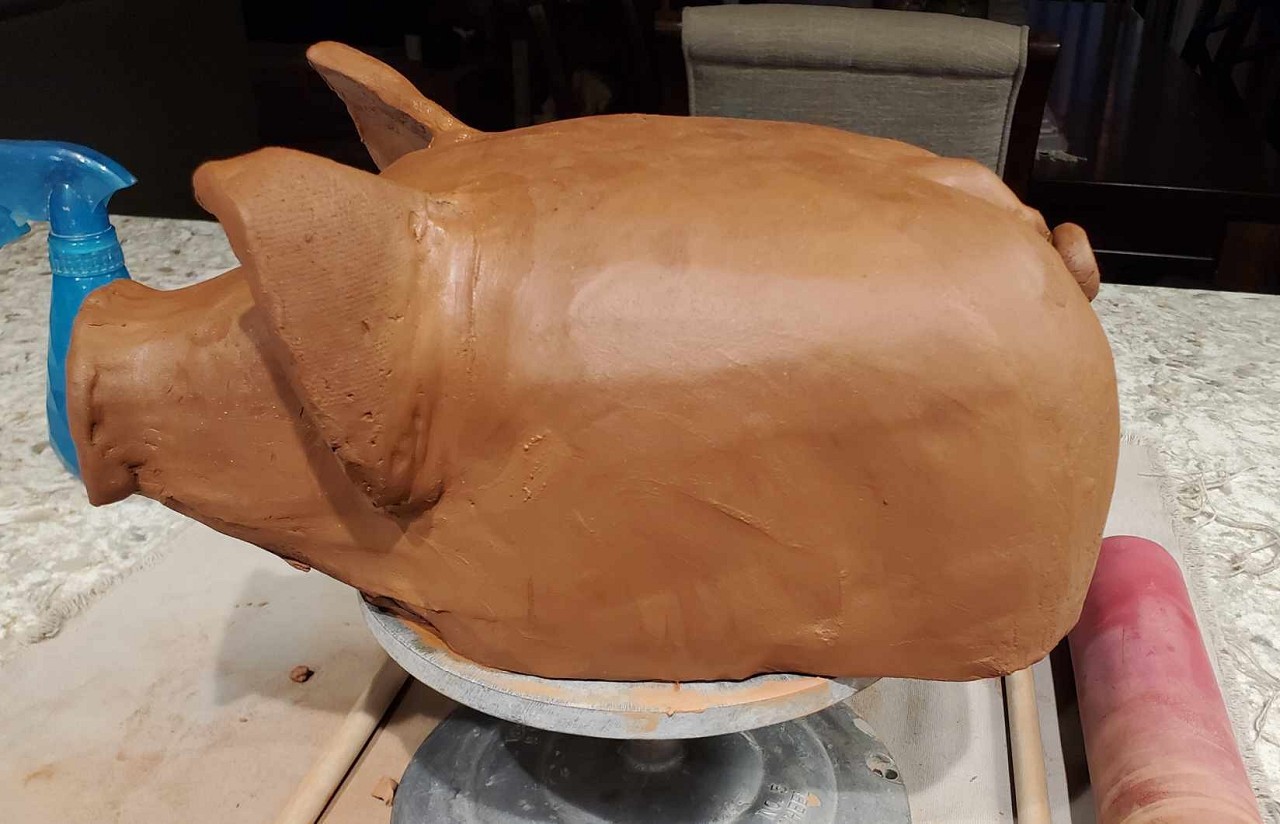
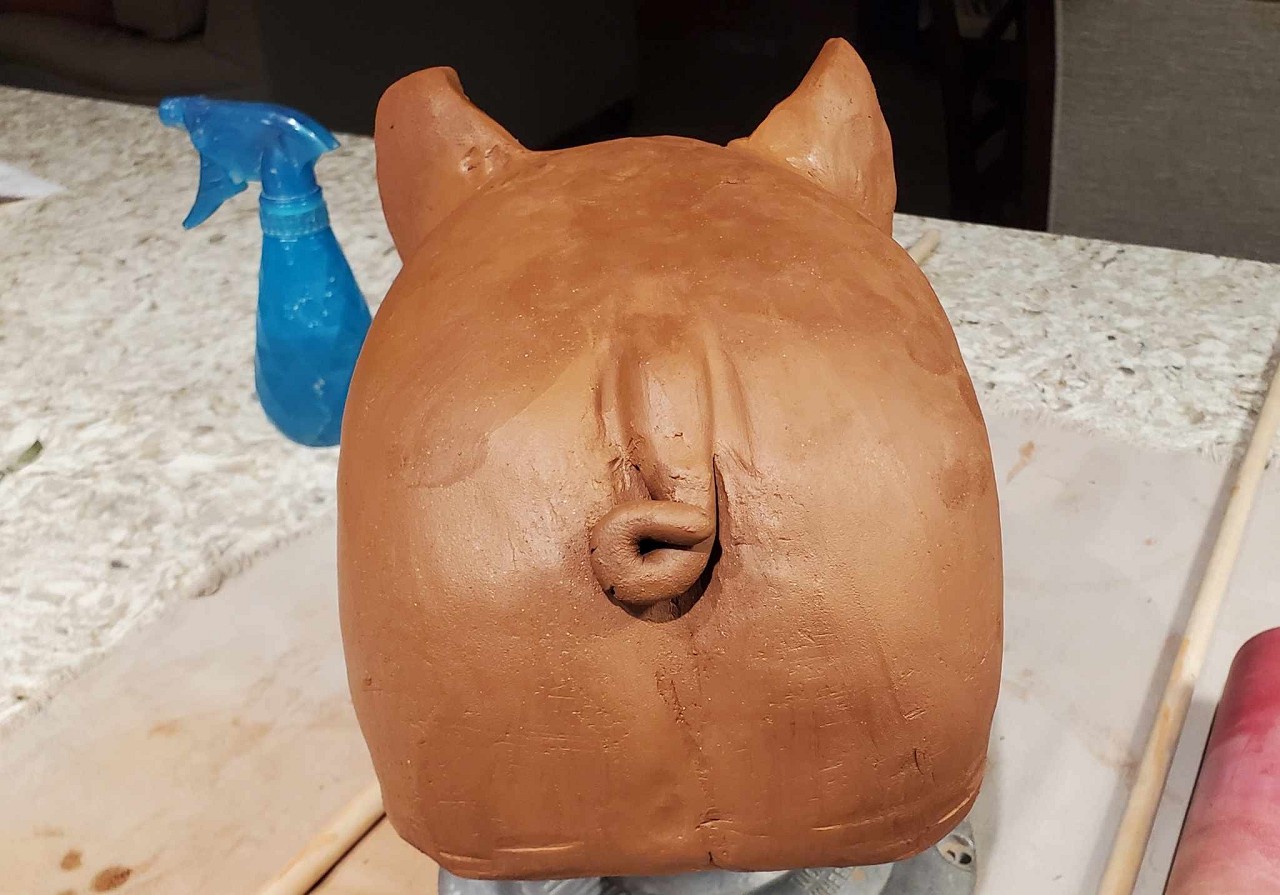
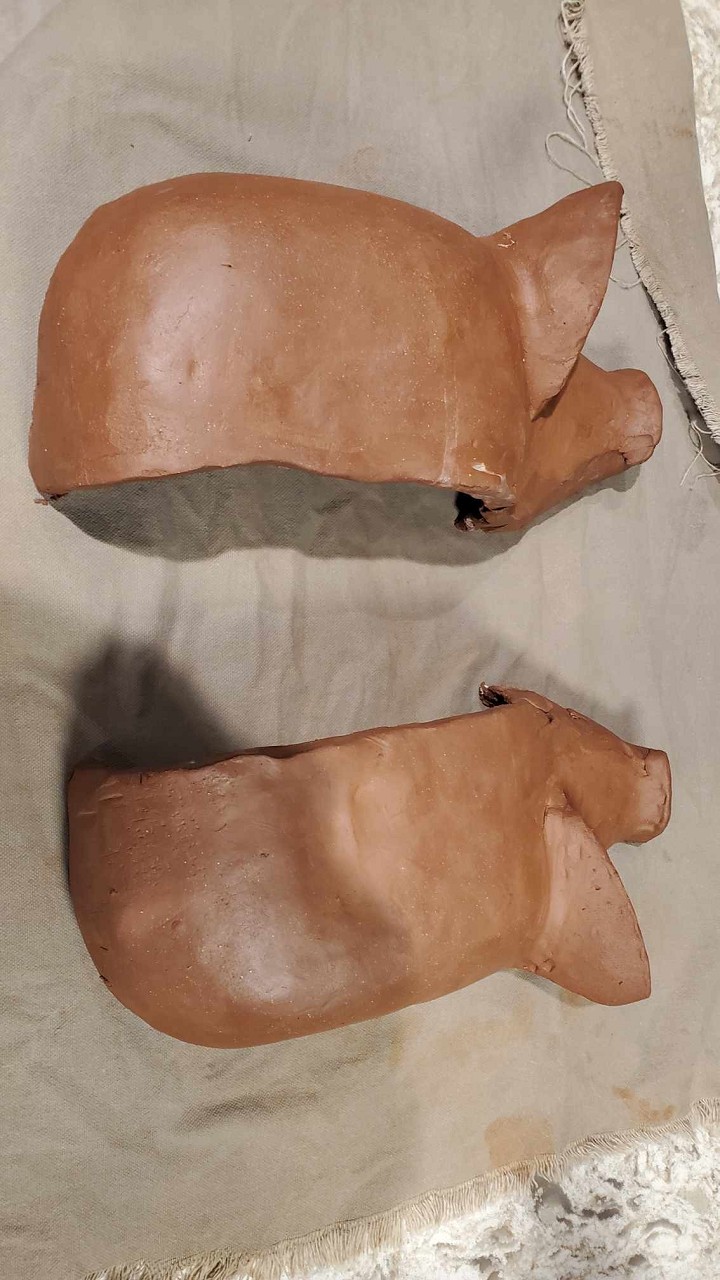
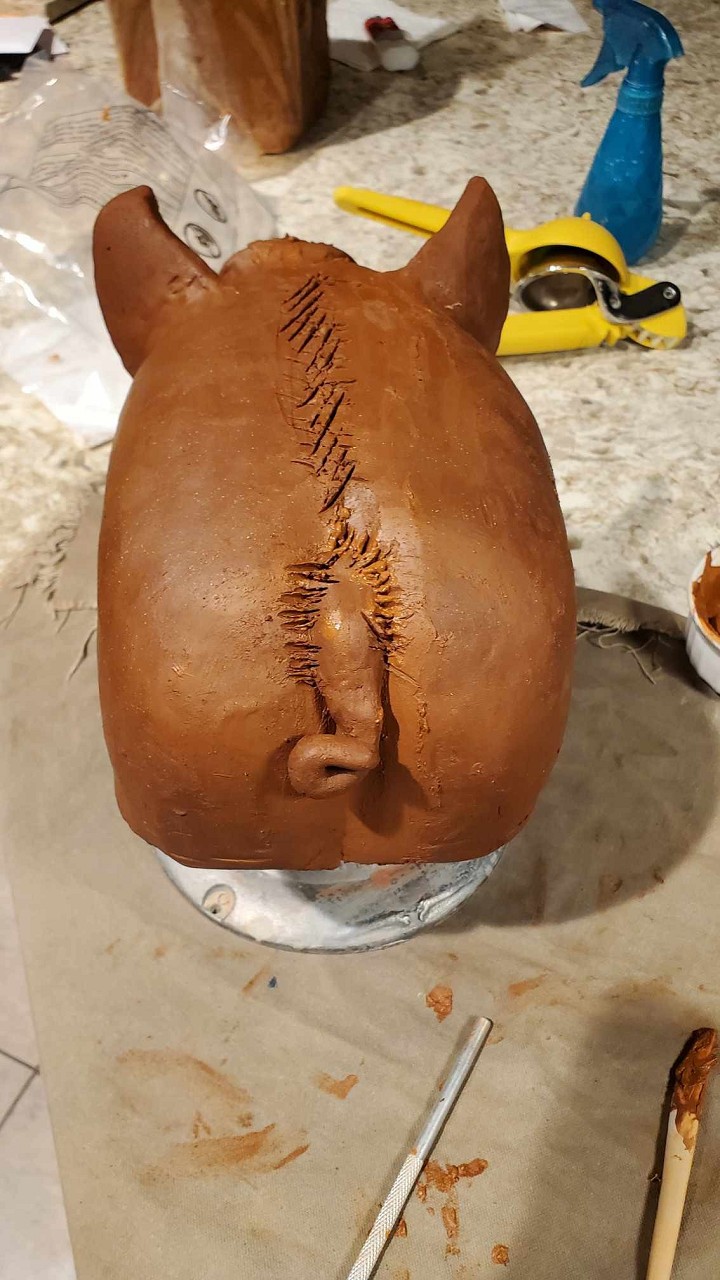
Working on my piggy again. Rolled out a slab of brown clay and layered it over the Styrofoam form. Added ears, eyes, and a tail.
The plan is to split the pig and allow it to dry and firm up a bit. I coated the pig form with Modge Podge so that I can use it again if I want. I'll pull the two halves off the form and then rejoin them. "If was at that moment he realized he had messed up" Used a score and slip method to rejoin the pig halves. Next, cut off the top of the pig to make a lid and added a lip to the lid so it doesn't slide around Rolled another slab for the bottom, scored and slipped it on. Dished the bottom to form a "foot" or rim that the dish will rest on. This helps it to sit flat after firing. Check out the foot on any coffee cup (drink the coffee before turning it over ;) ) Rolled some clay coils to fill the seam inside between the sides and the new bottom [ Edited by MadDogMike on 2023-10-15 11:08:54 ] |
|
M
MadDogMike
Posted
posted
on
Mon, Oct 16, 2023 12:41 PM
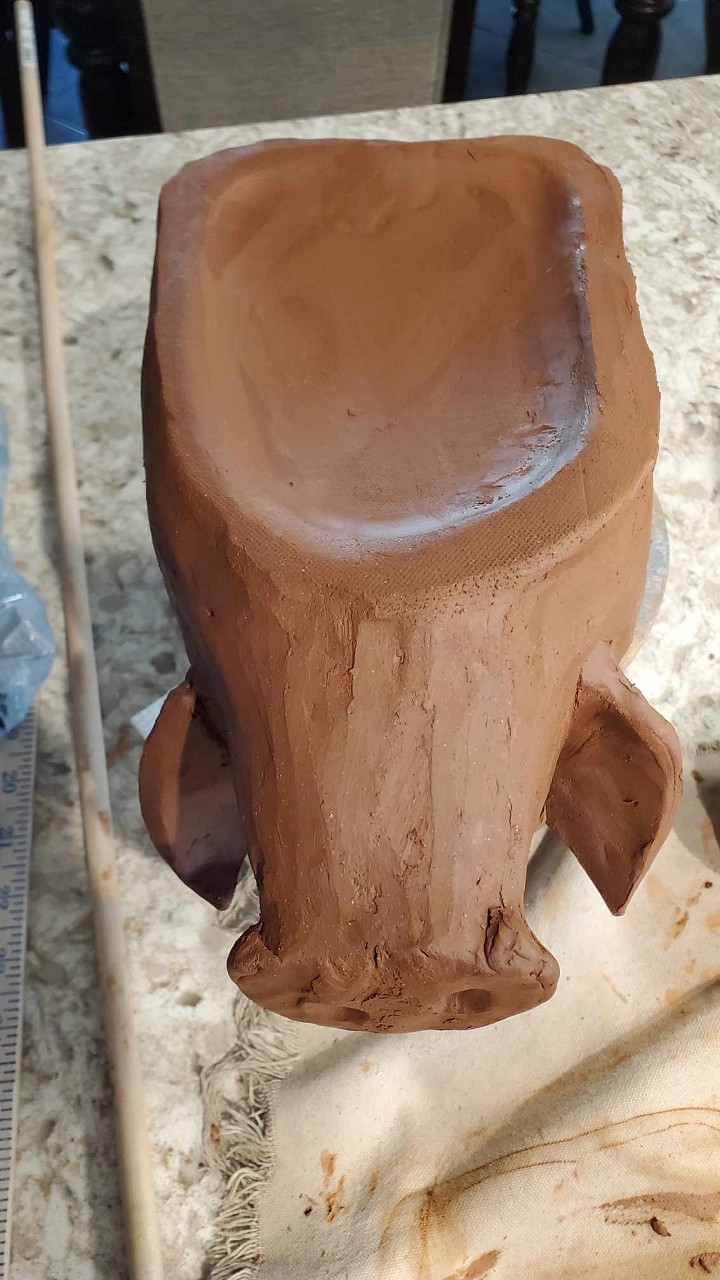
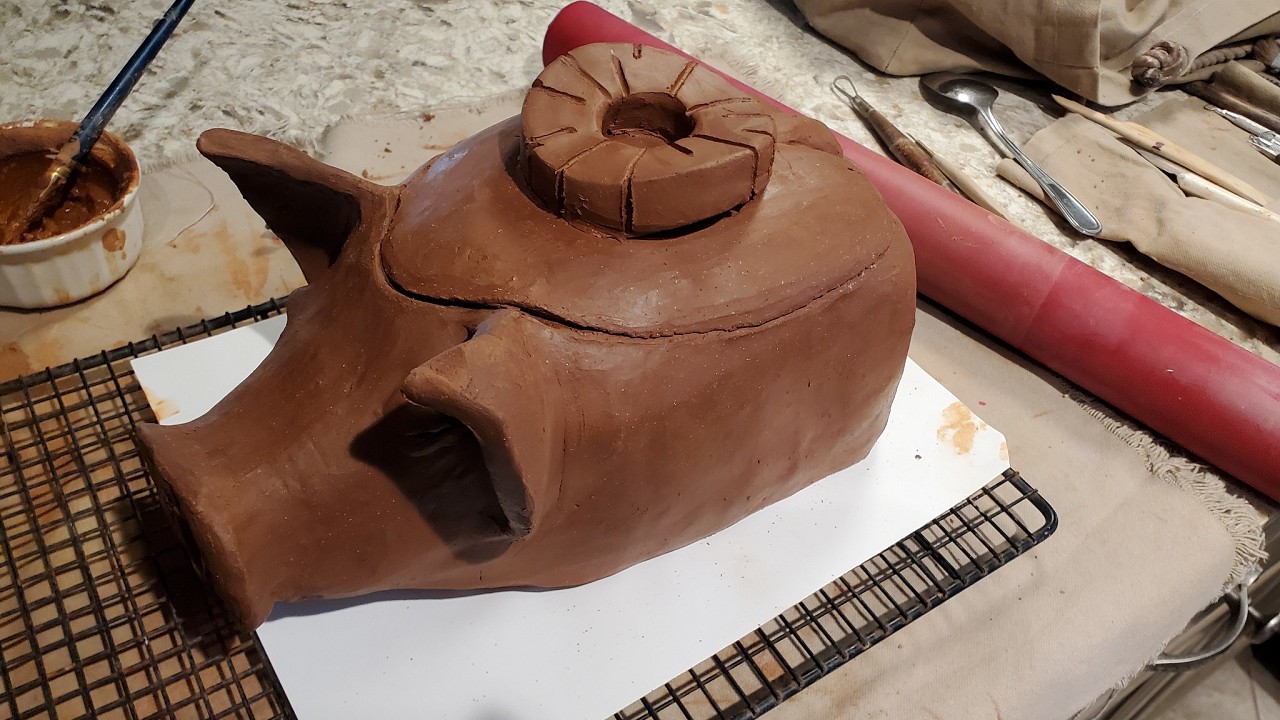
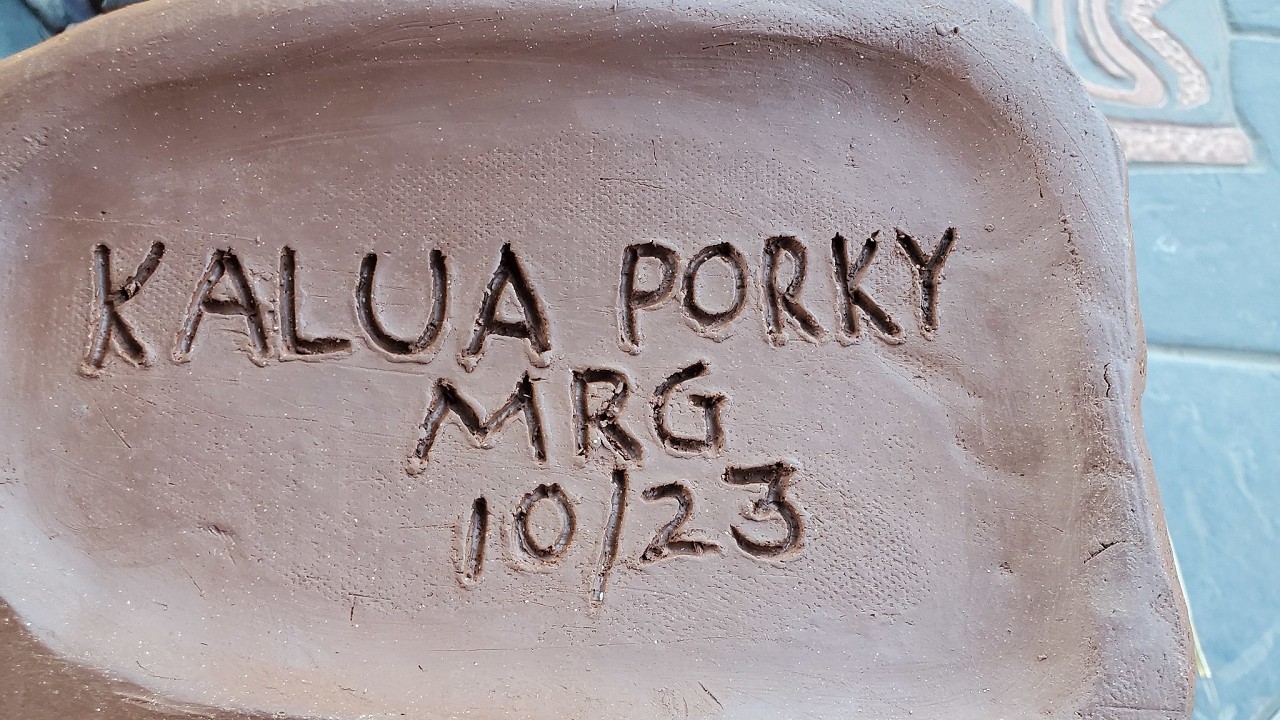
Added a pineapple slice on top to serve as a knob for the lid. Came up with a name, "Kalua Porky". Now sculpting is about done, just need to let it dry slowly for the next week or so before firing |
|
M
MadDogMike
Posted
posted
on
Tue, Oct 17, 2023 9:32 AM
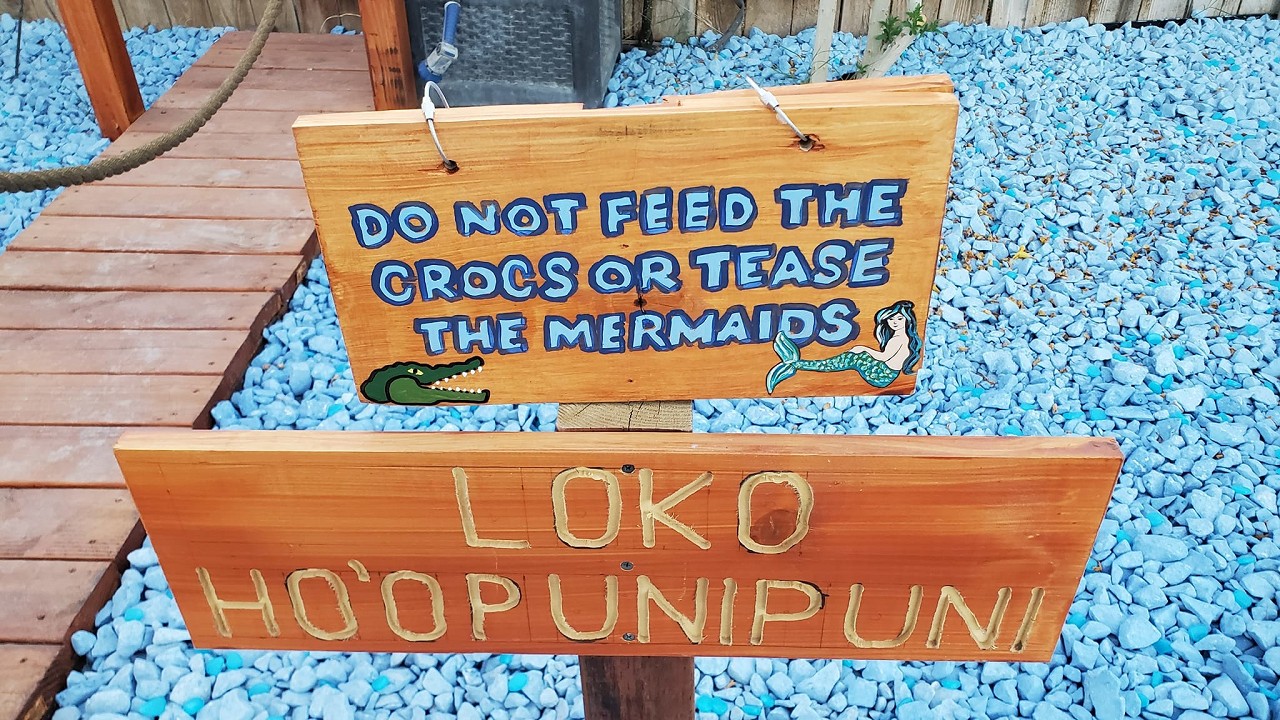
I was trying to decide between 2 signs for my "fake lake". The Rated G was more appropriate with my young grandsons running around (aged 2, 7, 11, and 14). But I liked the PG13 one too. Two rings at the top allow me to flip and display the one I want. |
|
WC
Will carve
Posted
posted
on
Wed, Oct 18, 2023 5:35 AM
I too enjoy the option of flexibility. |
|
H
hang10tiki
Posted
posted
on
Sat, Oct 21, 2023 1:21 PM
Great page Mike I will say I did duck when I saw this
|
|
OGR

Or Got Rum?
Posted
posted
on
Mon, Oct 23, 2023 7:59 AM
Piggy Piggy...looking good. I'd say the one sign is totally fine for the youngin's....I knew I loved women when I snuck into the ladies dressing room of a ladies store when I was 6 |
|
M
MadDogMike
Posted
posted
on
Tue, Oct 24, 2023 6:02 PM
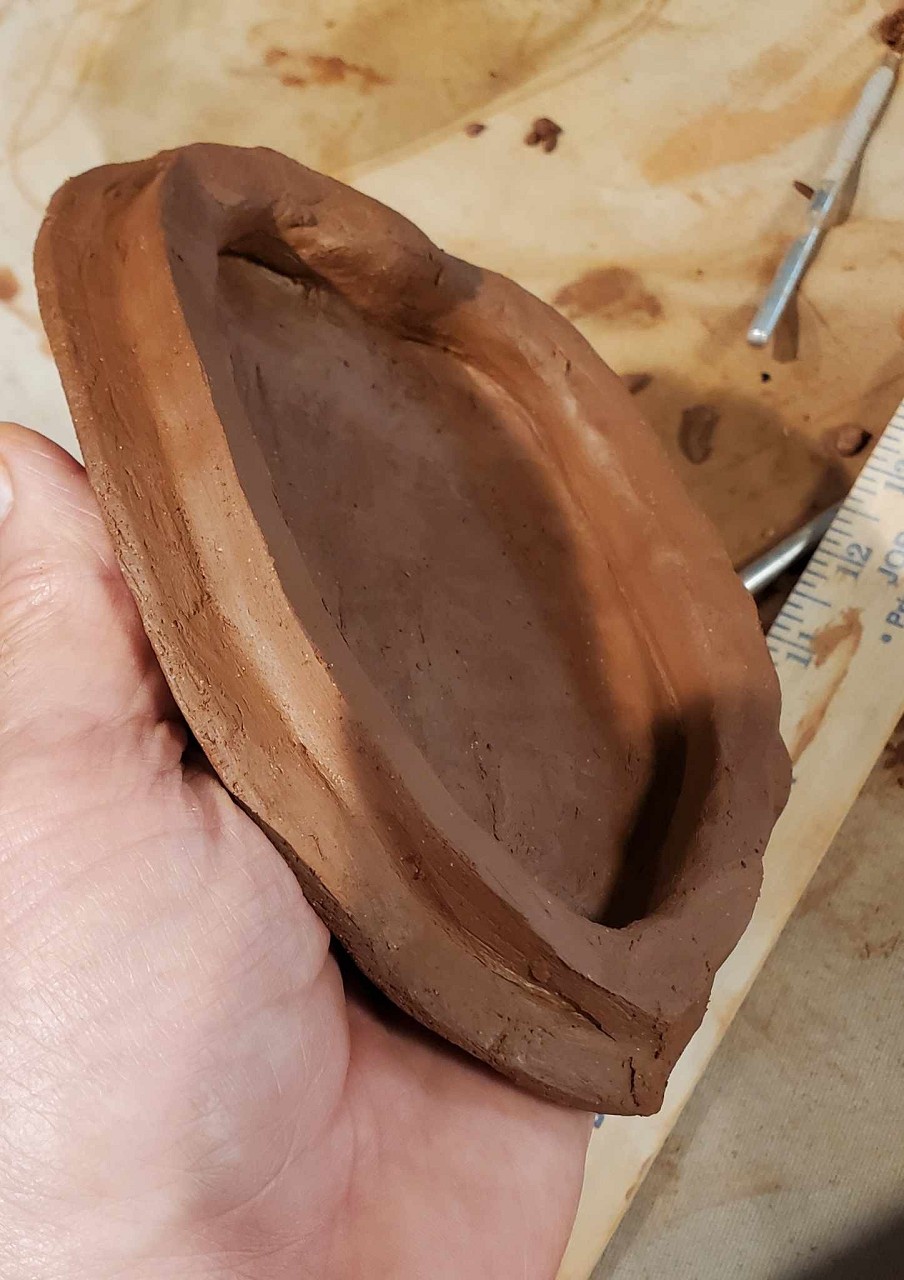
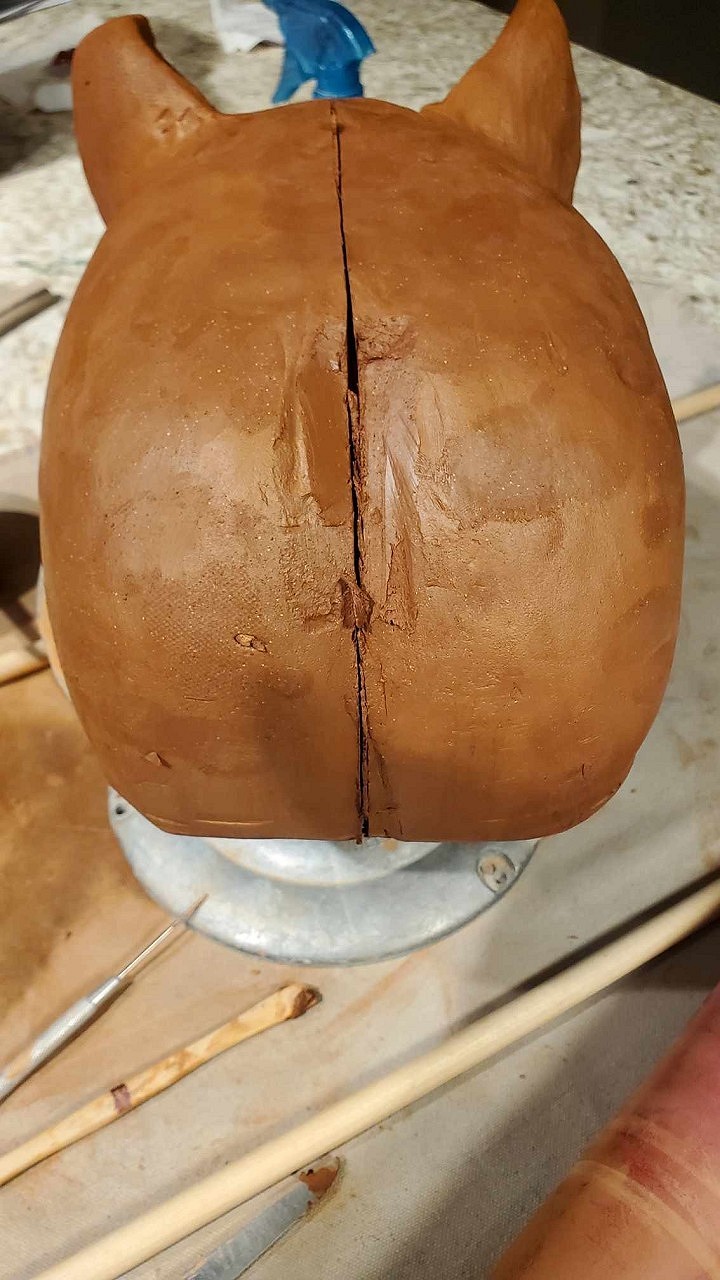
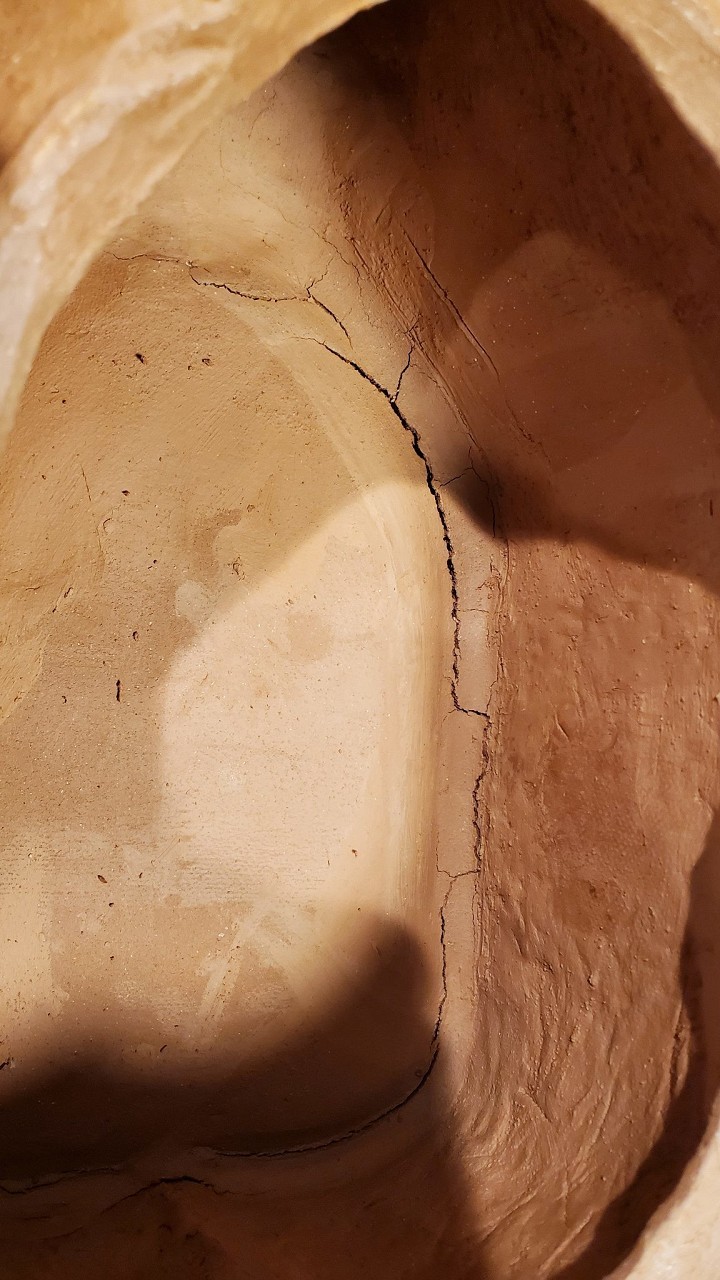
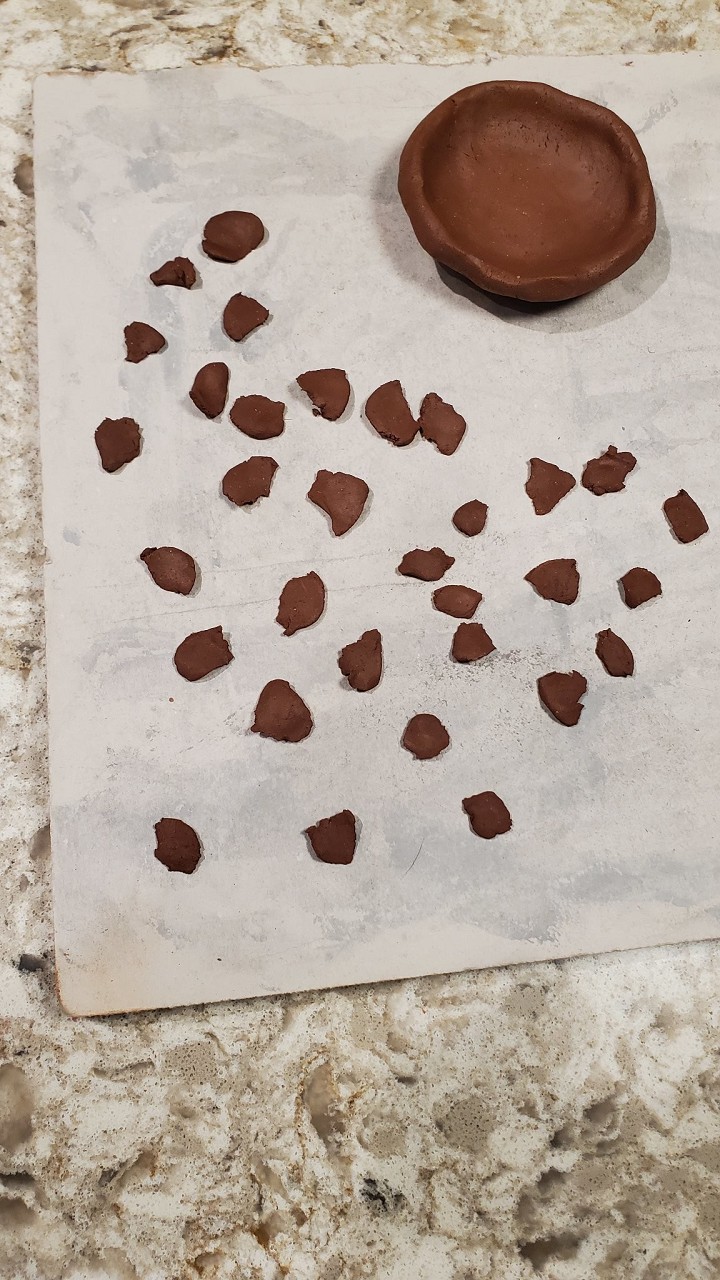
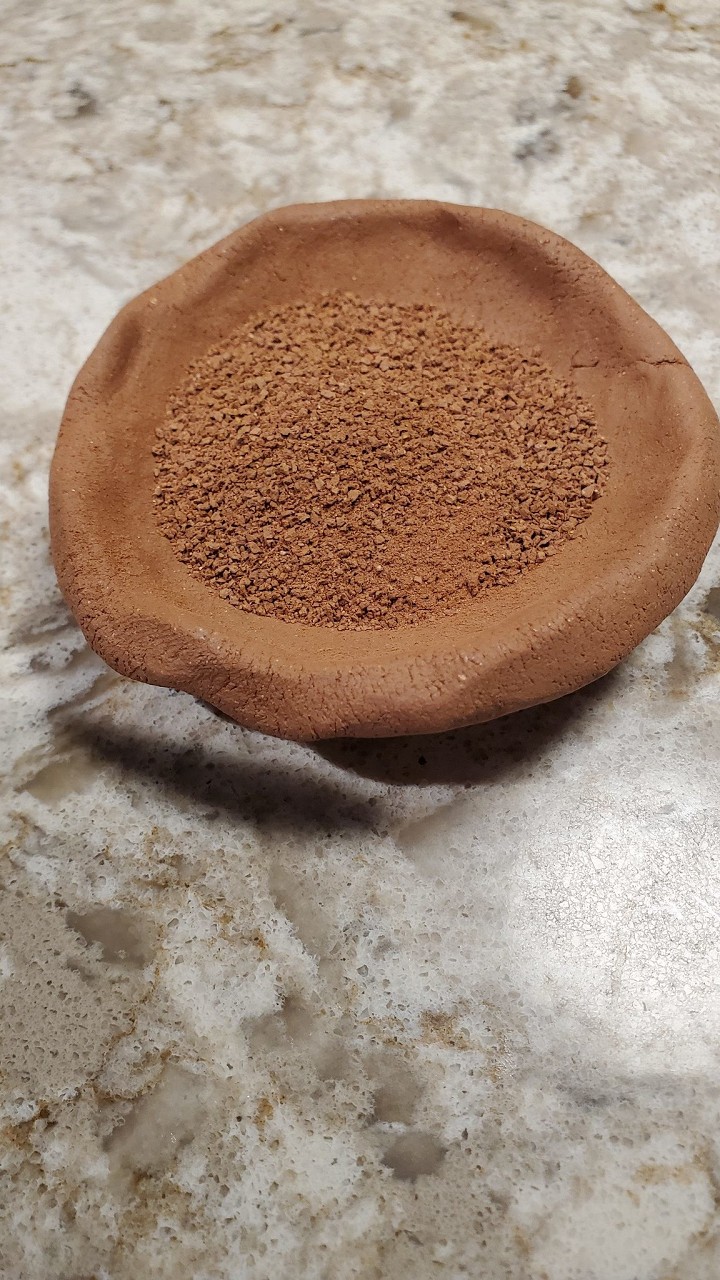
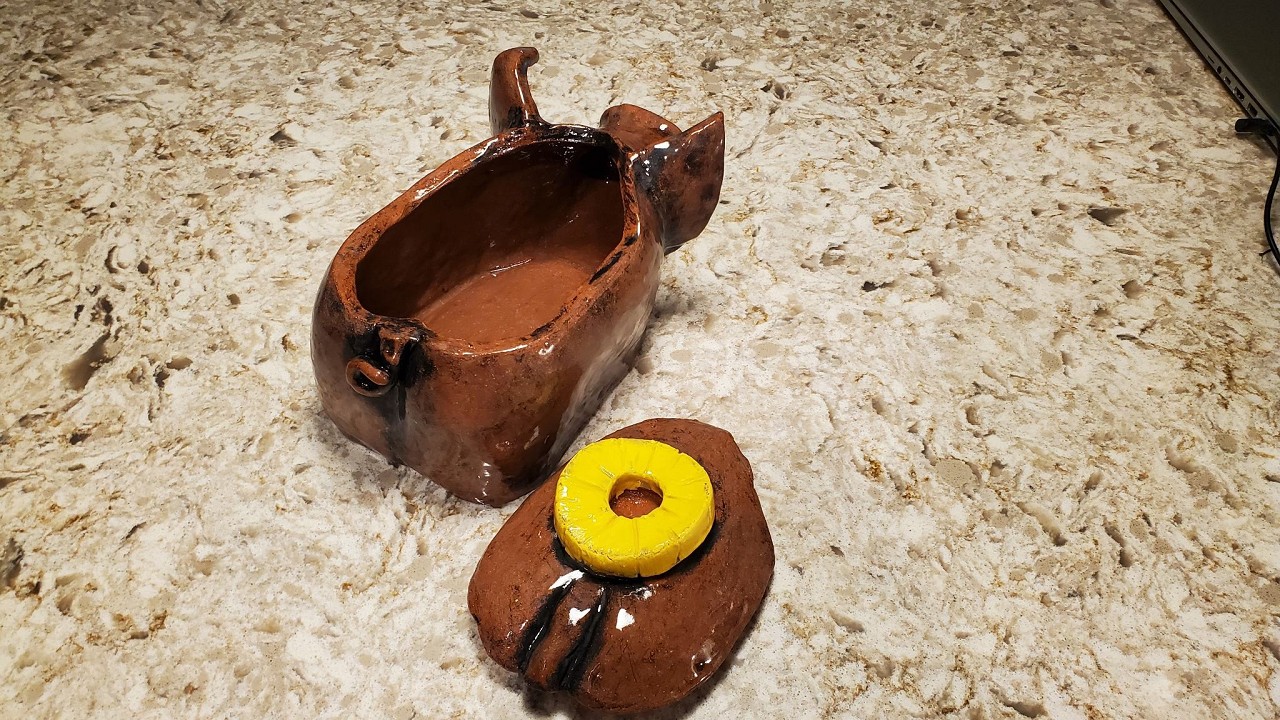
Will carve flexibility is an awesome thing. Too bad we can't even touch our knees anymore, let alone our feet LOL My little pig developed a crack inside. Maybe it dried too quickly? Maybe it stuck to the drying surface as it dried and contracted. No use in pointing fingers and laying blame now LOL I've got a repair technique I've had success with before using "calcined clay" and glaze. Raw clay is smashed into little bits and allowed to dry. I also made a little pinch pot dish The dried bits of clay are smashed into a powder and screened into the little dish. The pig went into the kiln tonight along with the clay powder. Once fired (calcined), the clay dust particles will have shrunk as much as they are going to shrink. I'll mix the powder into a paste with liquid clear glaze and pack it into the crack. Then clear glaze the whole inside of the pig and fire again. Since the clay powder is the same clay as the pig it will be the exact same color and it's preshrunk so it will fill the crack. We'll see how it works :D [ Edited by MadDogMike on 2023-10-24 18:03:13 ] |
|
D
danlovestikis
Posted
posted
on
Wed, Oct 25, 2023 7:44 PM
I like doing repairs. Your clay dust is a bit like Magic Mend. I loved that stuff. I was always so greatful that you told me about it. Pig is so cute, love the tail. Signs so clever. Your yard is so much fun. How tall is the grandson who used to play on the pirate ship? |
|
M
MadDogMike
Posted
posted
on
Thu, Oct 26, 2023 2:26 PM
in reply to danlovestikis
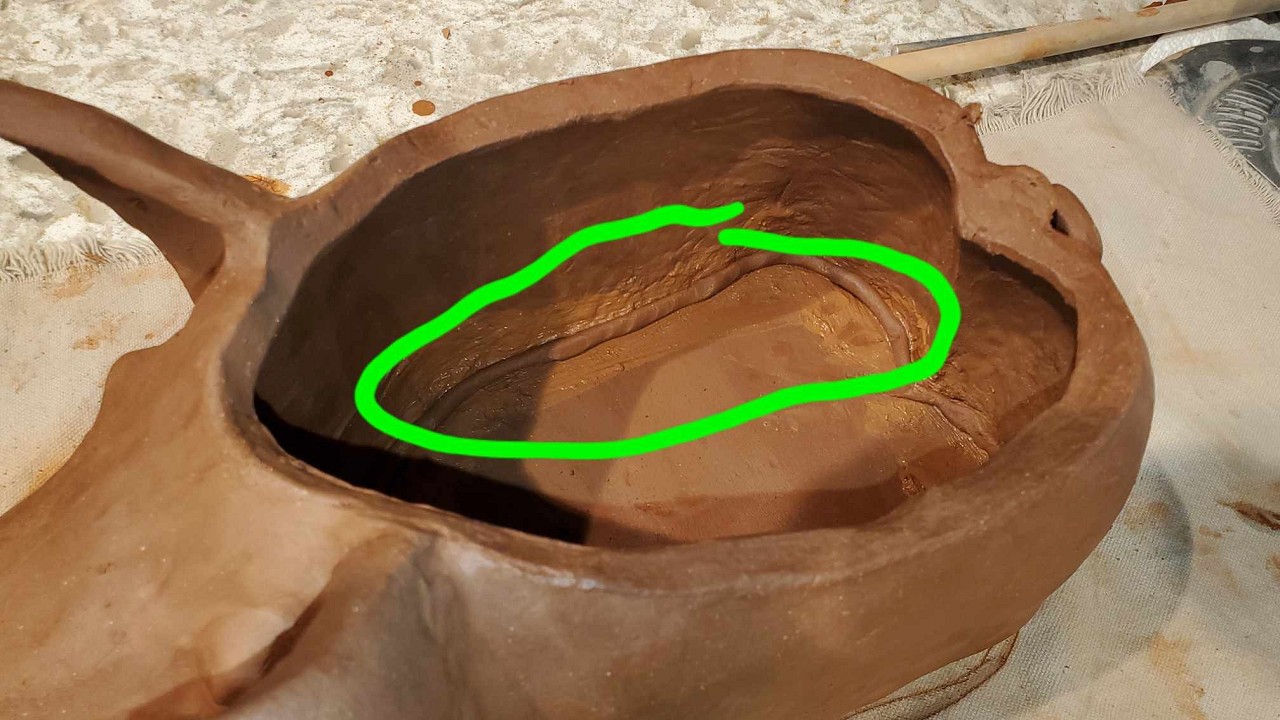
Wendy, that little boy is almost as tall as me now. He had passed his mom and dad LOL. My repair worked OK. It's a little rough because I didn't have a fine screen to sift that clay powder with but it will work.
|
|
H
hang10tiki
Posted
posted
on
Sat, Oct 28, 2023 7:49 PM
🐷 |
|
OGR
Or Got Rum?
Posted
posted
on
Sun, Oct 29, 2023 7:47 AM
[ Edited by Or Got Rum? on 2023-10-29 07:48:02 ] |
|
M
MadDogMike
Posted
posted
on
Tue, Oct 31, 2023 8:49 AM
LOL hang10tiki and Or Got Rum? Finished my piggy! |


Pages: 1 2 3 4 5 6 7 8 9 10 11 12 13 14 15 16 17 18 19 20 21 22 23 24 25 26 27 28 29 30 31 32 33 34 35 36 37 38 39 40 41 42 43 44 45 46 47 48 49 50 51 52 53 54 55 56 57 58 59 60 61 62 63 64 3035 replies