Pages: 1 2 3 4 5 6 7 8 9 10 11 12 13 14 15 16 17 18 19 20 21 22 23 24 25 26 27 28 29 30 31 32 33 34 35 36 37 38 39 40 41 42 43 44 45 46 47 48 49 50 51 52 53 54 55 56 57 58 59 60 61 62 63 64 3,035 replies
|
M

MadDogMike
Posted
posted
on
Sun, Dec 15, 2013 5:44 PM
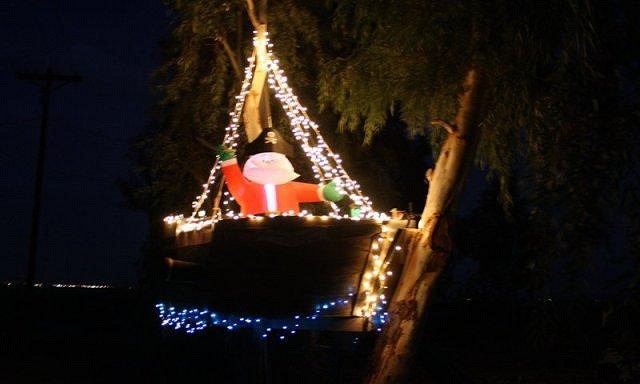
Thank you Jon When you hurry through life, you just get to the end faster. [ Edited by: MadDogMike 2014-01-15 19:07 ] |
|
L

lunavideogames
Posted
posted
on
Sun, Dec 15, 2013 6:37 PM
Ahoy Captain Santa! Very nice. |
|
T

TikiRootsRocka
Posted
posted
on
Mon, Dec 16, 2013 7:44 AM
Mike, your piece for the album cover art swap is out of control! Very nice work! |
|
H

hang10tiki
Posted
posted
on
Wed, Dec 18, 2013 8:29 PM
U 1 KraZy Mo Fo Bruddah Mad Dog |
|
ATP

Atomic Tiki Punk
Posted
posted
on
Wed, Dec 18, 2013 11:14 PM
Your upsetting the status quo, Mike! |
|
D

danlovestikis
Posted
posted
on
Thu, Dec 19, 2013 7:41 AM
You are a wonderful grandpa. Wendy |
|
L

LoriLovesTiki
Posted
posted
on
Sat, Dec 21, 2013 9:15 AM
Love Captain Santa!! |
|
M
MadDogMike
Posted
posted
on
Tue, Dec 24, 2013 11:20 PM
|
|
H
hang10tiki
Posted
posted
on
Wed, Dec 25, 2013 6:48 AM
Awesome [ Edited by: hang10tiki 2013-12-25 06:54 ] |
|
L
LoriLovesTiki
Posted
posted
on
Thu, Dec 26, 2013 12:30 PM
Great card, Mike! I saw that one online and wanted to replicate it but was too lazy. Very well done. Merry Christmas to you and your family! |
|
C

Clarita
Posted
posted
on
Mon, Dec 30, 2013 8:42 AM
Very cool captain Santa and card, you guys rock! All the best to all of you, in this new year :) |
|
M
MadDogMike
Posted
posted
on
Thu, Jan 2, 2014 8:55 PM
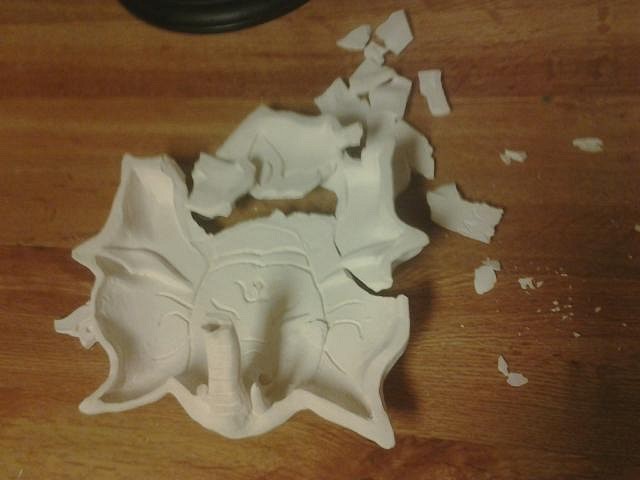
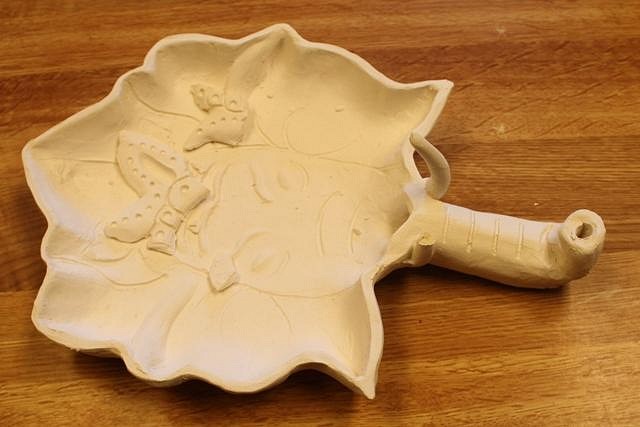
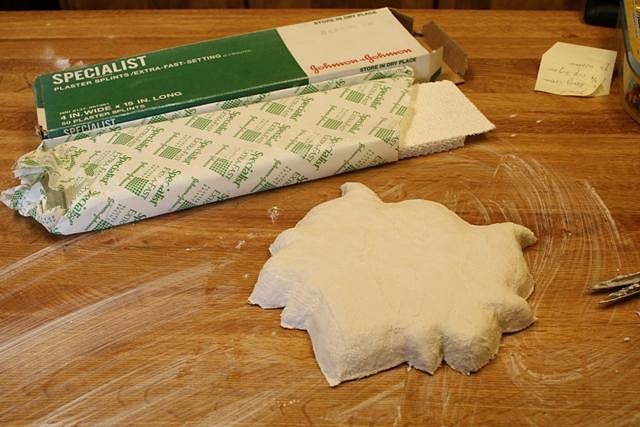
Thanks guys :) I am a religious man and I believe the Bible admonition against worshiping idols. I don't worry much about Tikis because there is not really anyone worshiping them. But I felt a little uneasy when I went to make a Ganesh oil lamp for a Hindu friend. I am pretty careful about joining clay and seldom have kiln explosions. When the first Ganesh exploded in the kiln I figured it was a coincidence. But when the second one exploded I decided it was a sign. I won't be trying again :) But I did try an experiment that worked out fairly well. I like to use Styrofoam shapes for slump molds, they work will but can be a bit rough in texture and need to be coated with tissue prior to each use. I took my Styrofoam form and covered it with plaster impregnated gauze (cast material), worked really well. It smoothed out the foam, eliminated the need for tissue, and the plaster helped absorb water from the clay. |
|
D
danlovestikis
Posted
posted
on
Thu, Jan 2, 2014 10:52 PM
You put a lot of work into those elephants. I hope your friend knew how much you wanted to do this for him. [ Edited by: danlovestikis 2014-01-03 00:13 ] |
|
M
MadDogMike
Posted
posted
on
Wed, Jan 15, 2014 7:04 PM
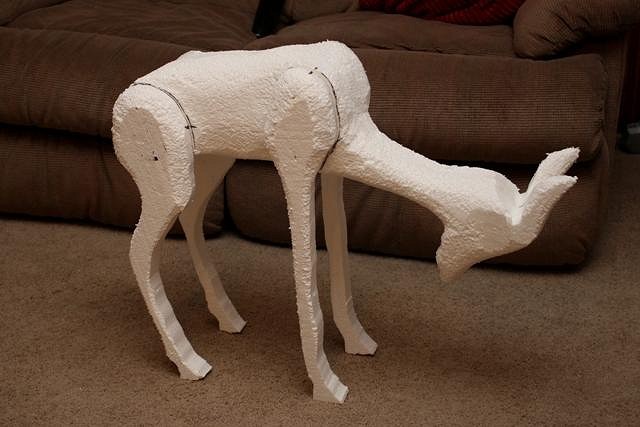
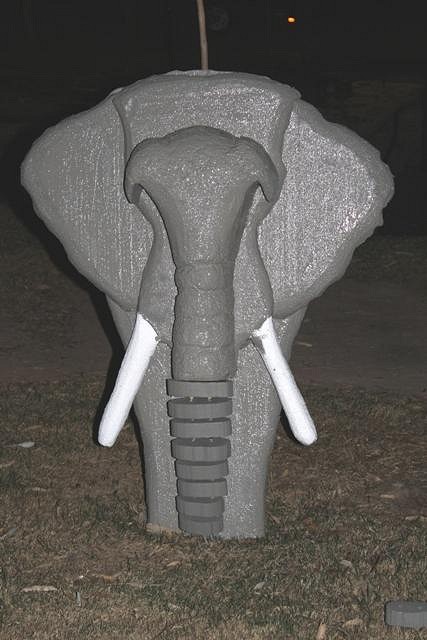
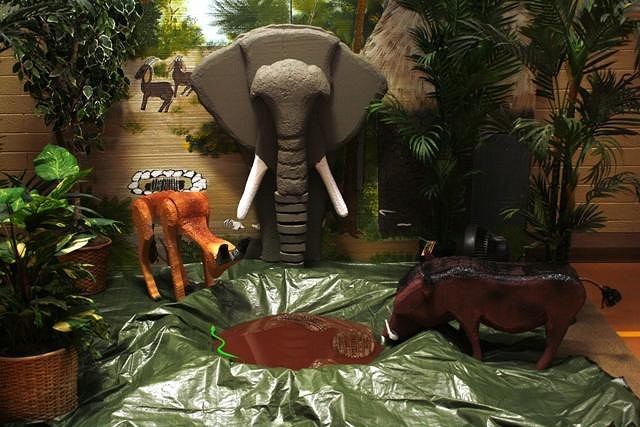
I noticed my last few posts haven't been very "Tiki", this one isn't any better. I am making these foam animals for a water wells for Africa fundraiser display. Warthog & gerenuk are about 2 1/2 feet long. Elephant is 4 feet tall and 3 feet wide, his trunk will sway with help from an oscillating fan. But, the warthog has inspired me for a slightly more "Tiki" project for the Headhunter Harbor; I want to try a more permanent concrete over foam sculpture of a lying boar to hide away in a corner of my tropical garden. Scratched and stained concrete should make cool pig skin but not such great eyes or tusks. So I want to try to make those out of glazed clay, embed them in the foam, and concrete around them. Anyone have any experience in concrete over foam? When you hurry through life, you just get to the end faster. [ Edited by: MadDogMike 2014-01-15 19:09 ] [ Edited by: MadDogMike 2014-01-17 06:39 ] |
|
H
hang10tiki
Posted
posted
on
Wed, Jan 15, 2014 7:52 PM
Again the wild n KraZy mind of the Mad Dog hard at work Awesome bruddah Jon |
|
T

TikiAno
Posted
posted
on
Wed, Jan 15, 2014 10:31 PM
Great idea- I haven't poured any concrete over foam, though I knew someone that sprayed Rhino Lining over foam for sculptures and it worked really well. I'd try some small tests, but I wonder how the weight of the concrete would work on top of the lightweight foam.... |
|
M
MadDogMike
Posted
posted
on
Thu, Jan 16, 2014 6:18 AM
Thanks Dave and Jon :) Dave, I know they do concrete or thinset or something over foam for mosaic sculpture but I've just never tried it. My son in law used to own a Line-X dealership and I had access to FREE Line-X but he sold the business. It works awesome over foam but it ain't cheap. |
|
T
TikiAno
Posted
posted
on
Thu, Jan 16, 2014 10:16 PM
Rhino lining ain't cheap either.... concrete would be inexpensive to try out... and I'm sure we're all curious if it would work. Actually, I remember someone using concrete over foam in the carving forum a while back? (Maybe in Australia?) I might be remembering something wholly different, though.... |
|
L
LoriLovesTiki
Posted
posted
on
Wed, Jan 29, 2014 6:02 PM
Dave's right. When I was researching making concrete tikis for my backyard I saw someone who had put concrete over carved Styrofoam or something very similar. I just saw the boar on FB so I know you were successful. I need to repair a giant tiki flowerpot I bought at Christmas Tree Shops that has since cracked. I was going to ask you for repair suggestions Mike. |
|
D
danlovestikis
Posted
posted
on
Thu, Jan 30, 2014 8:25 AM
Dan was looking over my shoulder and said, "that guy is always creating art", so true, that's a wonderful bunch of animals. You are so good. Wendy |
|
M
MadDogMike
Posted
posted
on
Thu, Jan 30, 2014 2:11 PM
Thanks ladies :) I've been taking lots of step-by-step pictures and will post them when my piggie is done, hopefully this weekend. Started with the foam sculpture, added a couple of coats of mortar mix, next a coat or two of concrete vinyl patch with some pigment. Hopefully it will work :D |
|
M
MadDogMike
Posted
posted
on
Fri, Jan 31, 2014 3:24 PM
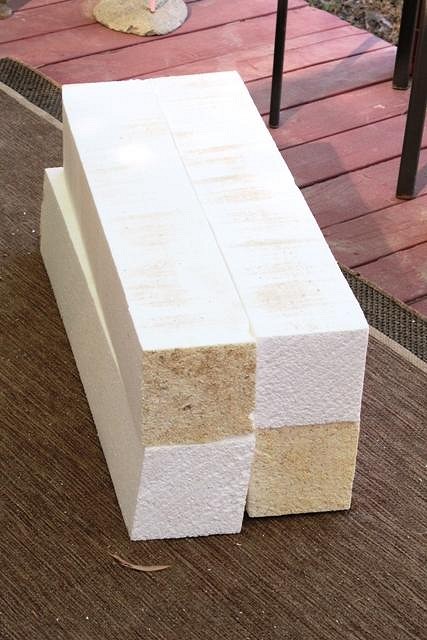
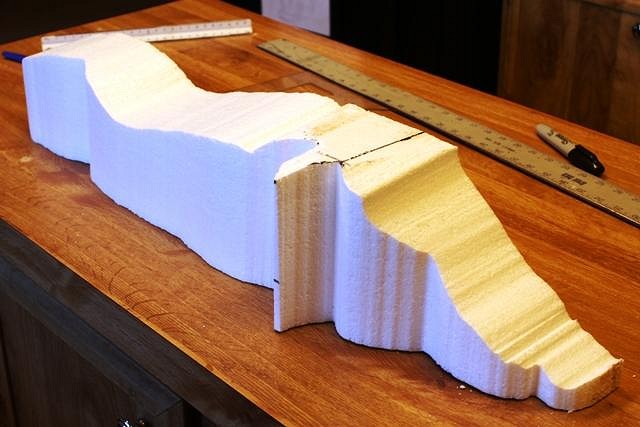
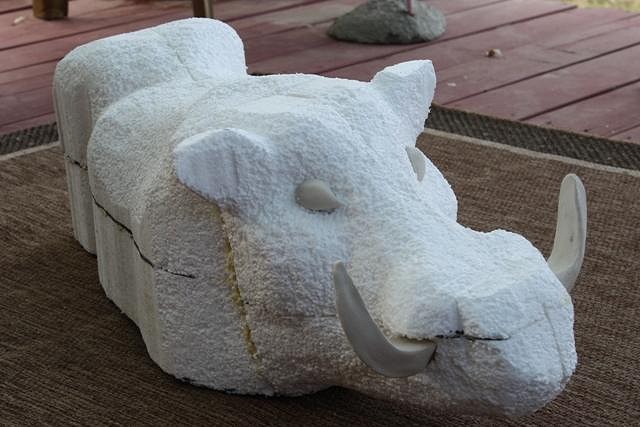
The Polynesian Feral Pig (Sus scrofa) seen here in it's adopted tropical habitat. He looks a bit uneasy, maybe he has heard rumor that he is to be the "guest of honor" at the next luau :lol: I decided I wanted a near-life-sized boar in my tropical garden. A ceramic sculpture would have been a fun challenge for me with lots of texturing and glazing opportunities. But I don't have access to a kiln 3 feet long so I decided on concrete over foam with ceramic tusks and eyes. Years ago I picked up a truckload of free Styrofoam blocks and made a vertical heated wire cutter and a horizontal heated wire cutter to work with it. I started with four blocks of foam, each 6x6x34 inches. I'm not so good at freehanding such things, so I found 3D CAD images of a boar a gridded it out onto the foam blocks. I cut it out with the heated wire. Cut all four pieces and glued them together. Then took a SurForm rasp and finished sculpting the shape. The ceramic tusks and eyes each have a large peg formed onto them to embed them into the Styrofoam. Here's where I veered off into uncharted waters having never done concrete sculpture before. I mixed up some mortar mix to the consistency of a thick milkshake and started spreading it on the foam (in the kitchen of course :lol: ) It covered the horizontal surfaces easily (back & top of head) but was difficult to make it stick to the sides. I ended up just smearing it on the sides, enough to get a thin coating. After this mortar was set, I applied another layer. The next layer was easier to apply, the dry rough concrete of the previous coat allowed the second coat to stick better. I used the second layer to build up some details on the face. Total thickness of the mortar mix was about 1/4 to 1/2 inch. After the mortar mix cured for a day, I put on a final coat to smooth and color the boar. I used Quikcrete Vinyl Patching Compound which contains very fine sand and adhesion additives. I added 1/4 cup of Quikrete Charcoal Liquid Cement Color to 8 cups of the dry mix and enough water to make a thin slurry, about the consistency of cream of wheat. I spread it on with my hands then used a large paint brush to smooth it out. After the patching mix had set for a little while, I used a stiff brush to make some hair texture on the top of the head and down the middle of the back. At some point I will put a concrete sealer on it. Since the pigment is embedded in the concrete and the ceramic is glazed he should look good in my garden for years to come Edit - updated top picture When you hurry through life, you just get to the end faster. [ Edited by: MadDogMike 2014-02-09 08:18 ] |
|
Z

zerostreet
Posted
posted
on
Fri, Jan 31, 2014 3:59 PM
Wow! That's pretty impressive Mike! |
|
LLT

little lost tiki
Posted
posted
on
Fri, Jan 31, 2014 5:03 PM
you....are....a...MADMAN! you always bring the BEST out of the most unlikely materials! |
|
ATP
Atomic Tiki Punk
Posted
posted
on
Fri, Jan 31, 2014 5:22 PM
Mike! you are so ultra creative it's "ridiculi", that's the plural of ridiculous. |
|
L
LoriLovesTiki
Posted
posted
on
Fri, Jan 31, 2014 6:06 PM
Thanks for the step by steps! U da man! |
|
T
TikiAno
Posted
posted
on
Fri, Jan 31, 2014 6:35 PM
Awesome. I'm with Ken- you're always welcome in my camp when it's "that" time... :) Impressive work, as always, I'm sure it'll be a hit. |
|
D
danlovestikis
Posted
posted
on
Fri, Jan 31, 2014 8:35 PM
I am always amazed at all you can do. Wendy |
|
S

Skipper
Posted
posted
on
Sat, Feb 1, 2014 8:47 AM
Well seen it on facebook Mike, and it still looking cool :) You schuld do a lot more off these |
|
C

cy
Posted
posted
on
Sat, Feb 1, 2014 9:06 AM
Great work MadDog, always interesting, never boaring. |
|
WC

Will carve
Posted
posted
on
Sat, Feb 1, 2014 3:39 PM
never boaring,, |
|
M
MadDogMike
Posted
posted
on
Mon, Mar 10, 2014 9:52 PM
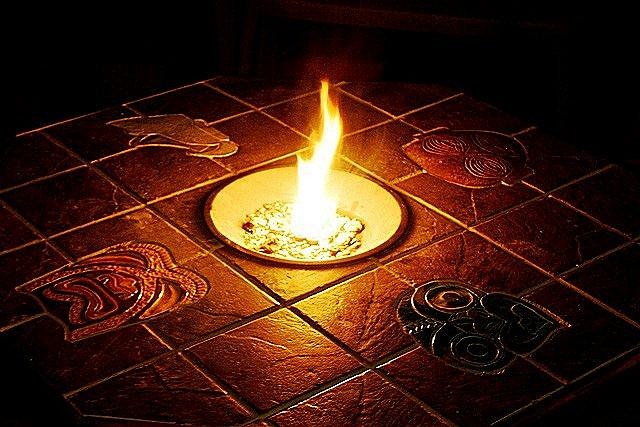
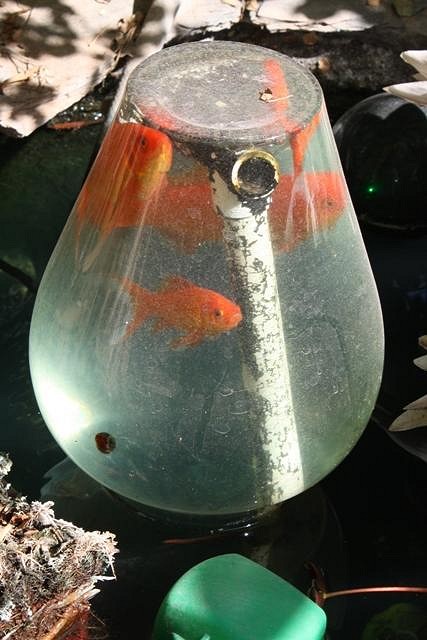
Spring starts March 20th. But here on the Anvil of the Sun Summer starts on April 1st, so we have 11 days for outdoor entertainment. I have been doing some upgrade work to the Headhunter Harbor. I had made a Headhunter mosaic end table several months ago so I made a matching one. I had some outdoor wireless speakers that worked well but they were black shiny plastic and didn't blend in well. I built some covers for them with wood frames and fabric sides to allow the sound to come out, they fit just right under the tables. Because the tiles around the headhunters are glass, I figured some uplighting under the tables would be cool so I made a place on top of the speaker covers for some LED "hockey puck" lights. The propane fire pit on my Guardians of the Flame table went bad and I couldn't find a suitable replacement. The hole in the table was specifically made for this fire pit so I salvaged the metal bowl and made a 3 wick Tiki torch out of copper pipe fittings, a piece of old road sign, and a Mason jar. It’s makes a nice small bonfire flame. Picked up a cheesy plastic flamingo at Lowes and repainted it to look a bit more realistic. I also redid my "fish condo". The support for the upside down vase was a piece of PVC pipe but it was very visible. I replaced it with a clear acrylic support that looks much better A bit of jungle trimming and some fresh flowers planted, I'm ready for my brief window of opportunity :) |
|
D
danlovestikis
Posted
posted
on
Mon, Mar 10, 2014 11:09 PM
WEll worth the wait MadDogMike. Keep it up and keep posting. You've been missed. Wendy |
|
T
TikiAno
Posted
posted
on
Tue, Mar 11, 2014 10:14 AM
MDM cannot be stopped! Love the added table, fire upgrade, and... well... everything. Fish condo looks great- can they get some air/ filtration in there? Don't want them to boil over! Things are warming up here slowly, I can only imagine out there... :wink: |
|
S

SandraDee
Posted
posted
on
Tue, Mar 11, 2014 10:26 AM
Love those tables :) You are so crafty Mike! |
|
H
hang10tiki
Posted
posted
on
Tue, Mar 11, 2014 10:45 AM
Cool tables mad one Jon |
|
D
danlovestikis
Posted
posted
on
Wed, Mar 12, 2014 9:03 AM
As you can see he was delighted with your birthday card. Thank you always, Wendy |
|
L

littlegiles
Posted
posted
on
Wed, Mar 12, 2014 11:01 AM
Mike, you always amaze me. Great idea with the under-table lighting! Love what you did to the firepit table. I think I prefer that to a propane flame.
|
|
M

muskrat
Posted
posted
on
Wed, Mar 12, 2014 12:55 PM
Holy Cow! |
|
L
LoriLovesTiki
Posted
posted
on
Wed, Mar 12, 2014 6:47 PM
I love the way you tackle projects Mike! and that birthday card for Dan was terrific!! Keep the creativity coming! |
|
LLT
little lost tiki
Posted
posted
on
Thu, Mar 13, 2014 10:23 PM
YOU,Sir,are a Piece of Work! |
|
C
Clarita
Posted
posted
on
Fri, Mar 14, 2014 2:36 PM
You can't be more creative, no you can't, no no no no no, |
|
T

tikilongbeach
Posted
posted
on
Fri, Mar 14, 2014 2:50 PM
Wow, I love what you're doing with the place! |
|
M
MadDogMike
Posted
posted
on
Mon, Mar 17, 2014 5:52 AM
Top 'o the St Paddy's morn to ya! And this morning look what I found: Unfortunately, a dead Leprechaun won't tell you where his pot of gold is :( May have to try something else next year. :lol: :D :lol: :D :lol: :D :lol: :D :lol: :D :lol: :D :lol: :D :lol: :D David, Liz, Jon, Clara, Lori & Lori - Thank you very much. When you hurry through life, you just get to the end faster. [ Edited by: MadDogMike 2014-03-17 07:11 ] |
|
H
hang10tiki
Posted
posted
on
Mon, Mar 17, 2014 10:30 AM
U 1 KraZy mo fo |
|
M
MadDogMike
Posted
posted
on
Sun, Apr 27, 2014 9:04 AM
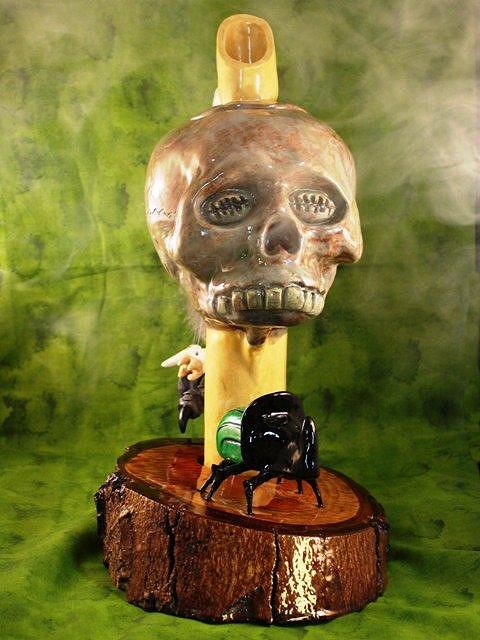
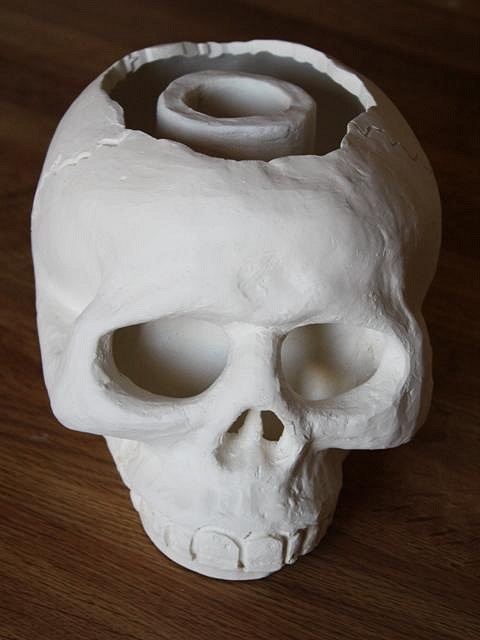
Been busy working on a wedding and a big set decoration project so I haven't done any ceramics lately. But I spent 5 days in Mexico last week and I'm not very good at sitting still so I took a molded skull with me. I had made this trophy skull for the Cannibal Art Swap last summer |
|
D
danlovestikis
Posted
posted
on
Sun, Apr 27, 2014 11:51 AM
You make the best stuff you creative wizard. Wendy |
|
S

swizzle
Posted
posted
on
Sun, Apr 27, 2014 6:05 PM
Very cool MDM. Your last one was great so i look forward to seeing how this one turns out. |


Pages: 1 2 3 4 5 6 7 8 9 10 11 12 13 14 15 16 17 18 19 20 21 22 23 24 25 26 27 28 29 30 31 32 33 34 35 36 37 38 39 40 41 42 43 44 45 46 47 48 49 50 51 52 53 54 55 56 57 58 59 60 61 62 63 64 3035 replies