Pages: 1 2 3 4 5 6 7 8 9 10 11 12 13 14 15 16 17 18 19 20 21 22 23 24 25 26 27 28 29 30 31 32 33 34 35 36 37 38 39 40 41 42 43 44 45 46 47 48 49 50 51 52 53 54 55 56 57 58 59 60 61 62 63 64 65 66 67 68 69 70 71 72 73 74 75 76 77 78 79 80 81 82 83 84 85 86 87 88 89 90 91 92 93 94 95 96 97 98 99 100 101 102 103 104 105 106 107 108 109 110 111 112 113 114 115 116 117 118 119 120 121 122 123 124 125 126 127 128 129 130 131 132 133 134 135 136 137 138 139 140 141 142 143 144 145 146 147 148 149 150 151 152 153 154 155 156 157 158 159 160 161 162 163 164 165 166 167 168 169 170 171 172 173 174 175 176 177 178 179 180 181 182 183 184 185 186 187 188 189 190 191 192 193 194 195 196 197 198 199 200 201 202 203 204 205 206 207 208 209 210 211 212 213 214 215 216 217 218 219 220 221 222 223 224 225 226 10,816 replies
|
D

danlovestikis
Posted
posted
on
Tue, Feb 9, 2016 9:17 AM
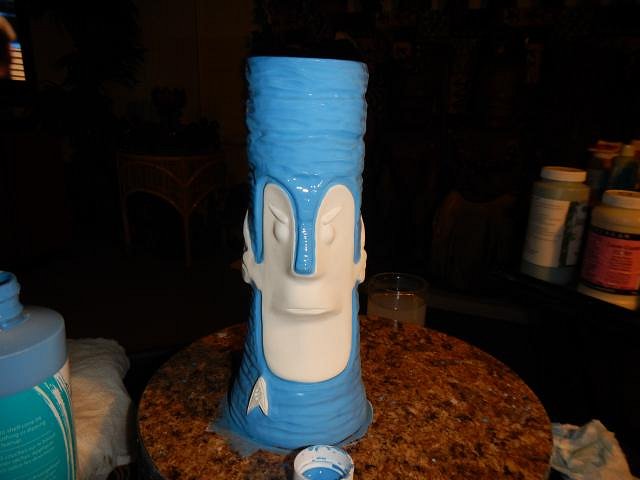
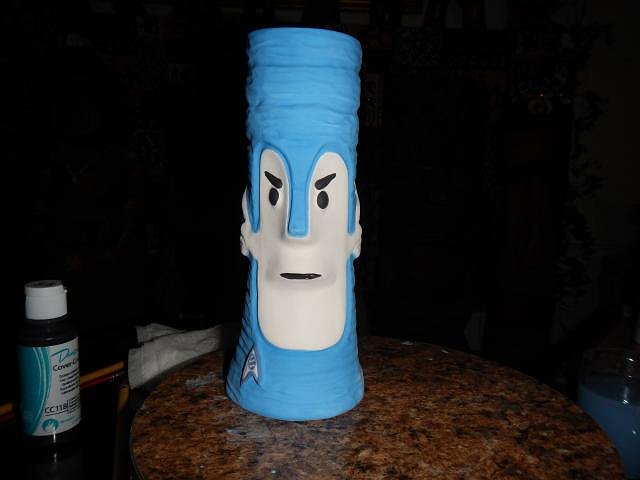
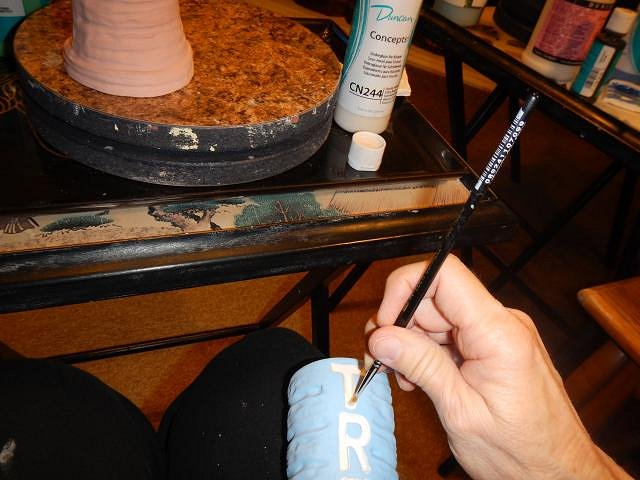
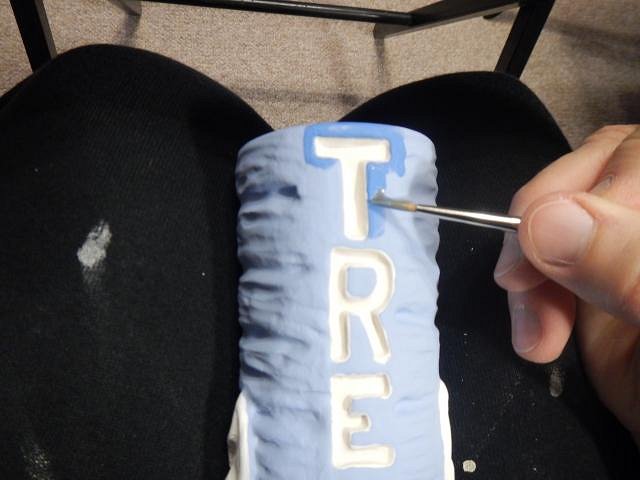
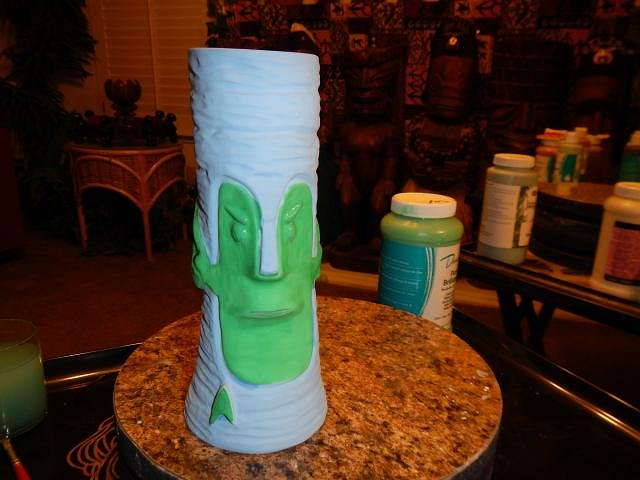
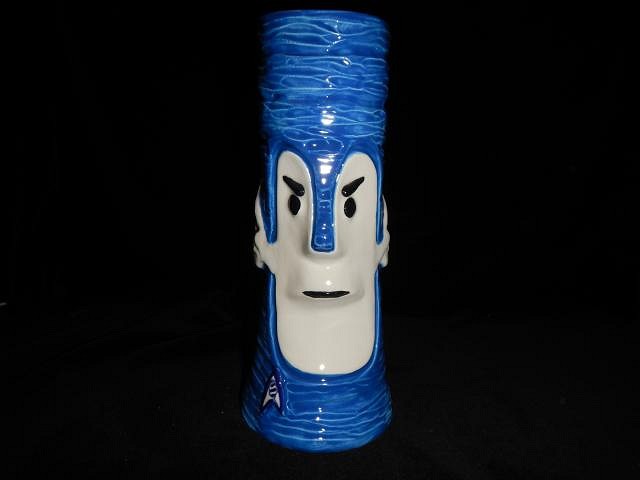
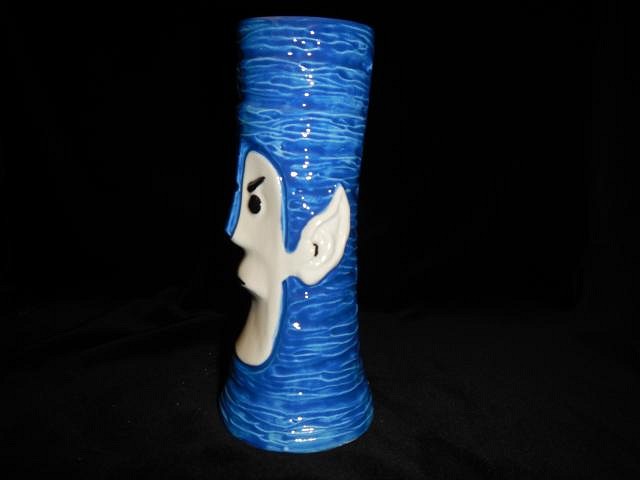
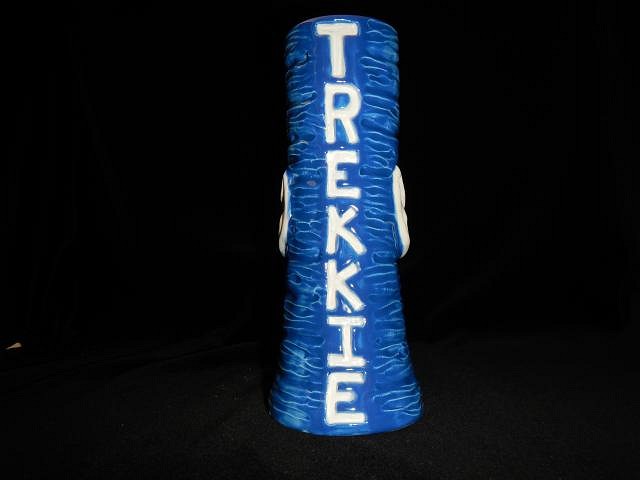
Wish List #6 continues and there's still so much to do. It's great to be so busy with fun projects. comicbookhero asked for a Mr. Spock mug. This was a really fun Tiki Bob conversion. I used underglazes for this to prevent running. I always do the color first so I can wipe off any that gets on the white areas before glazing the face. Otherwise tiny specks you can't really see may show up at firing and spoil the face.
I even do the black eyes (cover coat under-glaze) and mouth before the white. I learned this through years of trial and error. After they are finished I then carefully paint the white Duncan cover coat on the face. The blue is Duncan Concepts and so is the white used in the letters. This process takes a long time. It's back and forth fixing the many letter edges to make sure they are sharp. When the cover coat black and white are dry I apply the clear brilliance. I'm happy with the back. Into and out of the kiln this Spock is done and shipped!
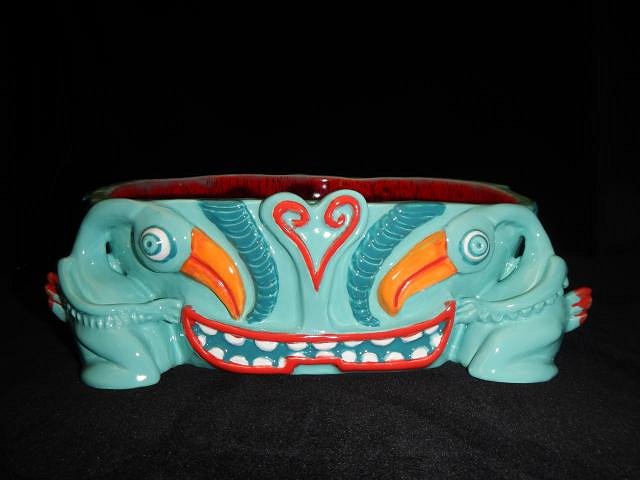
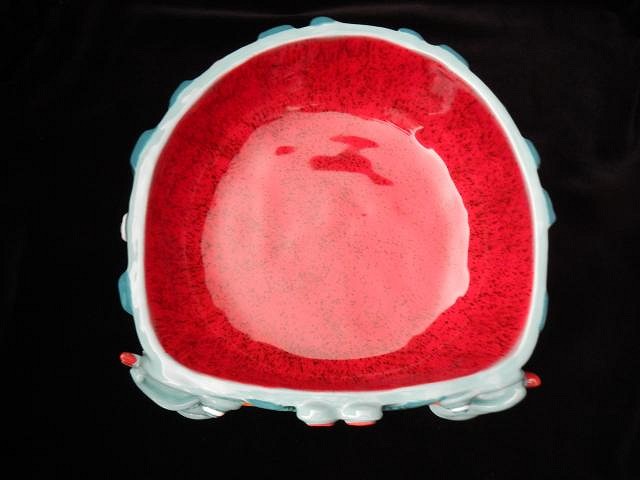
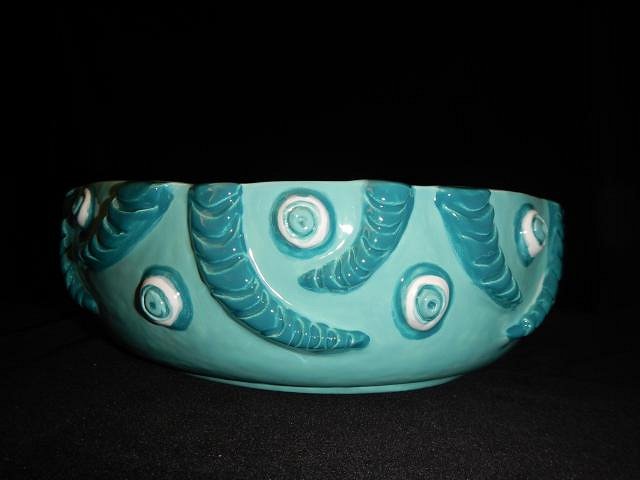
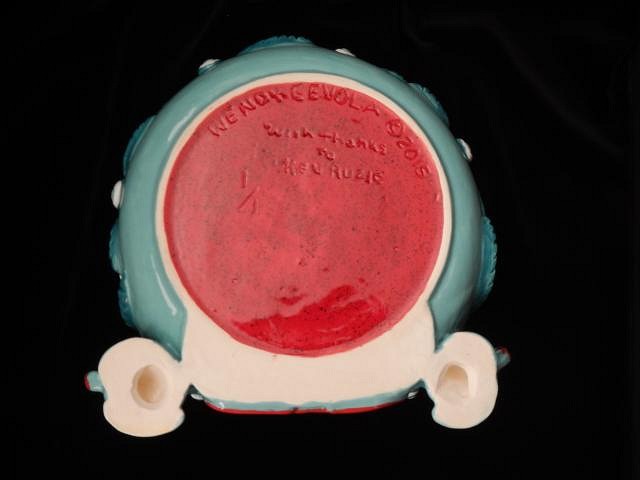
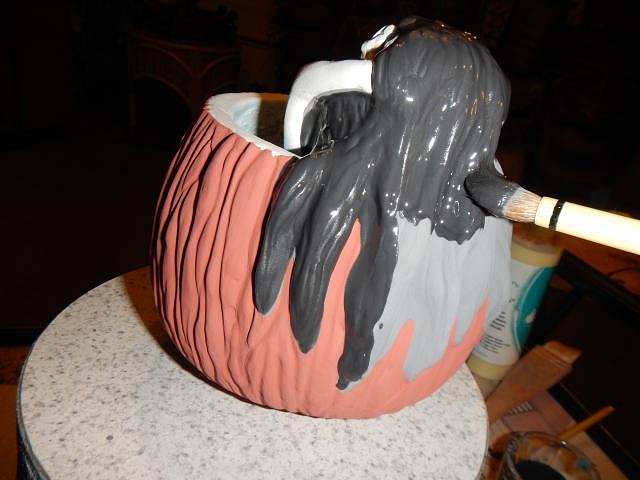
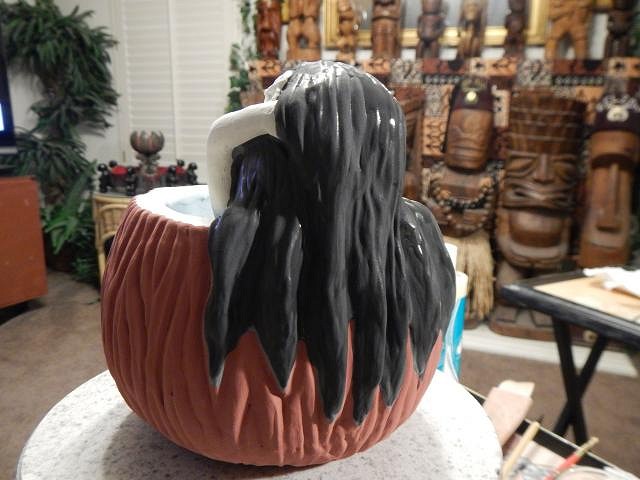
Jen Tiki's bowl is finished and has been shipped. All the glaze skips have filled in with the second glazing firing run. All the white spots are gone. Doing a fourth layer worked really well. On the bottom I carved With Thanks to Ken Ruzic. It was his original painting that showed this bowl and inspired Jen Tiki to have it made. Without his permission it wouldn't have happened. Thank you Jen and Ken. Wendy |
|
L

lunavideogames
Posted
posted
on
Tue, Feb 9, 2016 11:19 AM
Both of those turned out great! It is so fun to watch your thread Wendy. You make so many one of a kind mugs and there is so much diversity between your projects. It is an adventure everytime I am on the internet. |
|
H

hang10tiki
Posted
posted
on
Tue, Feb 9, 2016 4:42 PM
What Treg said |
|
D
danlovestikis
Posted
posted
on
Wed, Feb 10, 2016 5:52 AM
lunavideogames thank you so much. It's all a lot of fun. I've been working through the Bob's headed towards some of the most challenging Wishes. Every time I glaze something it firms up in my mind how to do the next one. Glazing is always a challenge. hang10tiki you guys rock! ============================= Wish List #6 continues... I'm backing up a bit to show the kiln loads. Filled the bottom level. After it fired. Filling the top level. After it fired. These were extra Tiki Bob's I did along the way. The purple has sold. Backsides. Howard Dinits of Maui ordered this Eat Drink and Be Merry Lanai mug altered at the bottom.
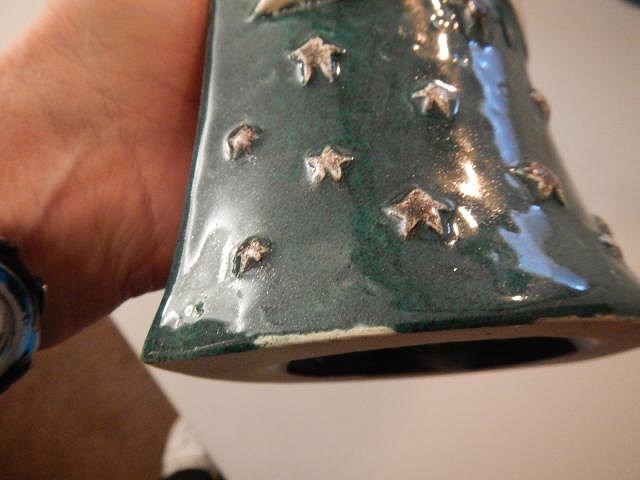
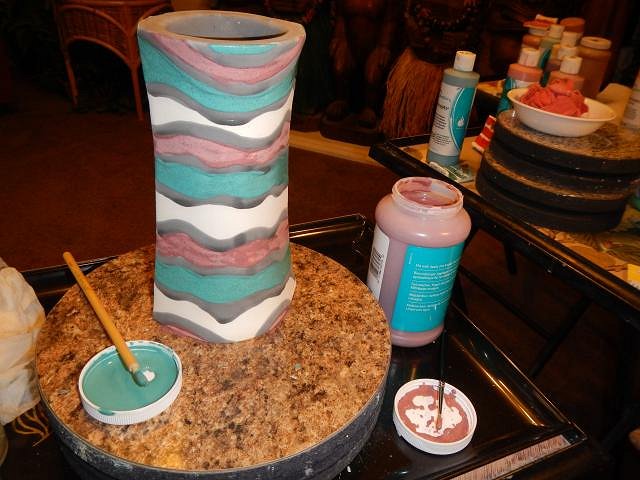
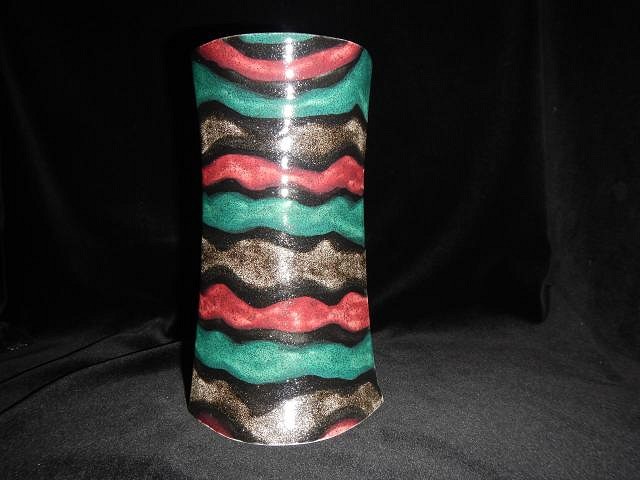
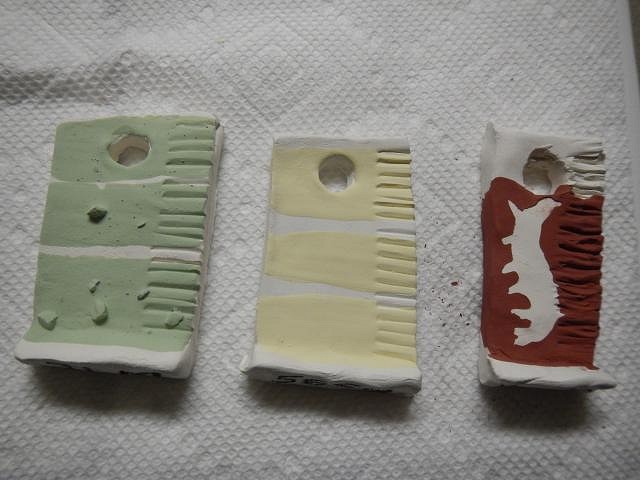
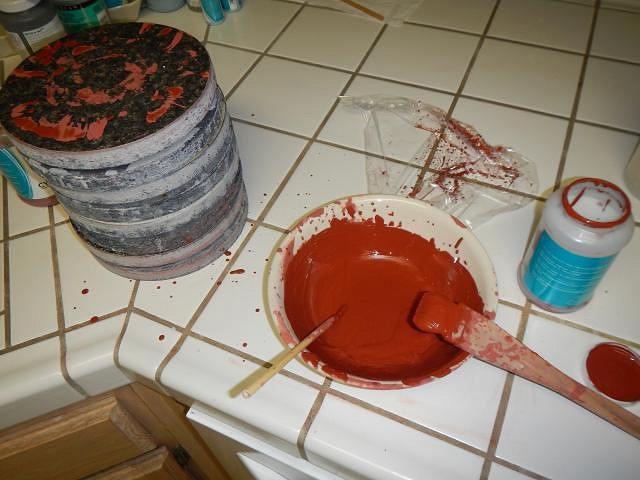
========== This Wish is based on the logo for a new business owned by Barbara Lawrence. I'm not sure that the glazing on this mug worked. Her logo is bright. She mentioned sparkles so I used a glitter glaze (you can't tell by the photos) but they are darker than I thought they would be. Three coats of glaze. I used the top picture for this mug and for a second project that is a wall plaque. After the base coat dried I wiped the glaze off of the stars and used a silver sparkle glaze. I used a fine brush for the hair but doing 3 layers made the strands too thick. I did the body in white but missed shading it. I also did a few colored stars. Here it is after firing. I took it outside into the sun to see if the glitter would show in the photo. Nope. I found an edge that needs attention when I re-glaze this mug. Backing up to the glazing of the backside. I tried for wavy. Three layers of each and it still came out blotchy. I will post this on fb for her but I don't think I achieved the right effect. I don't always get it right. Thank you for the visit. Cheers, Wendy |
|
D
danlovestikis
Posted
posted
on
Thu, Feb 11, 2016 7:41 AM
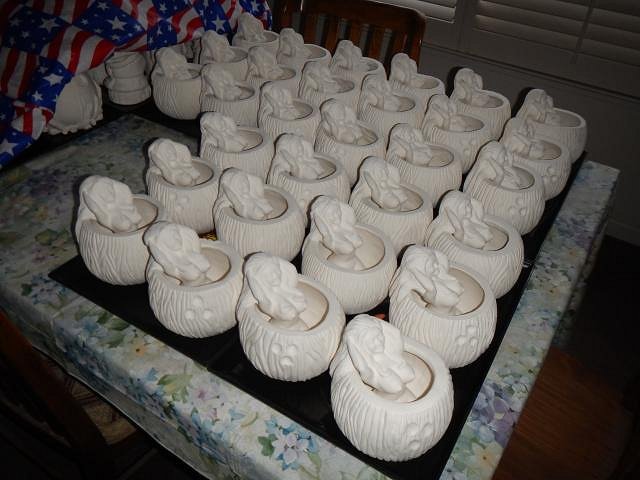
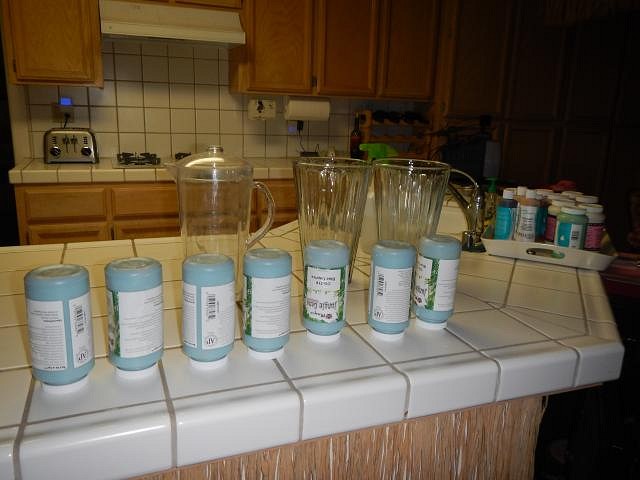
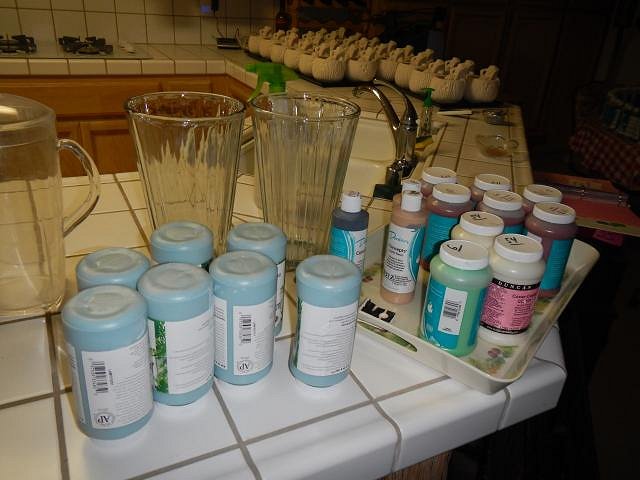
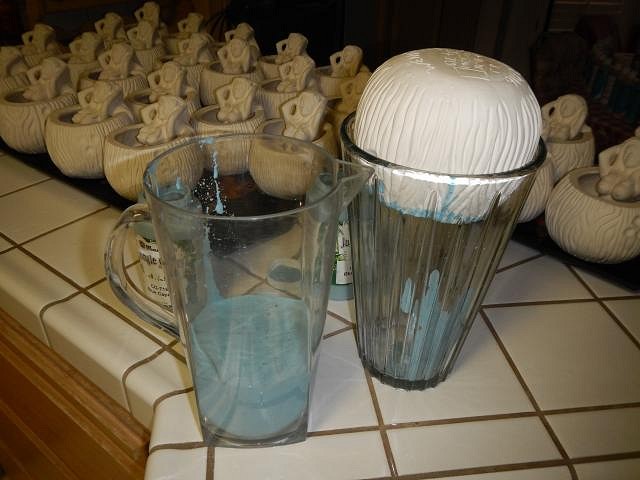
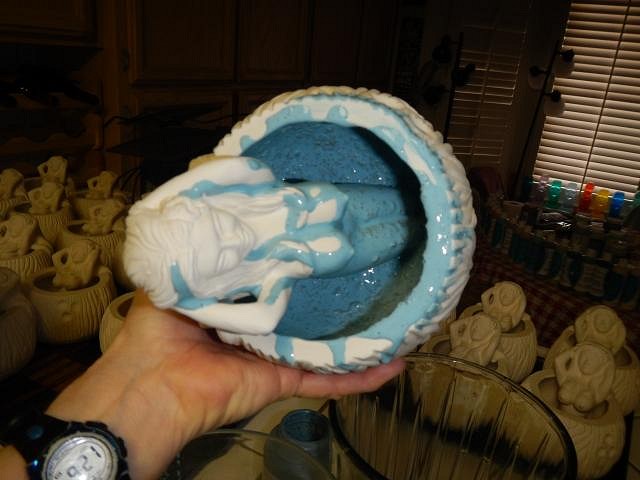
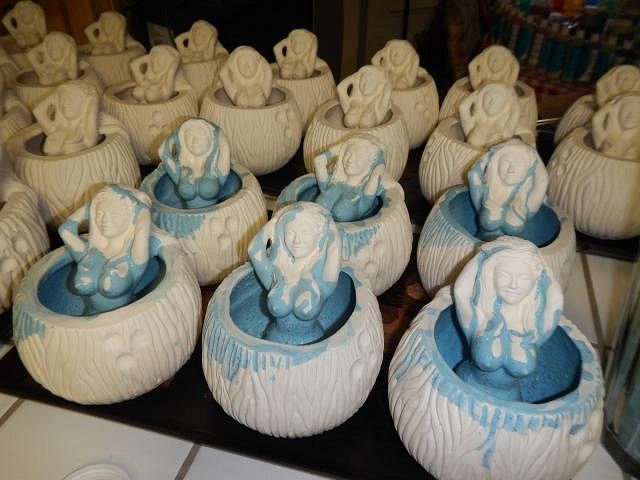
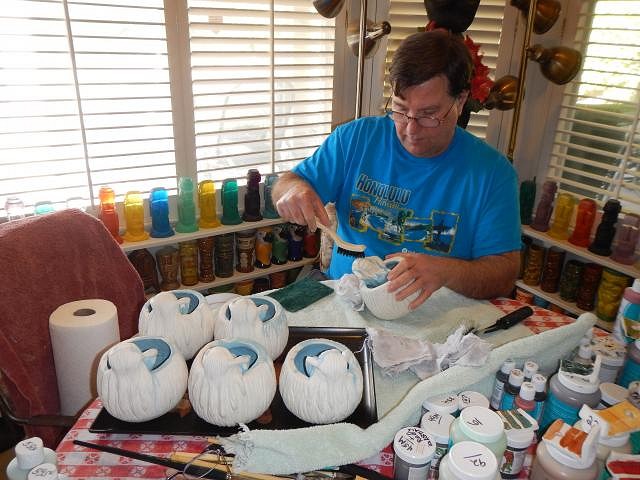
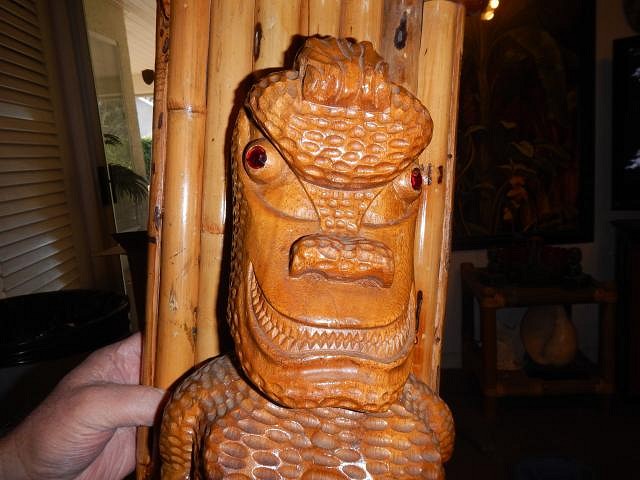
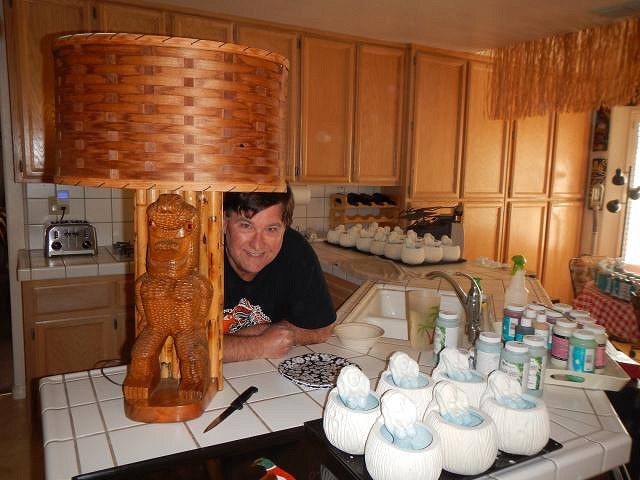
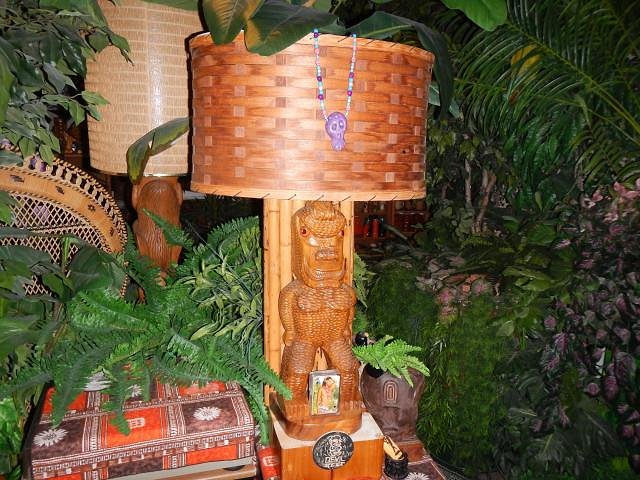
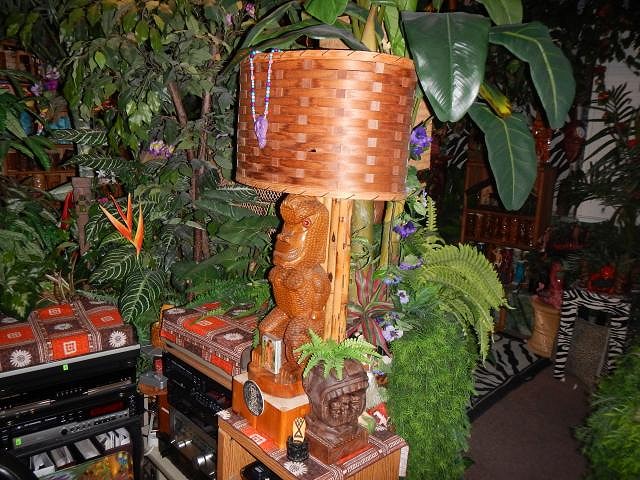
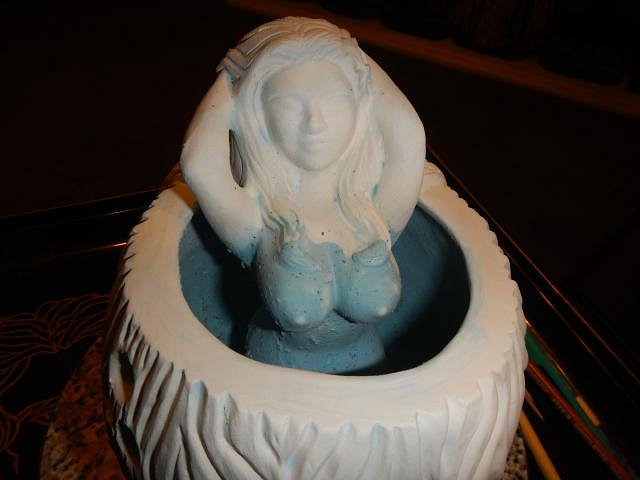
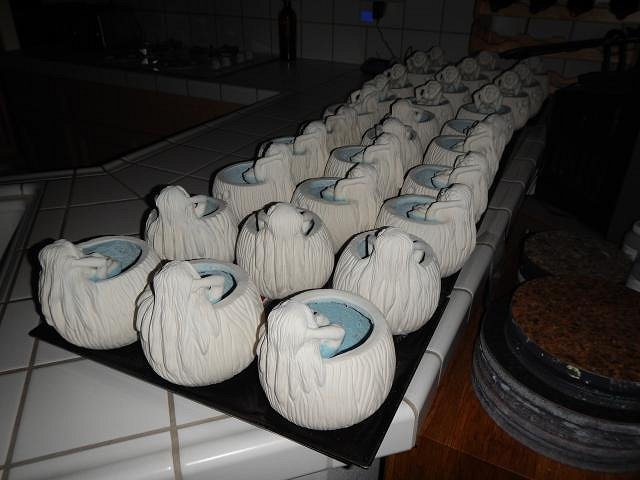
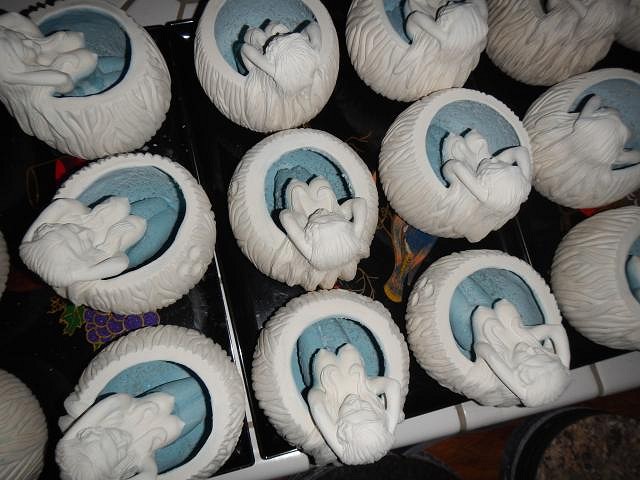
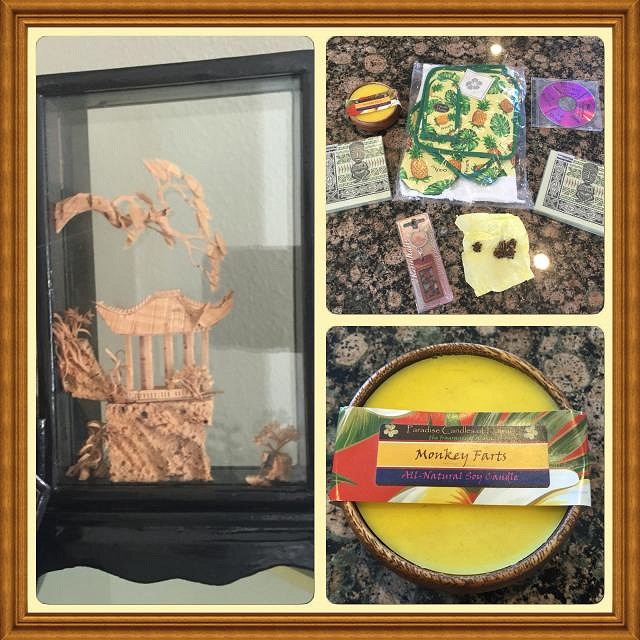
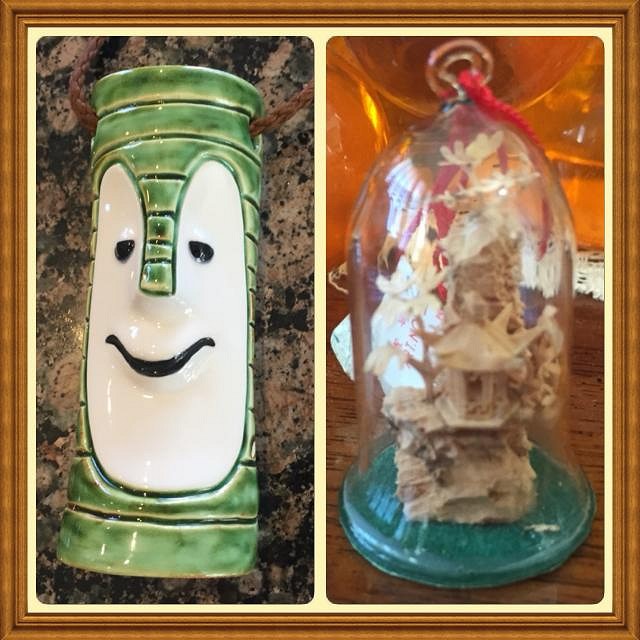
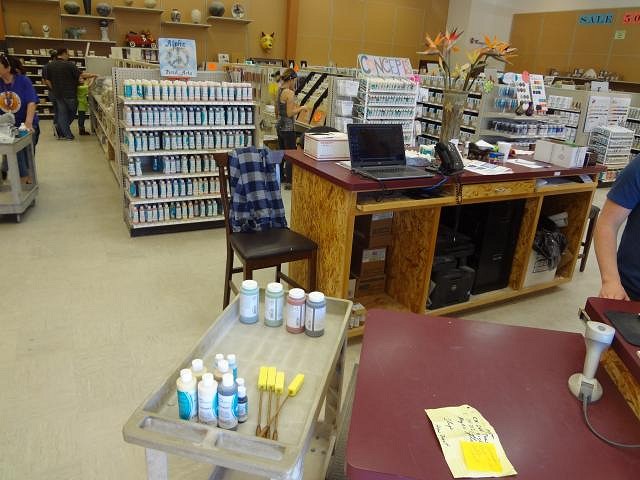
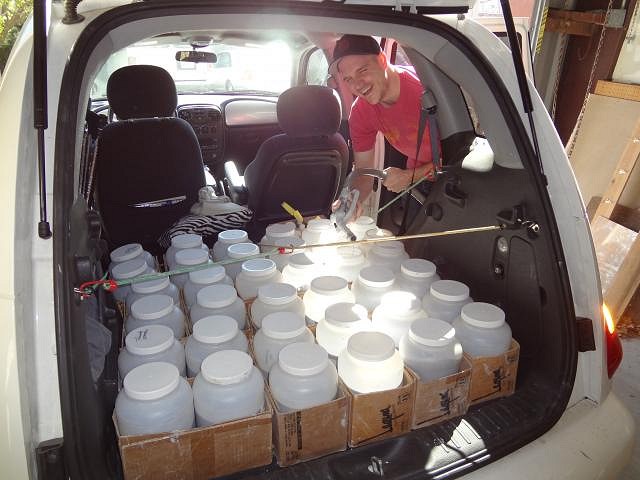
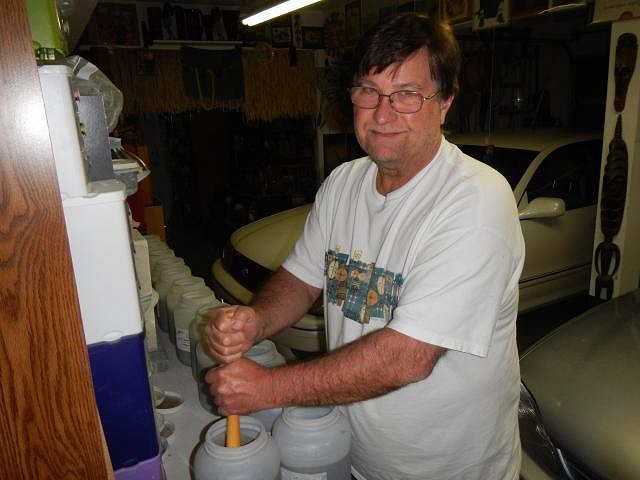
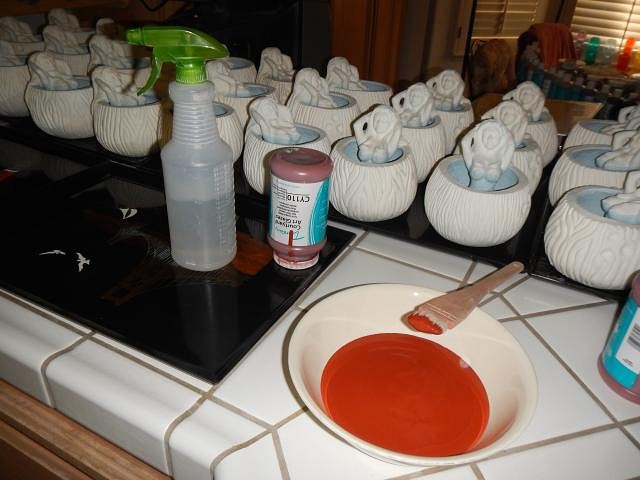
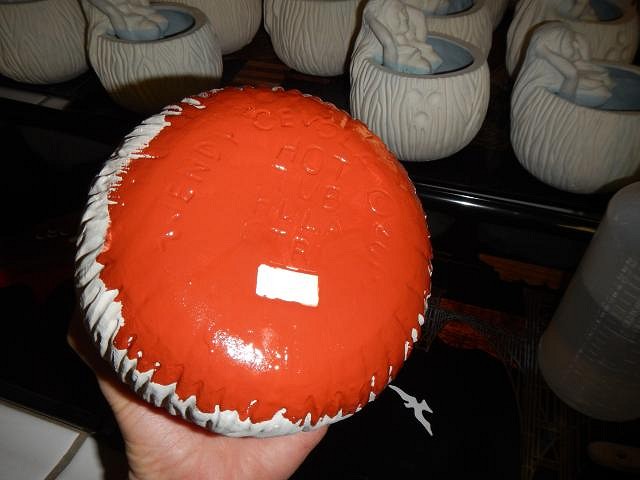
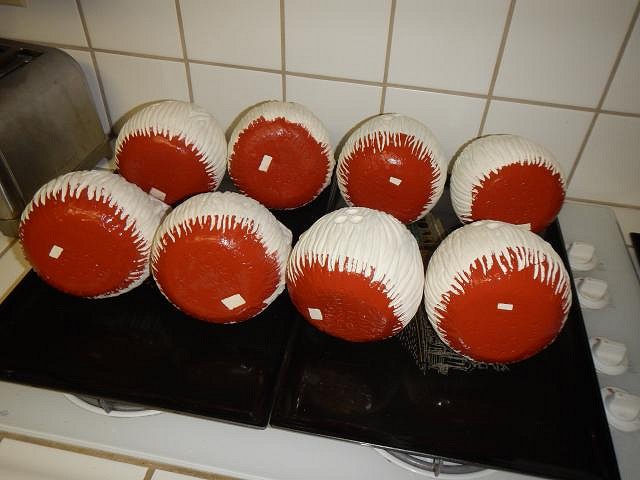
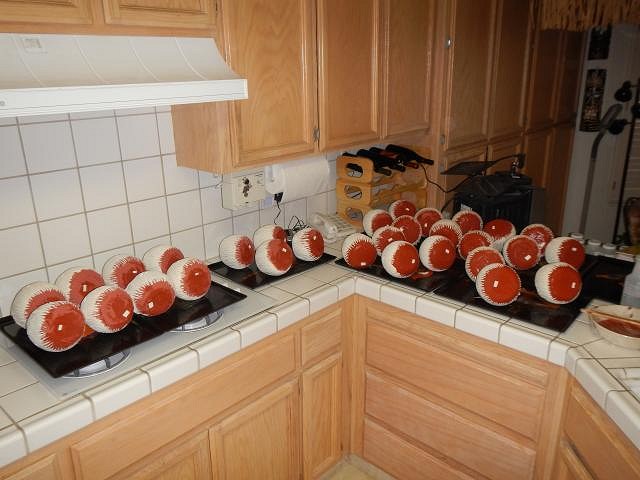
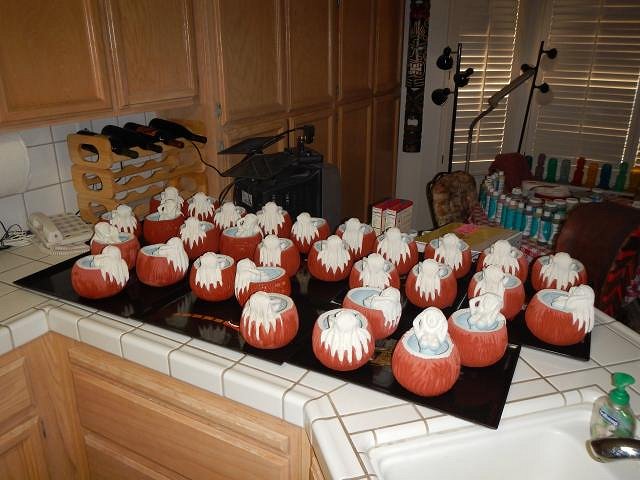
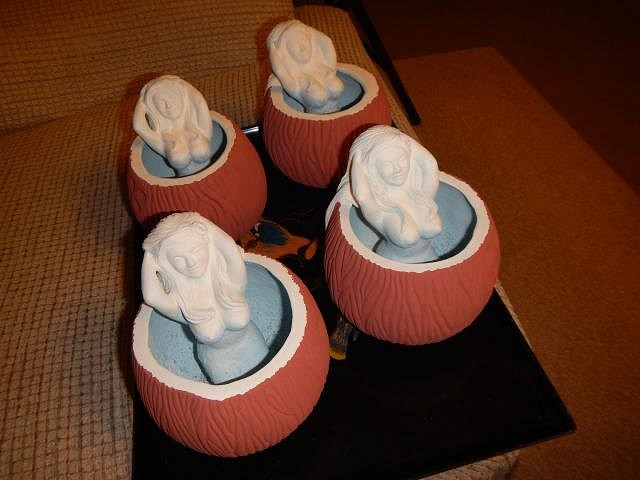
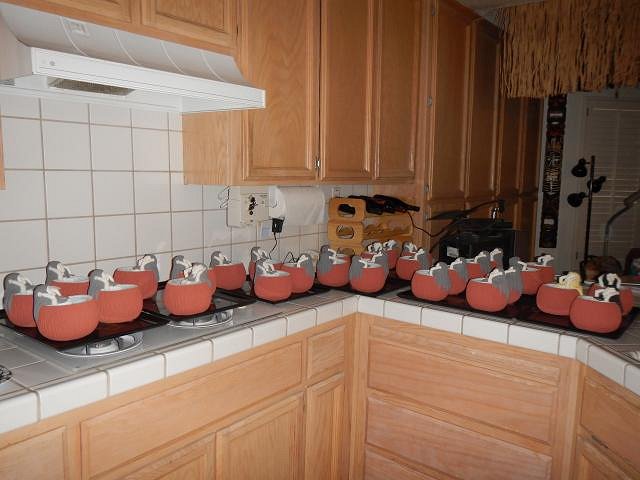
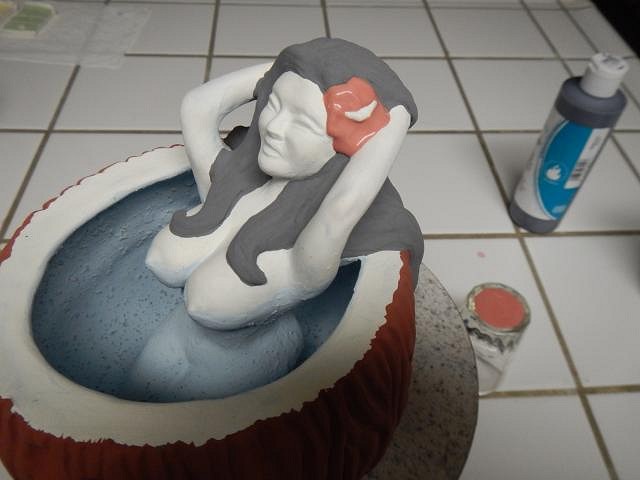
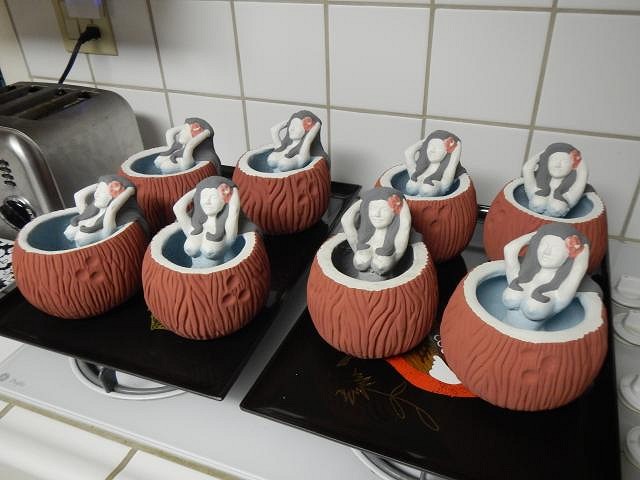
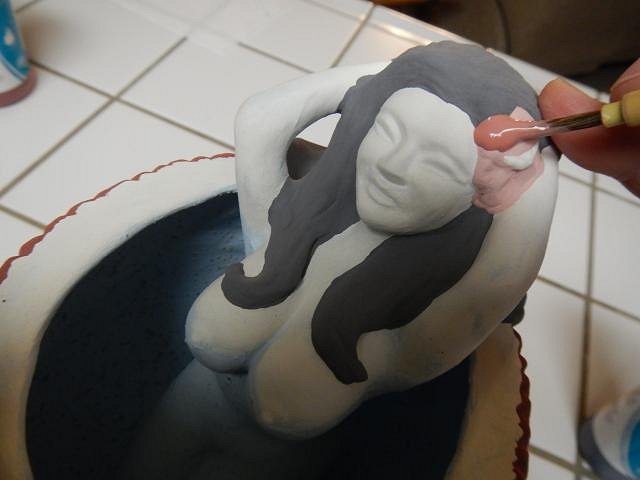
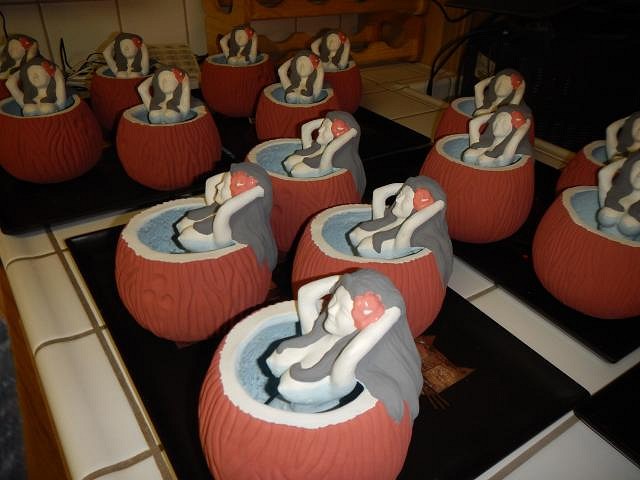
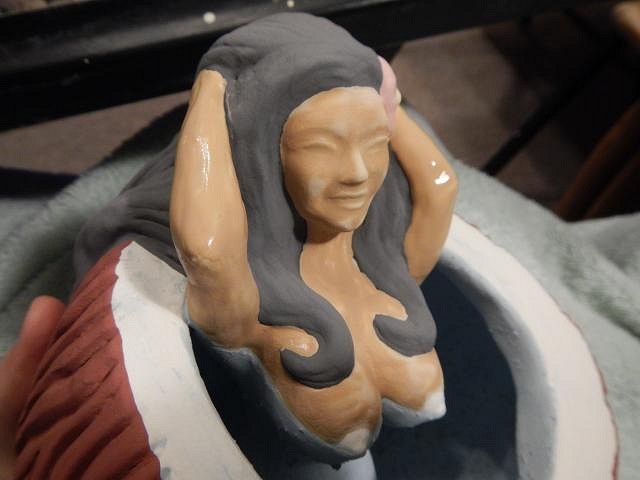
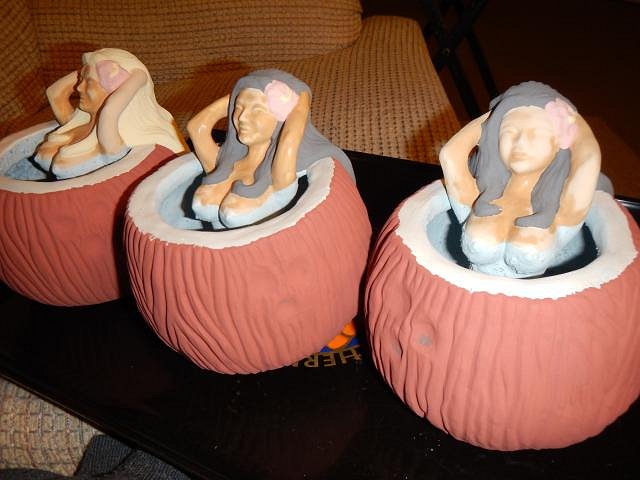
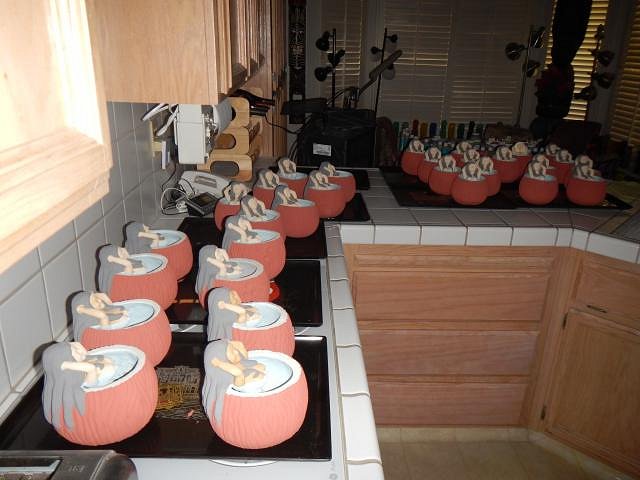
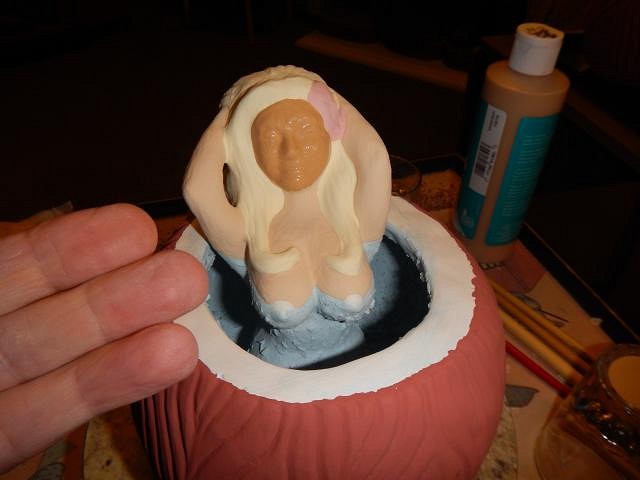
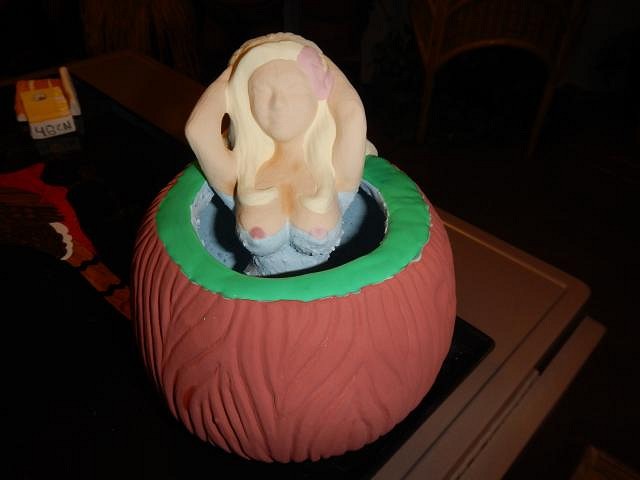
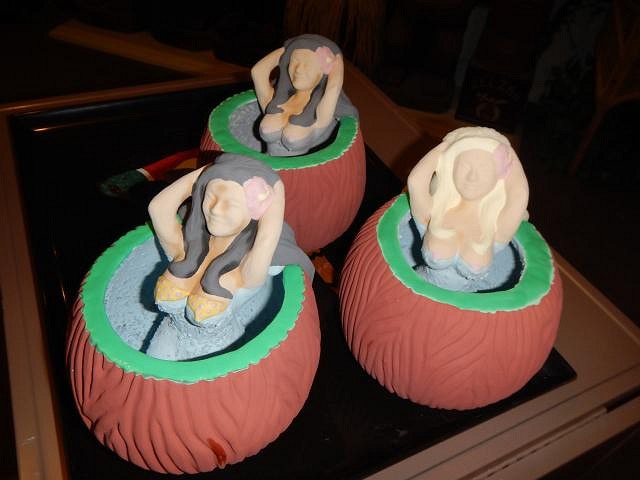
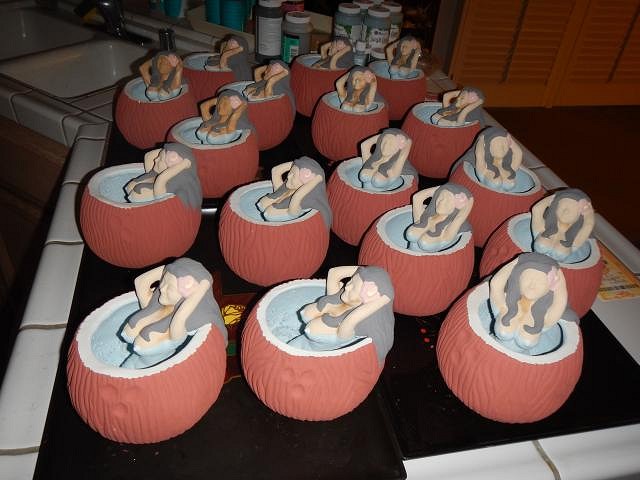
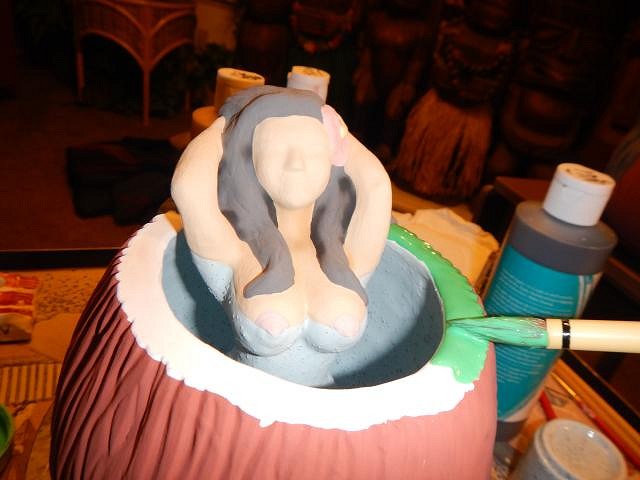
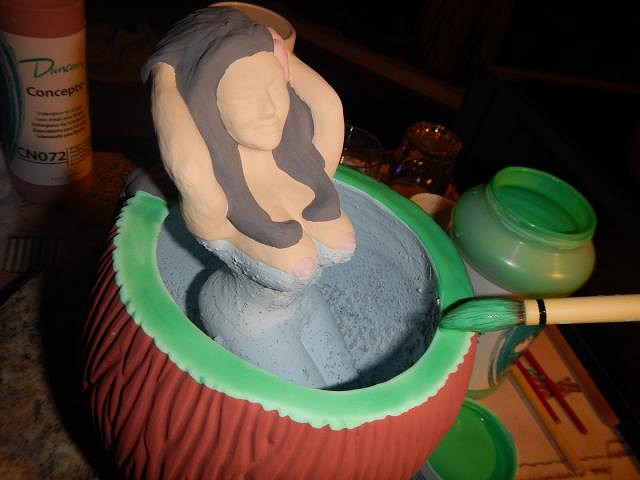
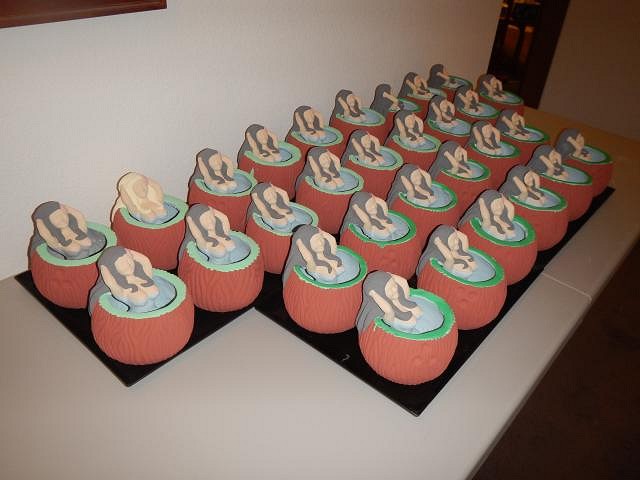
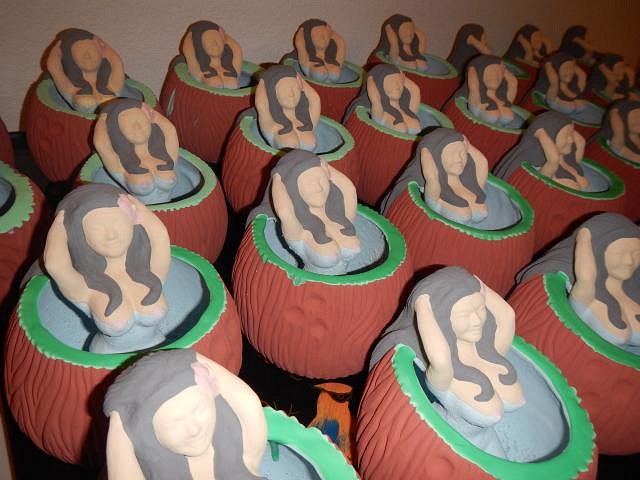
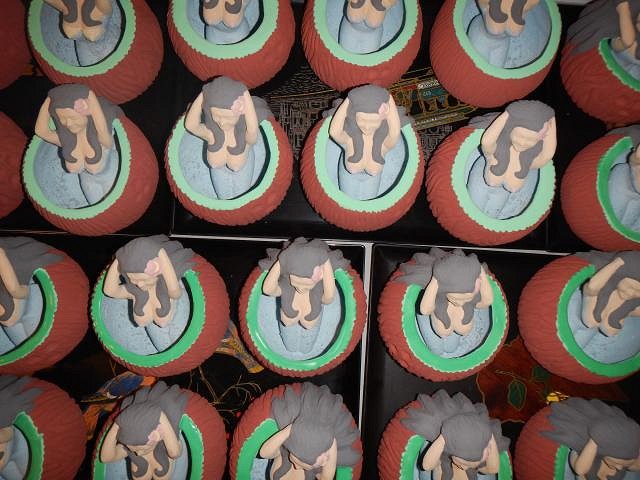
the first people to sign up for Wish List #6 were those who missed the first Hot Tub Hula Girls. I decided that I would get going now on numbers 31 - 60 so I could make 30 more wishes come true. They have been waiting under wraps. We made a trip to Alpha Fired Arts to buy many jars of glaze. The first step was to fill each coconut to the top with water. I count to five and pour it into the next coconut topping it off. If I don't saturate the inside with water it will grab 1/2 a jar of glaze adhering it to the sides. Adding water first has the glaze adhere in just the right amount. Now I get out the rest of my supplies. A pitcher and two vases from a thrift store that can hold an overturned HTHG mug. I fill up the coconut. It takes more than the pint jar of glaze. I let it sit for 15 seconds. Next I overturn it and pour out the excess into the pitcher and leaving it upside down I put it into one of the vases to continue dripping. I haven't found a better way to do this so the clean up of this first step is a huge job. 6 down 24 to go. Every so often I slowly refill the jars from the pitcher. After most of the fluid glaze pours out the crystals are left in the pitcher. I use my hand to divide and scrap them into each jar. Then I shake each jar vigorously before pouring into the next mug. Important: you can't wash your hands in the sink because these crystals will clog your drain. I forgot to take a photo of the large bowl in the sink that I use to wash my hands. At the end of this process I save all the crystals that accumulated on the bottom and add them back into the glaze jars. When I made the last batch I found that cleaning off the glaze runs gave me muscle knots in my back from old injuries. So my right hand man will do them for me if I bribe him well. This part of the cleaning project took two days. He does the outside runs leaving the breasts for me. Here is Dan's bribe for the first day. They are salt and pepper shakers. Here's a bottom sticker. Look what an interesting phone number! The one plug is missing and the second plug is inside. I had this lamp saved for his anniversary present but the fact that he worked for two days straight so I could get so far ahead meant a lot so he got it early. I found it on eBay and it came from Portland, Oregon. The fun part was he had bought this lampshade in Portland 2 years ago when we went to Tiki Kon. Now he had a perfect lamp to use it on. It is now in his tiki jungle room. The skull necklace hanging on it was a gift from Swizzle. Everywhere we look is a tiki with a story. What a joyful hobby, cheers, Wendy |
|
J

JenTiki
Posted
posted
on
Thu, Feb 11, 2016 10:44 AM
I don't really know anything about glazing ceramics, so this might be a silly suggestion, but ... would it be possible to dip the mug upside down in wax, just up to the edge of the coconut, and maybe rub the edge of the coconut with beeswax before pouring in the glaze for the inside? I would think that would create a resist to keep the glaze from sticking to the waxed parts. Then you could fire it once with just the inside glazed, the wax would burn off, then glaze the rest and fire again. Would that even work? Just a thought. |
|
S

swizzle
Posted
posted
on
Thu, Feb 11, 2016 5:32 PM
Hi Wendy, I have to say that the Diamond Head mug came out amazing. That looks really, really good. So does JenTiki's Ken Ruzic bowl. That's a great lampshade that Dan used on the lamp and it looks even better with my pendant hanging on it. :D Now as for the HTHG mugs, having to clean up the outsides of the overpour is the same thing i had/have to deal with on my Bob'O'Nuts. Having the Hula Girls on the inside adds a lot more work for you, or Dan, as the case may be. While JenTiki's suggestion is one option you could try, what i'm thinking is, you could wrap the girls tightly with plastic wrap (I believe you guys call it saran wrap) and tape it down so that no glaze can run up under it when you pour it out, and then after you've removed it you can paint by hand back up to be level with the bowl. Maybe give that a try with just one and see how it goes. Unfortunately, by the very nature of the design you have a lot of extra work per mug regardless of how you go about it. It's just a matter of finding what works the best and takes the least amount of time. |
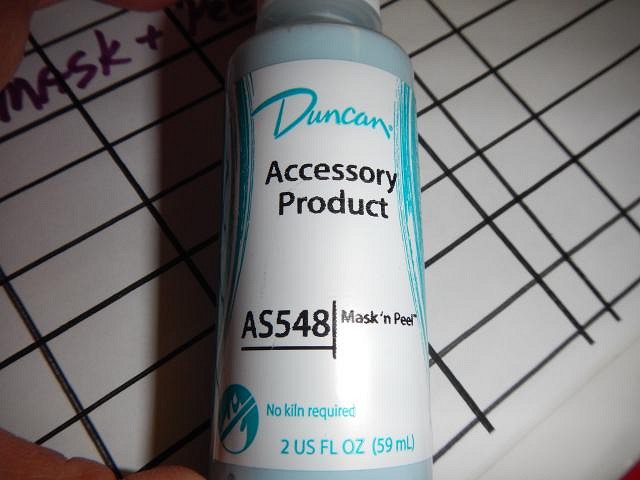
|
D
danlovestikis
Posted
posted
on
Sat, Feb 13, 2016 9:12 AM
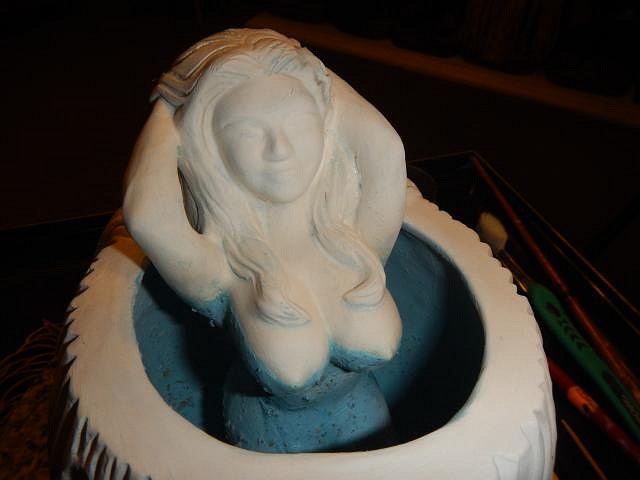
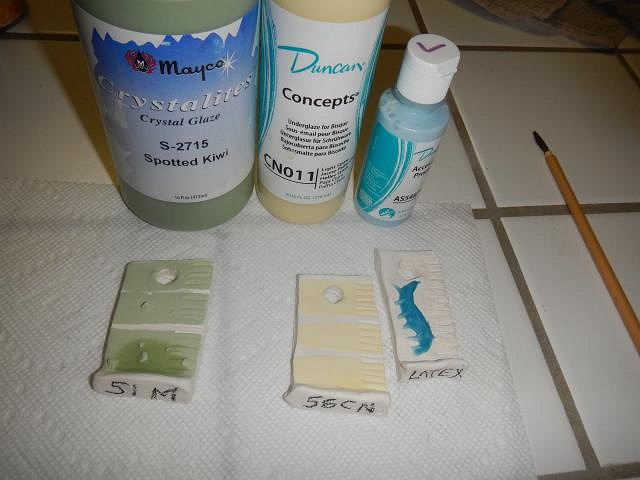
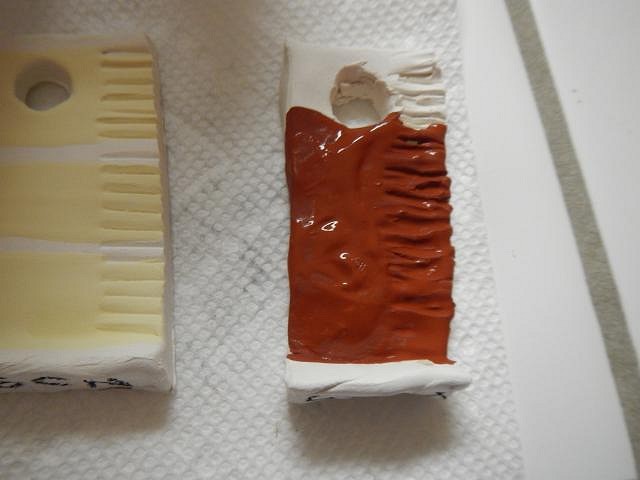
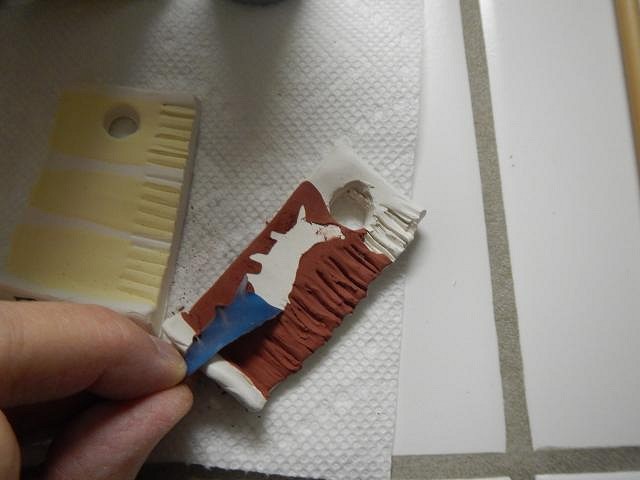
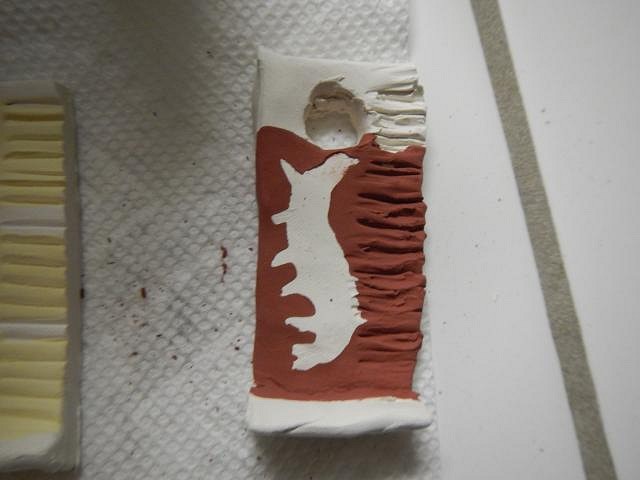
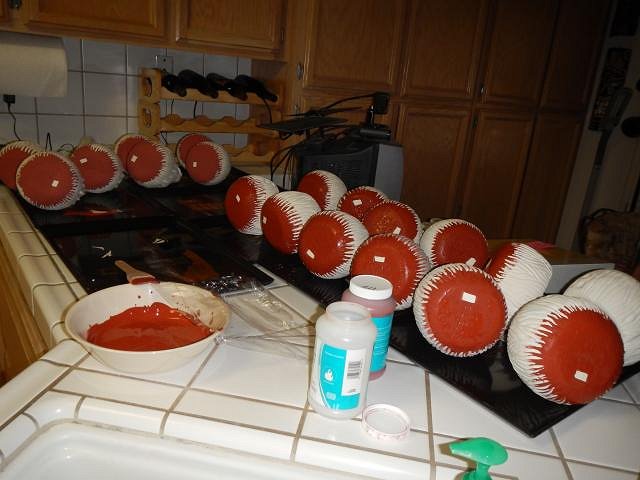
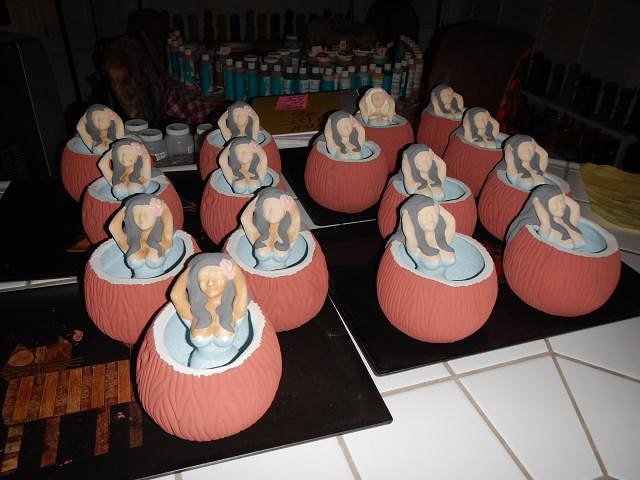
I thought that all of these ideas should be put together as a leaning opportunity for everyone. They are all good ideas. It comes down to time vs cost vs Dan's labor (he likes working for tikis). JenTiki I don't really know anything about glazing ceramics, so this might be a silly suggestion, but ... would it be possible to dip the mug upside down in wax, just up to the edge of the coconut, and maybe rub the edge of the coconut with beeswax before pouring in the glaze for the inside? I would think that would create a resist to keep the glaze from sticking to the waxed parts. Then you could fire it once with just the inside glazed, the wax would burn off, then glaze the rest and fire again. Would that even work? Just a thought.swizzle Now as for the HTHG mugs, having to clean up the outsides of the over-pour is the same thing i had/have to deal with on my Bob'O'Nuts. Having the Hula Girls on the inside adds a lot more work for you, or Dan, as the case may be. While JenTiki's suggestion is one option you could try, what i'm thinking is, you could wrap the girls tightly with plastic wrap (I believe you guys call it saran wrap) and tape it down so that no glaze can run up under it when you pour it out, and then after you've removed it you can paint by hand back up to be level with the bowl.Copied from facebook. Kristina Worrall Duncan Mask-N-Peel latex resist yet? You can cover any areas you don't want the glaze to go and after glazing peel off the latex to reveal an unglazed surface. I haven't personally used it, but others I know have and they really seem to like it. Maybe it would be worth a try? If you're interested you can buy it at bigceramicstore.com Best of luck and keep up the hard work :) ======================== Jen Tiki I have an entire gallon of wax resist and I do plan to use it one day for glazing effects. For the Hot Tub Hula Girls it would just be too expensive. Because of all the differences in thickness of the clay in this design I have to do 13.5 hour fires and once glazed not very many fit into the kiln. Otherwise it would be a good plan. Swizzle I have a 10 pound roll of plastic wrap. I though about doing a wrap and never got around to it. For me it's less work to have Dan do this part. However you've convinced me that on the next run I should at least try it. =========================== Kristina Worrall is a facebook friend. Her idea is intriguing. I have to look into the cost of this latex product. Dan and I are fortunate that in decades of working in a hospital wearing latex gloves we are not allergic. ========================== Today we go to Alpha Fired Arts to pick up more slip and glaze so I can continue on with all these projects. Wish List #6 continues with the next step on the Hot Tub Hula Girls #31 -60. Oh Horrors. Johnny Velour requested that his HTHG mug had green water with Caribbean blue spots. These tree didn't add up to enough to fill it to the top. Trying to swish the glaze around to coat the girl was a stupid error on my part. I should have worked with a brush. It's just hard to reach her back that way. Oh well. I made such a mess it even covered the outside of the coconut. Dan worked his magic. At the end of the two days all 30 HTHG mugs were ready for me. Actually I started on them the same day he started. I would take the mug he just finished and wet down her chest. I would scrape off as much as I could with a wooden stick. The at wet brush was used next. After all 30 were done I let them dry overnight to firm up the glaze and to make it dry so it could grab more coats. Next I did one layer on all 30 and then the next day I did another layer on all 30. Now they are lined up waiting for the next step which is the coconut color. At this point my hands needed a break so Dan and I took off for a trip. I took the computer so I could post each day while we were gone. I only missed yesterday while we were in the car for 12 hours. [ Edited by: danlovestikis 2016-02-13 09:41 ] |
|
S
swizzle
Posted
posted
on
Sat, Feb 13, 2016 6:20 PM
Kristina Worrall's suggestion of using Duncan Mask-N-Peel latex resist would be the one that produces the best results, however the reason i didn't suggest that myself is because of the cost. I think it would add quite a lot to the price of each mug because of how much you would use for each one. The reason i suggested the plastic wrap is because it is cheap and would be reasonably quick in comparison to brushing on the latex resist, although after seeing in one of the pics you just posted how much of the Hula Girl is actually attached to the coconut itself, getting the plastic wrap in there and tight enough might be easier said than done. I still think you should try at least a couple that way and see if it does save you some time, and also some glaze. |
|
H
hang10tiki
Posted
posted
on
Sat, Feb 13, 2016 8:26 PM
That's a fine bunch of Wahines bathing in some cool lookin coconuts |
|
D
danlovestikis
Posted
posted
on
Sun, Feb 14, 2016 9:38 AM
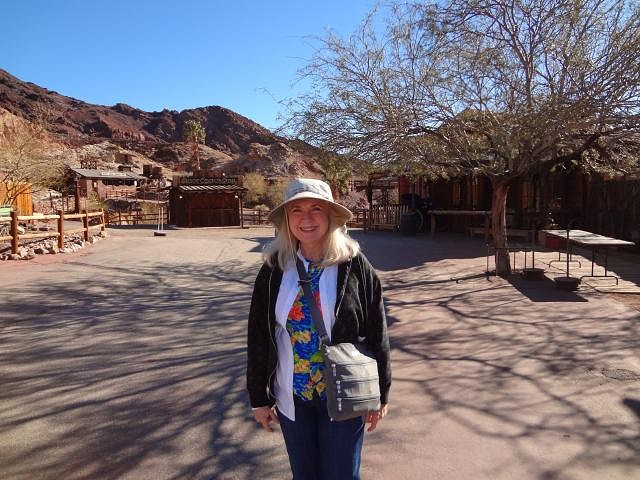
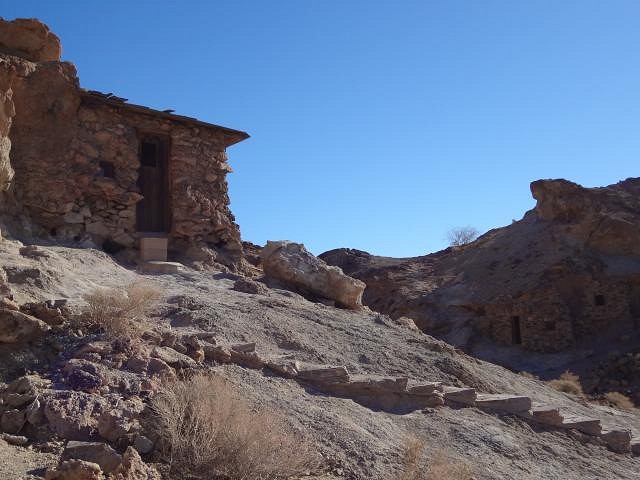
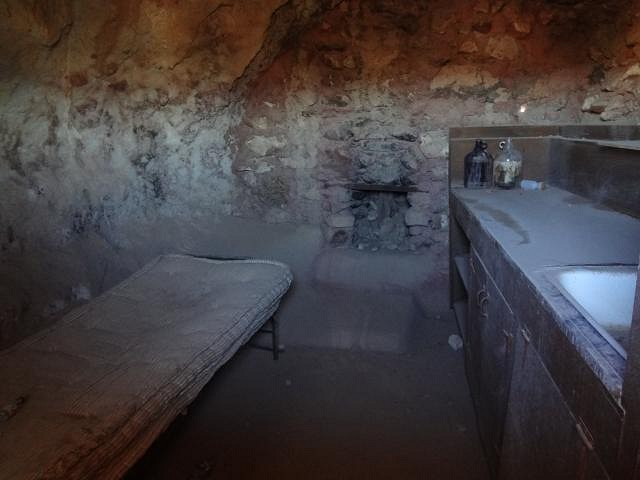
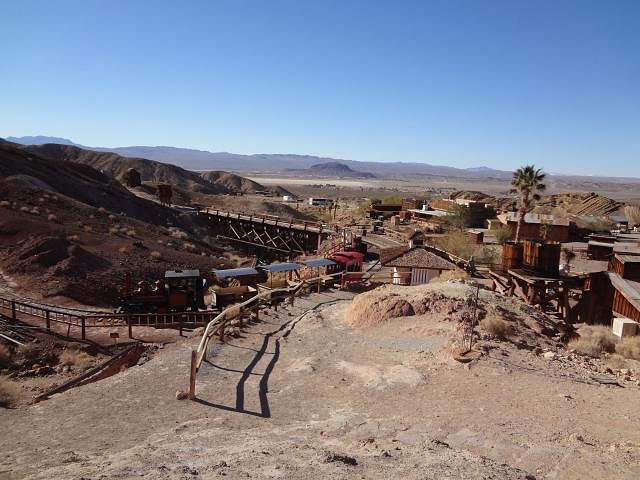
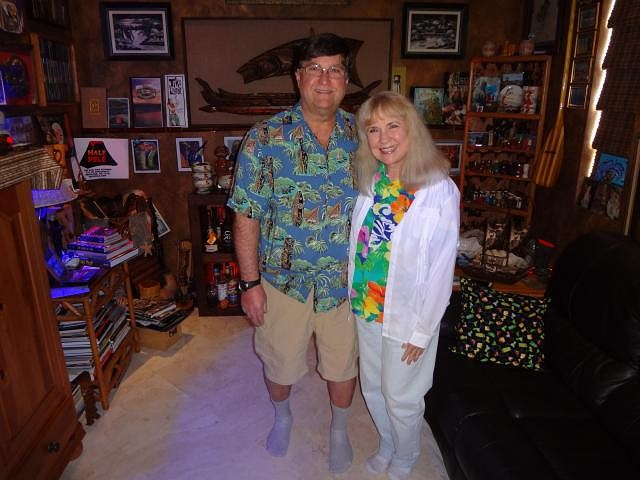
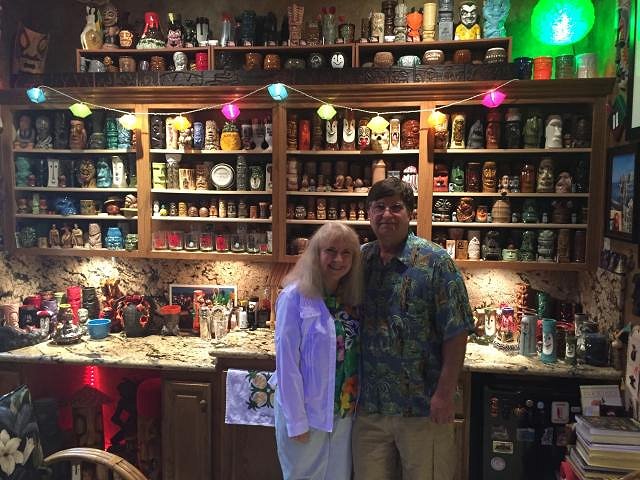
hang10tiki until they are super hot in the kiln! ================ While taking a hand rest time off Dan and I took off for Las Vegas, Nevada. This will be a tiki hunt and a visit to hang10tiki's. Here is our trip and tiki loot! Our first stop was in Bakersfield, CA for their half dozen huge shops. Dan wants to build one of these to hold his ash tray collection. I saw an old tray that looked like the fogcutter mug I just glazed. We ate at an old Woolworths diner at the side of an antique store. I love numbers. This is low mileage for our 13 year old PT Cruiser. This car is great for trips. We stopped for the night in Barstow. The next morning for the very first time we drove off the freeway to the ghost town of Calico. I hiked up the hill to this rock house. Dug out of the wall it kept the miners of silver cool. This is the view from the doorway. We have arrived in Las Vegas and made the first stop at the Great American Antique Store. Woo Hoo we found an unmarked Bumatay mug. The next day we visited hang10tiki and his wife Janelle.
The men traded gifts. I gave hang10tiki a necklace that I had made. It's a sleepy Tiki Bob. We left them to head to the Buffet at Planet Hollywood. Our favorite. We ran into Ron a friend from Forbidden Island tiki bar that is located in Alameda, CA. We only see him once a year so this was special. The next day we were off to tiki hunt in Bolder City.
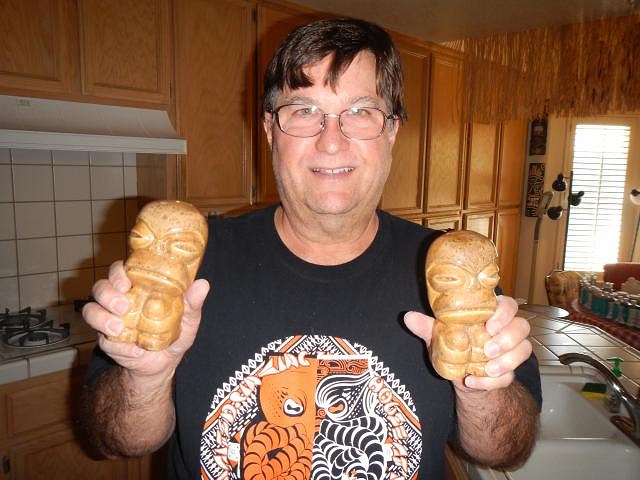
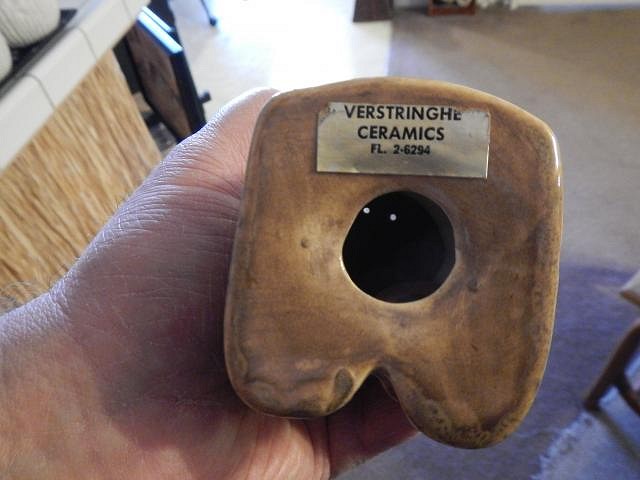
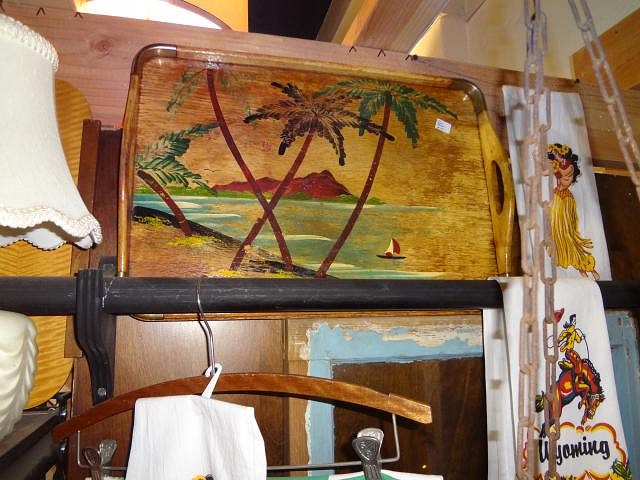
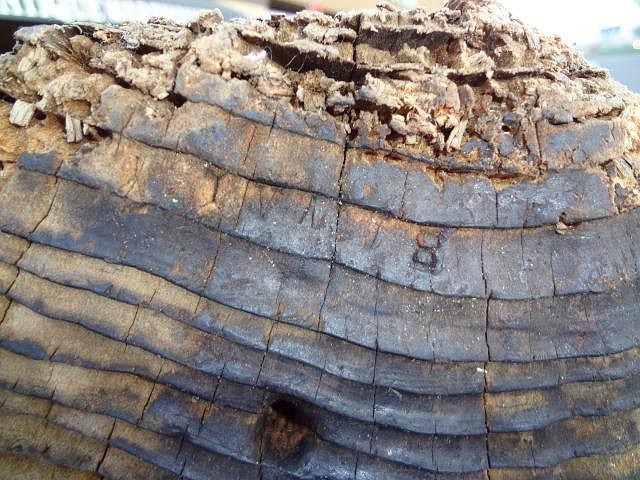
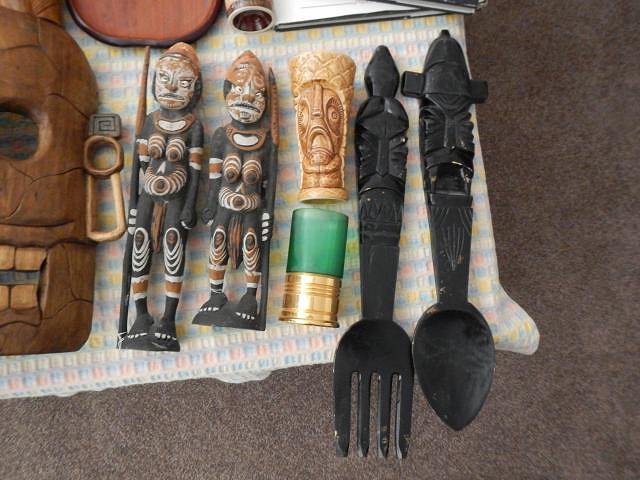
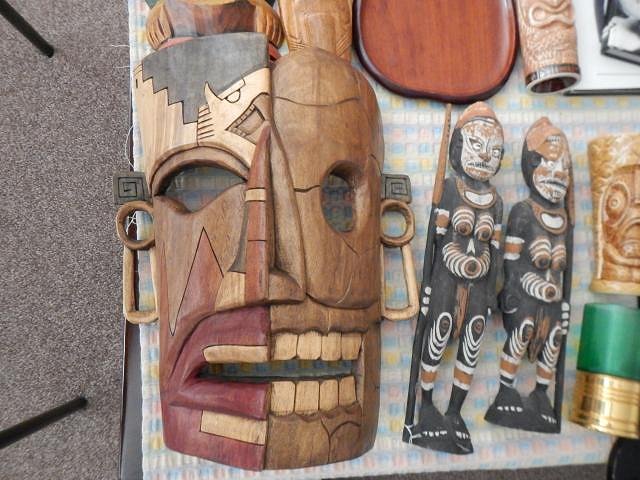
We loved this wall hanging but at $700 we had to let it stay right there. The owner said she would burn it before lowering the price. She said she researched it and it was worth that much. I saw a letter holder and by taking the photo upside down it looked like a Moai! The next day we are on our way home. We stopped for the first time at Peggy Sue's a real 50's diner. It was fun to do one time. My cottage cheese had a surprise of potato salad in the middle and I don't think it was meant to be that way. Once we made it to freeway 99 we started stopping at more antique stores. This was possible because we left Las Vegas at 4:30 am. Oh my gosh we found a Witco. I've always wanted a big Witco. This one seems to be very old. There are numbers and letters on the bottom. I can't make them out. Back home I took lots of photos of our tiki treasures. ebtiki how'd we do?
This spoon and fork set was from Korea but for $5 it had to go into my collection.
Happy Valentine's Day everyone. I took these on our trip and told Dan, "now I have my card!"
Ethyl M cactus garden. |
|
T

TikiAno
Posted
posted
on
Sun, Feb 14, 2016 1:24 PM
Happy Valentine's Day, lovebirds! (that's to Wendy & Dan), okay? Looks like a great trip- great find with the large Witco. Missed a few days bc of a crazy work week, but relating back to glazing issues, don't think wax resist is the way to go, especially when dealing with all of the different glazes you do. Swizzle's call on plastic wrap sounds like a great idea- have to remember that one. Wendy, do you ever use an airbrush for glaze? Definitely might be the fastest/ most efficient way for putting glaze exactly where you want it to go, especially when dealing with high volume like all of those bowls! I'm always impressed by your detail, patience, and skill in hand brushing all of your pieces- for those that haven't glazed ceramics before, you have NO idea how much work Wendy puts into each and every one of her pieces. Wow. Pouring glaze is definitely a skill, and while pouring into a standard (round) bowl or mug would be one thing, pouring in/ around a wahine even tougher. Near impossible? Wow. Love the Spock Bob, and JenTiki's bowl blows me away. So glad Kinny gave it the thumbs up to make. |
|
H
hang10tiki
Posted
posted
on
Mon, Feb 15, 2016 7:15 AM
Well hello :) Like that ashtray shelf idea Looks like you had lots of fun hunting It was great to see you 2 again :)
|
|
D
danlovestikis
Posted
posted
on
Mon, Feb 15, 2016 7:56 AM
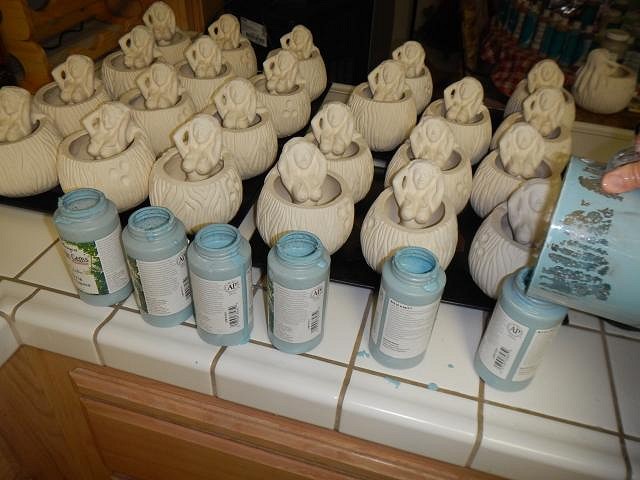
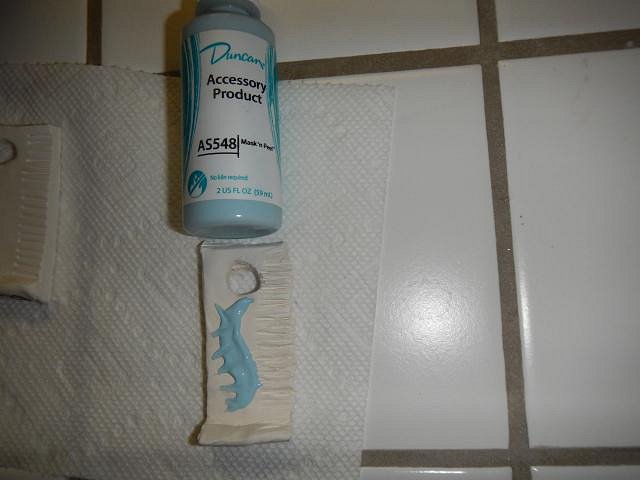
TikiAno I hope you had a wonderful Valentines Day. Comparing Las Vegas to a visit with hang10tiki and Janelle the visit with them won hands down. They made the trip so much fun. We only found 1 mug in LV all the rest were found on the way home. It kept the long drive interesting. More information on the latex below. I have sprayed some of the crawl mugs. These HTHG's are just going to always be hard because there are no shortcuts. I will try Swizzles suggestion next time. I have the wrap, I have to see the amount of time to wrap and remove vs Dan's labor. Ceramics as you know are not an easy art form. You have to have lots of time to get things done. hang10tiki after seeing you two the rest of LV was anticlimactic. Thank you for the fun visit and treasures. Remember the candle can be a perpetual gift. Given to us, given to you, who would be next??? ======================= On Saturday we went to Alpha Fired Arts to buy supplies. We buy our slip by having them fill 36 gallon jugs 1/2 full. He fills them right in the car. This way when we get home I can add water if their mix is too thick and then Dan stirs them with a bat. They had the Latex. However it came in 2 once bottles for $2.65 and it's been discontinued by Duncan. This is not going to work for the Hot Tub Hula Girls but I bought a couple to experiment with. I started by painting some on a tile. It's thick and this wasn't easy. I did some thinner side pulls too. I did my other glaze test strips while waiting for it to dry. 4 hours later it was dry. I then painted some glaze on the tile. After the glaze dried I peeled off the latex. I'll fire this to see if the glaze moves or the edges stay sharp. All dry and ready to fire...someday. ======================== I start with the bottoms of the coconuts. I set up what I need and then it's one at a time. I leave the box for the number unglazed. That way I can number them with a felt pen after they are done. 8 down 22 to go for the first layer. 30 first layers done. 30 with the second layer done. This glaze is thick and 2 layers were enough. While they are on their sides I was able to glaze the 3 dents. All done. It was a long but productive day. There are a lot of steps to each of these and I'm not done yet! Wendy |
|
D
danlovestikis
Posted
posted
on
Tue, Feb 16, 2016 7:37 AM
Wish List #6 continuation of the Hot Tub Hula Girls Now was the time to glaze the outside of the coconut hot tub. Then I did the rest of the first coat of glaze all the way around. One at a time until all 30 have their first coat of glaze. Between each mug I clean off the turntable so that it doesn't get sticky and start to pull off the glaze. I have used paper towels but in the end it just worked out best to clean it off between mugs. I actually got the second layer of glaze on all 30. A huge accomplishment for me on this full day of work. Thank you for the visit, Wendy |
|
H
hang10tiki
Posted
posted
on
Tue, Feb 16, 2016 9:59 AM
I bet you the only people I know who have had 30 coconuts in the kitchen |
|
J
JenTiki
Posted
posted
on
Tue, Feb 16, 2016 11:27 AM
Holy Orongo, Birdman!!! My bowl is HUGE! And beautiful! It arrived to my office today. I'll post pics when I get it home and find it a place on the shelf. Thanks so much Wendy! |
|
H
hang10tiki
Posted
posted
on
Tue, Feb 16, 2016 4:44 PM
JenTiki be lucky :) [ Edited by: hang10tiki 2016-02-16 16:44 ] |
|
D
danlovestikis
Posted
posted
on
Wed, Feb 17, 2016 2:50 PM
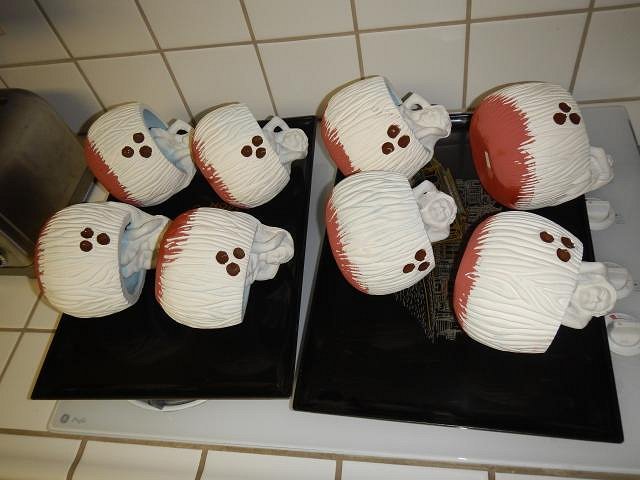
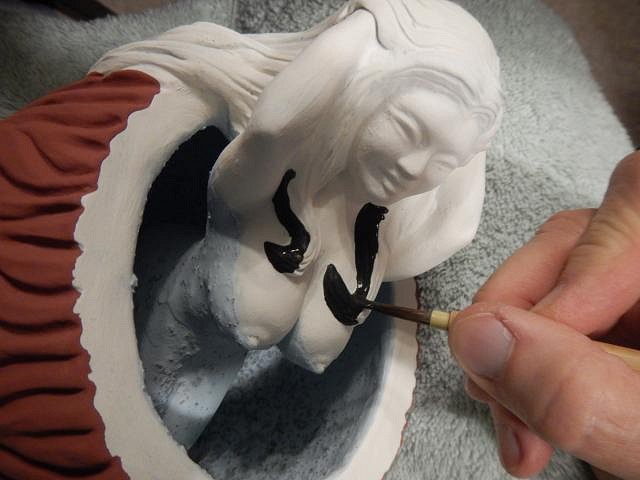
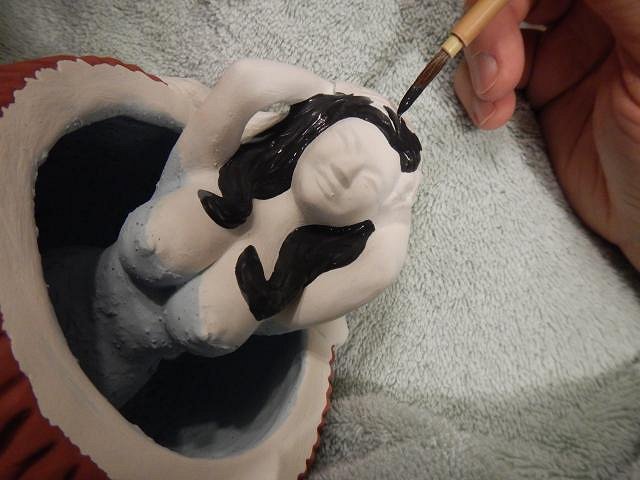
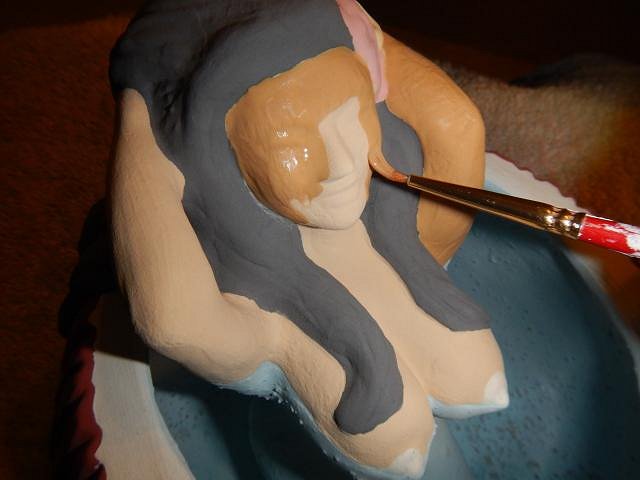
hang10tiki how about Tarzan? JenTiki you are so welcome. Your post made me very happy. I am a fan of Kenny's art and especially the birds. I'm looking forward to those photos. hang10tiki I am in so much trouble. kingstiedye made me promise that I would have him over to see Jen's bowl before it shipped and I forgot. He's not happy but he still loves me. =========================== Wish List #6 continues on with the Hot Tub Hula Girls. I've started painting the hair and I got the first of 2 layers done on 11 yesterday. I am working on them again right now. I just took a break to post. My system is to do all the dark glazes first so if I get a speck or a touch of glaze in the wrong place I can wipe it off.
Okay breaks over back to work. Wendy |
|
H
hang10tiki
Posted
posted
on
Wed, Feb 17, 2016 7:32 PM
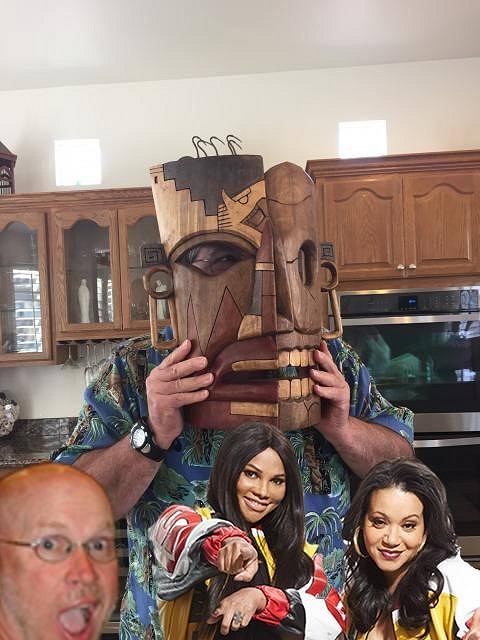
Lookin good So is this guy
|
|
T
TikiAno
Posted
posted
on
Wed, Feb 17, 2016 7:45 PM
Wait, there was a request for more seasoning....
|
|
I

IDoVoodoo
Posted
posted
on
Thu, Feb 18, 2016 3:20 AM
You guys are so great! |
|
J
JenTiki
Posted
posted
on
Thu, Feb 18, 2016 7:03 AM
I love kingstiedye, but I'm kinda glad nobody saw it before I did. It is my bowl after all. If he still wants to see it in person, he's welcome to come to Charlotte. :) |
|
D
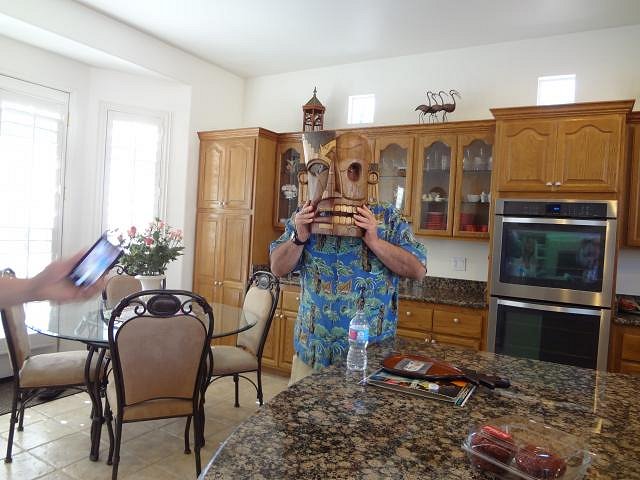
danlovestikis
Posted
posted
on
Thu, Feb 18, 2016 8:33 PM
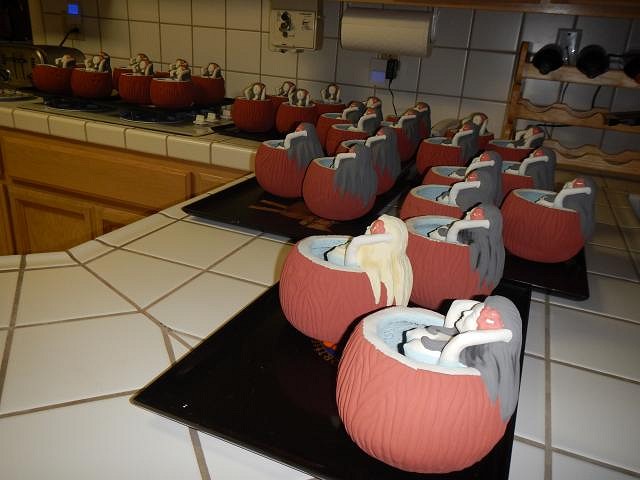
hang10tiki it was so nice of you to give us the mask. It is very much appreciated. TikiAno where is the spicy GROG? IDoVoodoo I'm going to be so happy when these are shipped and I'm back to one of a kinds to glaze. JenTiki then it worked out for the best. kingstiedye is saving up for a ticket to Charlotte. =========================== I had a photo of the mask where it has been hung and I can't find it. I recently changed to Windows 10 and it doesn't default to the first page of my photo files. It puts photos wherever it wants. I'll do another one soon. =========================== Wish List #6 is stuck on the Hot Tub Hula Girls. I do four at a time by bringing a tray to the couch. I'm doing one blond this time for Bulkmar Abdoberman.
Starting at 7 am I did all 30 first hair layers of glaze and then let them dry overnight. The next day I started at 7 am again and I did all the second layers.
I found one with a missed area. I did both the same day to catch it up. Now these are drying overnight. So many steps for each mug but I'll get them done. Cheers, Wendy |
|
T
TikiAno
Posted
posted
on
Thu, Feb 18, 2016 9:47 PM
Grogatio:
|
|
J
JenTiki
Posted
posted
on
Fri, Feb 19, 2016 7:09 AM
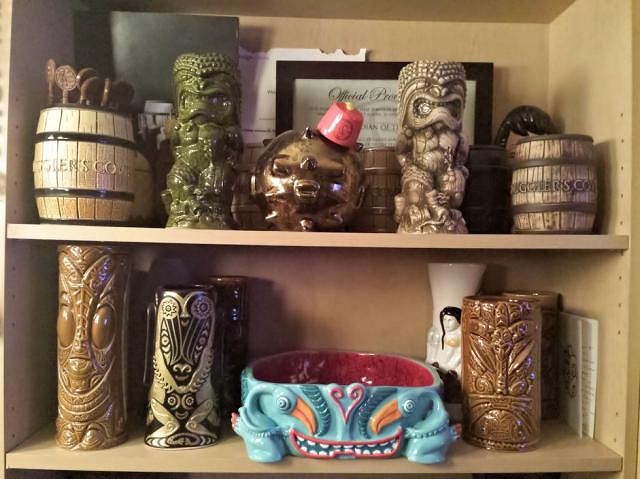
Here's the bowl next to mug that Kinny handpainted for me several years ago with the same birdman figures. You can see the bowl is a tiny bit too big for the shelf. And here it is with the Smuggler's Cove shelf above it. [ Edited by: JenTiki 2016-02-19 07:09 ] |
|
D
danlovestikis
Posted
posted
on
Fri, Feb 19, 2016 2:59 PM
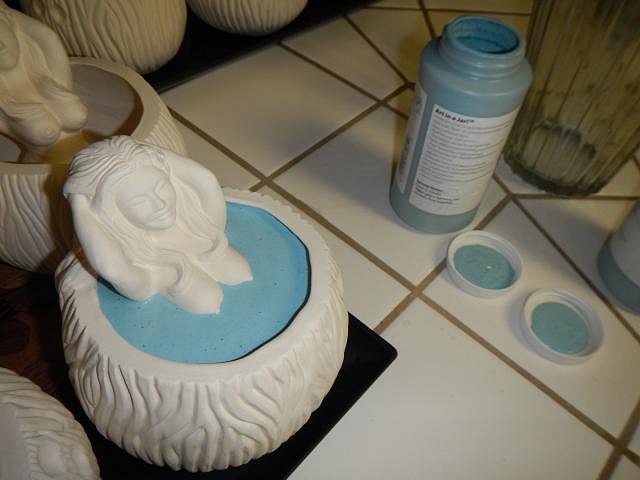
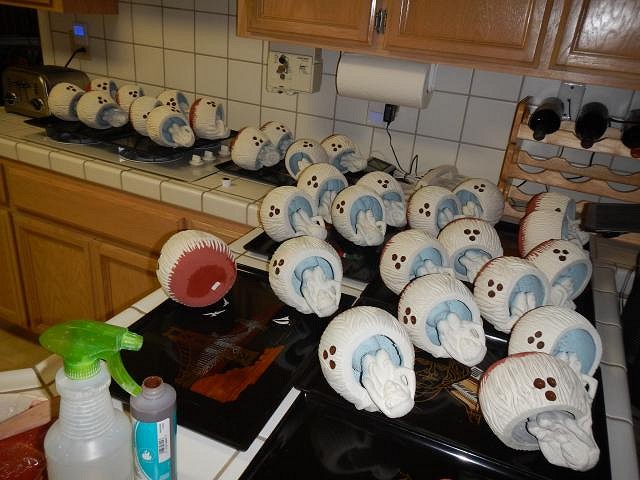
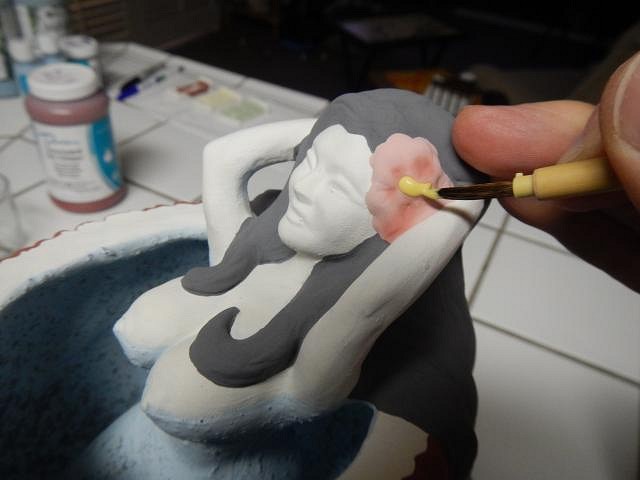
Tiki Ano if only GROG were still watching he would be having such fun. JenTiki the mug with the birds is so cool. Thank you for having me make this bowl for you. I was challenged to think of how to make it work. I learned a lot along the way. I am so happy you like it. ======================== We had some visitors. I am so sad that I didn't get a photo of kingstiedye and his wife Sandy. He gave me this Tiki Tony necklace. How cool is that? Very! Wish List #6 more steps on the Hot Tub Hula Girls. Now it was time to glaze the flowers. I started with a layer of neon red concepts under-glaze. First 8 done. All 30 done and I let them dry. Now I started on them again with another layer of red. All 30 done. The last step on the flowers were to do 2 layers of yellow on the stamen. All 30 done and drying. There's a lot of picking up and setting down these mugs. I don't understand why I'm not growing more muscles. Cheers, Wendy |
|
H
hang10tiki
Posted
posted
on
Fri, Feb 19, 2016 8:46 PM
Ano- u r on a roll |
|
D
danlovestikis
Posted
posted
on
Sat, Feb 20, 2016 8:25 AM
hang10tiki Dan is crazy for this mask. He watches it more than the TV. He sends you another big THANK YOU.
Wendy |
|
D
danlovestikis
Posted
posted
on
Sat, Feb 20, 2016 9:20 PM
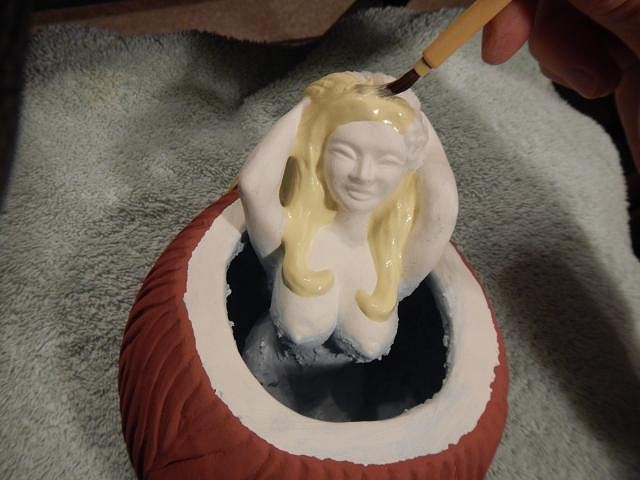
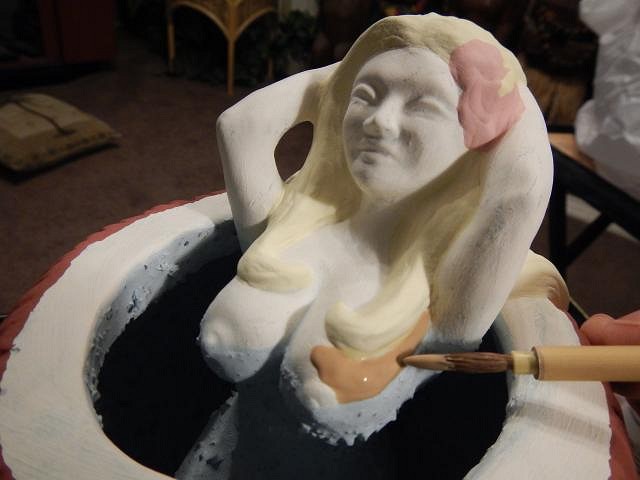
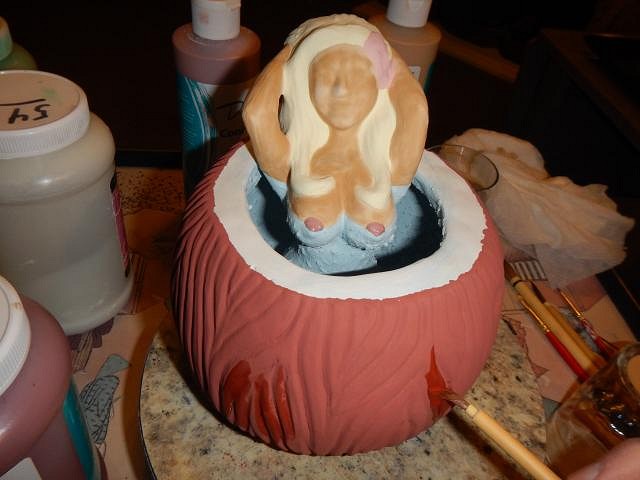
Wish List #6 continues with the Hot Tub Hula Girl mugs. It's now time to do 3 layers of glaze on their bodies. I started with the blond and the glaze was too thick and she looks a bit wrinkled. I added water to the glaze and did this one but the glaze was still too thick. This time I got it right! In the lighter colors of CN glazes by Duncan you need more layers than with darker colors. Otherwise you will see streaks. I worked all day and got one layer on 15 of the 30 mugs. 12 to 13 hours a day and I'm still not done! Cheers, Wendy |
|
T
TikiAno
Posted
posted
on
Sun, Feb 21, 2016 6:49 AM
Watching you glaze makes me tired. Once again, if you haven't glazed ceramics, you really have no idea just how much work and time Wendy puts into each and every one of her pieces. Wowzers. So. Many. Layers. Oy. Thanks for all. Wendy, I'd like to think that Grog is popping in here from time to time. :) JenTiki, that bowl looks awesome and happy it found a good home. Might be time to order one of those shelf extensions since that bowl is worth it! :0 Jon, thanks. This one's for you....
[ Edited by: TikiAno 2016-02-21 06:51 ] |
|
H
hang10tiki
Posted
posted
on
Sun, Feb 21, 2016 6:57 AM
Glad Dan-0 likes the mask |
|
D
danlovestikis
Posted
posted
on
Sun, Feb 21, 2016 9:51 PM
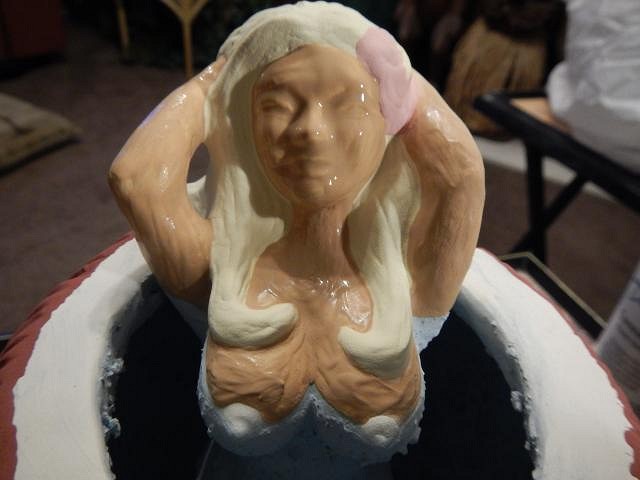
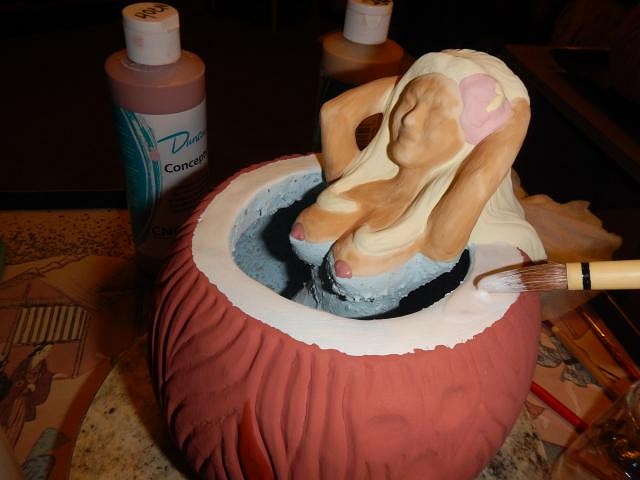
TikiAno I'm looking forward to spending less time with topless hula girls and more with the other mug projects. Thank you for noticing how hard these are to glaze. hang10tiki you too? I want that bread! =================================== Wish List #6 Hot Tub Hula Girl mugs continue to be glazed. I set to work on the next 15 that needed the first layer of skin glaze. I messed up the hair. So then I had to re-glaze the hair. I do a lot of back and forths. 3 down. Finally I got the second 15 done. Now 30 have the first layer of skin glaze. After they dried overnight I started on the second of three layers that are needed for the skin. When I had done 15 I yelled yippee half way there. At the end of a very long day, 13 hours, I had all 30 done with the second layer. Tomorrow it stars again!!! Wendy |
|
H
hang10tiki
Posted
posted
on
Mon, Feb 22, 2016 6:07 AM
All those Hula girls make me want to dance On second thought, better not Have a great day Back to my coffee and season 7 of Hawaii 5-0 |
|
D
danlovestikis
Posted
posted
on
Tue, Feb 23, 2016 11:36 AM
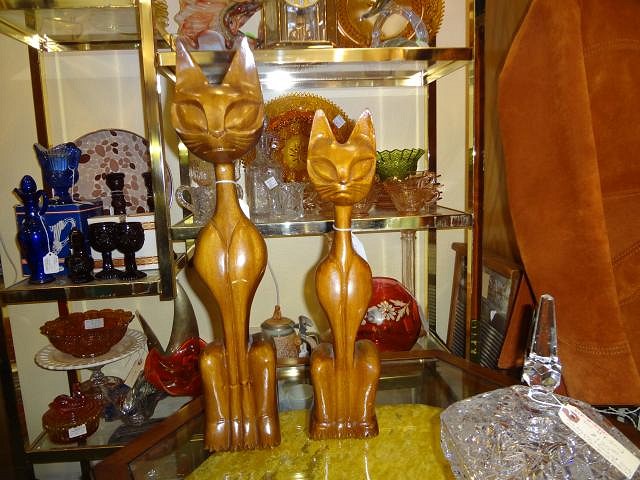
hang10tiki I bet you could do dancing with the stars and survive. ==================== I am working non-stop on the Hot Tub Hula Girl mugs but I thought I would take a break and do a Misc. photo catchup day. Dan and I have been to a few antique stores on days we are driving to run errands. I saw these mid-century cats and begged for them. Our home is so full of tikis I knew Dan would have to bump something so I could have them. He did it! So I got my anniversary present 3 months in advance. Thank you everyone for all the views. Passing two and a half million is blowing my mind! We were at home depot and saw one of Tiki Diablo's planters. I think I heard that a new batch will be in this summer. They are really great designs and quality. At an antique store we found a tiny tiki that matches a larger one we own. I think they were made in the Philippines. Swizzle Dan relocated your necklace so he could see it better when sitting in his chair. I've made 4 of the Tyber Tiki Maori lamps and Dan has taken two of them. Actually one that sold was a jar. He paired it up with the lamp shade I decorated with a felt pen. Tiki Tony sent me this photo of Stephen Hillenburg the inventor of Square Pants Sponge Bob drinking from one of my Ren Clark severed heads. We do get out and about from time to time. Today is a stay at home and glaze all day long day. Photos tomorrow. Cheers, Wendy |
|
L
lunavideogames
Posted
posted
on
Tue, Feb 23, 2016 12:09 PM
Those cats are great! I always have to buy every cat mug and my wife Emily takes them all from me. She would love those as well. A very cool anniversary present. Nice to see a severed head out and about :) Hope the army of hula girls in their coconut tanks all make it through their battle with the kiln. |
|
H
hang10tiki
Posted
posted
on
Tue, Feb 23, 2016 8:39 PM
Those are cool cats... |
|
D
danlovestikis
Posted
posted
on
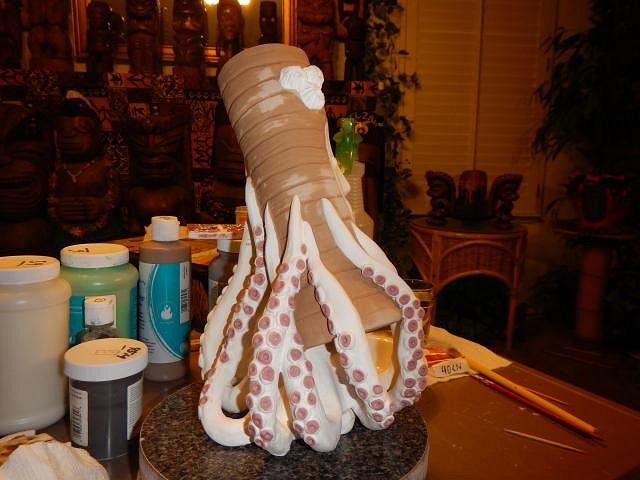
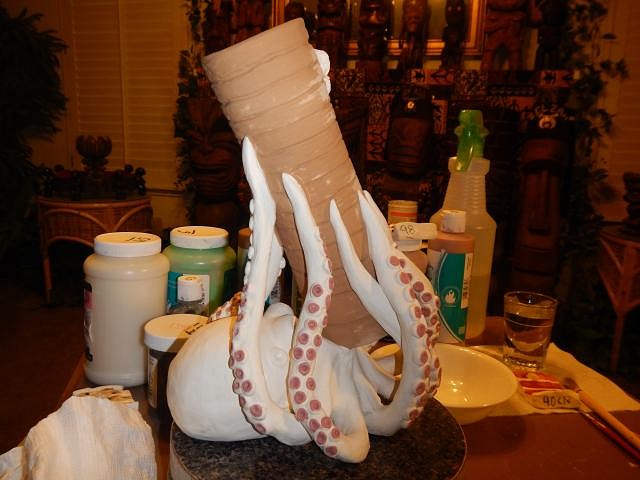
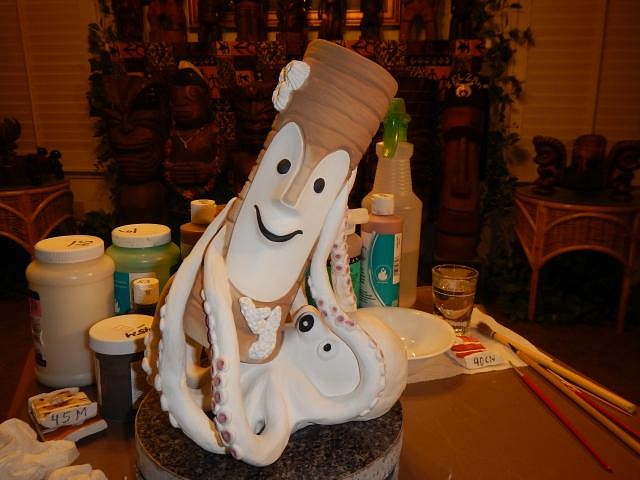
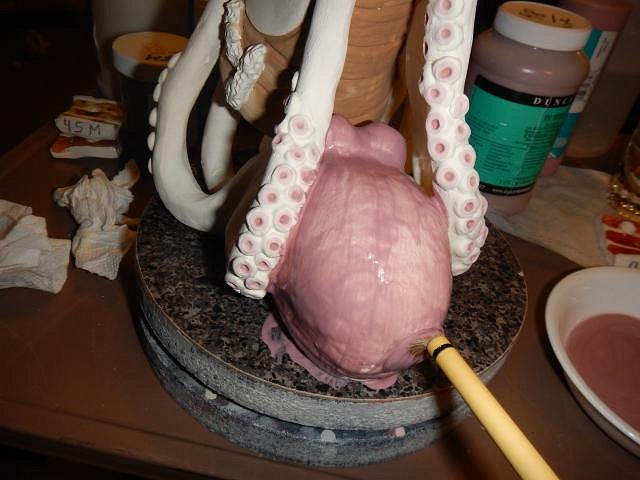
Wed, Feb 24, 2016 8:55 AM
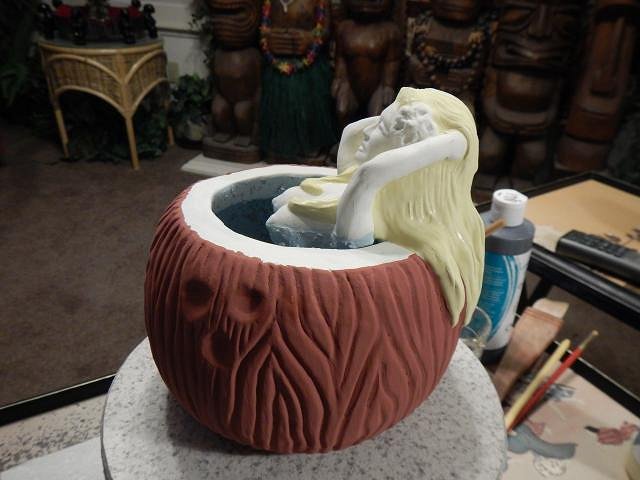
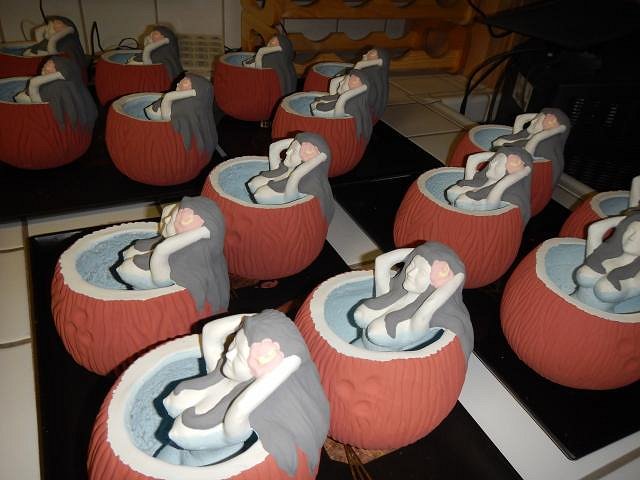
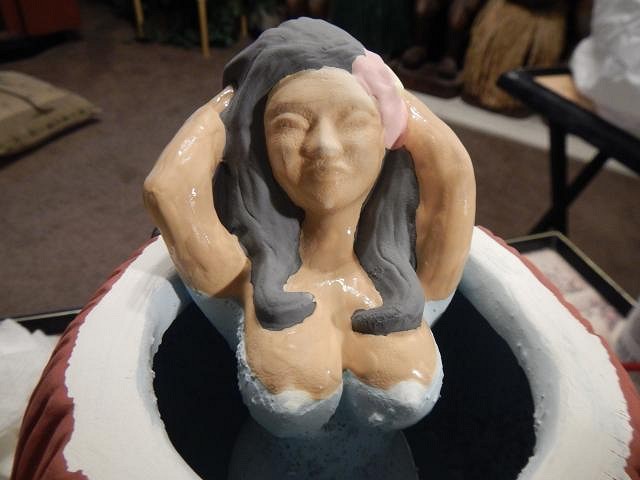
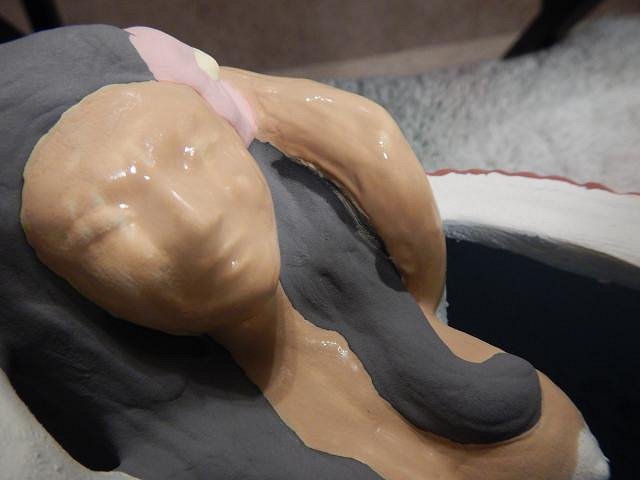
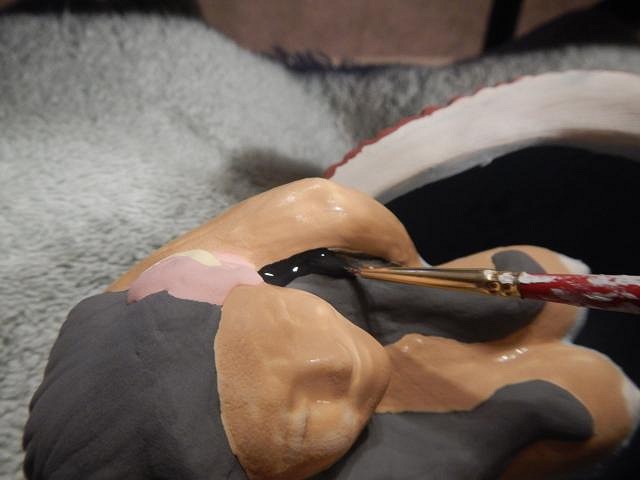
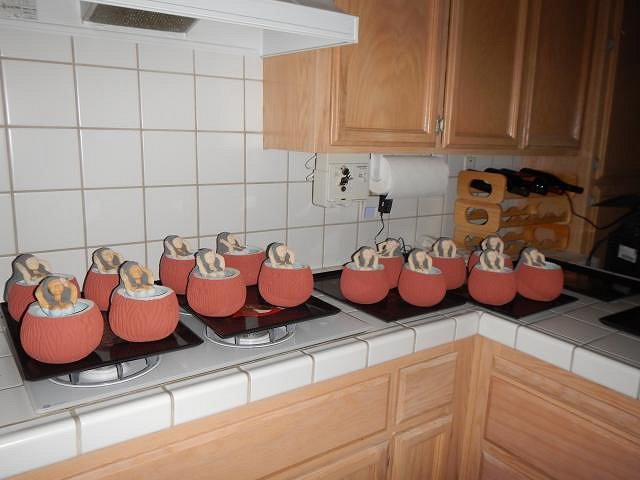
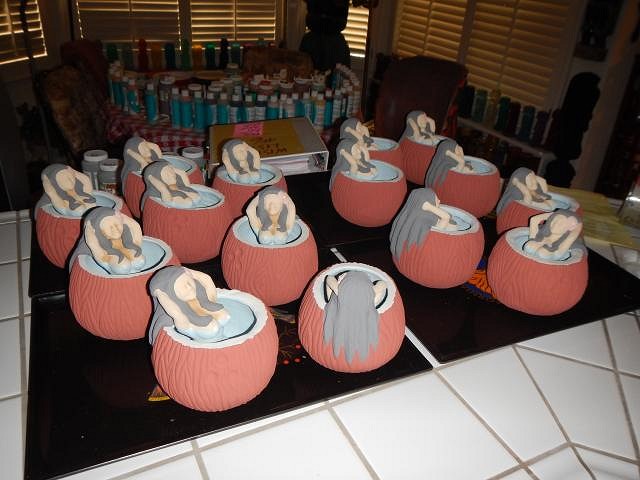
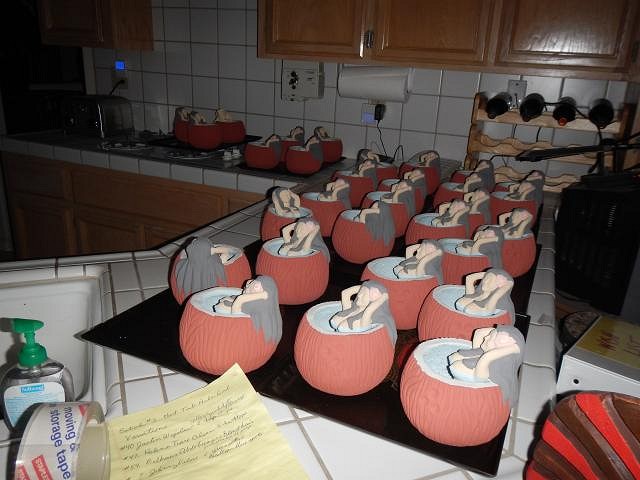
lunavideogames I once made a tiki with a cat sitting on top as a lid. I'd forgotten about that, it was a wish. Your octopus with Tiki Bob mug is the next thing I will glaze. I may start tonight! hang10tiki made a video of Dan and I. It's so professional. Tiki Hula put it on U-Tube. Thank you so much. ================================== Wish List #6 I have finished the glaze portion of the Hot Tub Hula Girls. Hopefully they will not need touch up glazing. Here are a few of the many photos I took during the past few days. The third layer of skin glaze is started. Skin done nipples added. The while underglaze is added to the top of the coconuts. 2 layers. 2 layers of clear are painted on. I dry each layer before doing the next. I carried these mugs so many times! The 3 variation mugs are glazed. Here are the last 15 with the 3rd layer of skin glaze. Now I started doing all the nipples and hair touch ups, right after those steps I did the white under-glaze twice and then the clear twice. With many 12 hour work days I finished the glazing portion of the Hot Tub Hula Girl mugs. Now they need to dry completely. Then I will fire them. I'm not sure how many will fit in the kiln at a time so it will take awhile. When they are out of the kiln I still have to paint on all the faces and then bake them in the home oven. I will make one more batch of 30 this summer at $100 each plus shipping. After those are done the price will raise. These are as much work as a custom wish. Cheers, Wendy |
|
T
TikiAno
Posted
posted
on
Wed, Feb 24, 2016 9:23 AM
So. Many. Layers. So. Much. Glaze. Wow, congratulations on finishing glazin' all of these. Can't wait to see them all fired. All of the detail (and, of course, time) you put into each and every piece is astounding. :) |
|
J
JenTiki
Posted
posted
on
Wed, Feb 24, 2016 12:13 PM
Can you put me on the list for the next batch? I'll want a bit of customization too. |
|
H
hang10tiki
Posted
posted
on
Wed, Feb 24, 2016 5:08 PM
Glad u like the video :) |
|
E

ebtiki
Posted
posted
on
Wed, Feb 24, 2016 9:48 PM
Congrats on the 2.5M milestone, Wendy - that one blew by quickly! |
|
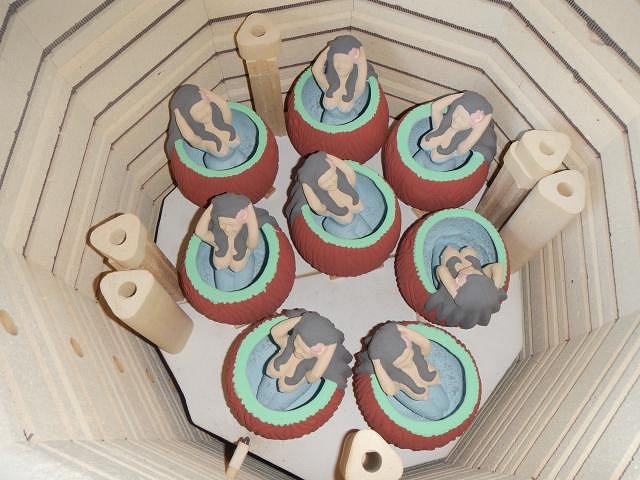
D
danlovestikis
Posted
posted
on
Thu, Feb 25, 2016 8:53 PM
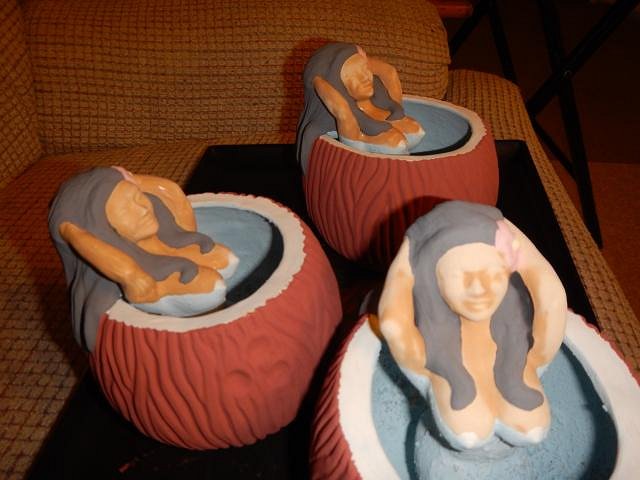
TikiAno it's been a long time since you posted Tiki Ari photos. Don't forget to do that for us. JenTiki Thank you. hang10tiki it's so wonderful that you are able to make a video. It looks very professional. ebtiki thank you, it's fun to know that even when there are no comments the work of posting is worth it. ====================== Wish List #6 update. The Hot Tub Hula Girl mugs are about to get a whole lot hotter. They were dry and ready to fire. First I looked for shelf supports that were tall enough. Then I loaded the bottom shelf with the mugs. I stuck my camera underneath the shelf to check to make sure none of the heads were touching the shelf. Well one of the mugs was taller. Since these are all assembled by me they are all different. So I got little inch thick bricks to raise the shelf. I then loaded the second shelf using the inch thick supports and I put down the third shelf. I checked with a mug and found that I could put in any more mugs. So the total for this load was 16 of the 30. So now I have a shelf that needs something on it before I fire. I need to see if there are any short wishes. Cheers, Wendy |
|
H
hang10tiki
Posted
posted
on
Fri, Feb 26, 2016 6:55 AM
Put Grog on the top shelf :lol: |
|
D
danlovestikis
Posted
posted
on
Fri, Feb 26, 2016 8:25 AM
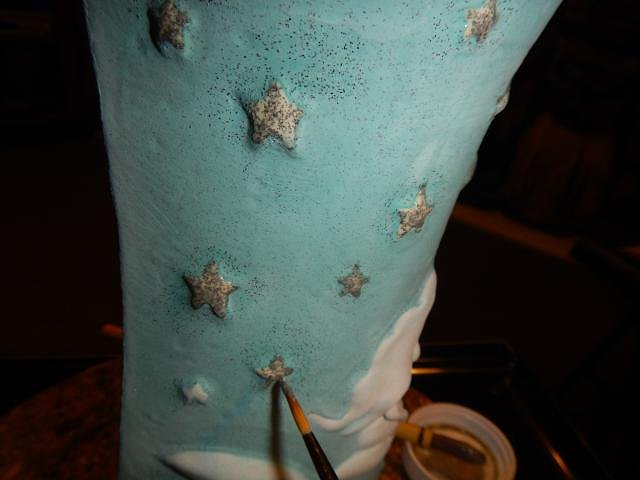
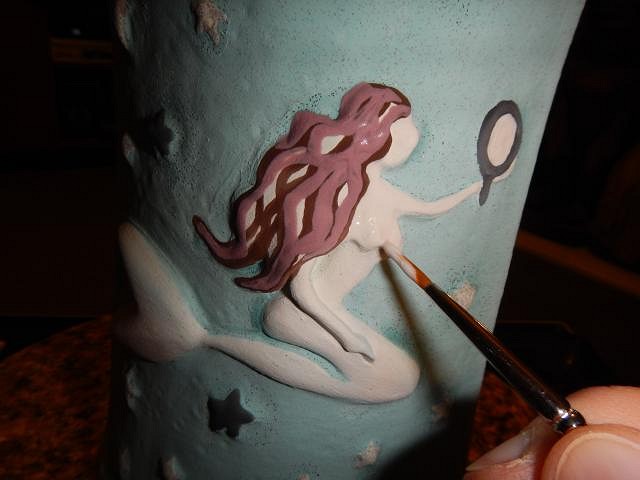
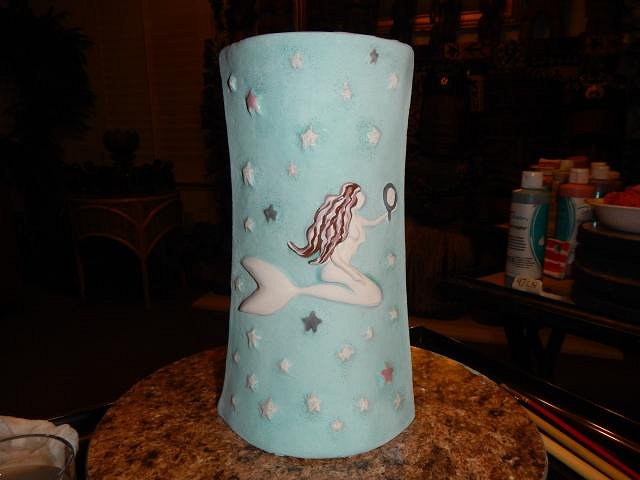
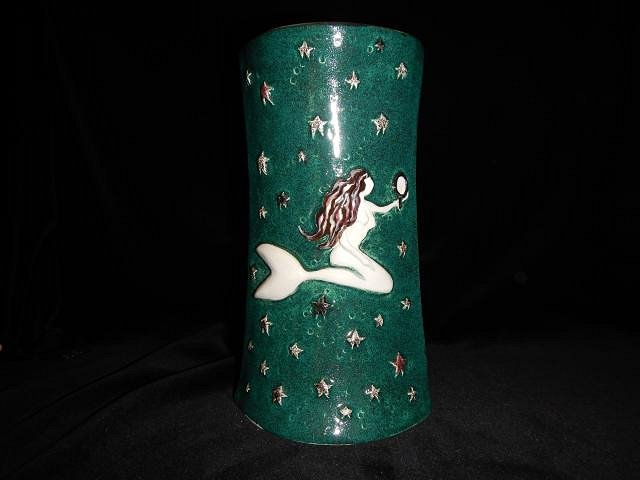
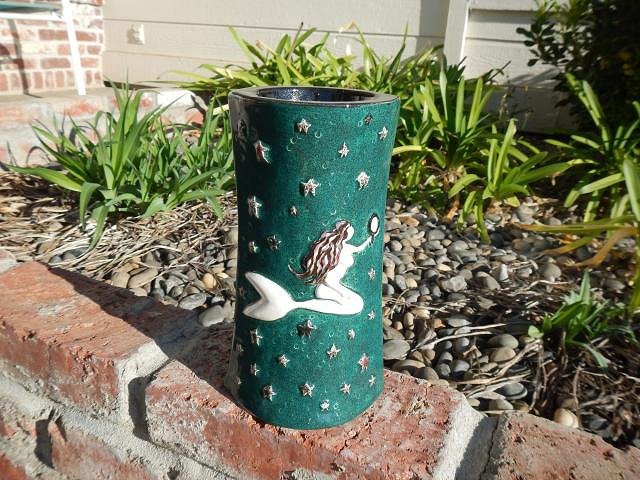
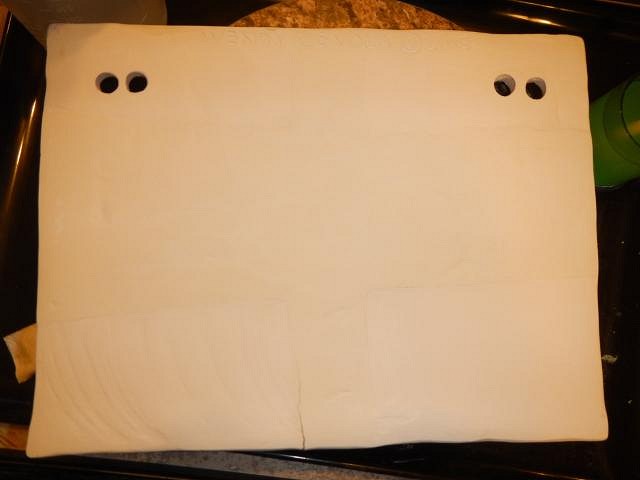
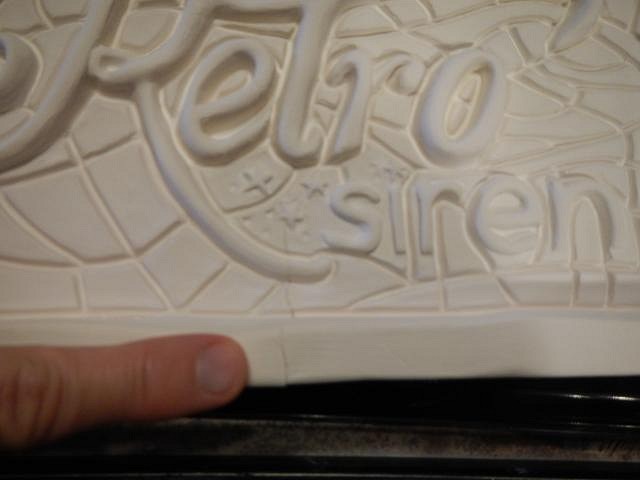
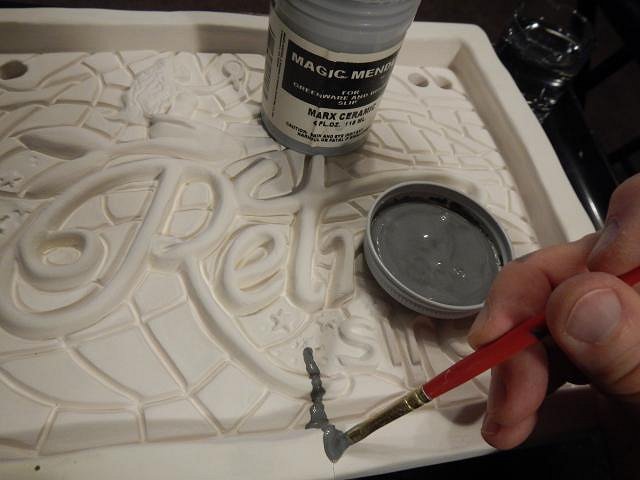
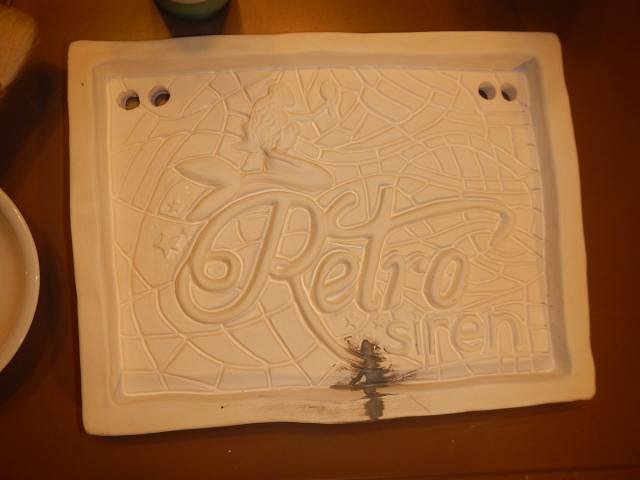
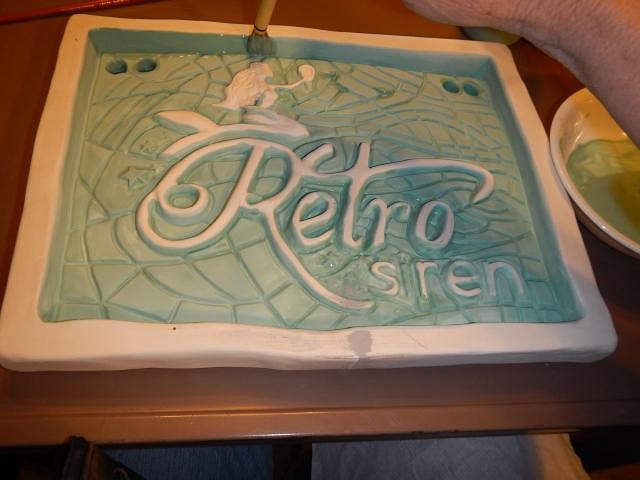
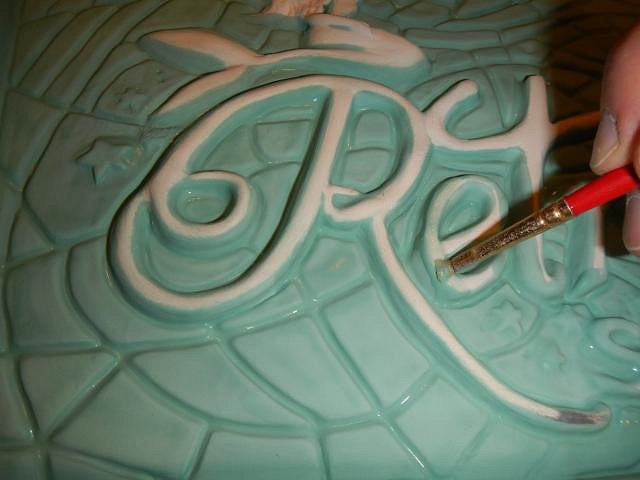
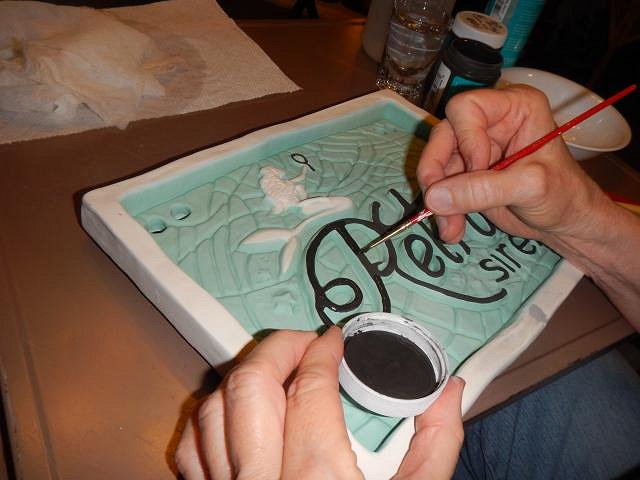
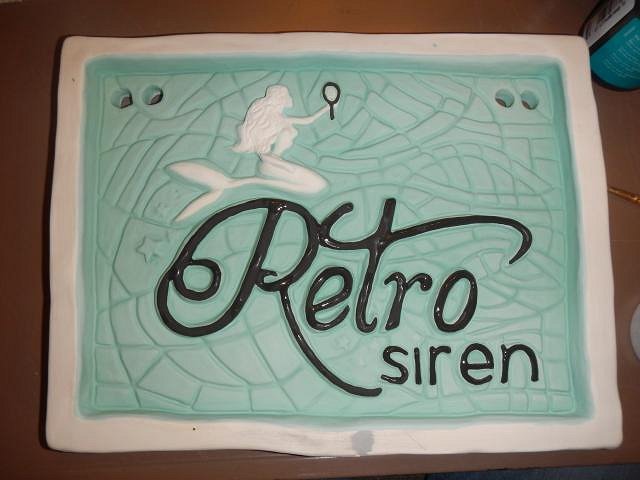
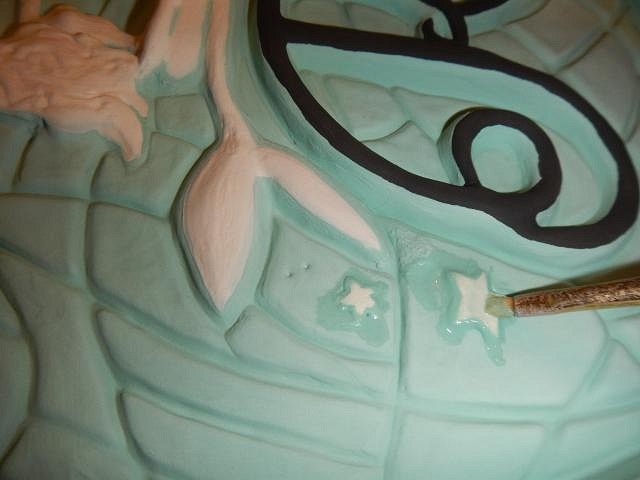
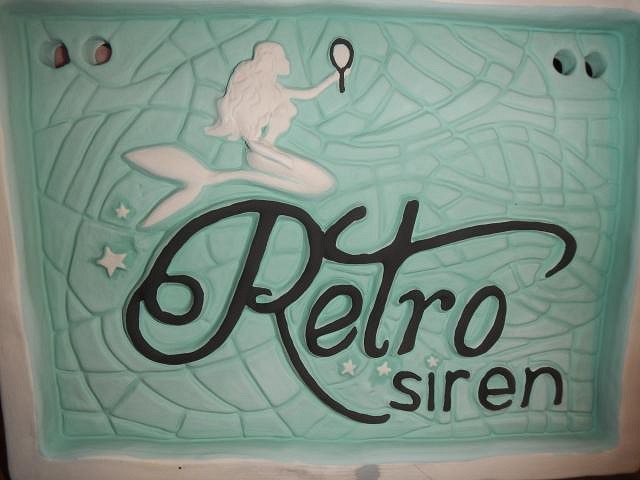
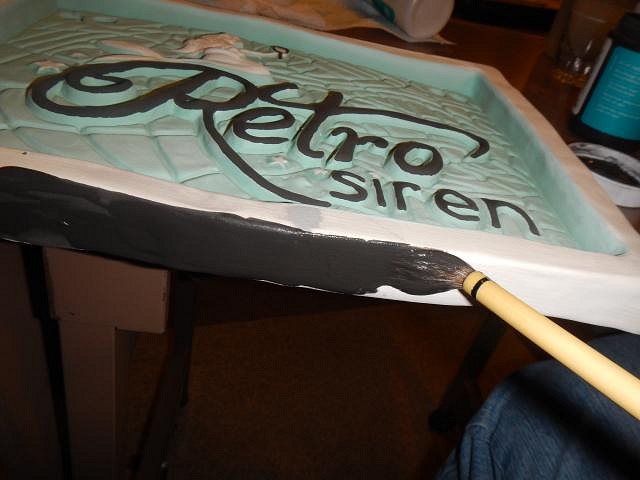
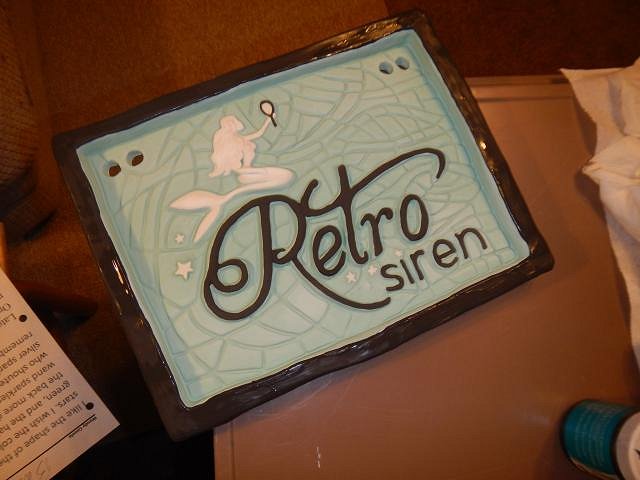
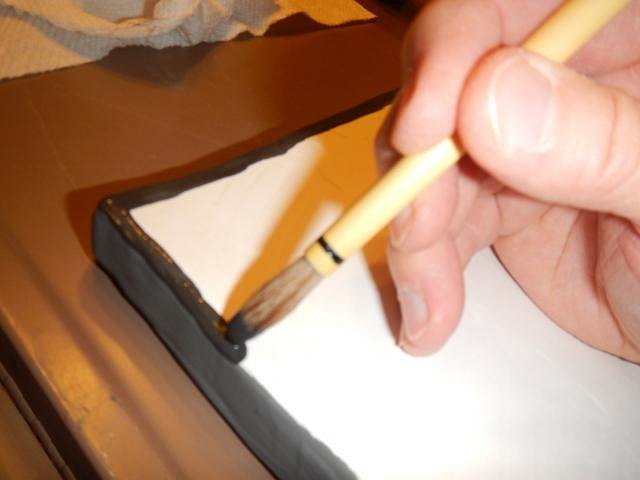
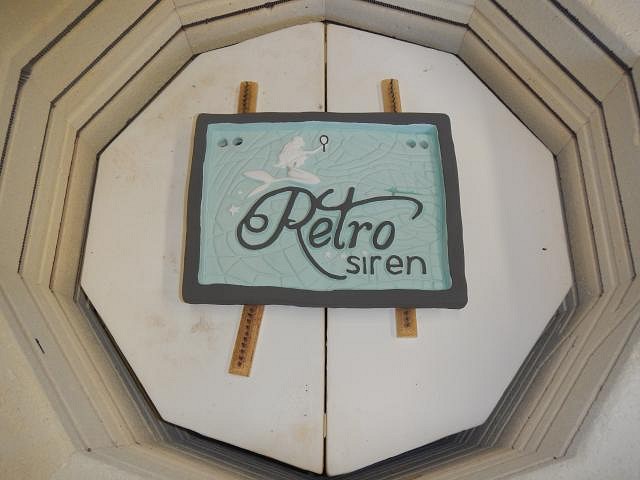
hang10tiki that made me shiver! =================== Wish List #6 progress report. I found the perfect piece to go on the top shelf for this firing of the Hot Tub Hula Girls. Barbara Lawrence ordered a mug, which I'm still going to tweak. She mentioned she was going to do a mosaic sign for her new business. I asked if I could do an experiment in making the sign in one piece. It would in the end look like a mosaic when I added grout. I didn't have any good clay, it had hardened in the bag. So I cut slabs and sealed them together. That experiment was great because I had a separation between two of the slabs. You can see it from the front. So to hide this I used Magic Mend. Thank you MadDogMike for this wonderful product. I let it dry overnight. The next day I sanded it and removed the dust (I hope) and then did the first layer of glaze. Drying between them I did the 2nd and 3rd layers of glaze. Now I used a stiff brush with water to remove glaze from the top of the letters. She requested a metallic glaze for the letters and mirror. Done. Then I glazed the mermaid all in white. Then I cleaned off the aqua glaze on the stars and glazed them in white. I decided to do the frame in the same metallic glaze to keep it cohesive. Done. The next day I did a boarder around the back so that from the side, when hung, there wouldn't be any white showing. The into the kiln. I didn't have any more short pieces to add. When this is done I will be using enamel to add detail to the mermaid and the stars. The load is firing!!! Wendy |
|
H
hang10tiki
Posted
posted
on
Fri, Feb 26, 2016 7:29 PM
Lot o work on the Kool sign |
|
D
danlovestikis
Posted
posted
on
Sat, Feb 27, 2016 8:42 AM
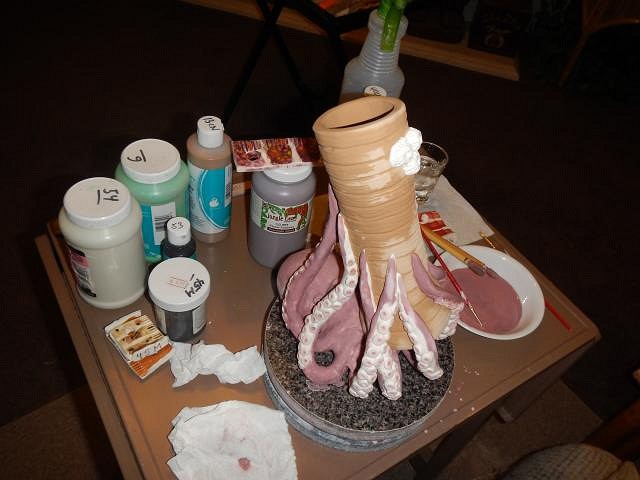
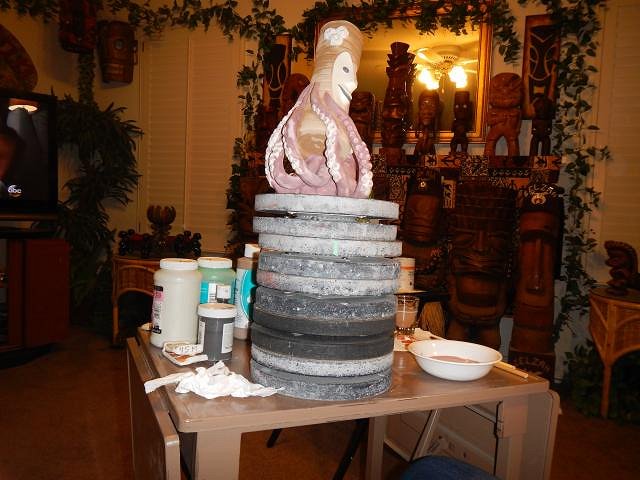
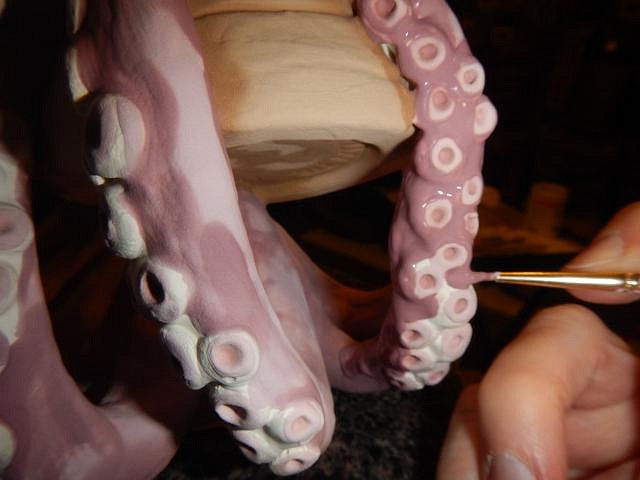
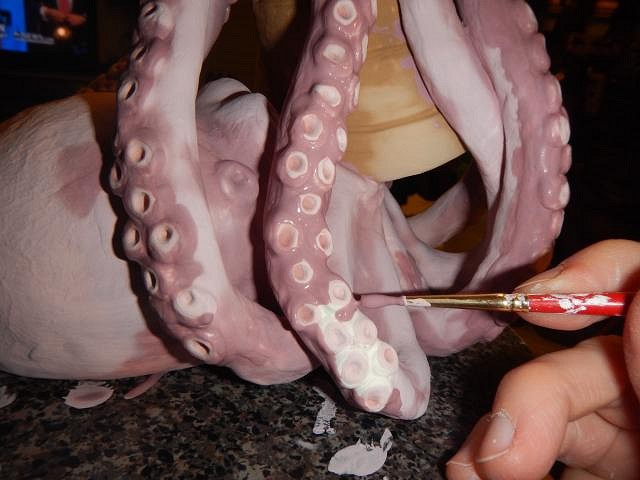
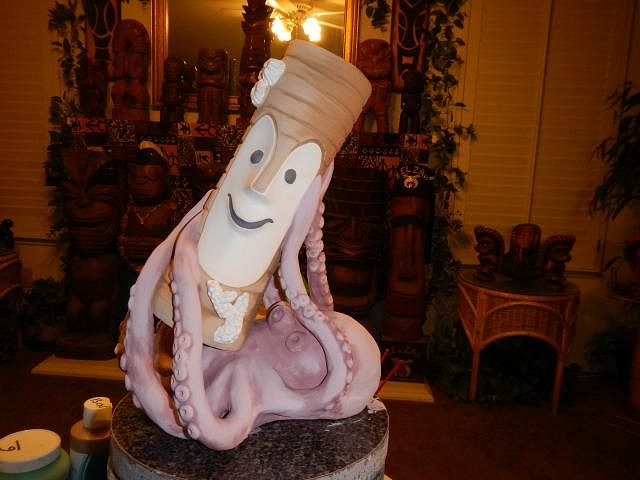
hang10tiki the sign is a lot of work but I think every piece I make is a lot of work. Keeps me out of trouble. I like your rhymes. ==================== Wish List #6 update. I've started to glaze lunavideogames octopus who grabbed a Tiki Bob mug. I was able to find glazes that worked well with each other. I first glazed the inside of Tiki Bob with a CN glaze. Then I used the same one on the outside. It is called Bright Ginger and is a favorite color of mine. This mug is crazy with so many nooks and crannies. It also has many tight areas that are hard to reach. Next I did the insides of each of the suckers one at a time. This was the easiest step but there were many of them. Next I started on the octopus. I did all the flat surfaces of the octopus first and did one layer all over him. I just bought a sturdy metal typewriter table. It's strong enough that I can stack my turntables so that I can glaze at eye level and save my back and neck. Now I started around each of the suckers. I used a tiny brush for this step. One layer down and two layers to go and then the rest of the "parts". On Tiki Bob he's supposed to look old so he just gets some of the second and third layers placed here and there. Cheers, Wendy |
|
H
hang10tiki
Posted
posted
on
Sat, Feb 27, 2016 10:05 AM
OMGW- that's awesome |


Pages: 1 2 3 4 5 6 7 8 9 10 11 12 13 14 15 16 17 18 19 20 21 22 23 24 25 26 27 28 29 30 31 32 33 34 35 36 37 38 39 40 41 42 43 44 45 46 47 48 49 50 51 52 53 54 55 56 57 58 59 60 61 62 63 64 65 66 67 68 69 70 71 72 73 74 75 76 77 78 79 80 81 82 83 84 85 86 87 88 89 90 91 92 93 94 95 96 97 98 99 100 101 102 103 104 105 106 107 108 109 110 111 112 113 114 115 116 117 118 119 120 121 122 123 124 125 126 127 128 129 130 131 132 133 134 135 136 137 138 139 140 141 142 143 144 145 146 147 148 149 150 151 152 153 154 155 156 157 158 159 160 161 162 163 164 165 166 167 168 169 170 171 172 173 174 175 176 177 178 179 180 181 182 183 184 185 186 187 188 189 190 191 192 193 194 195 196 197 198 199 200 201 202 203 204 205 206 207 208 209 210 211 212 213 214 215 216 217 218 219 220 221 222 223 224 225 226 10816 replies