Pages: 1 2 3 4 5 6 7 8 9 10 11 12 13 14 15 16 17 18 19 20 21 22 23 24 25 26 27 28 29 30 31 32 33 34 35 36 37 38 39 40 41 42 43 44 45 46 47 48 49 50 51 52 53 54 55 56 57 58 59 60 61 62 63 64 65 66 67 68 69 70 71 72 73 74 75 76 77 78 79 80 81 82 83 84 85 86 87 88 89 90 91 92 93 94 95 96 97 98 99 100 101 102 103 104 105 106 107 108 109 110 111 112 113 114 115 116 117 118 119 120 121 122 123 124 125 126 127 128 129 130 131 132 133 134 135 136 137 138 139 140 141 142 143 144 145 146 147 148 149 150 151 152 153 154 155 156 157 158 159 160 161 162 163 164 165 166 167 168 169 170 171 172 173 174 175 176 177 178 179 180 181 182 183 184 185 186 187 188 189 190 191 192 193 194 195 196 197 198 199 200 201 202 203 204 205 206 207 208 209 210 211 212 213 214 215 216 217 218 219 220 221 222 223 224 225 226 10,816 replies
|
V

VampiressRN
Posted
posted
on
Fri, Sep 23, 2011 1:37 PM
Wow...those are awesome...can't wait to see the bowl. Those birds are gorgeous...they sure like Dan. |
|
D

danlovestikis
Posted
posted
on
Sun, Sep 25, 2011 6:35 PM
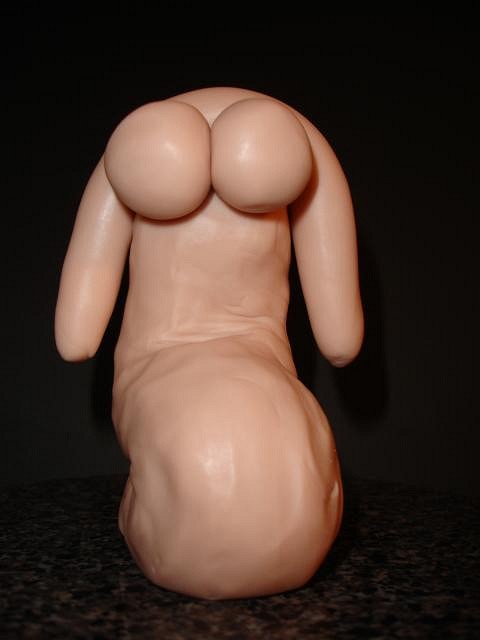
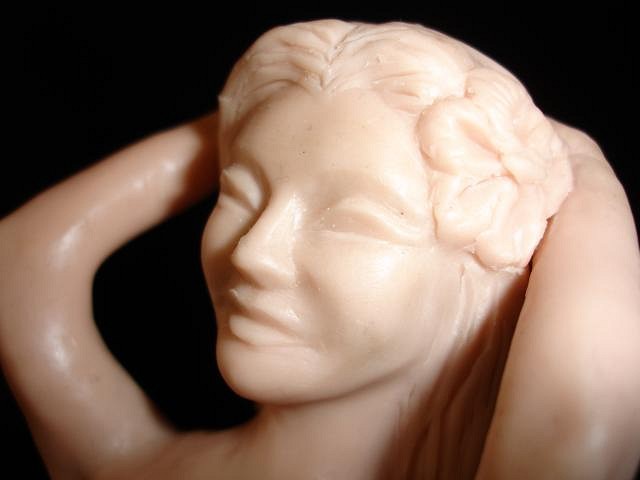
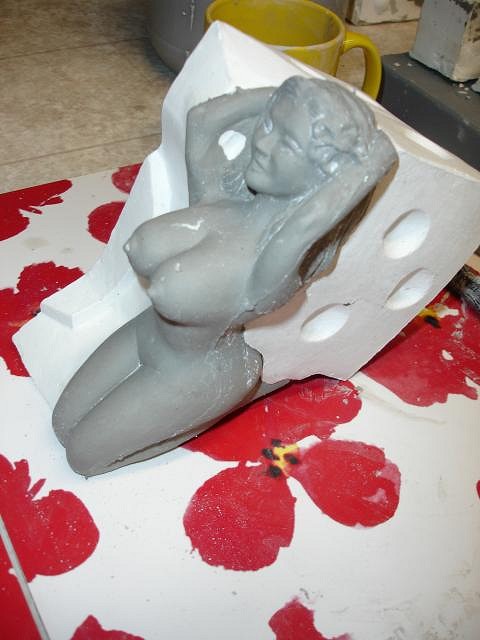
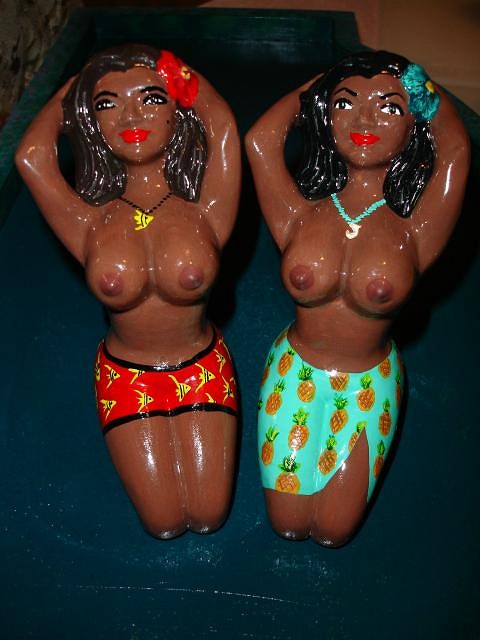
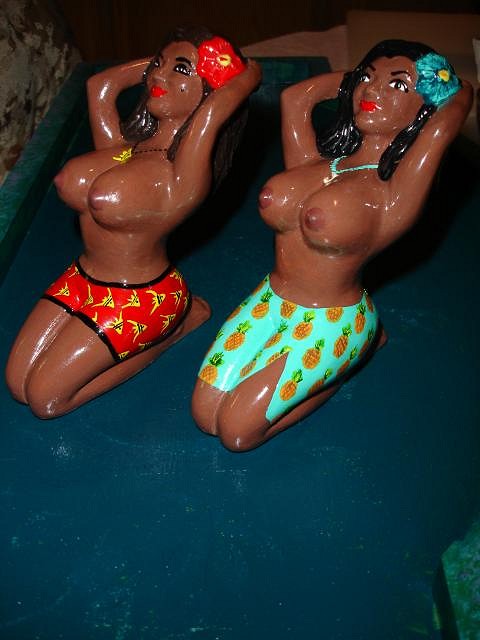
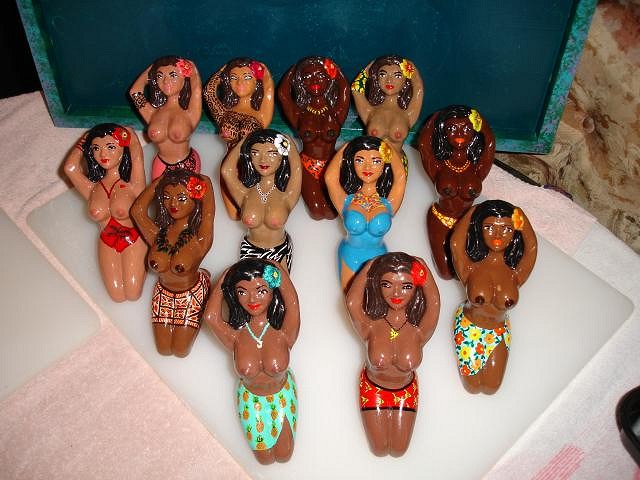
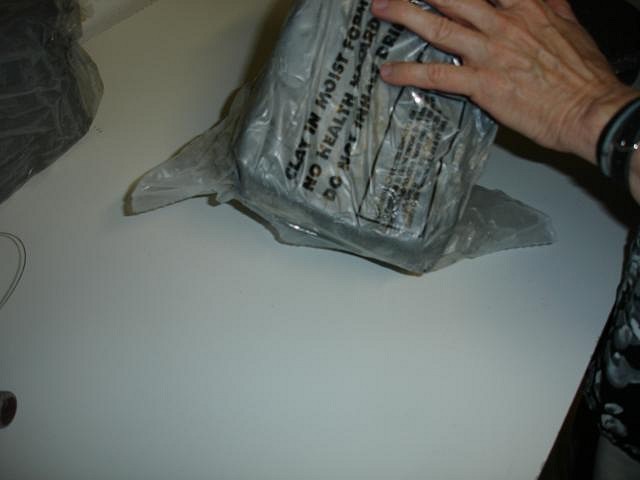
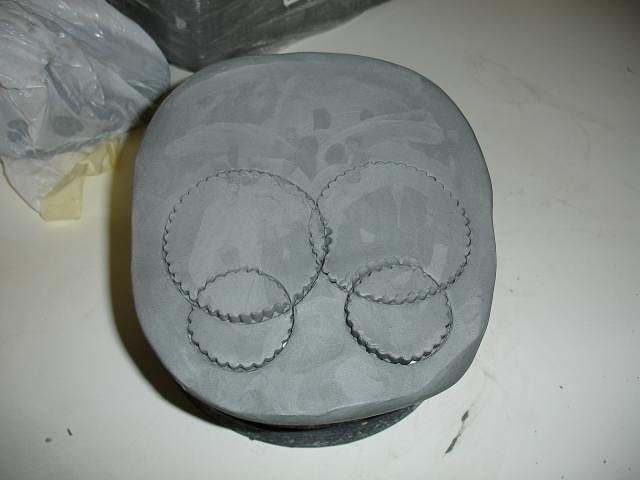
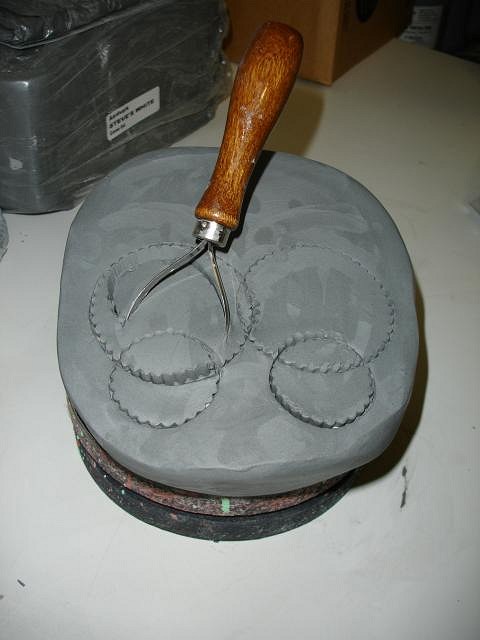
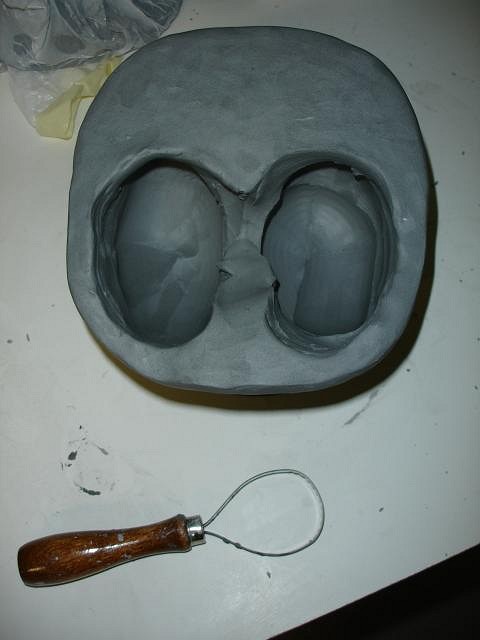
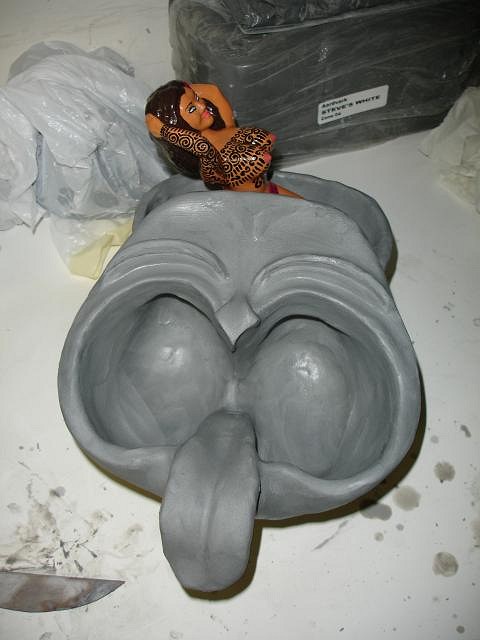
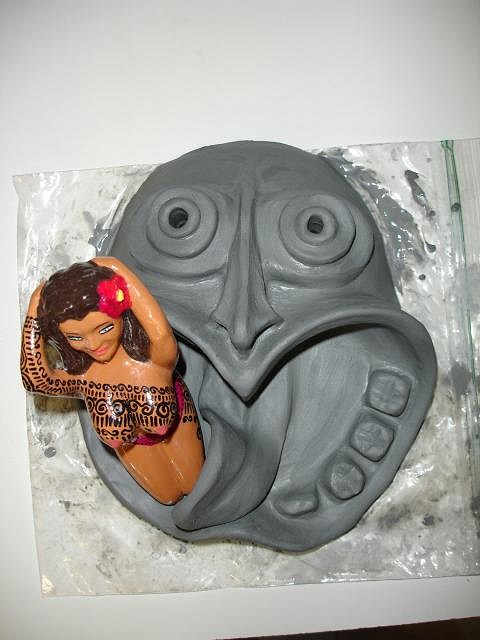
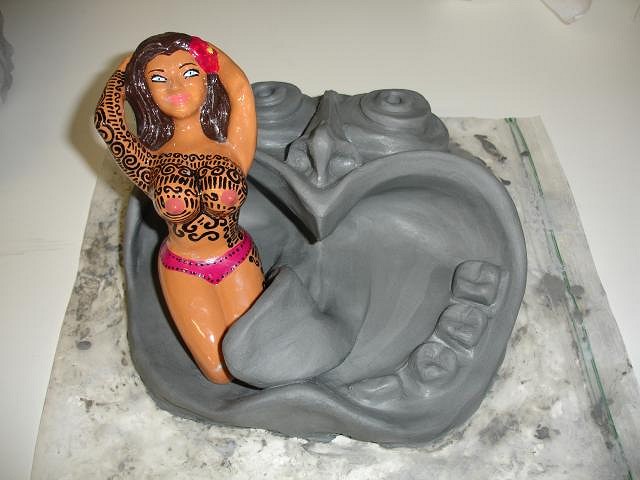
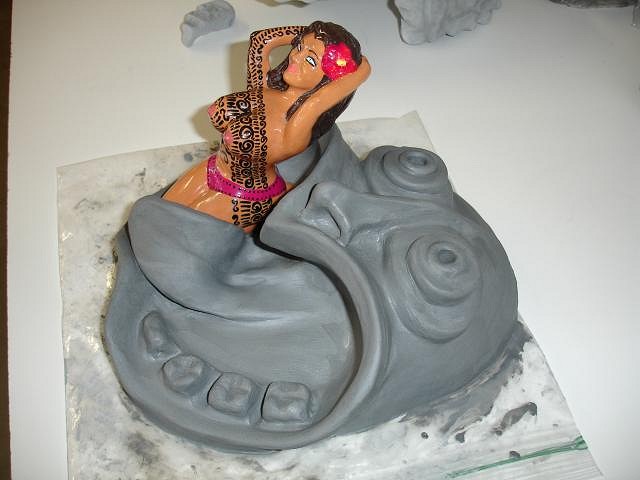
Hi Vamp, everyone loves Dan! We wish those birds were all ours. Too much work. Well I've finished all 12 woman. Here's a quick recap of how she came to be. I did the sculpt in Sculpey clay.
Finished the sculpture of the face in the clay. Ready to mold.
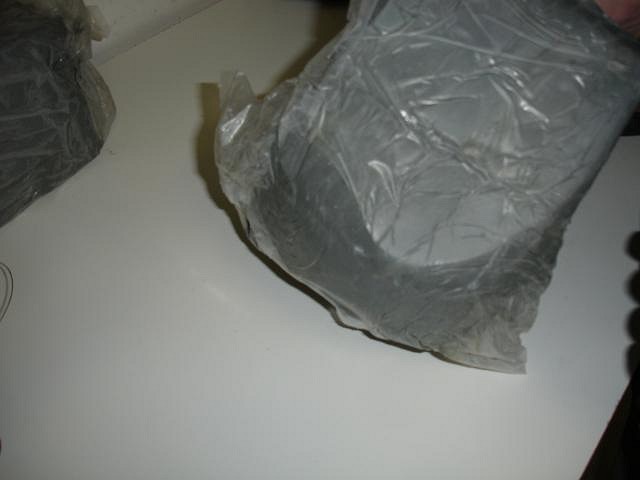
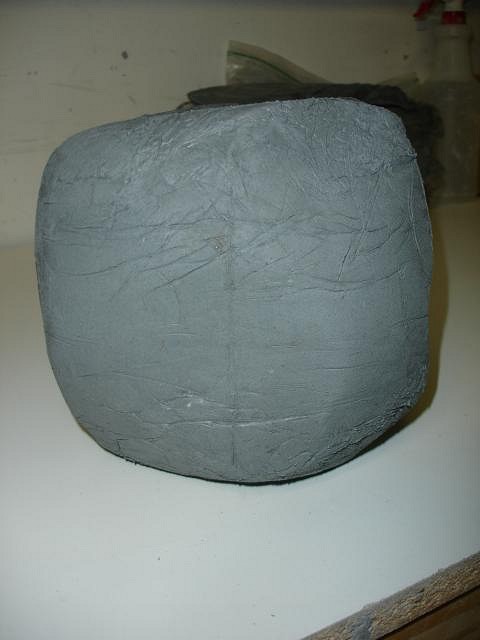
Coming out of the mold.
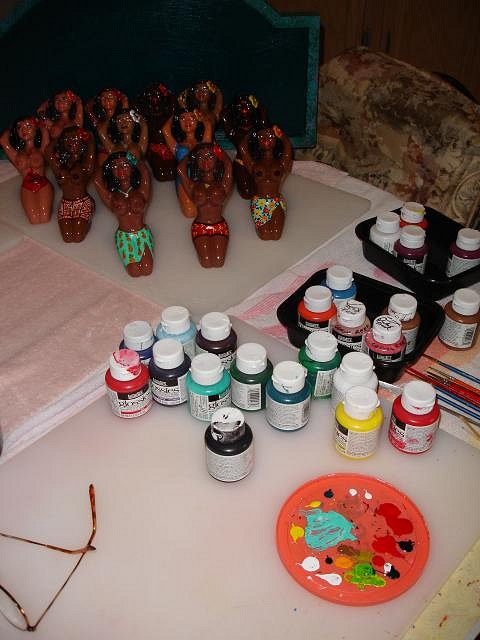
Going back to other pages you will see how I broke many when sanding them. Then some blew up in the oven. 12 survived and now I've painted them.
Fish and pineapples!
Next I'll be baking them to set the cold paint. Then I'll work on the bowls to go with them. Lots more work to be done. Cheers, Wendy [ Edited by: danlovestikis 2011-09-26 15:48 ] |
|
M

MadDogMike
Posted
posted
on
Sun, Sep 25, 2011 7:13 PM
Another great pair Wendy! Excited to see the bowls that go with them. My local Michael's didn't carry Liquitex Glossies so I picked up some Pebeo Porcelaine 150 for my mosaic repair. It's a bake-on too, I'll let you know how it works out. |
|
T

tigertail777
Posted
posted
on
Sun, Sep 25, 2011 11:39 PM
Wonderful Wendy! Can you tell me what kind of "cold paint" you are using, and how it works (you bake it on??? really?) would that stuff work on metals? I have a friend that wants me to paint tiger stripes on his orange bike frame and I can't find anything that sticks. You know, much as I have worked with sculpey I never came to the realization that you could make mold castings out of a piece made from it. Of course the number of molds I have mad can be counted on one hand...so I am not terribly familiar with how that whole process works. The main thing I have made a mold for was a latex mask, and the quick set plaster was nerve wracking to work with: that stuff had all kinds of huge warnings on the bag about how it could burn your skin if it came in contact...I was so terrified even with a mask that I was going to inhale some I held my breath the whole time I poured it. Good thing too: the stuff melted my original clay sculpt, I had to scrape it out. Can't wait to see how the women look with the bowls, those are just going to be stunning!:) |
|
S

swizzle
Posted
posted
on
Mon, Sep 26, 2011 12:53 AM
The hand painted details you have added to all the girls look fantastic Wendy. I'd be hard pressed to pick a favourite, but i really like these last two with the fish and pineapples. |
|
D
danlovestikis
Posted
posted
on
Mon, Sep 26, 2011 8:43 AM
Hi Swizzle, thank you. I haven't picked a favorite myself. tigertail777, when I started doing ceramics every thing I made was shipped to Gecko in Hawaii. Because of that I sculpted in Sculpey and baked it hard before it went into the mail. It's much better to use sculpture clay. Now that we do it all sculpture to finished product I use Roma Plastilina number 4 clay. This way I can change it at any time if there are undercuts. You can still make multiple molds. When your project is done you can reuse the clay. Right now I'm using the clay from the crawl decanter to make a new mug. You need some masks to wear. When you pour the plaster out of the bag or mix in the water there are particles too small to see. They stay in the air a long time. When you inhale them they harden in your moist lungs. Over time you will destroy your lungs. It's the same problem with the slip and clay. When it dries and becomes dust or you sand your work you are breathing a toxic substance. We wear masks all the time and after a day of working Dan while continuing to wear masks he mops the garage floors while I wipe down all the table tops with wet paper towels that I throw away. If you don't start good habits now you will have a very bad old age. The cold paint I use is Liquitex glossies. I buy them on line from Dick Blick on-line because I've not found an art store that sells them. Michael's used to but stopped in my area. It is a wonderful product and has the same colors as old vintage mugs. I can use them straight out of the bottle or mix them into colors to repair nicks and chips. The best filler is Elmer's Carpenter's Wood Filler. Over fill and then sand when completely dry. Paint and bake. The glossies says it will work on primed metal. The instructions for ceramics are to clean with alcohol before painting. It doesn't say if that works for metal. Since you can't put the bike in an oven you could use a heat lamp or leave it in the sun. Hot water will make it come back off of ceramics so you don't put it on objects for the dishwasher and I wouldn't submerge them in any water just in case. They are not to come in contact with food or drink. Maybe primed metal is sanded metal to make it a bit rough. Maybe customized bike posts on-line could lead you to someone who would know best. Good Luck and post photos if you do it. Cheers, Wendy |
|
Z

zerostreet
Posted
posted
on
Mon, Sep 26, 2011 8:55 AM
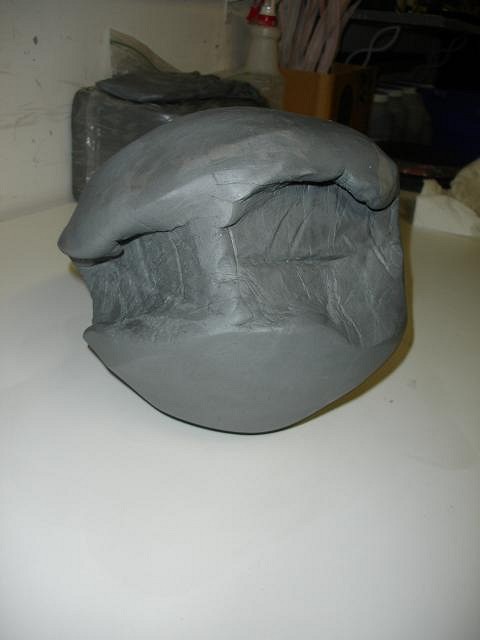
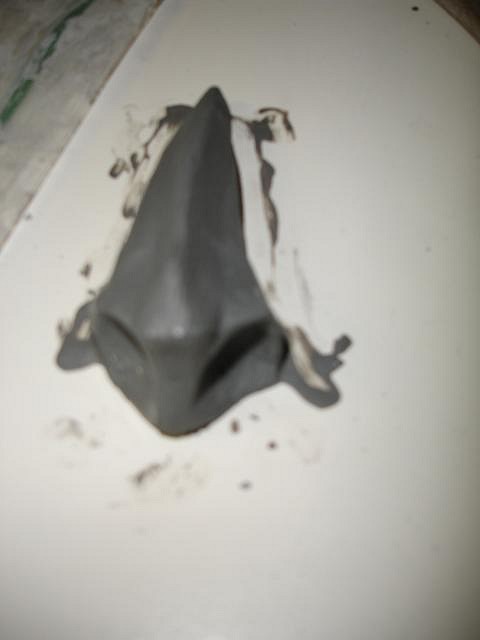
These are great! Love that close up of the unpainted face, great job! |
|
D
danlovestikis
Posted
posted
on
Mon, Sep 26, 2011 6:49 PM
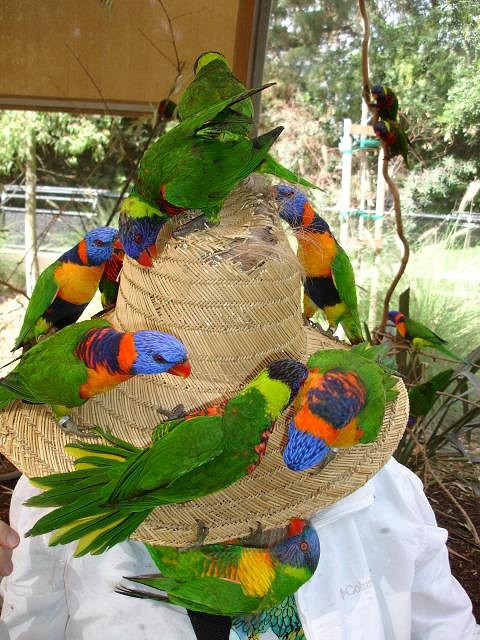
Thanks zerostreet, I like that photo too. Today it was my turn to wear the hat that the Lorakeets love to chew. There's not much left so they had fun pulling my hair out the top. Here are my two favorite photos from today. Wendy
|
|
V
VampiressRN
Posted
posted
on
Mon, Sep 26, 2011 7:37 PM
Great pictures...those birds are so beautiful...where do you go to see them? |
|
LLT

little lost tiki
Posted
posted
on
Tue, Sep 27, 2011 11:26 AM
Such sweet pictures! |
|
T
tigertail777
Posted
posted
on
Tue, Sep 27, 2011 6:45 PM
Thanks for the advice there Wendy... good lord I had no idea this stuff was so ridiculously dangerous to work with. I am not touching any of what is left till I get a proper mask I don't need my asthma to get any worse. :o And as for your photo... the following lyrics went through my head when I saw that: Our show is delightful we hope you'll agree |
|
D
danlovestikis
Posted
posted
on
Wed, Sep 28, 2011 9:45 AM
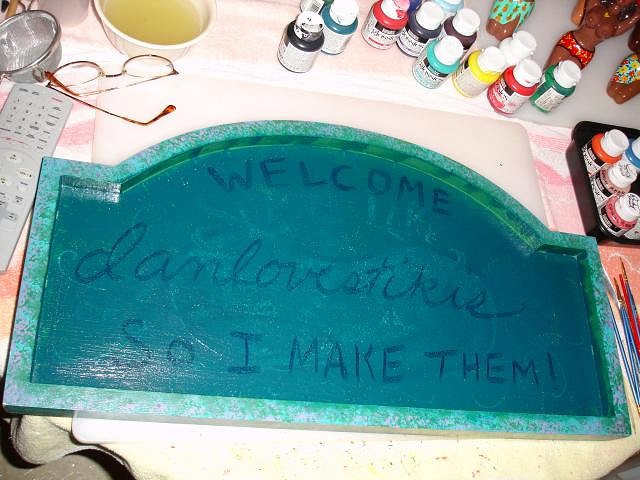
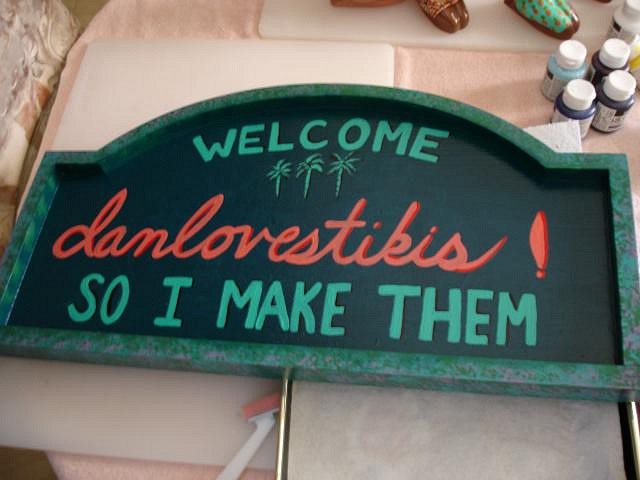
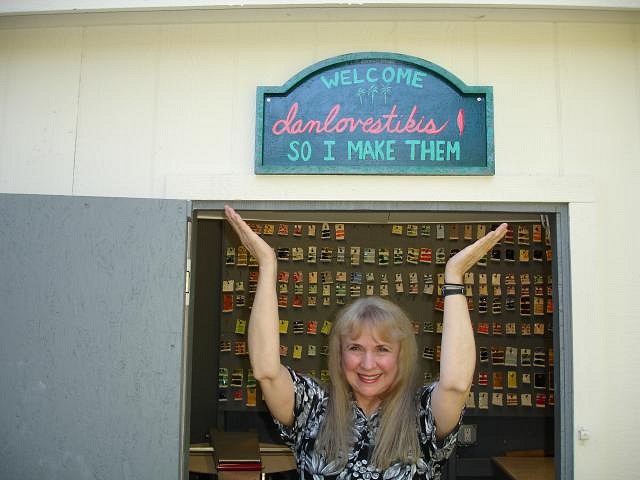
VampiressRN got a long PM from me days ago. little lost tiki, it always brings me joy when you stop by. We all love you, Wendy tigertail777, it is very important to be safe I'm glad I could head you in the right direction. I saw a decorative plaque at the Cancer Society store and thought I could change it to decorate my kiln shed. Here's what I did. Cheers, Wendy
|
|
M
MadDogMike
Posted
posted
on
Wed, Sep 28, 2011 10:26 AM
Nice sign Wendy (beautiful picture of you too) Your ceramics studio is cleaner than my kitchen!!! :D |
|
Q

Q-tiki
Posted
posted
on
Wed, Sep 28, 2011 2:20 PM
Wow! What an amazing thread. Kudos to you for such selfless sharing of your trials, tribulations and subsequent knowledge gained during the last year. :) Your work is simply beautiful. Cheers to you! |
|
V
VampiressRN
Posted
posted
on
Wed, Sep 28, 2011 2:48 PM
That sign says it all!!! Good addition. |
|
B

Beachbumz
Posted
posted
on
Wed, Sep 28, 2011 9:54 PM
Awesome Wendy.. Looks Great! Now lets see those bowls.. :wink: aloha |
|
D
danlovestikis
Posted
posted
on
Thu, Sep 29, 2011 8:55 AM
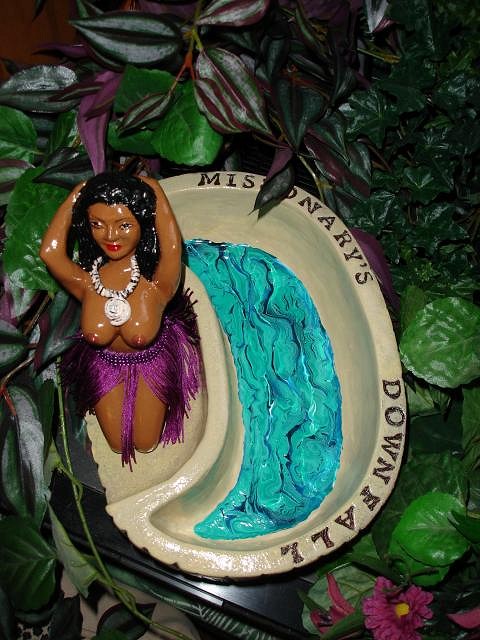
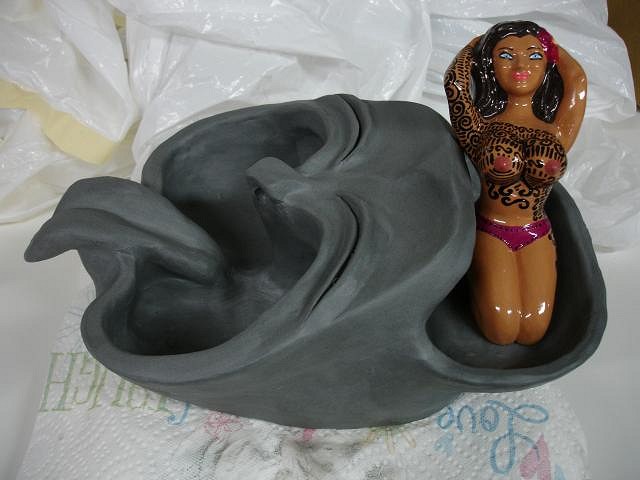
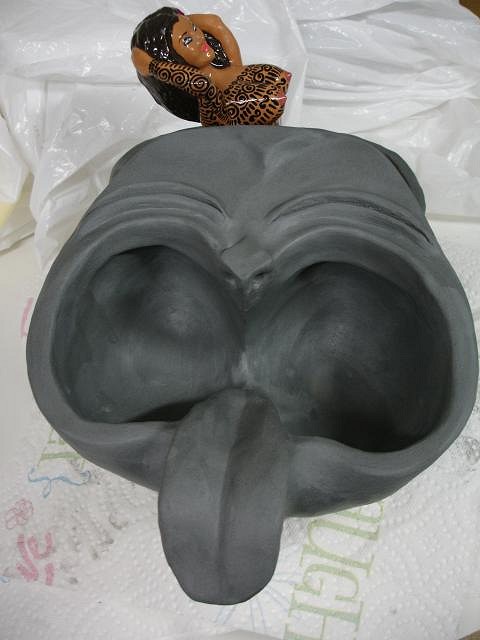
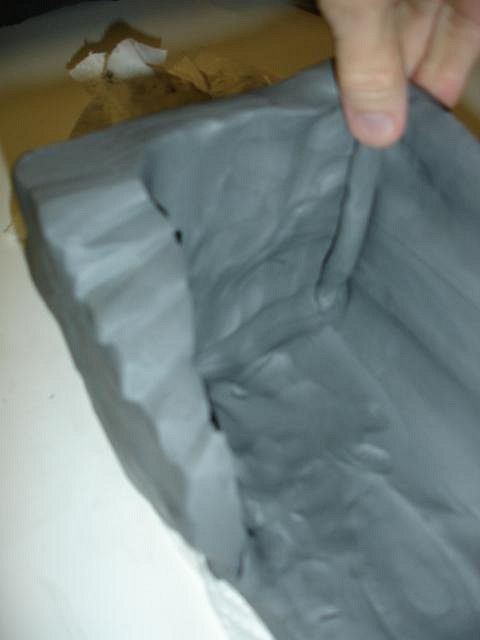
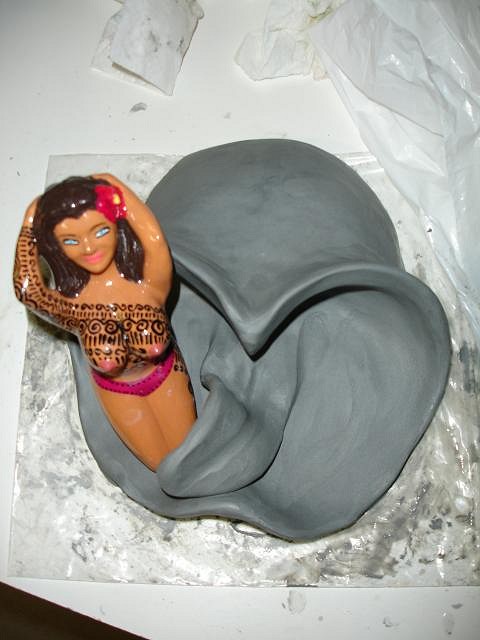
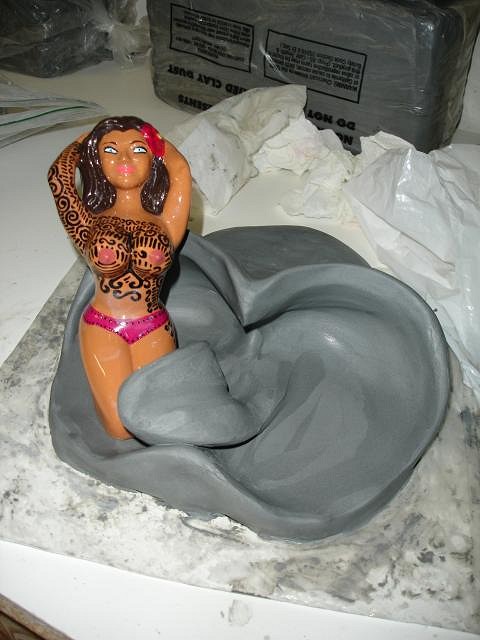
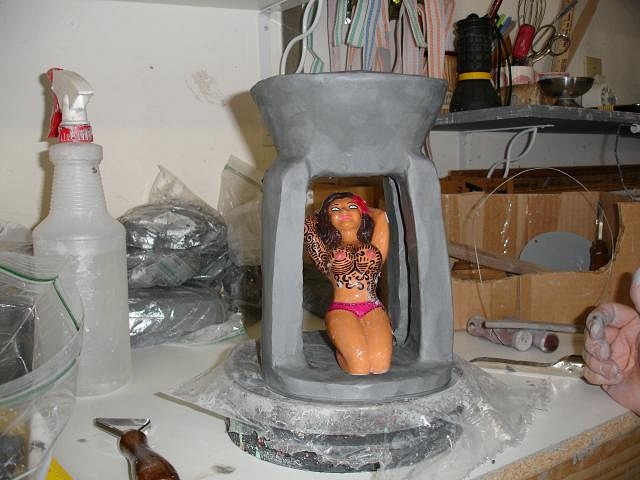
Hi Q-tiki, thank you and welcome to my thread. All of my art photos are on my Gallery Thread. Wendy in the title and danlovestikis as the author. Hi Vamp, thank you. I did the sign for our Sacramento Crawl next week. Hey Mike you always make my day. Ok, here goes. The first bowl I've made went to Gecko in Hawaii. He's eventually going to make the set in red dirt to look like Treasure Craft. I'm doing the version with the hand painted women and different bowls. I'll be experimenting with different styles. This is the bowl that went to Gecko.
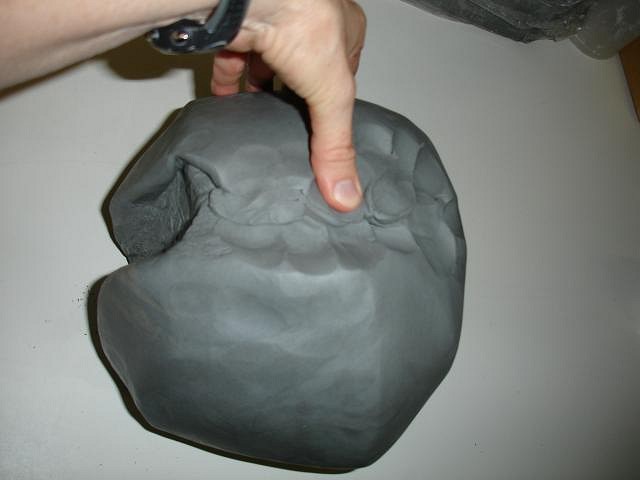
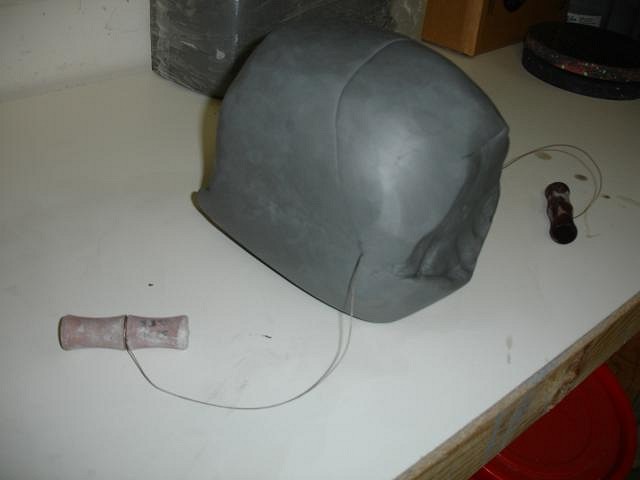
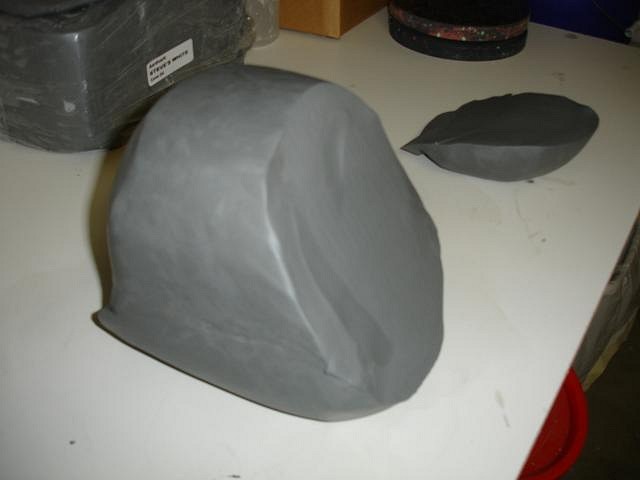
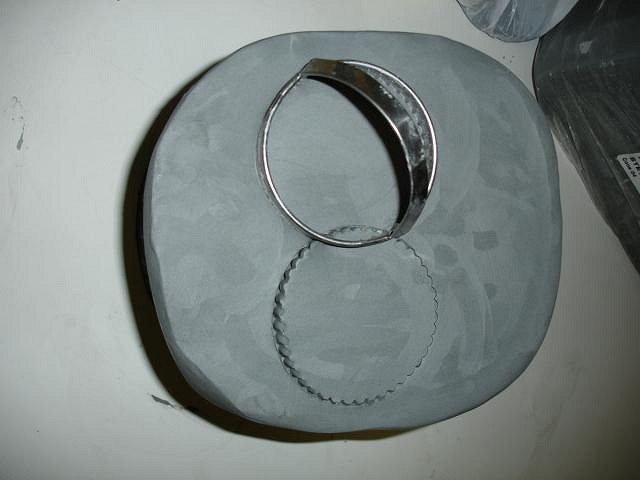
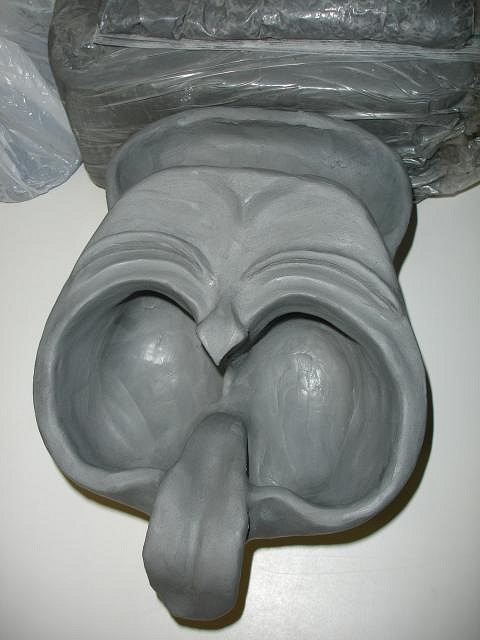
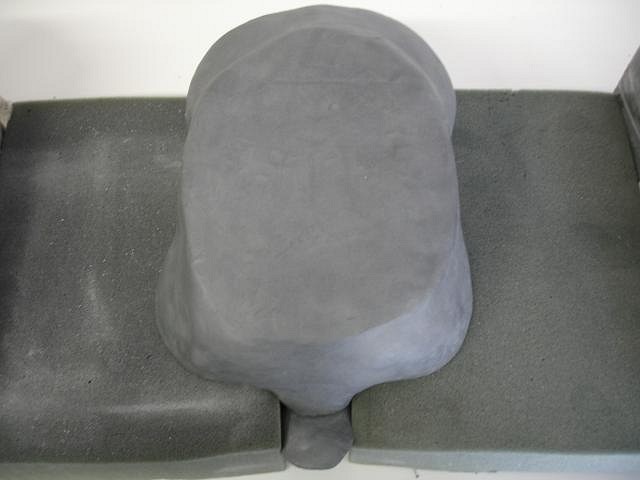
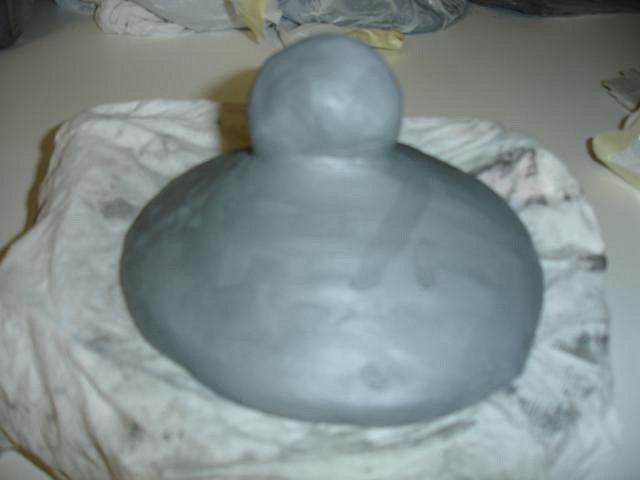
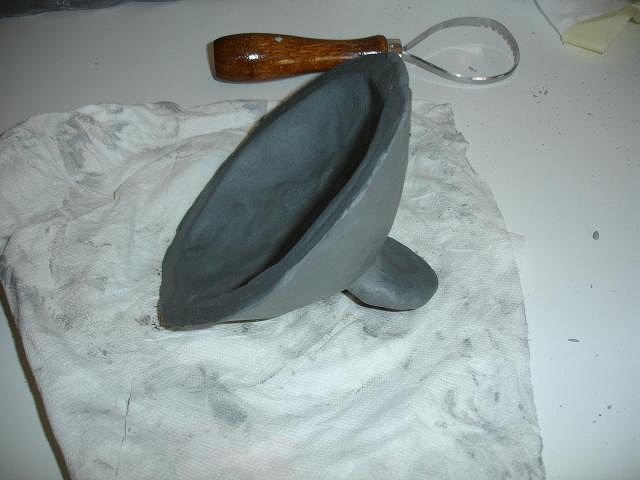
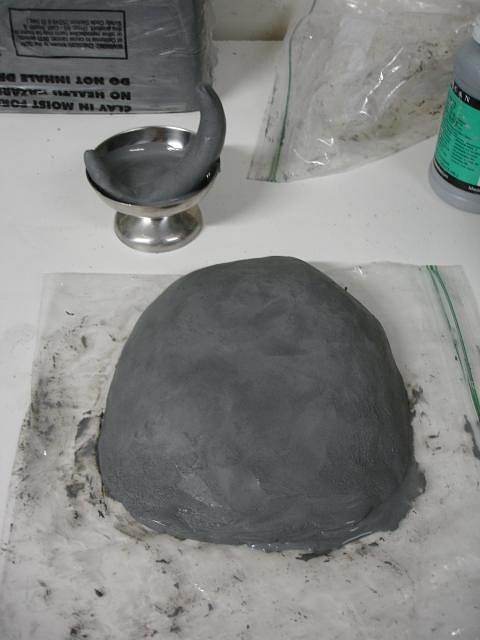
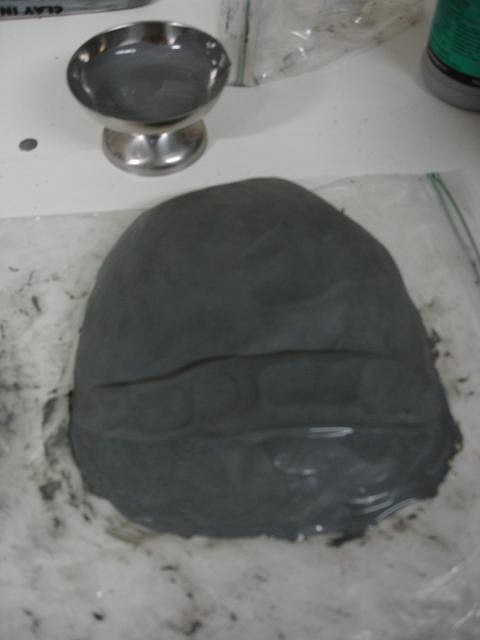
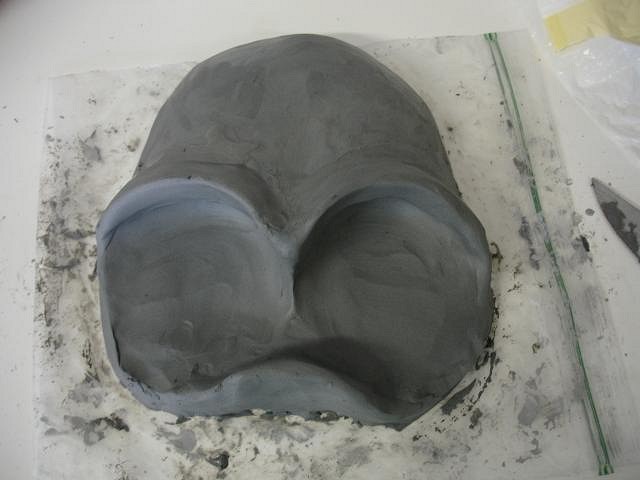
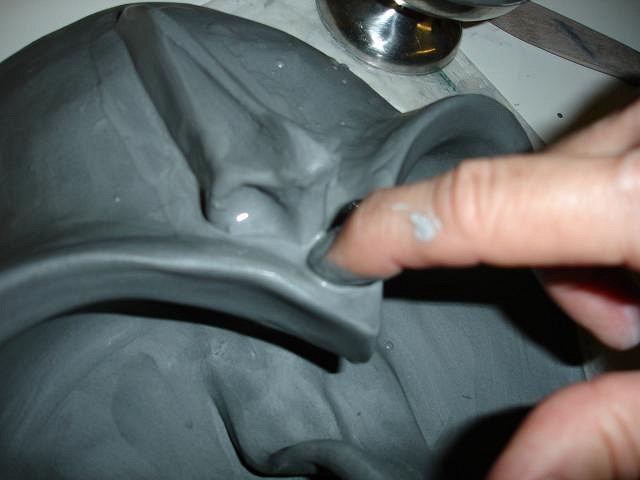
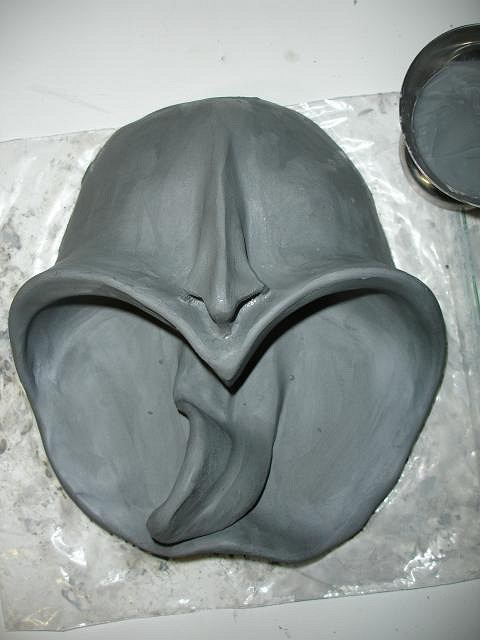
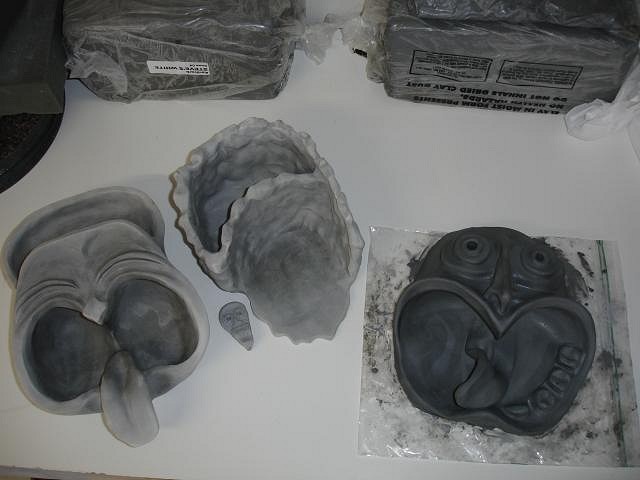
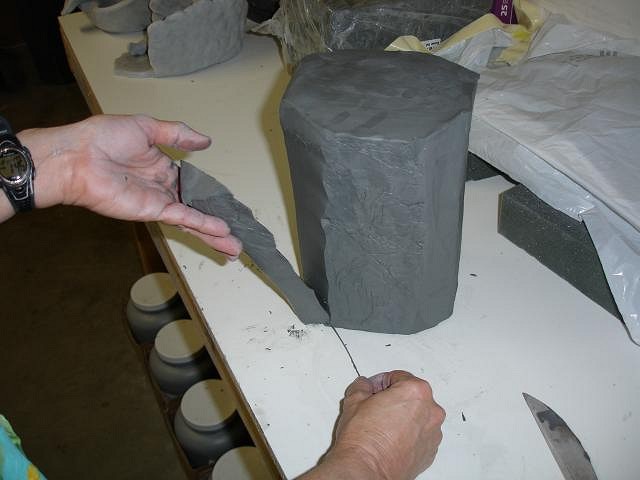
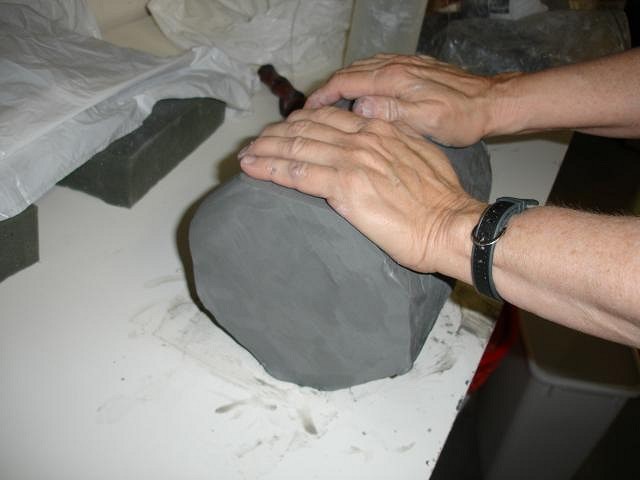
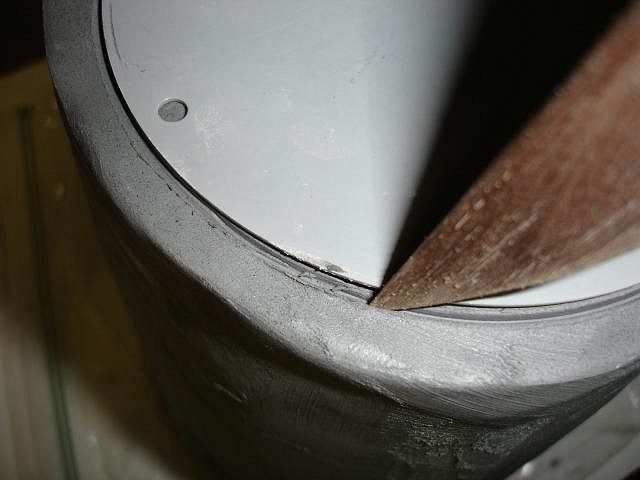
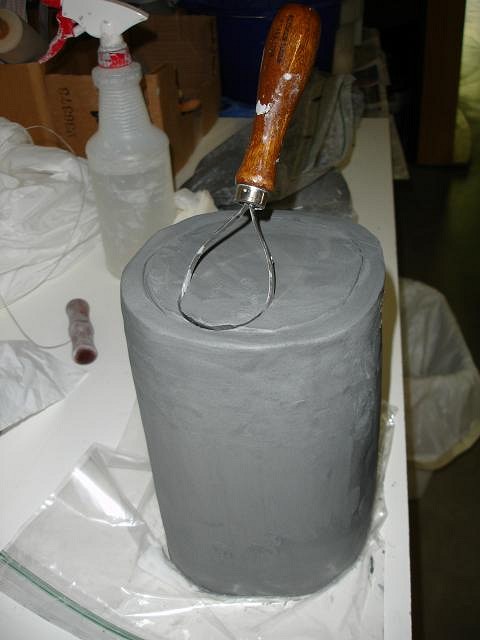
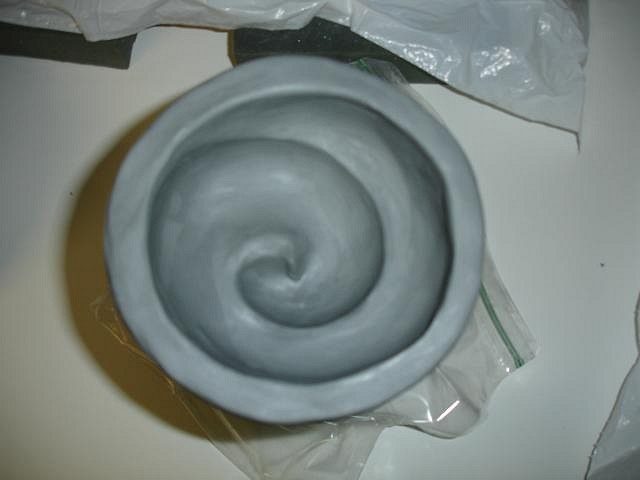
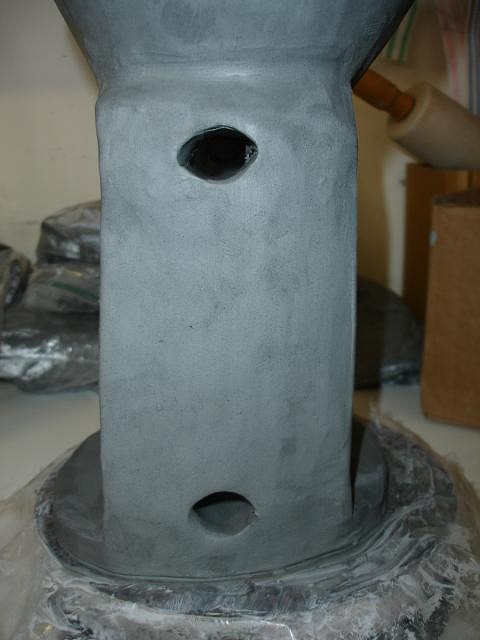
#1 Step by Step A bag of clay is as air pocket free as you can hope for. So I did not kneed it. I started by dropping the bag on its corners to round it. I did it to each corner. Bag removed. Next I rotated it on the table to further round it. Using my thumb I pressed the clay forward and into these areas. I was extremely careful to not introduce air pockets. I don't want explosions in my kiln. Using a wire I cut the angle for the bottom. I set the removed clay into a bag to keep it from drying out. I picked this up and flipped it over and onto a rotating wheel. I can't recall what they are called but you can see it at the top right of the screen. I had an idea of how large I wanted the mouth so I used these potters cookie cutters to map it out. There are different sizes. They actually started the first cuts into the clay. Using another cutting tool I began to scoop out the clay I needed removed. The basic mouth is carved out. Now I went to work on the design. I forgot to take photos of how I pressed my thumbs into the clay behind the head. I did this until I was able to form a platform for the Missionary's Downfall woman. I added a tongue, nose, eye slits and a triangle at the top of the head. Once it has dried to leather hard I will be removing more clay. It's important to have all the walls the same thickness so when fired the bowl will not crack. There are many thick areas in this design that will require clay removal. Since the back platform is soft I backed it up to a bag of clay for support while it dries. I will make the bottom of this platform level for the woman when it is dry. I will uncover the bowl for a couple of hours and then uncover for a couple. This will go on until it is completely dry. As soon as it's stable I'll start to remove the excess clay. Comments? Soon I'll start on bowl #2. Cheers, Wendy [ Edited by: danlovestikis 2011-10-01 17:39 ] |
|
W

WestADad
Posted
posted
on
Thu, Sep 29, 2011 2:56 PM
WOW! This is going to be cool! Love your work! Chris |
|
M
MadDogMike
Posted
posted
on
Thu, Sep 29, 2011 5:42 PM
Very cool Wendy, will each bowl be a one-off or will you make a mold? |
|
H

hiltiki
Posted
posted
on
Thu, Sep 29, 2011 7:43 PM
I love this piece and can't wait to see it finished. Your artwork is very fresh and colorful. |
|
D
danlovestikis
Posted
posted
on
Thu, Sep 29, 2011 9:20 PM
Hi WestADad, MadDogMike and hiltiki, Each bowl will be a 1/1 as are the women. No molds this time around. It's fun to make something big. I'm thinking up the next bowl design and when my brain is ready I'll start #2. Thank you for all your comments that make it all worth while to post the photos. Cheers, Wendy [ Edited by: danlovestikis 2011-09-29 21:21 ] |
|
D
danlovestikis
Posted
posted
on
Sat, Oct 1, 2011 3:21 PM
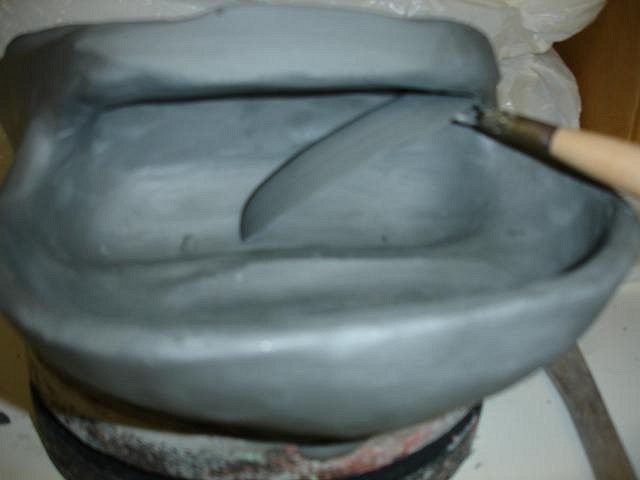
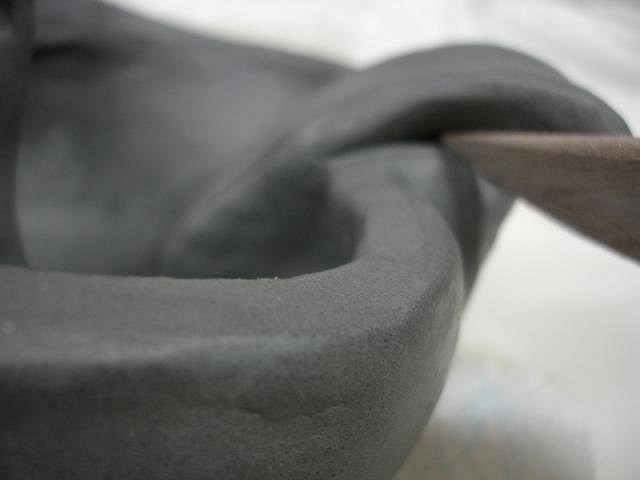
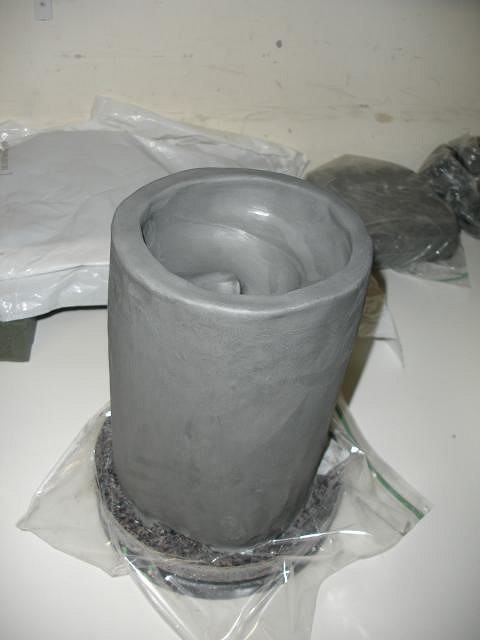
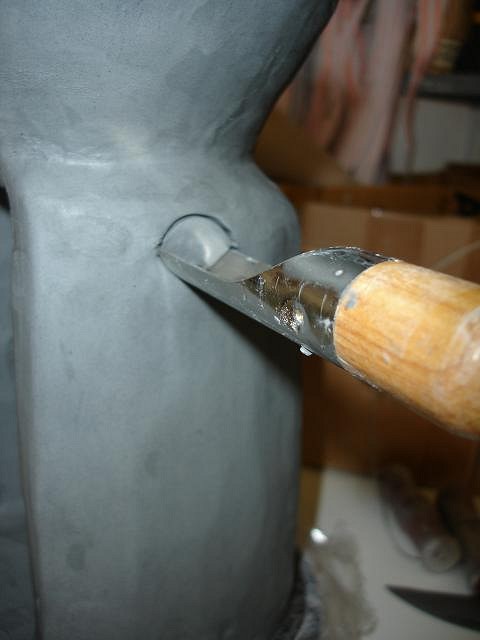
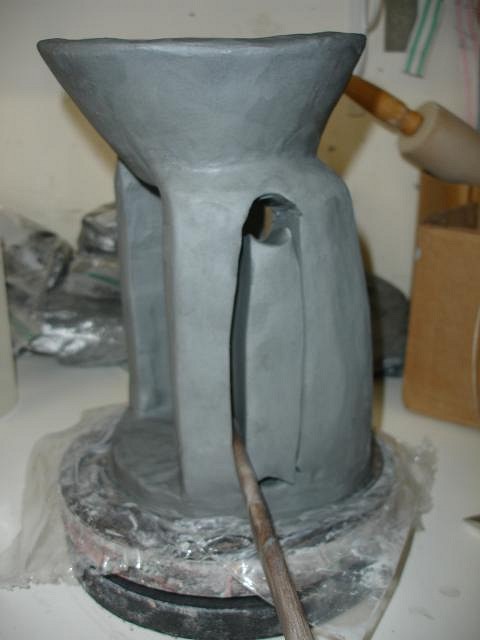
The bowl is firming up to leather hard. So today I removed more clay to make the thickness of all areas the same. I fine tuned under the tongue so that it doesn't blend into the bowl. Removing the clay. Oh No! I forgot to put a piece of plastic wrap on my banding (thank you MadDogMike) wheel before I set the bowl on it. So I used a tool and cut it lose and smoothed it for now. When it is leather hard I'll remove clay here too. With the girl checking level.
Fine tuning the tongue. |
|
D
danlovestikis
Posted
posted
on
Sun, Oct 2, 2011 3:57 PM
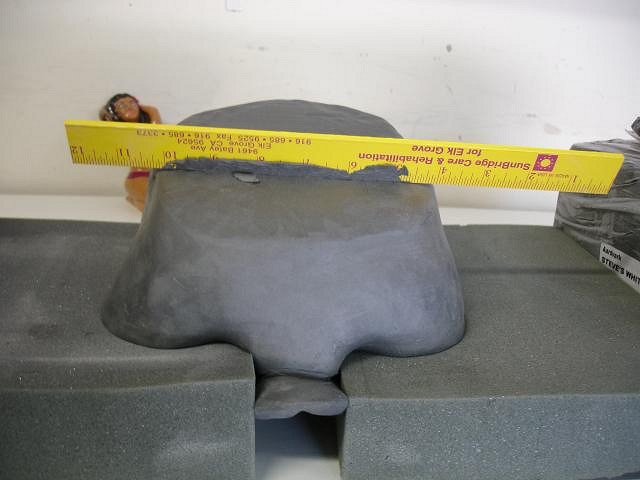
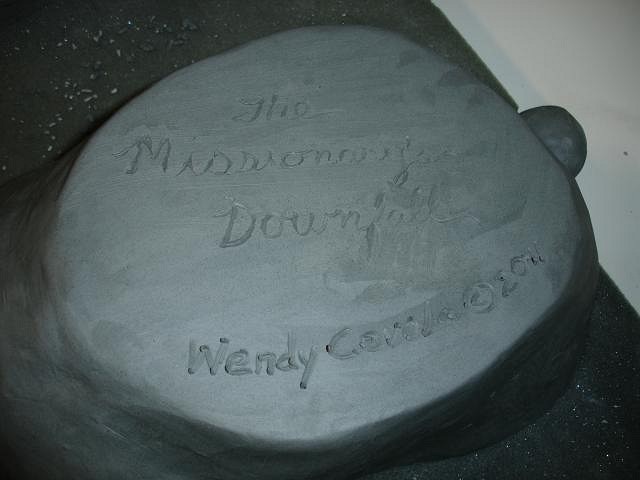
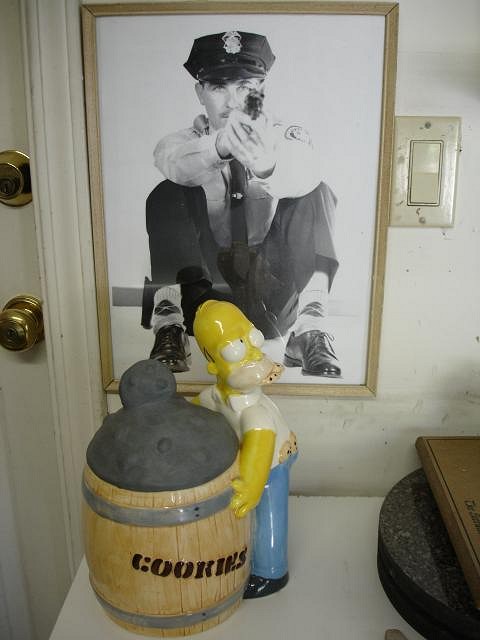
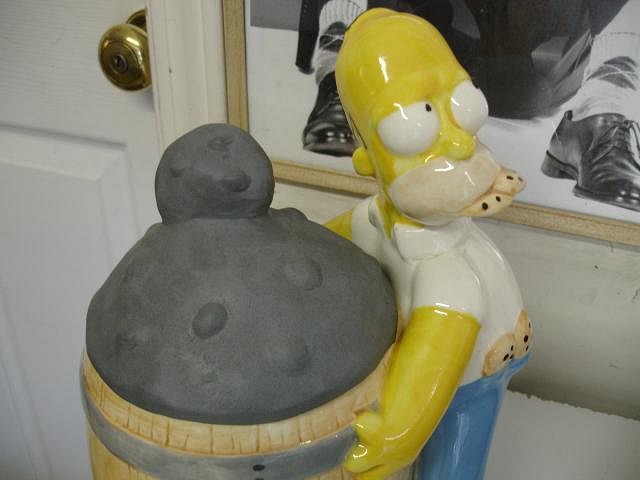
Today I decided to work on the bottom of the Missionary's Downfall bowl and to make a lid for Bullet's Simpson's cookie jar which is good practice for some future project. I always save foam rubber from packing boxes to use to support my soft clay sculptures. I used a couple of bags of clay to keep them from slipping away while I work the clay. The bottom of the tiki bowl was lumpy and I needed to smooth it. This ruler was perfect. I just pulled it along the bottom and it removed all the bumps. I used a tool with a point to write The Missionary's Downfall, my name and the copy write date. I will need to go back when the clay is dry to deepen and fine tune these words. For Bullets cookie jar I decided to make a huge chocolate chip cookie with a smaller one stuck on top for the handle. after I formed the dome I carved out the inside with a tool. I've added the chips. That's a photo of Dan's dad. He posed for a police magazine in the 60's. Close up of the worried cookie addict. The lid is larger than the hole with a ledge. It will shrink as it dries. Then I will sand it to fit and also to leave enough room for the glaze. Figuring all of that out and making it work is the hard part. [ Edited by: danlovestikis 2011-10-02 22:20 ] |
|
M
MadDogMike
Posted
posted
on
Sun, Oct 2, 2011 4:52 PM
And a well deserved cookie at that, great work! :D On a related note, now that I'm doing all the cooking in the house I notice my son and I go through more chocolate chip cookies than we do fresh vegetables :lol: |
|
Z
zerostreet
Posted
posted
on
Sun, Oct 2, 2011 5:58 PM
Love these step by step pics Wendy! |
|
D
danlovestikis
Posted
posted
on
Mon, Oct 3, 2011 7:46 PM
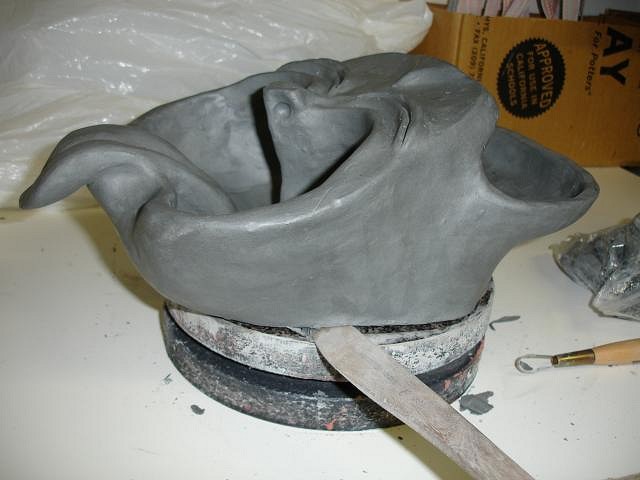
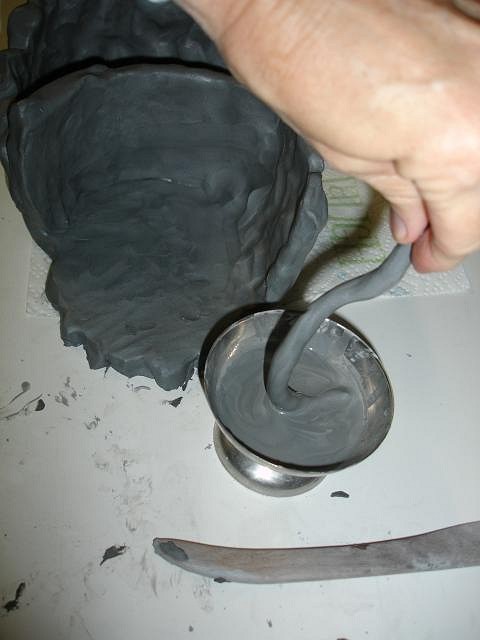
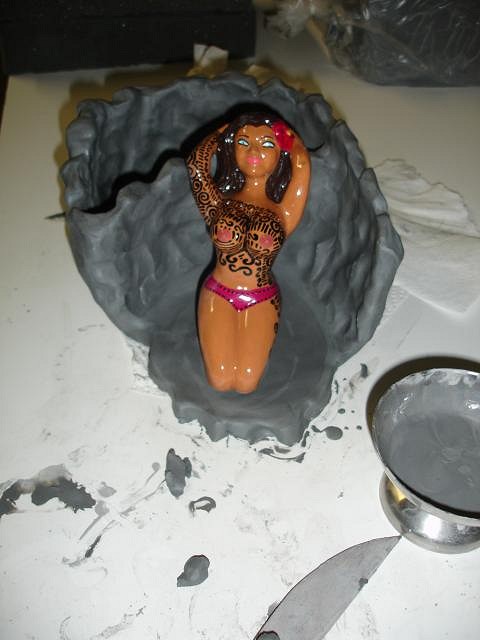
Thanks MadDog, I prefer chocolate chip cookies to fresh vegetables too. Thank you zerostreet. I love posting photos that are step by step and I love looking at them too. Especially yours and MadDogs! Oh and little lost tikis and... Sometimes clay just tells you what to do. I had these two pieces that I had cut off the last bowl. So I started to play with them. I started by making a back wall. Then I made a wall in front of that one to form a bowl and platform for the Missionary's Downfall woman. When I connect two pieces of clay I use slip as glue. It helps to eliminate air bubbles. I press into place and smooth.
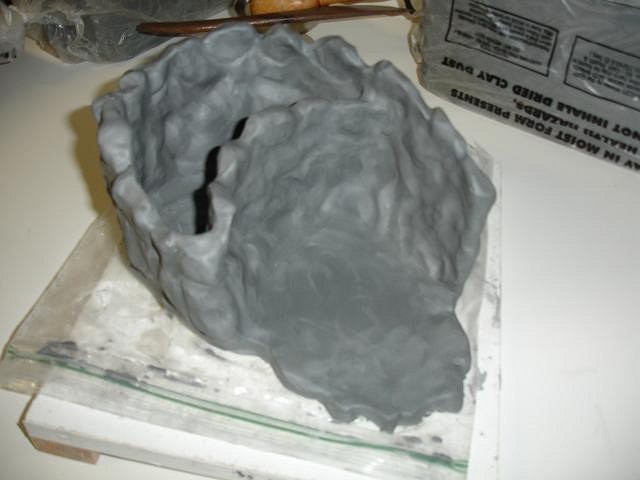
I made the clay into rocks with my fingers inside and out. I have more to do on this bowl and I'll share photos then. Right now I need it to firm up. This will be really fun to glaze. #3 next up! All the decanters are packed and ready to go on the Sacramento Crawl this weekend. We love the crawl. I will post photos on the crawl thread after the festivities. Cheers, Wendy [ Edited by: danlovestikis 2011-10-05 09:04 ] |
|
M
MadDogMike
Posted
posted
on
Mon, Oct 3, 2011 7:56 PM
Very unique bowl Wendy - I like it! |
|
T
tigertail777
Posted
posted
on
Tue, Oct 4, 2011 5:27 AM
Very cool bowls Wendy... I can't believe you are making each one by hand and different...that is a lot of work, but I love seeing them all and the step by step progress. :) |
|
LLT
little lost tiki
Posted
posted
on
Wed, Oct 5, 2011 9:10 AM
Love Love Love |
|
U

umeone
Posted
posted
on
Mon, Oct 10, 2011 9:34 AM
Aloha Wendy, I have just read your post and am amazed by not only your talent(which I was already aware of)but, your detailed tutorial. I love your tips and visuals to make it all come to life. I've learned so much from you and just wanted to say MAHALO! Wishing you much success with all your projects. Cheers, |
|
D
danlovestikis
Posted
posted
on
Wed, Oct 12, 2011 9:27 AM
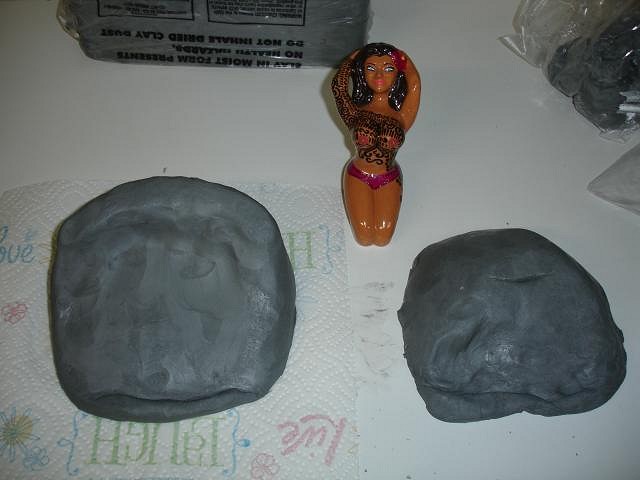
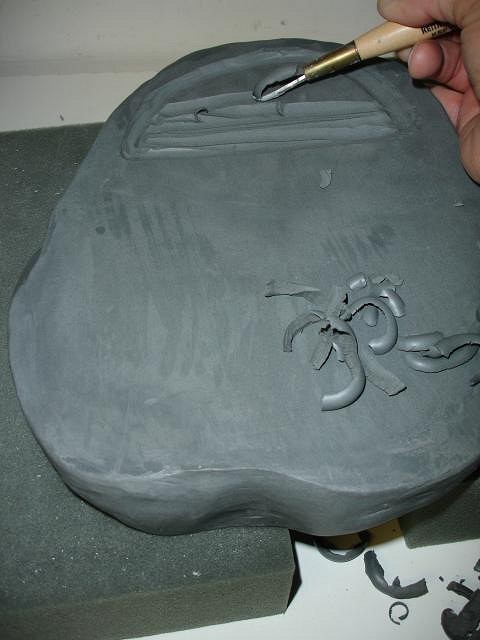
Hi MadDogMike, tigertail777, little lost tiki. Thank you for visiting here, I love to read your posts. Your words encourage me to work every day. I love looking at your threads and following your work. Hi Linda,(umeone), do you have a thread to show how you make your Kahiki mugs? As part of the Kahiki family I know everyone would follow you through your journey. You and I started making ceramics about the same time. I saw one of your works in Kohalcharms collection, terrific. Well Gang I've started the third platform for the Missionary's Downfall woman. I'm not sure how it will turn out. On this one I just pressed and pulled. I haven't decided on the top of the head yet. I want to see if I can do a Babalu technique and hollow it out like an chocolate bunny. I need for the bottom part to firm up first. (: Wendy Dip clay to add into the slip. Build up the clay to the shape you want. This time I pressed in my fingers and shaped the mouth. I cut off the excess. I added a tongue and checked to see if she fits. Also leave room for shrinkage and glaze. |
|
Z
zerostreet
Posted
posted
on
Wed, Oct 12, 2011 10:32 AM
Very cool Wendy! Great job on that tongue! :P [ Edited by: zerostreet 2011-10-12 10:32 ] |
|
T
tigertail777
Posted
posted
on
Wed, Oct 12, 2011 4:40 PM
HA HA HA!!! The tongue is hilarious! Wonderful stuff Wendy! :lol: |
|
M
MadDogMike
Posted
posted
on
Wed, Oct 12, 2011 5:44 PM
He looks like he's enjoying that just a little TOO much :lol: Great work as always Wendy |
|
D
danlovestikis
Posted
posted
on
Wed, Oct 12, 2011 11:32 PM
zerostreet, I'd love to know what you edited out. tigertail777, thanks I want to have fun with this one and go crazy. MadDogMike, your sense of humor is inspiring me to make a strange tiki this time. This is so much fun! Wendy PS check out the photos on the Sacramento Crawl event, page 40 has lots of photos of how fun Northern California can be [ Edited by: danlovestikis 2011-10-12 23:33 ] |
|
M

MikeyTiki
Posted
posted
on
Thu, Oct 13, 2011 4:02 PM
Just how big of a Kiln do you have? I did a little quick math and with the largest Skutt kiln I found using 11,520 watts at the most expensive off-peak rate of $0.1111/kWh would cost about $16 for a 12.5 hour fire but only if the kiln was going full boar the entire time. (Which I don't think it does.) Of course there are other costs involved, but I wouldn't think it is that much. Maybe the firing cost is one of the reasons that Munktiki moved to Portland. The off-peak electricity here is only $.07773/kWh. (~30% cheaper than what you pay.) In any case, you do amazing work, and I love that you share so many in-progress photos and information. |
|
M

MauiTiki
Posted
posted
on
Thu, Oct 13, 2011 8:09 PM
Mikey, My little kiln only goes for about 7.5 hours on average (to cone 06) and definitely is not on the whole time. It clicks on and off every few seconds. I've seen a little increase in my electric bill but not too bad. I don't have the BIG kiln like Wendy. |
|
D
danlovestikis
Posted
posted
on
Fri, Oct 14, 2011 9:36 AM
Ok it took me a while to figure out why my bill may be higher than some. I have a areovac suction motor that I run the entire time I am firing ceramics. It is attached to the bottom of the kiln and it pulls hot air from the top of kiln to the bottom and out. This exhaust system which is super loud keeps the hot air uniform throughout the kiln and makes glazing more uniform with less defects. To do this it pulls cool air from outside through tiny holes on top. The kiln has to work harder to keep its temperature constant. I didn't do the math that Mikeytiki did I just compared my electric bills and how many times I fired in a month and how much it raised my bill. Not a perfect method but it has been consistent. Check out MadDogMikes post on the Ohana page. You'll enjoy it! Wendy |
|
Z
zerostreet
Posted
posted
on
Fri, Oct 14, 2011 9:56 AM
Ha! I think it was a spelling error! Nothing risque I assure you! :D |
|
U
umeone
Posted
posted
on
Fri, Oct 14, 2011 11:48 AM
Aloha Wendy, I think I will leave the tutorial to you, I have a hard enough time figuring out what I'm doing let alone trying to tell someone else! I was thinking a blog might work though. How do you get one of those little smiley guys, anyway he is here in spirit. Mahalo, |
|
D
danlovestikis
Posted
posted
on
Fri, Oct 14, 2011 2:55 PM
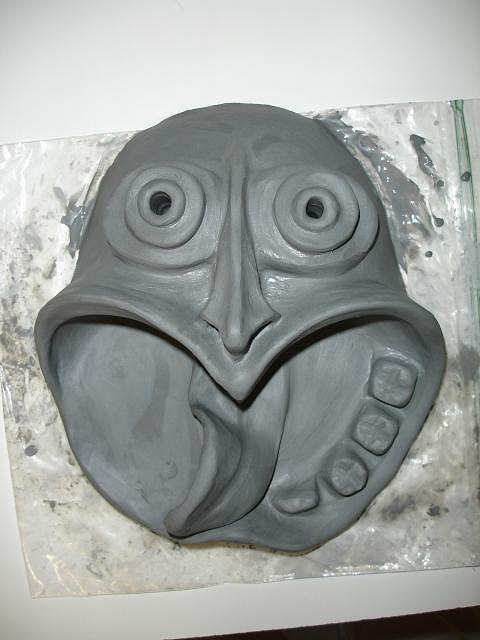
Hi Linda, I don't know how to get the smiley guys either but MadDogMike uses them all the time. We should ask him but if you look at his post on Ohana you'll see he's not up to typing right now. I use this (: zerostreet, so that's your story! I've done the major part on the third Missionary's Downfall bowl today. So that it has a purpose I've added teeth. Here are my steps. I will still need to hollow out the head when it is leather hard. Made my favorite PNG nose. Used slip like glue and pressed down. Smoothed with a soft paint brush. Rolled balls added slip and pressed down. I used a pencil for the hole. These will be reference points if I hollow it out from the bottom. I worked my way through college as a dental assistant so why not add teeth! Checking out the girl, yep she fits.
I'll work more on the nose etc. as it dries. Thank you for visiting, Wendy |
|
M
MadDogMike
Posted
posted
on
Fri, Oct 14, 2011 3:52 PM
Hilariously brilliant! Love the teeth. Very PNG Wendy, you just need to put eyes first then the smile :) Here's the page link that shows all the smilies Be good to yourself and to the ones you love [ Edited by: MadDogMike 2011-10-14 16:01 ] |
|
D
danlovestikis
Posted
posted
on
Fri, Oct 14, 2011 6:49 PM
Hi Mike, so I read your message and wondered why I should work the clay to put in the eyes first and then the mouth. Then I clicked the link and saw it was for the funny faces that umeone wanted. Thank you for the link and the kind words on my funny PNG guy. Heal fast I miss your work. Hugs, Wendy zerostreet I missspellled too. Edit! [ Edited by: danlovestikis 2011-10-14 20:58 ] |
|
U
umeone
Posted
posted
on
Sat, Oct 15, 2011 7:07 AM
Thank you for the :) link MadDogMike. |
|
D
danlovestikis
Posted
posted
on
Tue, Oct 18, 2011 4:25 PM
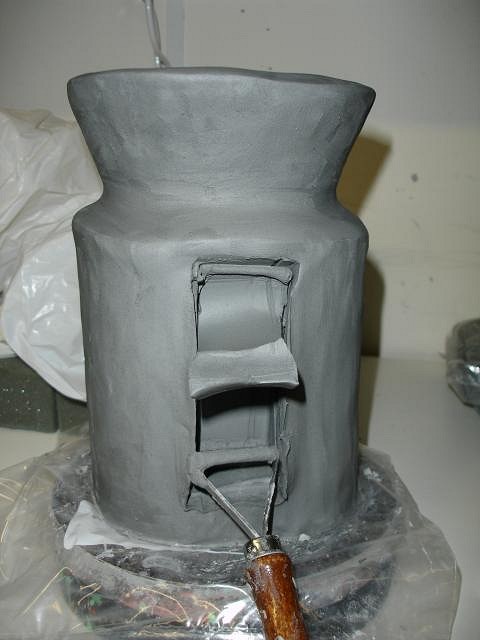
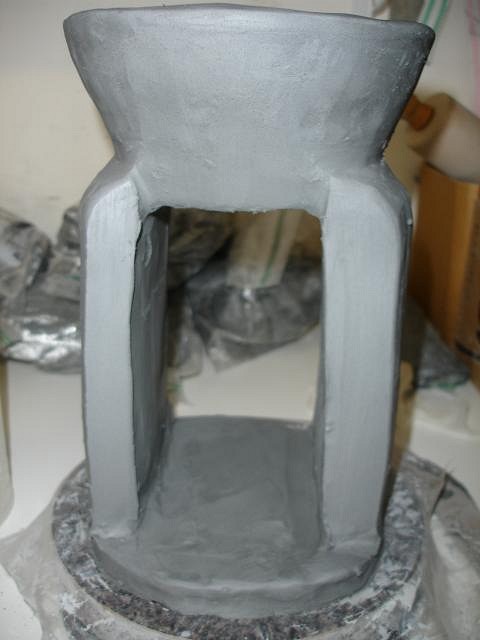
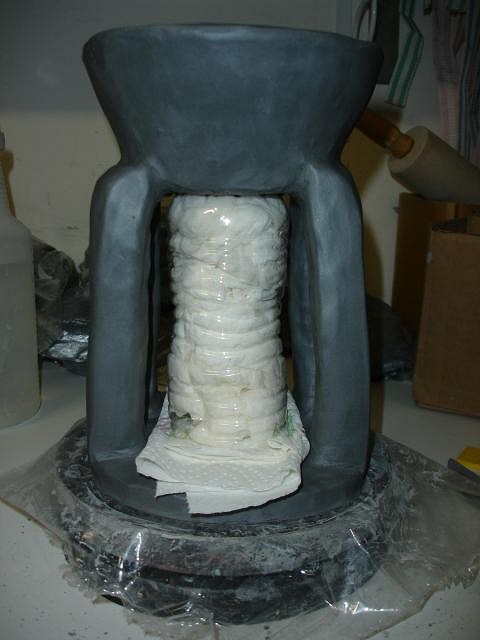
Thanks so much MDM an umeone. We are children again having fun with clay. Nothing is better than this. I Wanted to do another bowl but this time one that is taller. Since it is for the Missionary's Downfall women I had to find a place for one. So here comes bowl #4. The supports will be either tiki poles or Maori style designs. Time will tell. The interior of the bowl will be reminiscent of a seashell. So here's how it's coming along. Cheers, Wendy
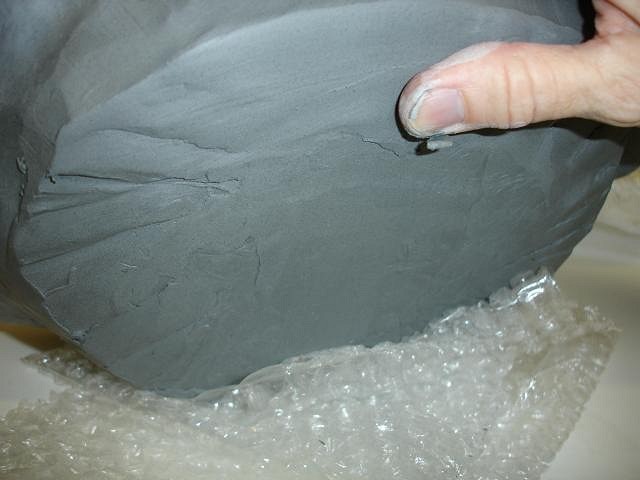
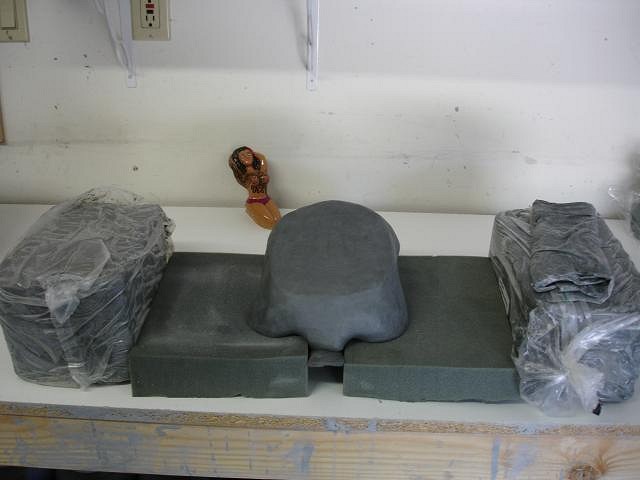
Supported by a water bottle I cut to the right height and filled with paper towels that I will use to clean up some other time. |
|
M
MadDogMike
Posted
posted
on
Tue, Oct 18, 2011 4:48 PM
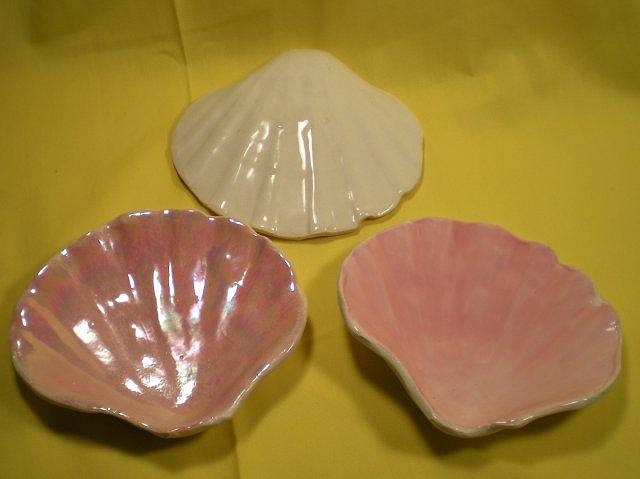
Very cool Wendy, now that's a challenge! The inside shell is awesome! Have you tried the Mother of Pearl luster? You put it over pink or ivory and fire at cone 018. The shell on the bottom left has the fired luster but it doesn't photograph real well.
|
|
D
danlovestikis
Posted
posted
on
Wed, Oct 19, 2011 10:43 AM
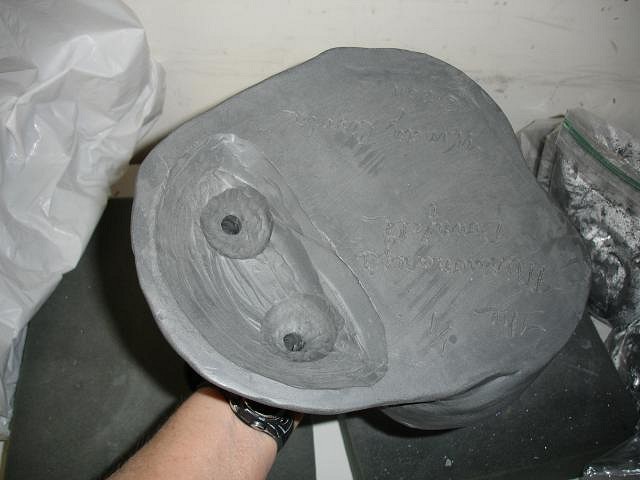
Hi MDM, I didn't know that luster existed. It fires at the same cone as gold. I need to try both, thank you. Today is bottoms day. I flipped the pedestal bowl and filled and smoothed the bottom and left exposed to dry for an hour. The ash tray needed the portion behind the eyes dug out. Clay should all be the same thickness so that it doesn't crack. That is why I'm removing clay here. Fine tuning ahead. Wendy |
|
D
danlovestikis
Posted
posted
on
Thu, Oct 20, 2011 9:00 AM
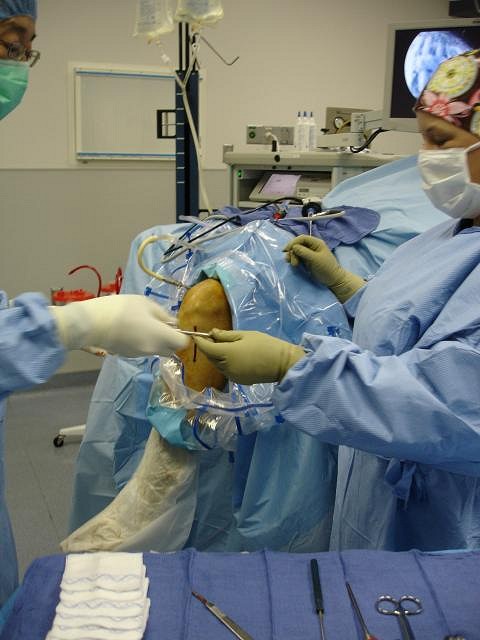
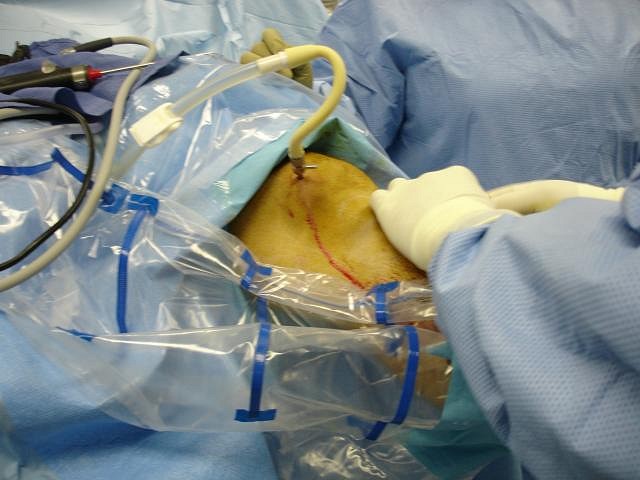
Hi friends, I injured my left knee and broke my right ankle on the way to Oasis. I didn't know I was that bad off until I got home. I didn't let it spoil our vacation to the tiki wonderland. I just limped along. Oasis was the best year yet and vacationing with hundreds of friends doesn't get any better. Anyway I'm having surgery on my knee today to repair the damage. I'll be back here as soon as I can think straight enough to type. Dan had the same surgery on the same knee a few years ago. Since we worked at the hospital for a combined 60 years we get photos of the surgeries we go through. Here's Dan and what I have to look forward too at noon today. Cheers, Wendy
|


Pages: 1 2 3 4 5 6 7 8 9 10 11 12 13 14 15 16 17 18 19 20 21 22 23 24 25 26 27 28 29 30 31 32 33 34 35 36 37 38 39 40 41 42 43 44 45 46 47 48 49 50 51 52 53 54 55 56 57 58 59 60 61 62 63 64 65 66 67 68 69 70 71 72 73 74 75 76 77 78 79 80 81 82 83 84 85 86 87 88 89 90 91 92 93 94 95 96 97 98 99 100 101 102 103 104 105 106 107 108 109 110 111 112 113 114 115 116 117 118 119 120 121 122 123 124 125 126 127 128 129 130 131 132 133 134 135 136 137 138 139 140 141 142 143 144 145 146 147 148 149 150 151 152 153 154 155 156 157 158 159 160 161 162 163 164 165 166 167 168 169 170 171 172 173 174 175 176 177 178 179 180 181 182 183 184 185 186 187 188 189 190 191 192 193 194 195 196 197 198 199 200 201 202 203 204 205 206 207 208 209 210 211 212 213 214 215 216 217 218 219 220 221 222 223 224 225 226 10816 replies