Pages: 1 2 3 4 5 6 7 8 9 10 11 12 13 14 15 16 17 18 19 20 21 22 23 24 25 26 27 28 29 30 31 32 33 34 35 36 37 38 39 40 41 42 43 44 45 46 47 48 49 50 51 52 53 54 55 56 57 58 59 60 61 62 63 64 65 66 67 68 69 70 71 72 73 74 75 76 77 78 79 80 81 82 83 84 85 86 87 88 89 90 91 92 93 94 95 96 97 98 99 100 101 102 103 104 105 106 107 108 109 110 111 112 113 114 115 116 117 118 119 120 121 122 123 124 125 126 127 128 129 130 131 132 133 134 135 136 137 138 139 140 141 142 143 144 145 146 147 148 149 150 151 152 153 154 155 156 157 158 159 160 161 162 163 164 165 166 167 168 169 170 171 172 173 174 175 176 177 178 179 180 181 182 183 184 185 186 187 188 189 190 191 192 193 194 195 196 197 198 199 200 201 202 203 204 205 206 207 208 209 210 211 212 213 214 215 216 217 218 219 220 221 222 223 224 225 226 10,816 replies
|
D

danlovestikis
Posted
posted
on
Tue, Jan 13, 2015 10:28 AM
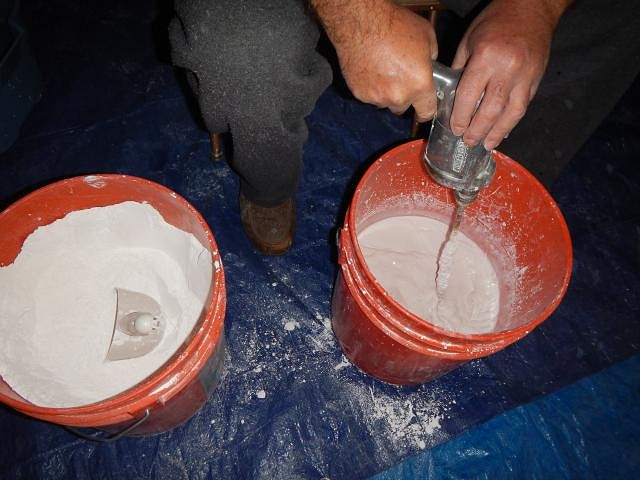
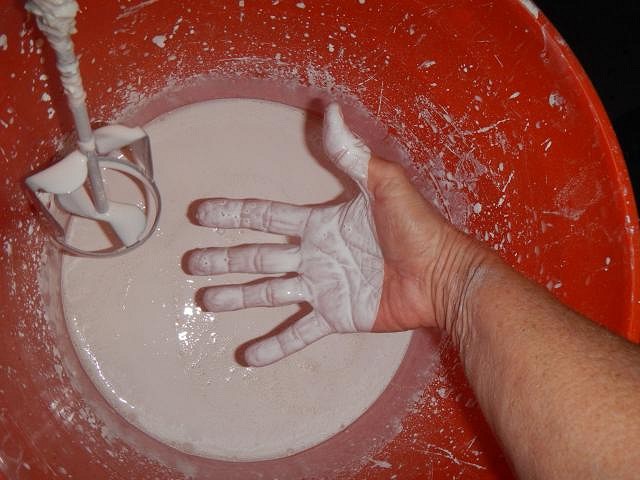
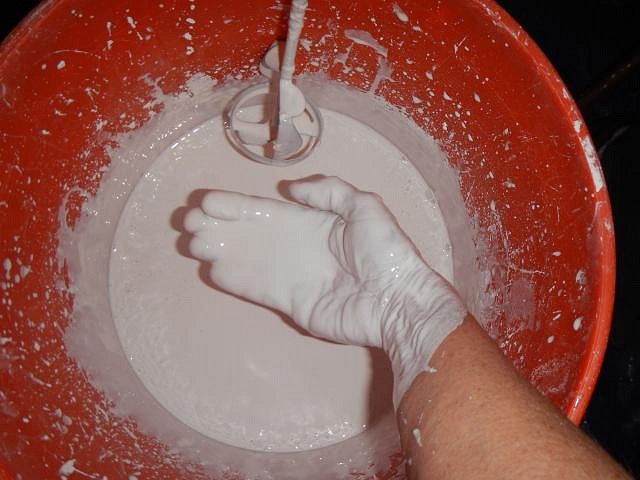
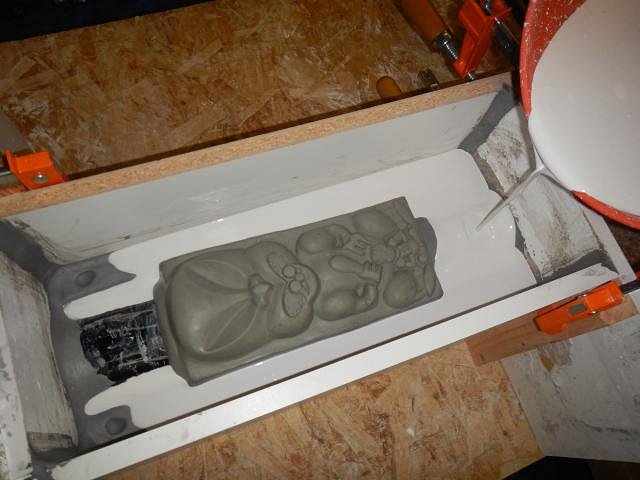
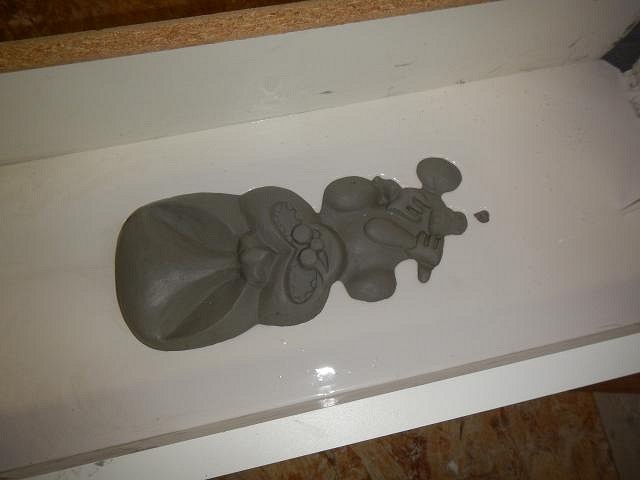
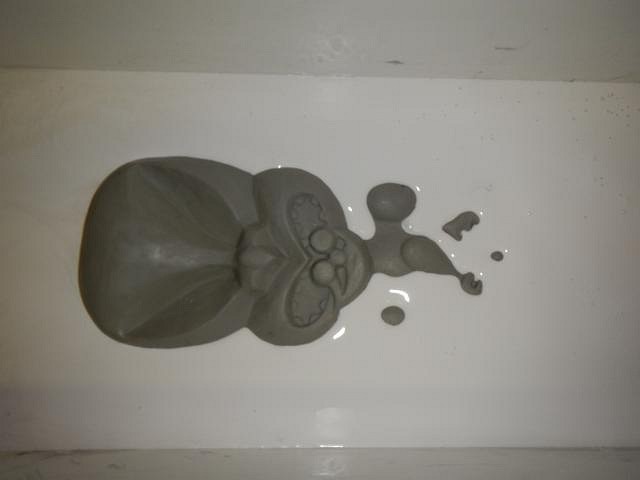
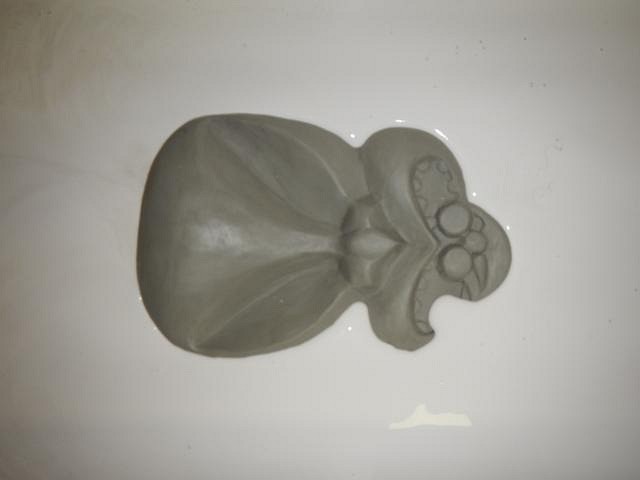
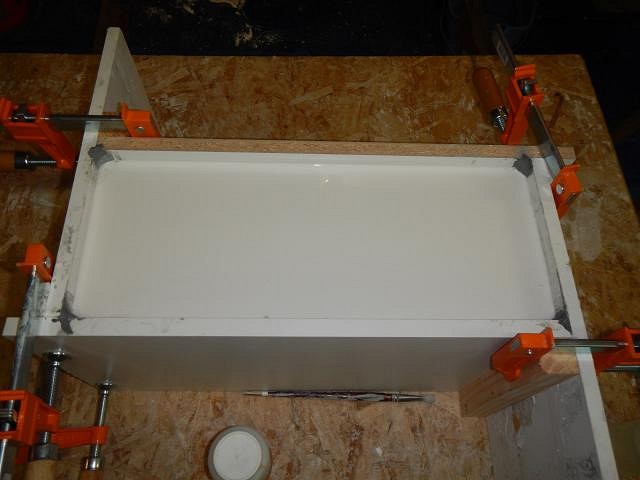
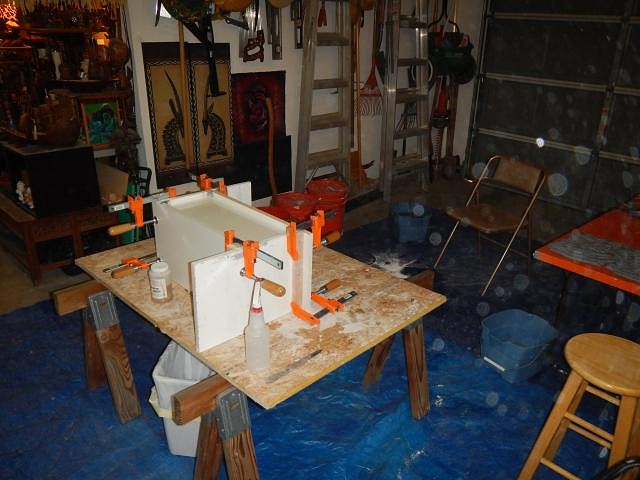
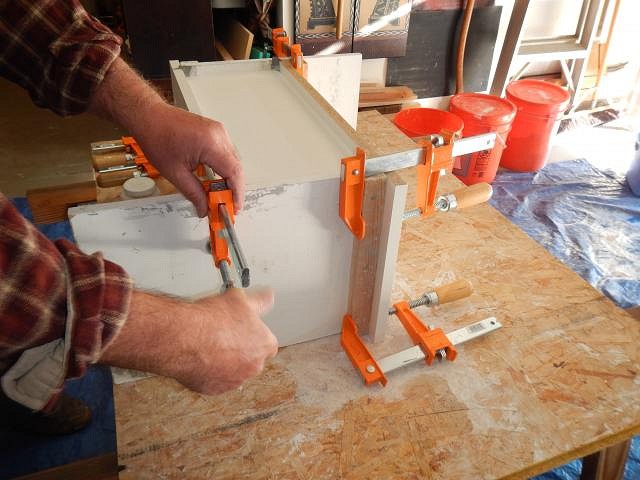
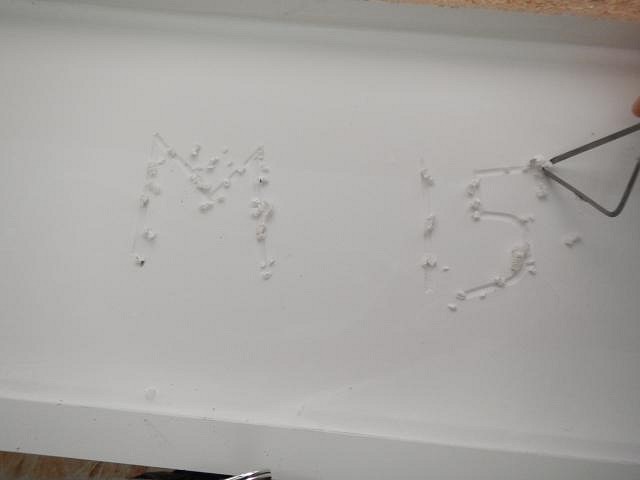
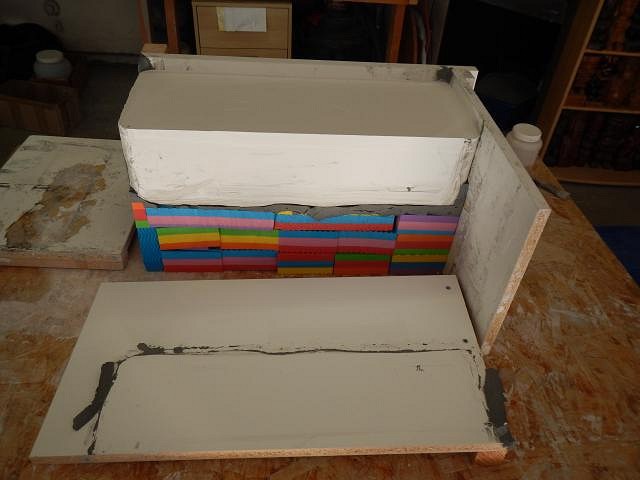
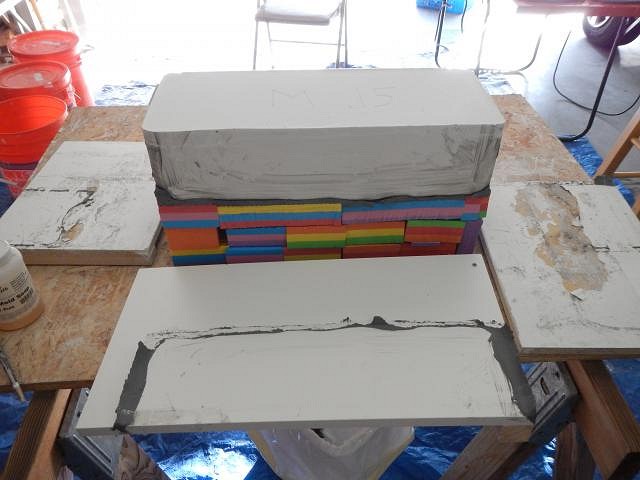
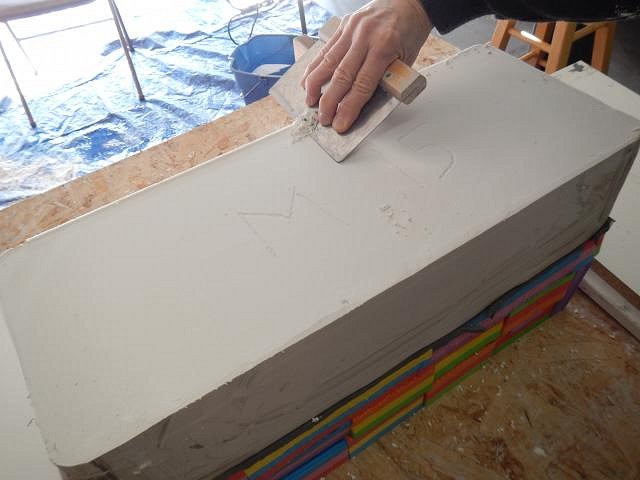
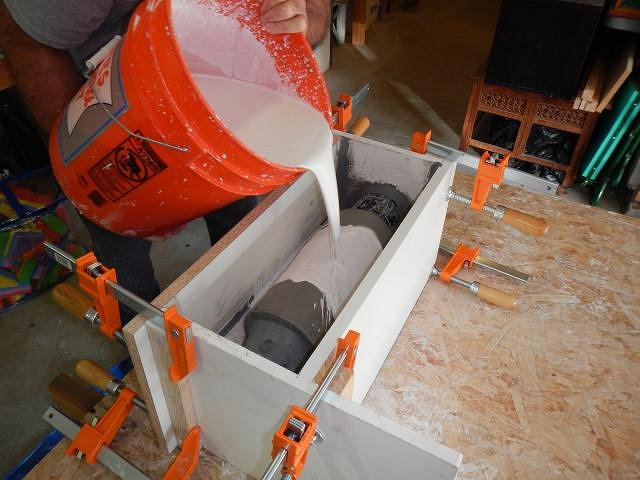
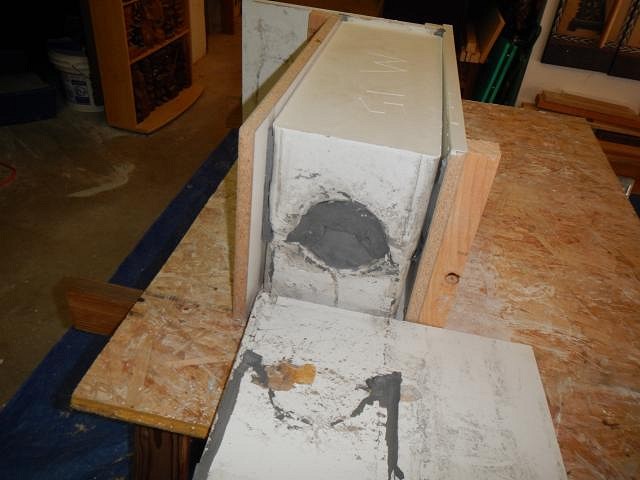
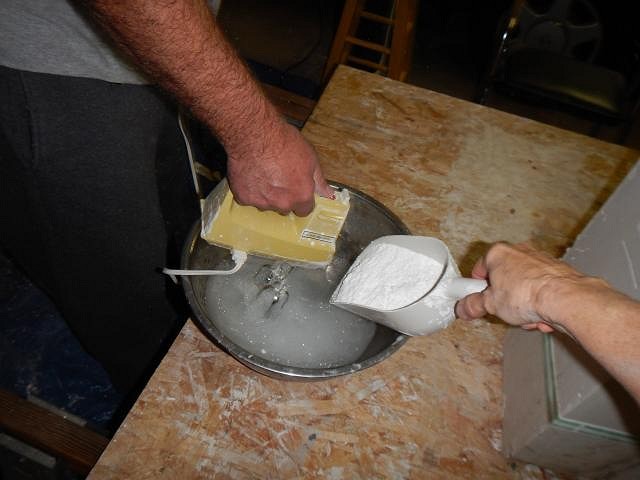
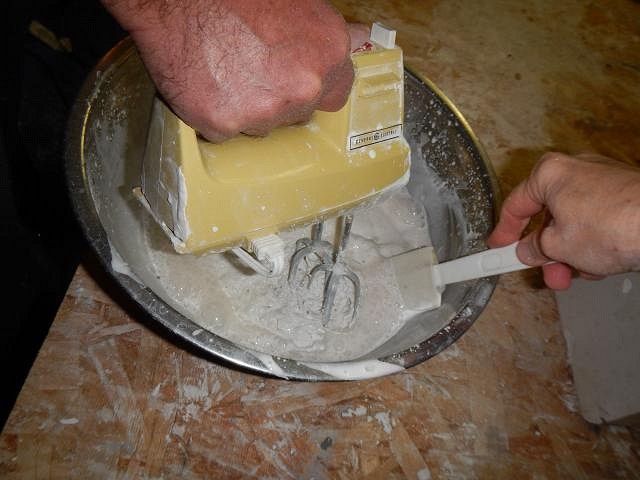
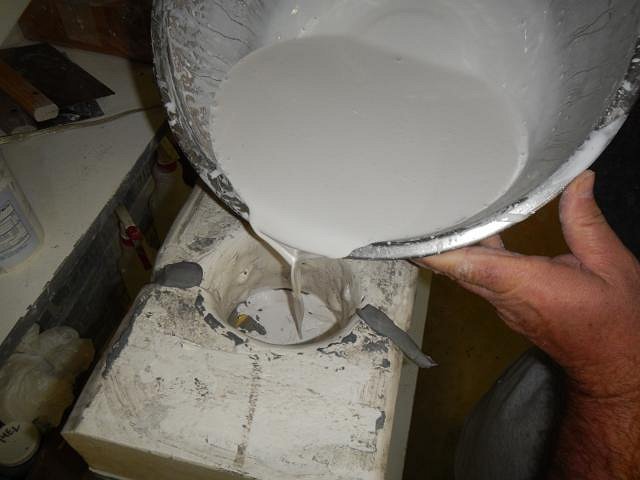
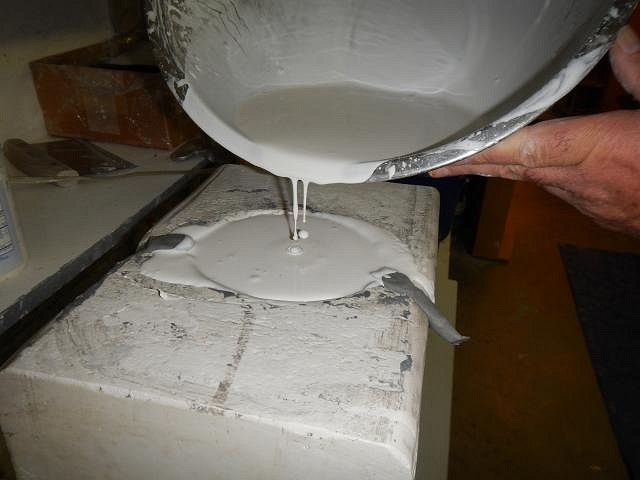
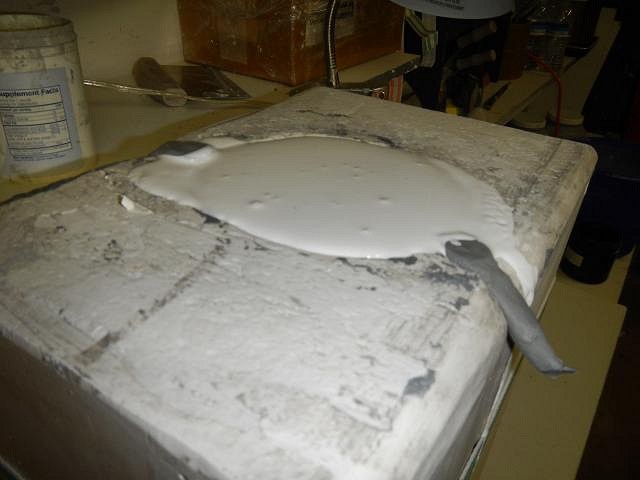
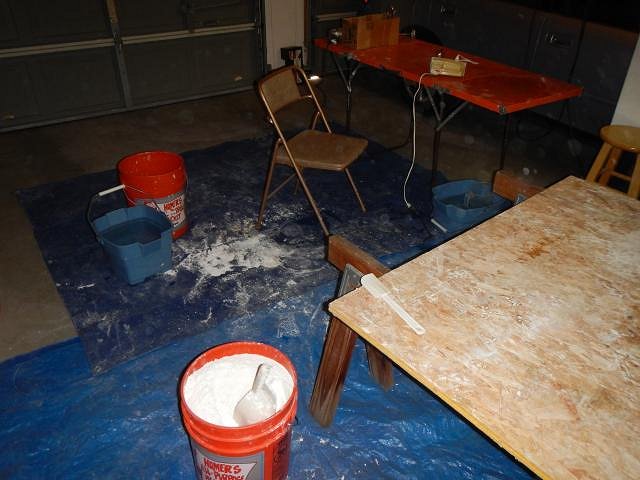
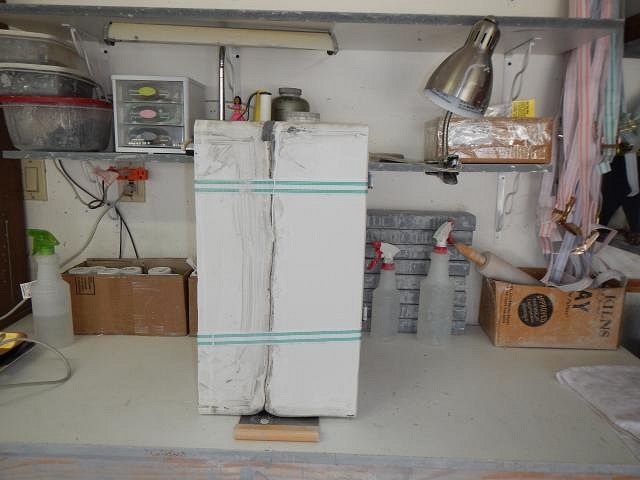
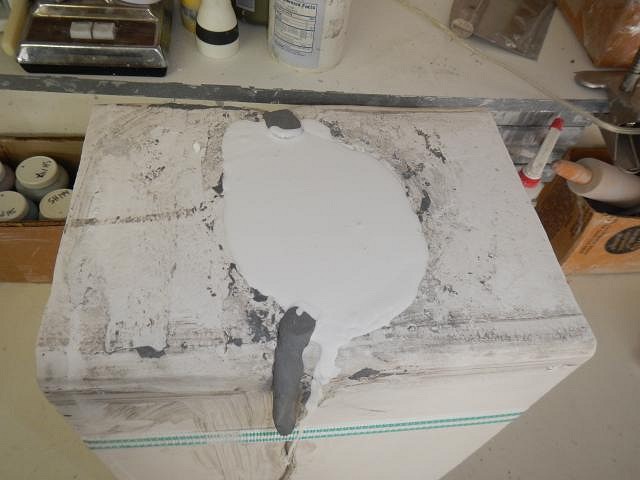
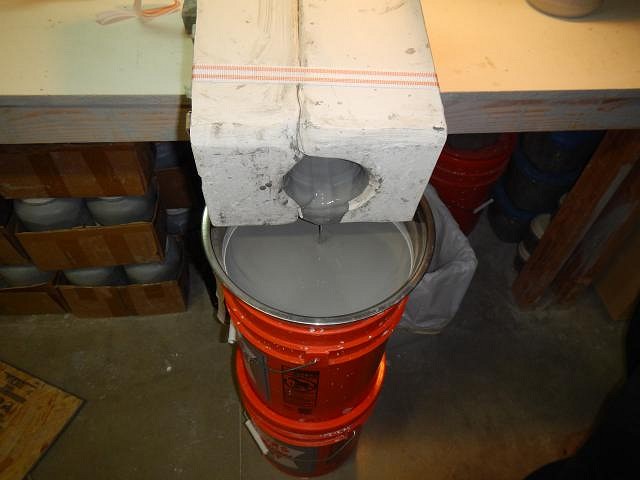
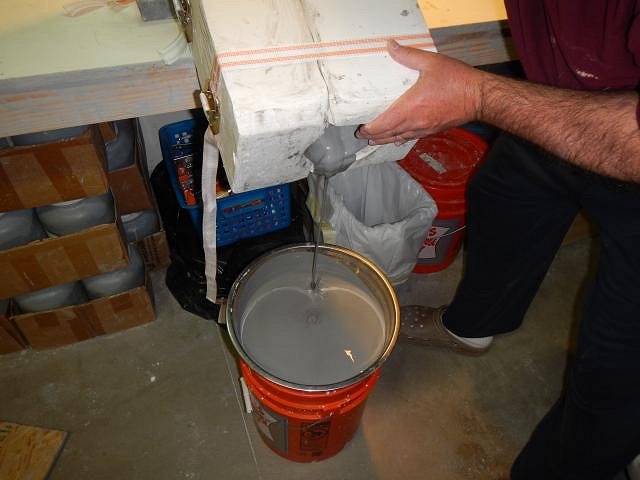
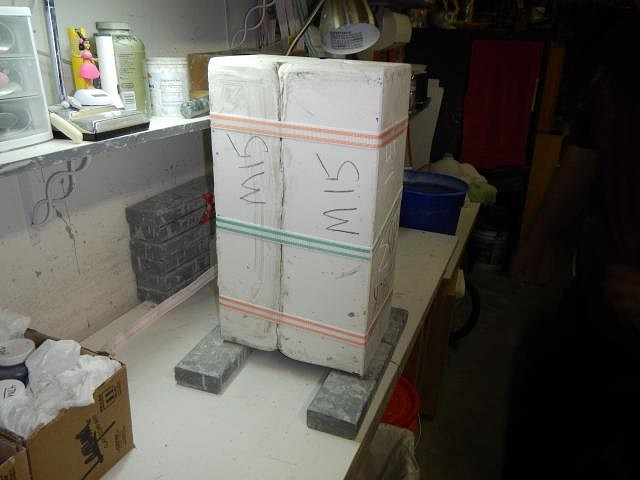
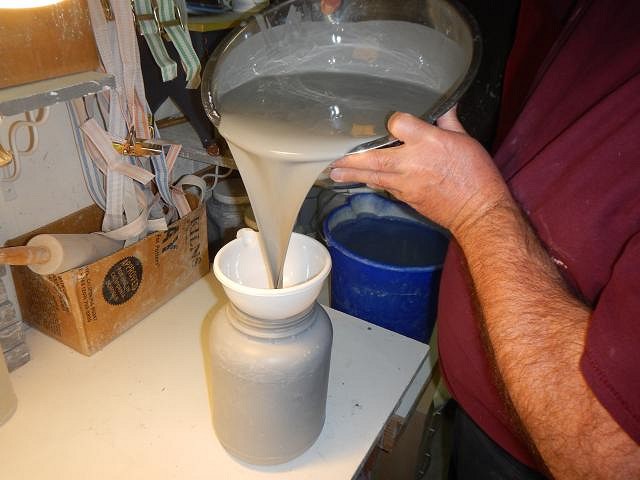
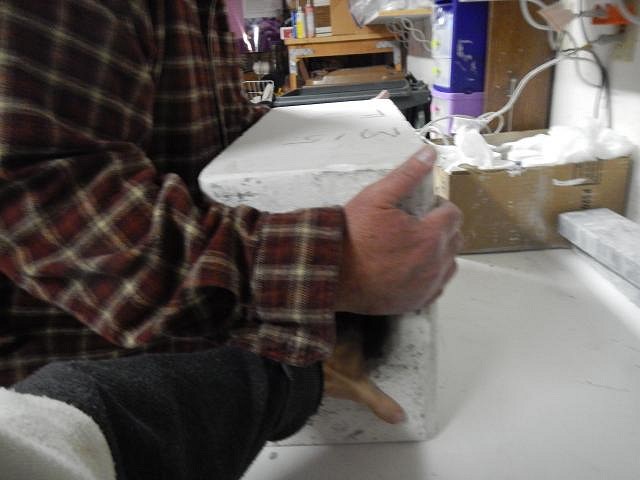
hang10tiki what a wonderful view of Diamond Head. I miss that island and I miss you and Janelle. TikiAno thank you for the adorable photo. It's going to be fun watching him grow up. The first year is full of so many changes. My great nephew is 15 months and he knows how to throw down a football and raise his arms like a touch down. Too bad their Oregon team didn't win. I have broken a few metal ones over the years when the clay was too dry. I break the wooden ones on leather hard. It's so annoying. That mold has to be moved with leverage or it will break our backs! hang10tiki (o: hang10tiki Oh Oh Oh those are sooooooooooooooo cute. Tiki Ano you need to copy and paste them to your photo file. Show him these when he's a little older. You could make him a laminated book. hang10tiki these are so good. kingstiedye (o: ====================================================================== Tyber Tiki's Wish is being molded. Part II. I fill a bucket with the amount of water that I think will come close to filling the box to the level I want. Then we slowly add the plaster with the mixer going. When I start to see bubbles in the plaster I have Dan stop and I do a check. This doesn't have enough plaster. After adding more and mixing I check again. It doesn't take much to go from the first check to this one. Look at my thumb. It needs to be the consistency of buttermilk. The clay sculpture is soft so I had Dan pour slowly on the plastic end piece. I am making a 3 piece mold. Going... Going... Going... Going... Gone! Once we start to work with plaster we wear face masks. Even though it's been 45 minutes since we poured the first piece a flash photo shows the plaster dust floating in the air. This dust will turn to plaster in your lungs and never come back out. Breathing this is worse than smoking. Now that it has heated up and turned firm the boards can be removed. I then carve in a label. This M-15 is for Maori and the year. Later on I'll do this again with a crayon which shows up better. Part III tomorrow ================================================= Thank you all so much for the fun photos and messages. Jazzing up my thread helps keep it alive and right now IT's ALIVE! Cheers, Wendy |
|
TT

Tyber Tiki
Posted
posted
on
Tue, Jan 13, 2015 2:09 PM
What a cliffhanger Wendy! I can't wait to see how the Mega Maori Mold turns out once all the boards are removed and you've separate the pieces. Great stuff! Tyber Tiki |
|
T

TikiAno
Posted
posted
on
Tue, Jan 13, 2015 4:49 PM
Wendy, whenever you post mold making photos it gets me fired up (okay, very punny) to make a mold. Jon, those photos cracked me up. Thank you, man! |
|
L

LoriLovesTiki
Posted
posted
on
Tue, Jan 13, 2015 6:28 PM
Wendy, I will look for tiny wire carving tools. I wonder if I can find any at AC Moore or Michaels. If not the Internet here I come! Tiki Ari is SO flipping cute. I'm digging his tiki-ish sleeper. Very Kon Tiki! Jon, those pics are hysterical. Back to carving, I'm trying to wait on my 2nd platter. I rolled it and cut it out last night and had it wrapped in plastic today. Tonight I tried to carve a flower but it was too wet. So I'm going to let it dry some more and try again tomorrow. There's a fine line between too soft and too hard! Thanks for the tips everyone. |
|
D
danlovestikis
Posted
posted
on
Wed, Jan 14, 2015 10:04 AM
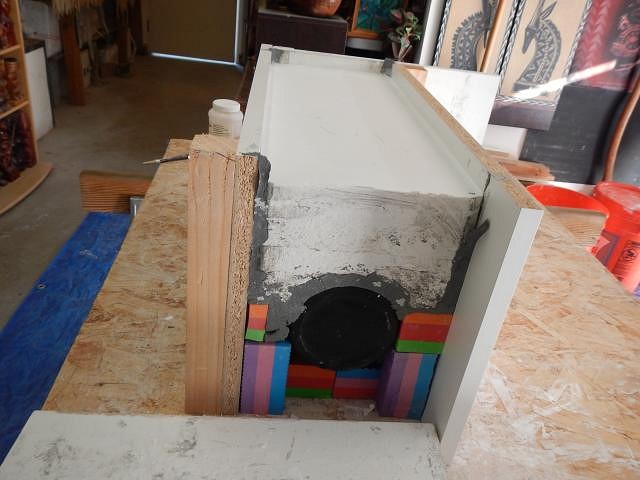
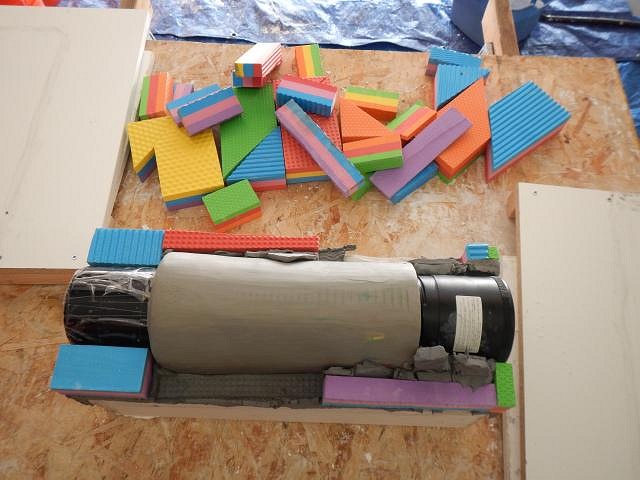
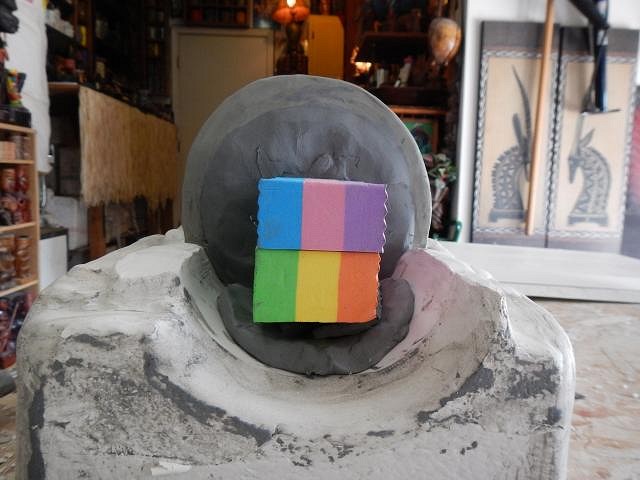
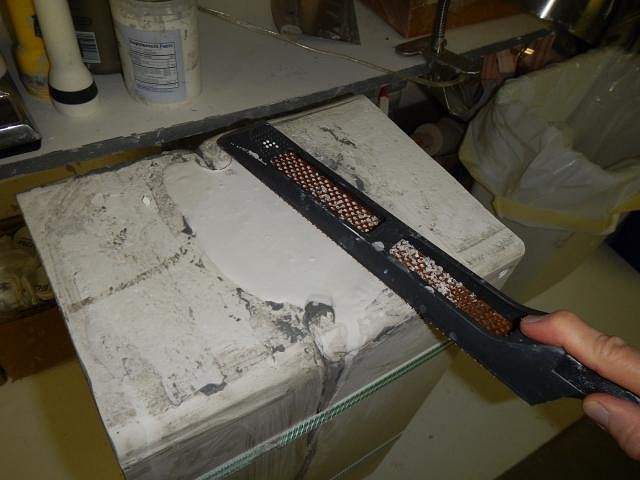
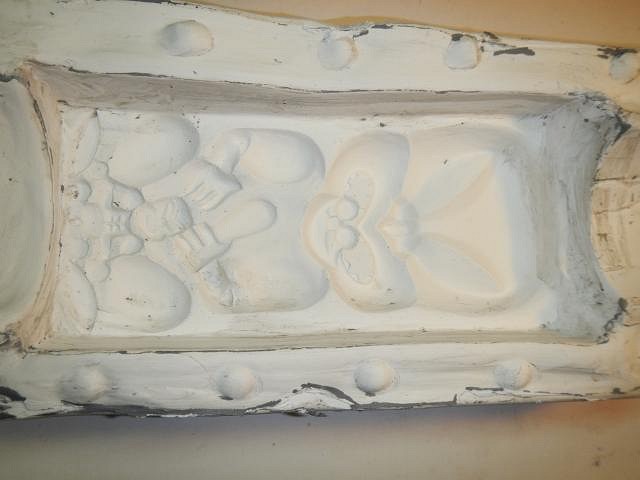
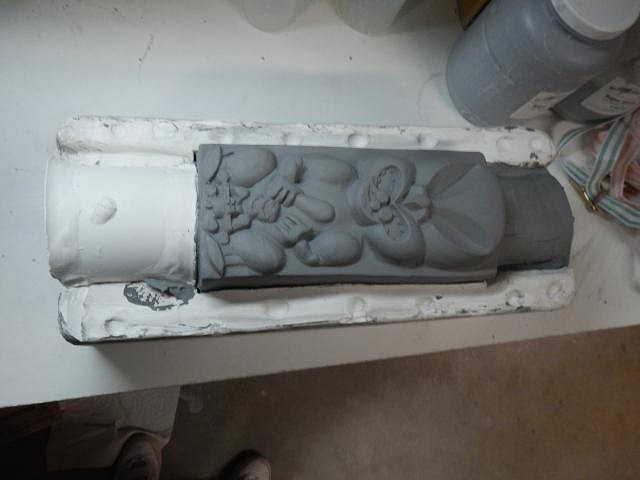
Tyber Tiki log on and check your Personal Messages. I sent you one a long time ago! I like cliffhangers but there are so many in mold making that it's more than one. TikiAno it really helps to have a second person help with making a mold. It Tiki Ari old enough? LoriLovesTiki I sent you a link to the best deal I could find on Ebay for the carving tools. Free shipping out of China! ============================================== This is the first time I've shared the Toys R Us blocks being used so I couldn't resist taking a lot of artistic photos All the areas where the blocks are located are areas where there would have been blocks of clay. Placing blocks is so much faster and easier. I used to use a rasp to remove the sharp edges from the mold pieces now I use the vegetable chopper because it cleans up with one swipe. I removed the blocks and the layer of clay from the first mold piece. It's nowhere near ready for piece number two. Tomorrow I'll show you all the tune up steps to get ready to pour again. I even need to smooth the back of the sculpture where the blocks made indentations. I could have put a buffer of cloth, maybe next time. May your day be filled with smiles, Wendy |
|
TT
Tyber Tiki
Posted
posted
on
Wed, Jan 14, 2015 12:33 PM
Hi Wendy, Sorry about missing your PM, I've just replied and need to be better at checking my PMs. Thanks again for the most excellent prize! Great pictures regarding the mold process, I now see that creating the mega maori mold is multi-stepped. :) This will be fun and informative to follow. Tyber Tiki |
|
H

hang10tiki
Posted
posted
on
Wed, Jan 14, 2015 1:27 PM
Wow Stop now n then for a cookie :) |
|
L
LoriLovesTiki
Posted
posted
on
Wed, Jan 14, 2015 5:57 PM
This thread makes me smile! I just love this stuff, that's what keeps your loyal followers coming back. It's so exciting!!!! I got your PM, thanks! I ordered the tools. Hope they won't be coning on a slow boat from China. They won't be here for a few weeks but you can't beat the price. You're right, I am hooked! Keep up the good work. |
|
H
hang10tiki
Posted
posted
on
Wed, Jan 14, 2015 6:41 PM
Can't wait to see the Super Carved Dan-0 Mug Going
Going Going So sad |
|
D
danlovestikis
Posted
posted
on
Thu, Jan 15, 2015 9:53 AM
Tyber Tiki I got it and saved it in my address book. There are lots of steps and so far all of them are going well. hang10tiki good guess. If we don't stop for food our energy gives out. LoriLovesTiki I love to watch art being made too. You could put your pieces on a thread and start a following. When I got started I put everything I'd made on Gallery and then started here with the step by steps. I hope the tools get here as fast as they say they will. It was the best batch I could find for you. hang10tiki we liked this so much I've put it on my facebook page for all to enjoy. I used to have a cast of my dad's face, it's with his great grandson now. ======================================== Photos later we have some errands to run. Cheers, Wendy |
|
D
danlovestikis
Posted
posted
on
Thu, Jan 15, 2015 4:44 PM
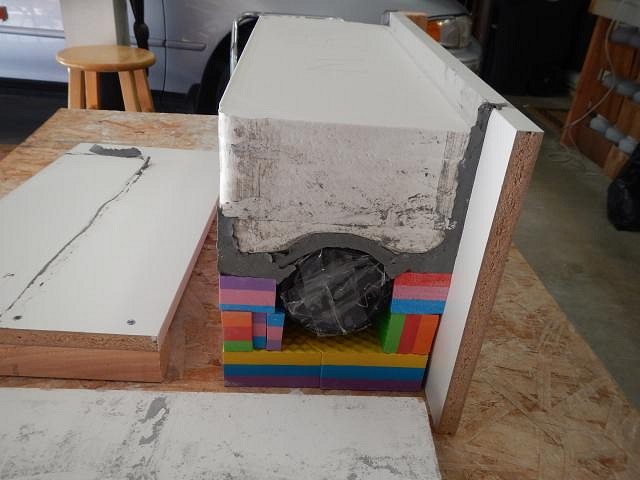
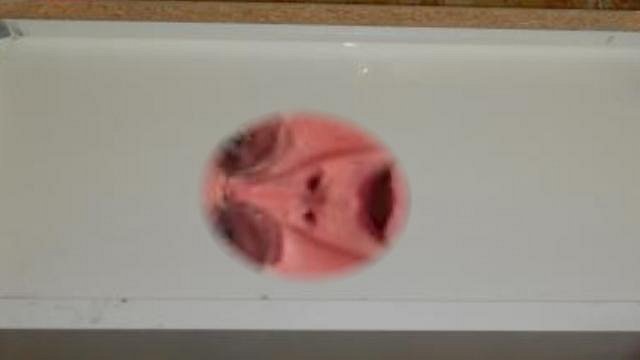
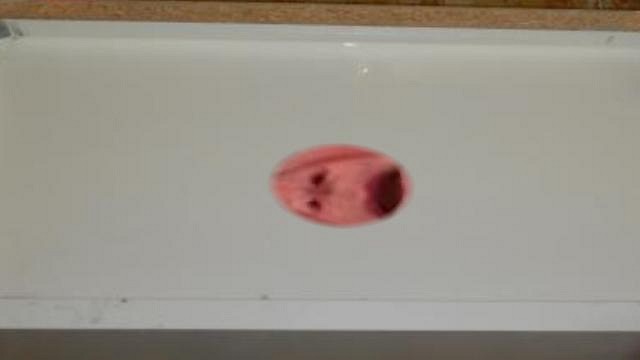
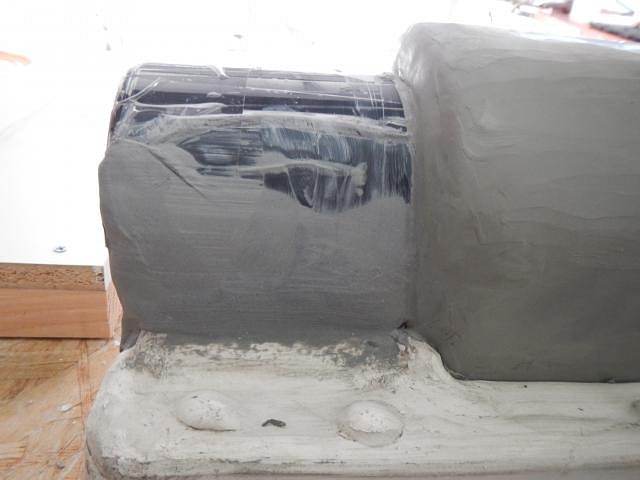
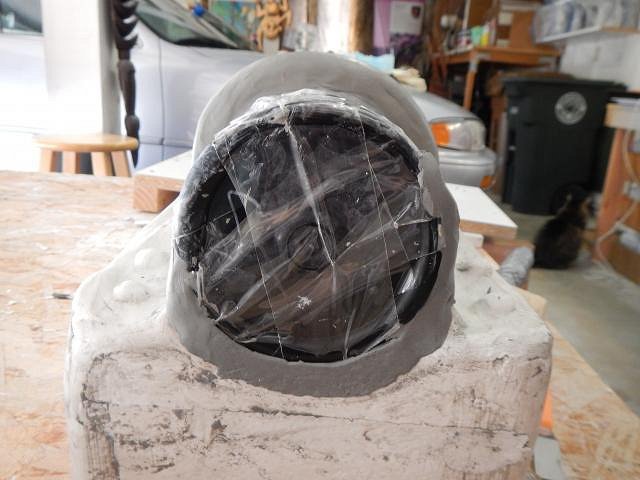
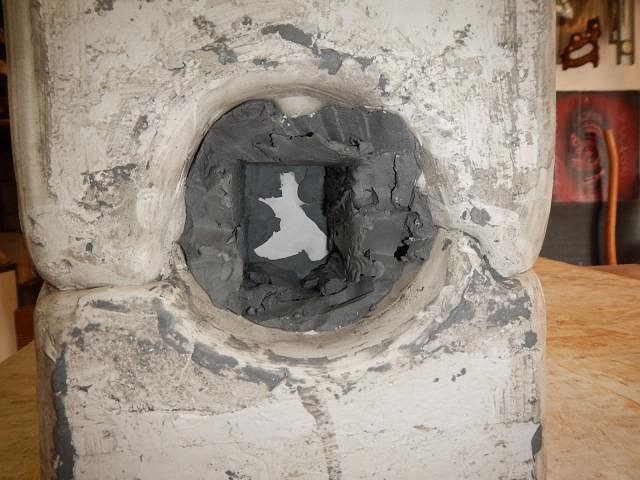
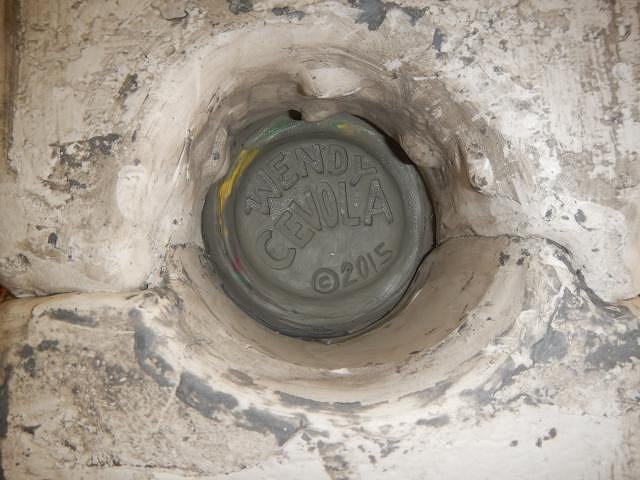
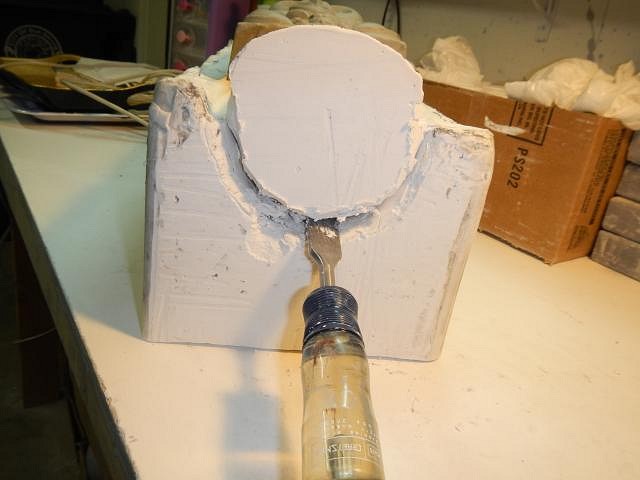
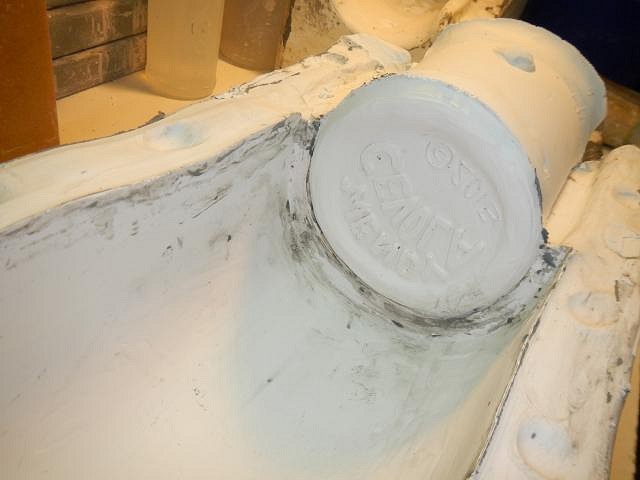
I'mmmmmmmmmm back! First off, Thank You hang10tiki for the Hanauma Bay post card. It was so fun to receive and the photo brought back long past memories. You and Janelle are sweethearts. Part IV of mold making. I was so lucky that I figured out that I was going to have a problem if I didn't fix something. But first...when you make your first mold piece you can see if there are any areas where the plaster is not tight against the mug and fix it by doing a bit of careful chiseling. This will keep the next mold piece from filling in a very narrow area and then if it breaks off you have an area that will leak. Next I looked at the end to see if my first mold piece came up to the center of the round end. If it doesn't as shown here the next piece poured will not lift off because it undercuts the round end. Neither of these sides reached the center of the end. The good news is the this didn't matter for the actual mug because it is not a circle is it shaped in half a circle. So I just added clay to this end piece so that after the plaster is poured I'll still be able to remove the sculpture. I did the same with the opposite end and then I had an Ah Ha moment. It dawned on me that after I pour the next big slab I wasn't going to be able to remove this plastic end piece without opening the mold. I didn't want to do that. So even though I'd gone to the work of removing the undercuts from the sides, I removed the piece which exposed the bottom of the mug/lamp. Now I would need to build the same shape in clay. But to start I wanted to protect my name carved on the bottom. I cut out a piece of cardboard and started covering it with clay. I put it in place and used clay to finish the seal. Now to speed up the making of the end piece I added a block. I kept adding clay until it was built and ready to proceed with the next piece of the mold. When you make a mold you need to always think of all the steps ahead. That's what saved me from having to open the mold before pouring the last end piece. You'll understand this part as the photos are posted. Thank you all for the visit, Wendy |
|
H
hang10tiki
Posted
posted
on
Fri, Jan 16, 2015 8:42 AM
Glad the post card made it |
|
D
danlovestikis
Posted
posted
on
Fri, Jan 16, 2015 10:22 AM
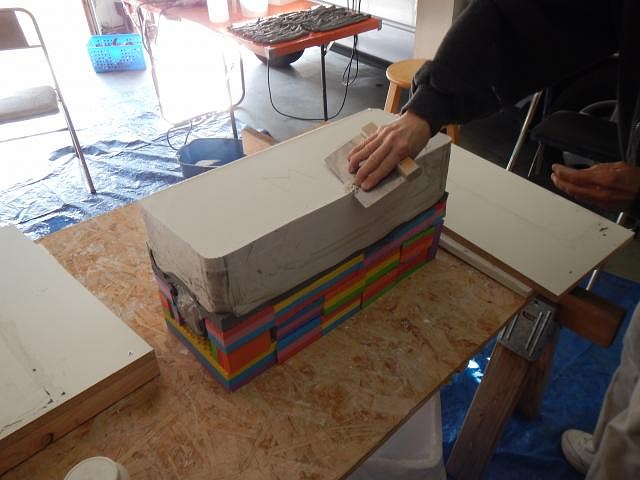
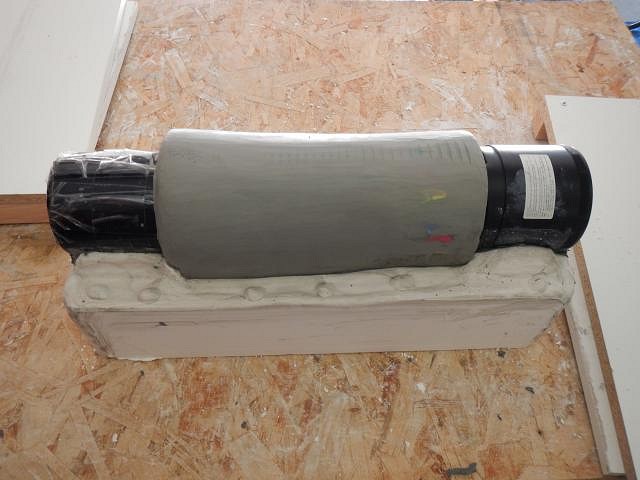
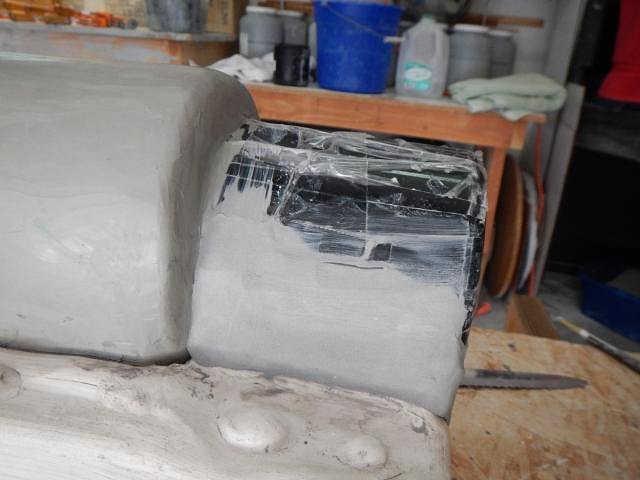
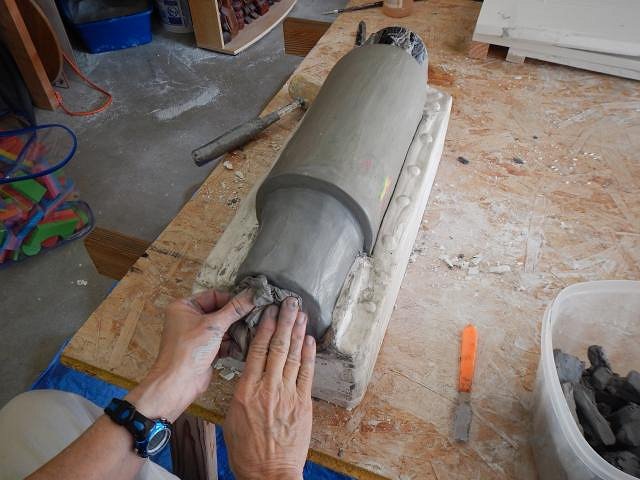
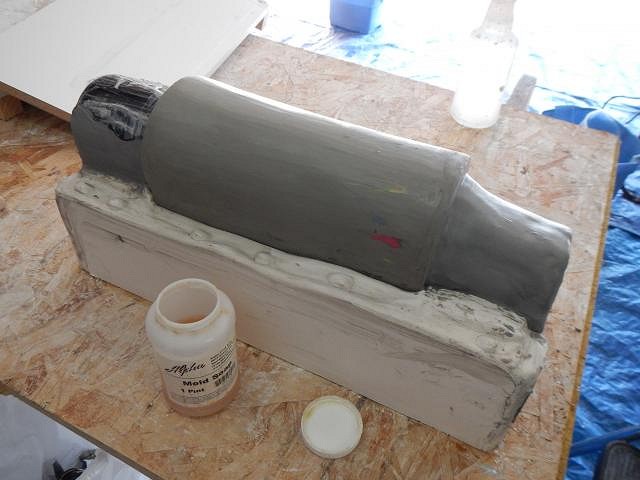
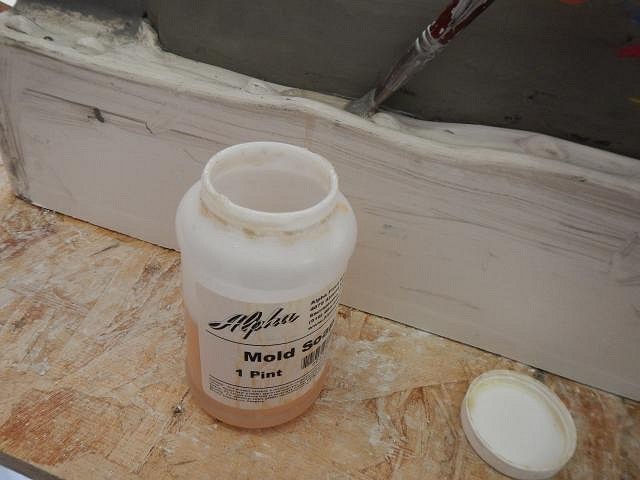
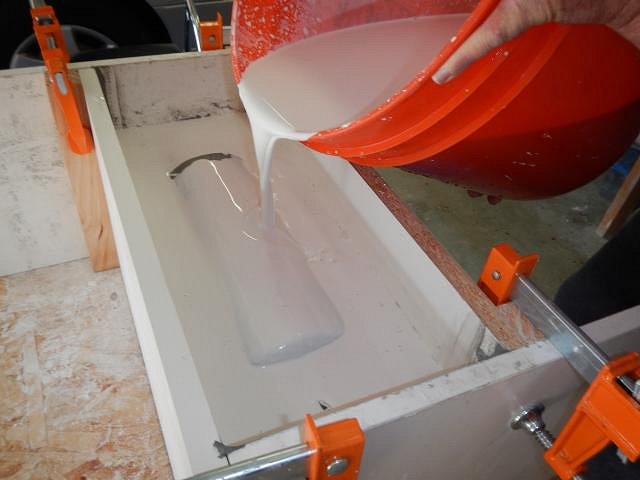
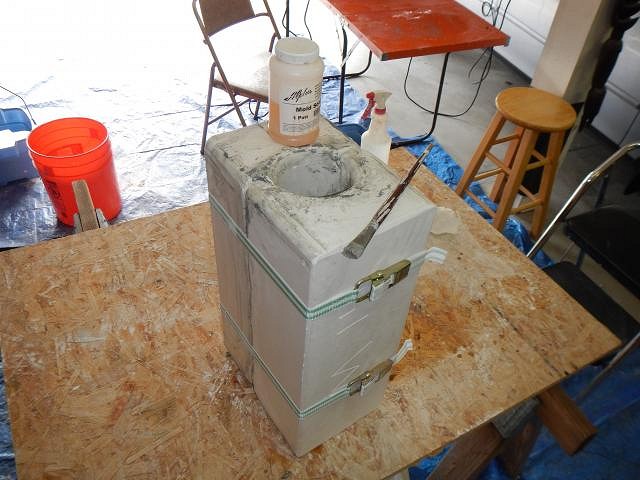
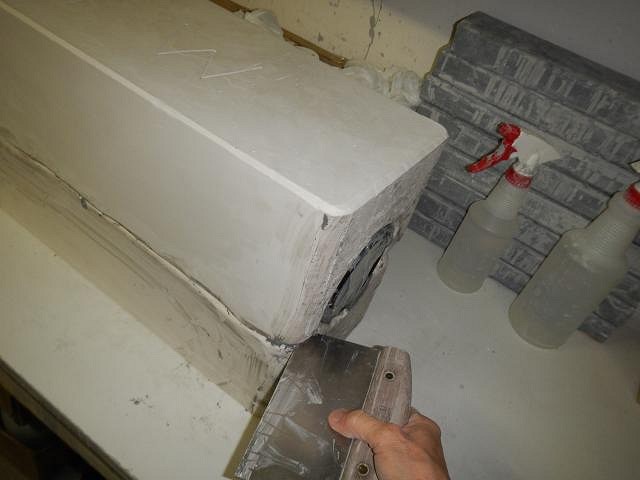
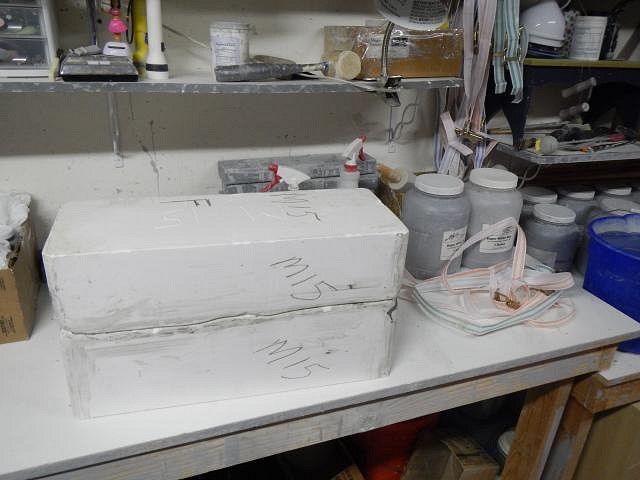
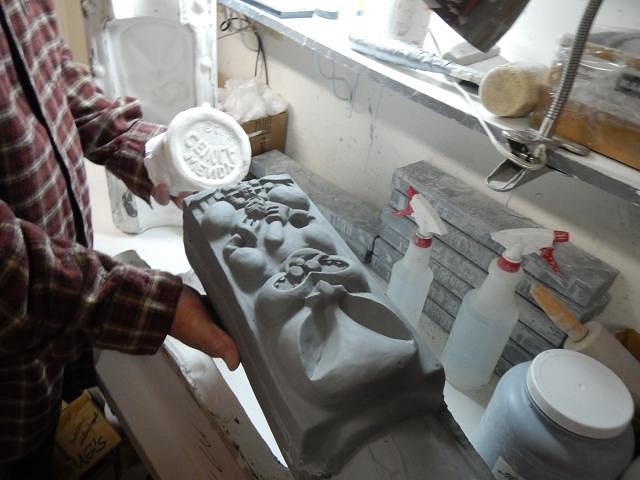
hang10tiki mold making is the hardest work in ceramics. It takes so much thought and care. Here's the next step on Whenever you are going to have plaster mold pieces touch you must use mold soap or they will permanently fuse together. I paint on the soap and wipe it off 4 times. I've been told 3 is enough but I've had a couple stick so now I do it 4 times. It's worth it. Put up the box around the first mold piece then use the super wet and sticky clay snakes to seal all the gaps and joints. Wipe these with a wet paper towel. Buy the way I get my paper towels at Home Depot because for workers there are super rolls (in an 8 pack) that last so much longer than those from the grocery store. I don't like loading the holder over and over again. I figured out how much I'd need and put the water in the bucket. Then as I slowly added the dry plaster Dan mixed it. Pouring was easy this time because the back of the mug/lamp has no detail. So I let him pour it right on and faster than for the front piece. How's that for figuring out how much to mix? Now it sits for 45 plus minutes. One piece to go! Step by step, step by step. Do them all correctly and mold making isn't so hard. No leaks so far! Cheers, Wendy |
|
H
hang10tiki
Posted
posted
on
Fri, Jan 16, 2015 2:13 PM
So will it be a giant mug
|
|
TT
Tyber Tiki
Posted
posted
on
Fri, Jan 16, 2015 2:23 PM
Wendy, I'm enthralled by the mold making process, it is a work of art in itself. Hang10tiki, I spit up my afternoon tea when I saw your pictures….too funny for words! However regarding your inquiries….I like “the lamp you can drink out of”….you know for the times you need a drink with just a little kick…or rather a little jolt :wink: Tyber Tiki |
|
D
danlovestikis
Posted
posted
on
Sat, Jan 17, 2015 10:11 AM
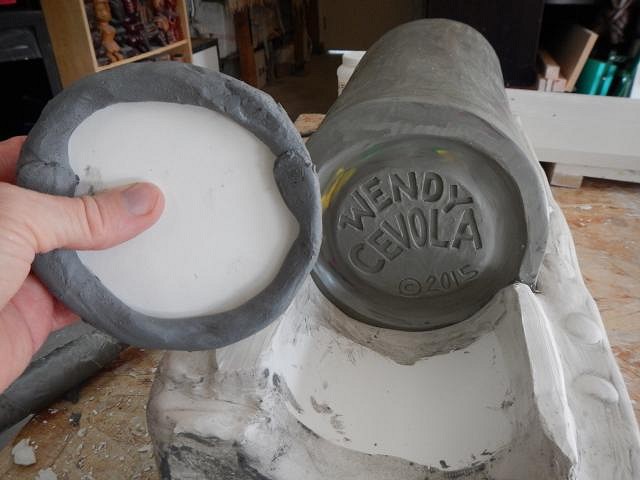
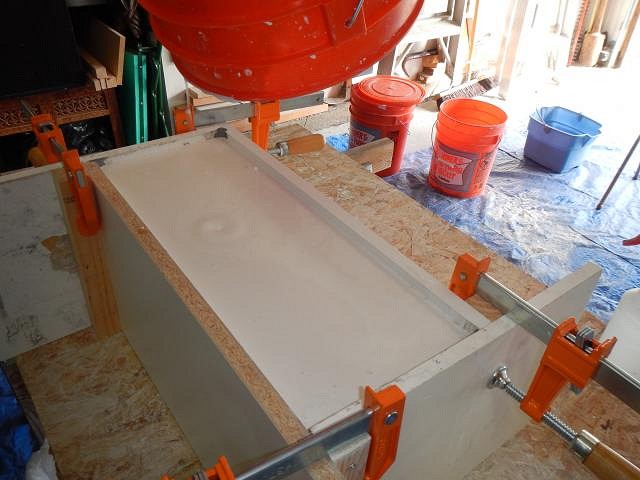
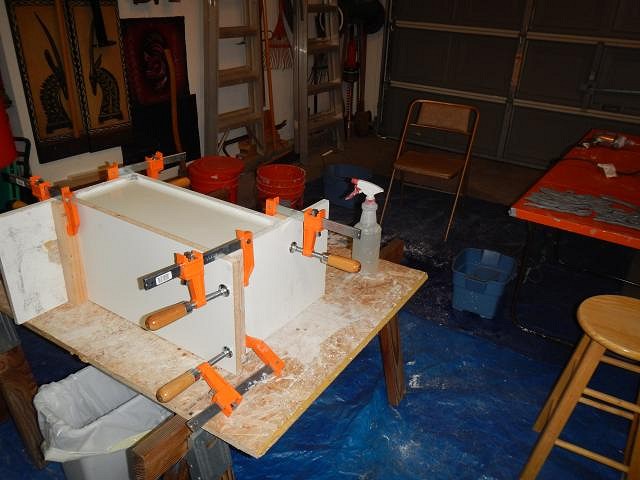
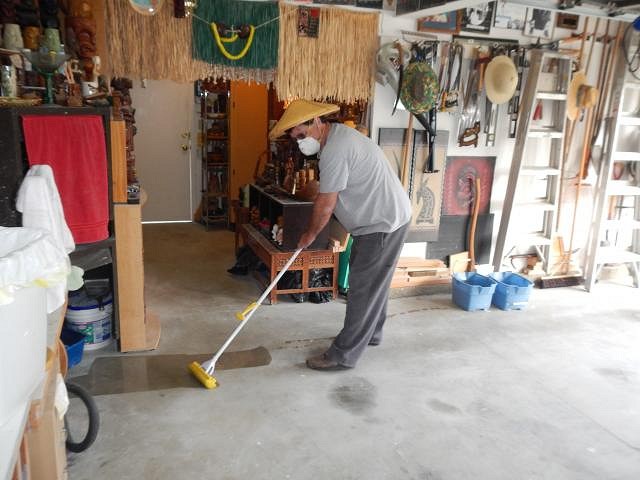
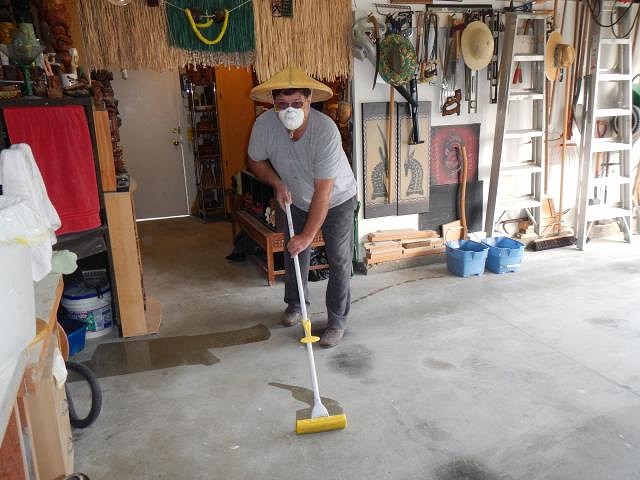
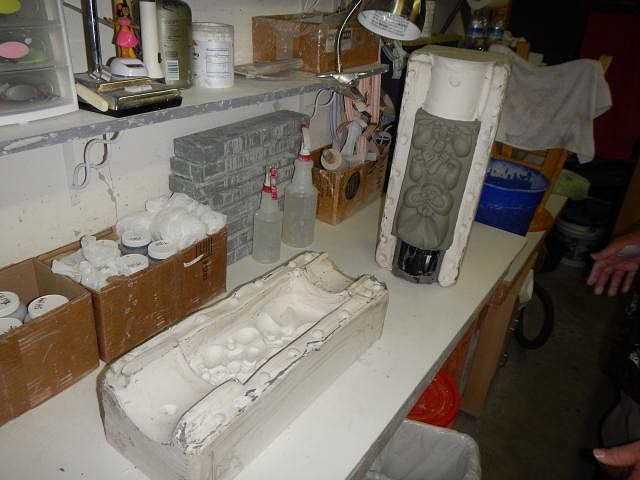
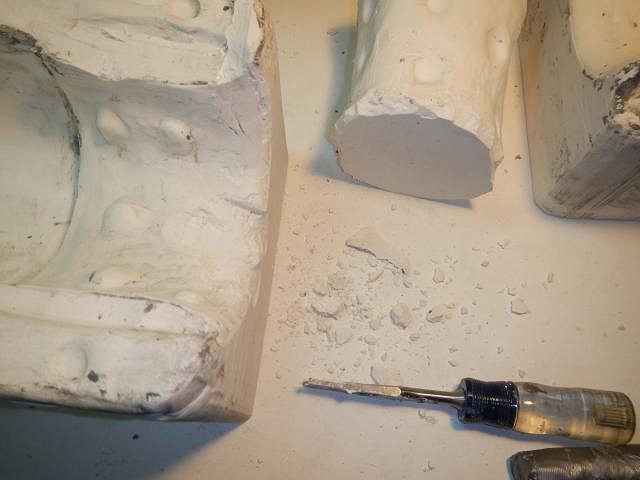
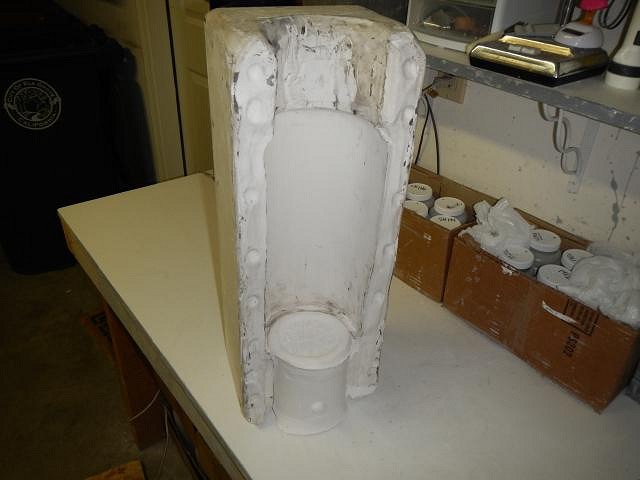
hang10tiki ohhhhh I wish my sculpt had been in those wonderful photos. Maybe when I have one carved??? Tyber Tiki thank you. It takes a crafters hand to figure out all the pitfalls. When I was in grade school I had sheets of wax, razor blades and matches as toys. I would build houses and cars using these three things. My mom was great, she taught me how to figure things out. This mold is really the easiest mold being only three pieces, it's just the size that was a challenge. ===================================================== Tyber Tiki you Wish step by steps continue.... Now that piece two of the mold has hardened the box is removed. I will not need it again. Instead as will show in another photo these two pieces are now held together by straps. The last piece is the bottom of the mug/lamp. I dug out the blocks first and then started on removing the clay and the piece of cardboard that covered my name. I should have not put so many bump locks on one side and none on the other. I started to carve one and stopped to put in a wet paper towel to catch the plaster crumbs. All done, now I have a lock on piece number two that will fill with plaster when this piece is poured. Mold soap layers added times 4. Since this is a small piece for the bottom be changed over to a bowl and hand mixer. I add the plaster slowly into the water. I use the spatula while Dan mixes. Once the plaster was just right poured in into the bottom hole slowly so all the lettering fills up without air bubbles. I made little clay dams at the top where the two pieces join that way we can overfill that piece. The reason for overfilling is so I can rasp the bottom flat with all 3 pieces the same. Then the mold can be slid together upright. If that center piece were shorter that would be more difficult. This was one of the least messy days we have ever had, no leaks for trips or drops! After putting that away and washing the tarps Dan began his routine mopping of the garage floor. Clay dust is deadly so dusting our garage happens more frequently than dusting Dan's mug collection. The mold is made just a few more steps. Cheers, Wendy |
|
L
LoriLovesTiki
Posted
posted
on
Sat, Jan 17, 2015 10:41 AM
Wendy, The process of making a mold seems straightforward UNTIL you point out the problems like undercuts, that I would never have noticed. I guess that's what all your experience has taught you. It's still fascinating to watch! It makes me want to try one day. As a report for you, carving is WAY easier (ie: smoother) when you carve at the right time. I carved my 2nd Hawaiian shirt platter last night at everything carved pretty smoothly without multiple strokes! IT will be even better when those new craving tools arrive. Thanks so much for finding them for me. |
|
H
hang10tiki
Posted
posted
on
Sun, Jan 18, 2015 7:23 AM
Spatula and a mixer I'll stick with making a Mai-Tai or 2
[ Edited by: hang10tiki 2015-01-18 08:16 ] |
|
D
danlovestikis
Posted
posted
on
Sun, Jan 18, 2015 9:32 AM
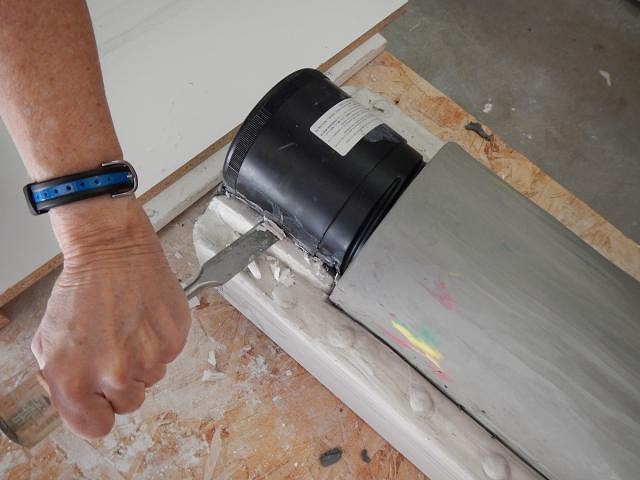
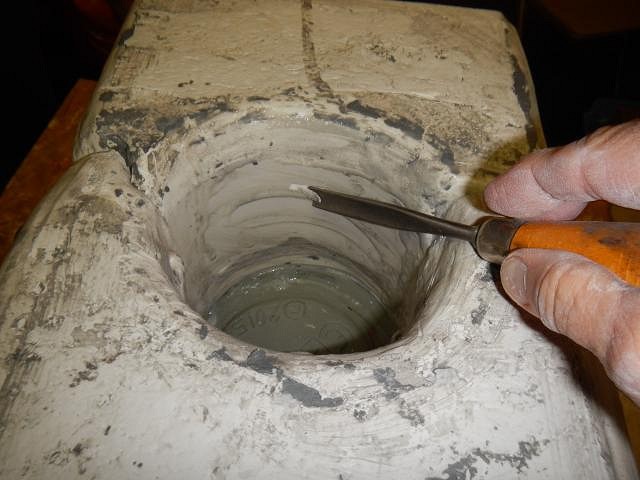
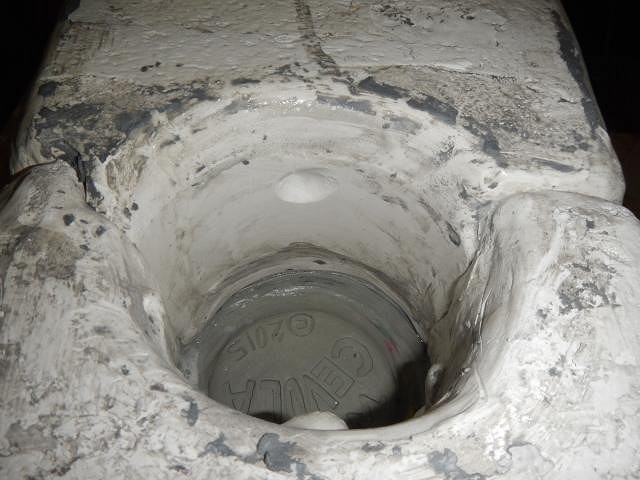
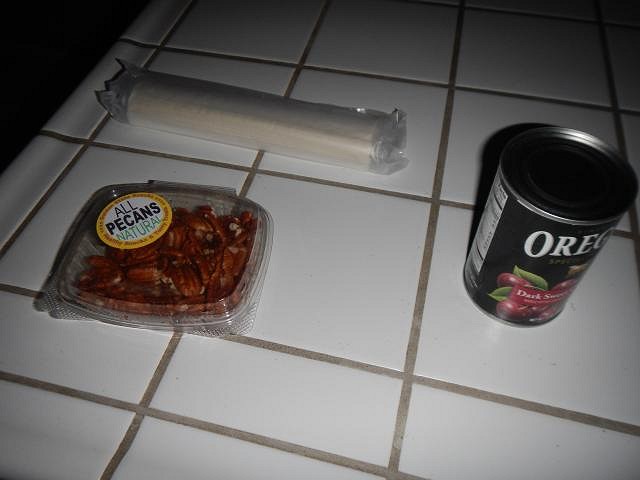
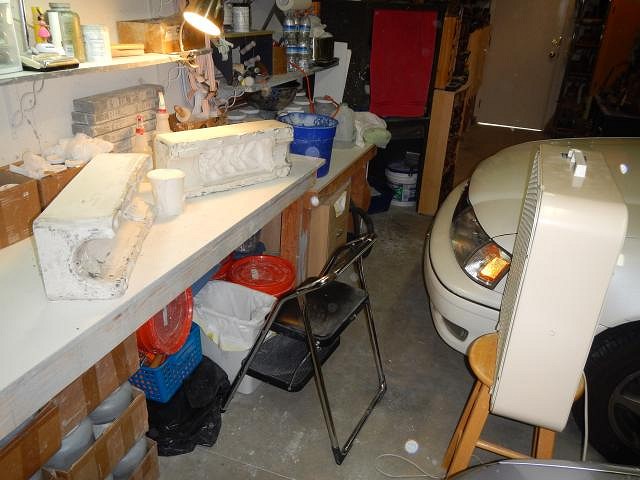
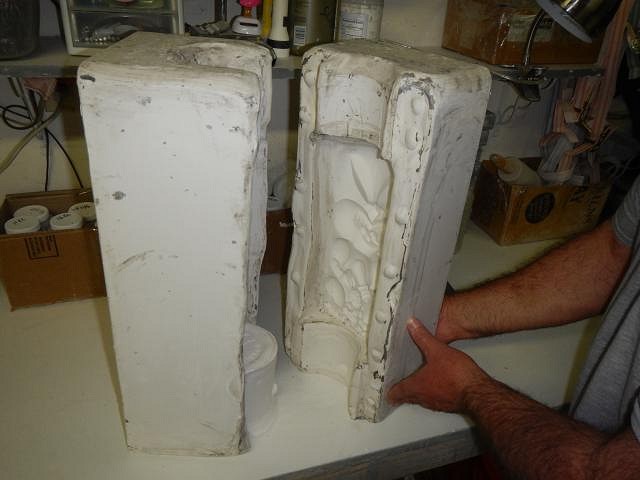
LoriLovesTiki if you try one just have some sort of list of steps. I did a picture board that we used the first few times. It helped me remember to use the mold soap. It would be fun to see you mold your own mug. Tiki Ano if planning to do just that. hang10tiki I cooked a desert last night. I made it up so it didn't go too well but it was fun. I had never used phyllo dough before so I wanted to make cherry tarts. I made the egg white, olive oil, water mix that you spread on each sheet then sprinkle with sugar and cinnamon. I was lazy and did every third sheet. I found out that was a no no. I boiled the cherries and pecans but it didn't thicken up. I guess I should have used corn starch. So in the end I made big crackers because there wasn't enough sugar on them and we dipped it in the runny cherry juice. I think going to the bakery is a better idea and I'll stick to artwork. Thank you for the drink photo in front of my art. I love those photos that you take that way. =================================================== Tyber Tiki's HUGE Maori mug/lamp Wish mold is ready to open. Firt I had to step back and look at the largest mold we have ever made. Will it work? Fingers crossed. The last piece was ready to fine tune. These little clay dams were removed so that I could rasp the bottom flat. Making all the mold pieces on the bottom the same gives you an option for how you re-assemble the mold each time. I carved around this piece so that it would come loose easier. To start the process of taking the pieces apart I use my vegetable chopper and the rubber mallet. lift it off. Good thing I have Dan! He set aside the piece with the sculpt inside and we gazed upon the important piece of the mold. It not only looked good there were no pulled off pieces of clay. Now it was time to screw up. I tried to "lift" the round end piece with a chisel. I thought, "Oh no it's stuck". That was so dumb. So we removed the sculpt and then I lifted out the end piece. Since I had made it so deep the chiseled out plaster will have no effect and will not leak. No we placed the pieces facing a fan and put it on low to run 24/7. Each day we rotated the side facing the fan. The mold must dry 100% so that it "sets". Then the mold will be good for a long time. If you do not wait and try to pour too soon the mold will degrade very fast and loose detail. So you have to be patient. ==================================================== I wonder what I will be posting tomorrow. Hmmmmmmmmmm. Cheers, Wendy |
|
B

Beachbumz
Posted
posted
on
Sun, Jan 18, 2015 11:10 AM
Wendy I love it all! I've been following your progress on Facebook but nothing beats Tiki Central..:wink: Can't wait to see it finished up, btw I really love the way you did the bottom with your name, Nice! Aloha :sheckymug: |
|
H
hang10tiki
Posted
posted
on
Sun, Jan 18, 2015 10:38 PM
Huge mold.......... Glad u had Dan-0 to Lift it Cheers |
|
T
TikiAno
Posted
posted
on
Mon, Jan 19, 2015 12:35 PM
Wendy (and Dan), congrats on another Mold-Making Victory!
Bonus question:
Thanks for posting! |
|
D
danlovestikis
Posted
posted
on
Mon, Jan 19, 2015 8:10 PM
Beachbumz my head exploded with all the compliments. hang10tiki I wouldn't want to ever lift that mold. I can move it using leverage but that's it. TikiAno
answer all the pieces need to be made together so that they don't leak. I've tried to make the bottom piece first and it was harder than doing it the way I have shown. Either Beachbumz or Maui Rob, I can't remember which have made the bottom first so you can check out their threads because they did step by steps.
If you make a thin walled mold then keep it strapped together to dry. I make thick heavy molds so that I can take them apart to dry them faster. Out in the sun is just fine but the fastest way is to have a fan blowing on the mold. Sun and fan is ideal and we have done it that way. It will not shrink it just drys and becomes "thirsty" that's why it works with slip. Bonus question:
The huge Maori mug/lamp is Romo number 1 clay. It's very soft so it's not good for fine detail. I plan to hand carve the mug/lamp once it is poured. Best Wishes, Wendy ==================================================== I took a holiday. Photos tomorrow, cheers, Wendy Wow, I just saw we are on cool and current, thank you everyone who voted for us, I'm so happy_____________ [ Edited by: danlovestikis 2015-01-19 20:11 ] |
|
D
danlovestikis
Posted
posted
on
Tue, Jan 20, 2015 10:29 AM
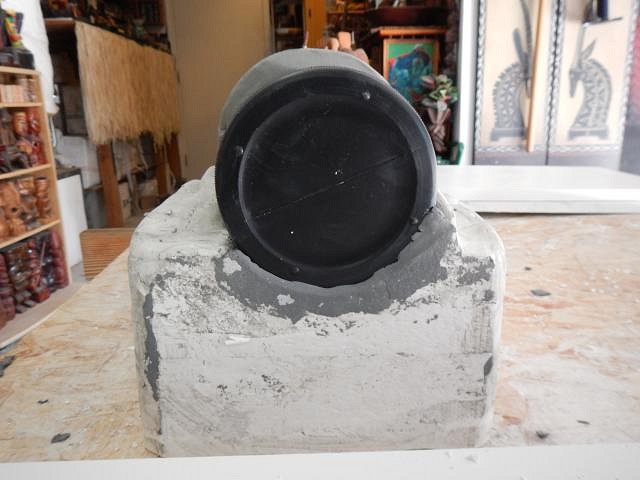
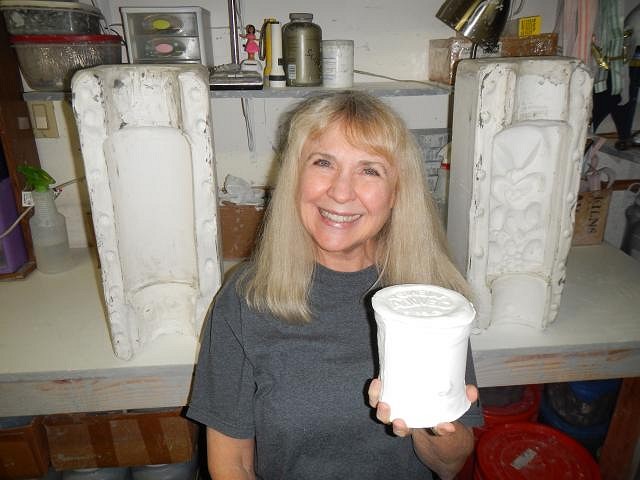
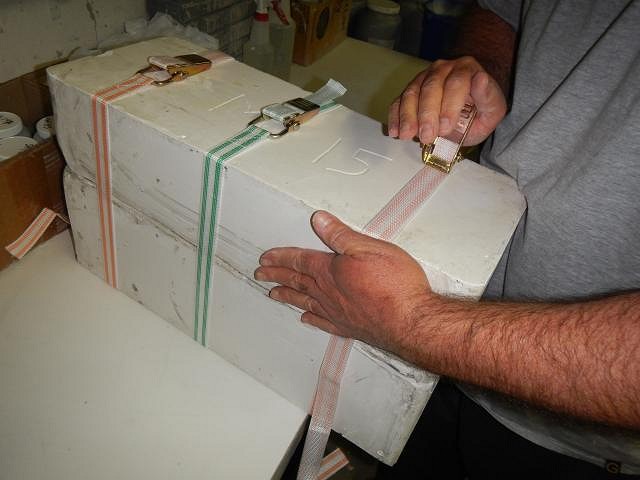
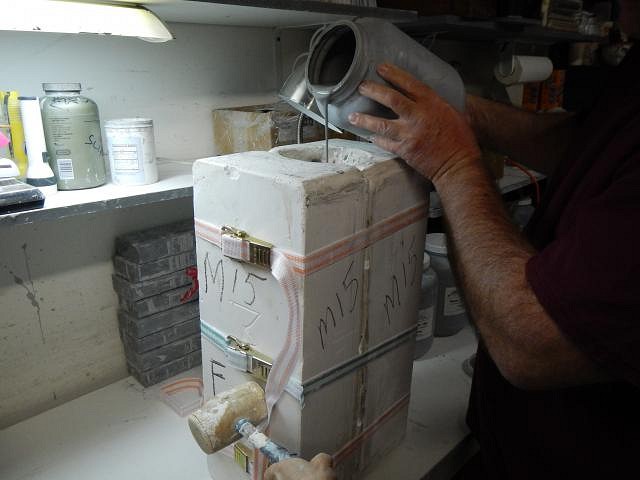
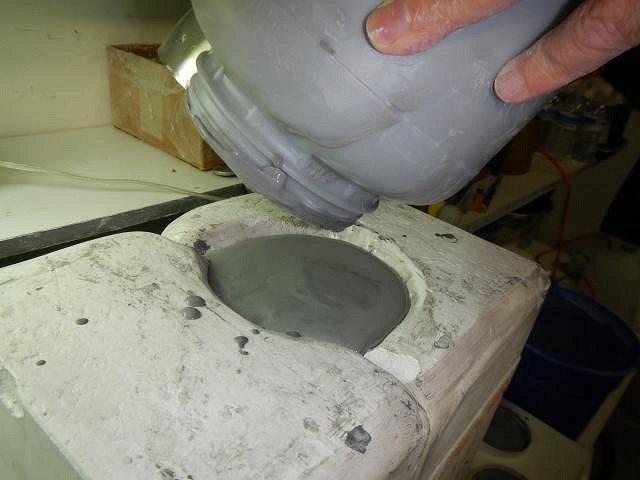
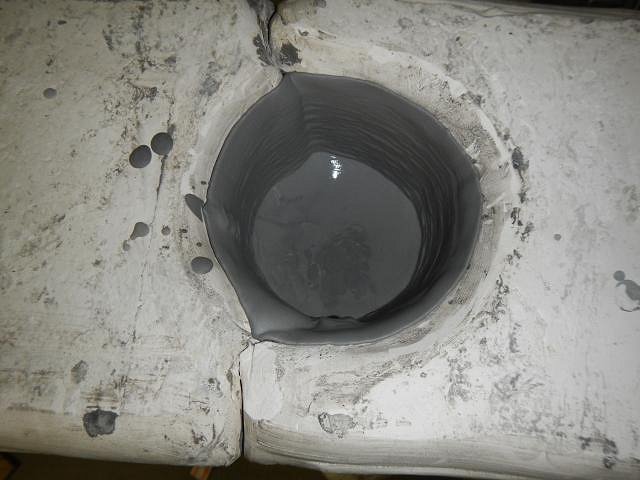
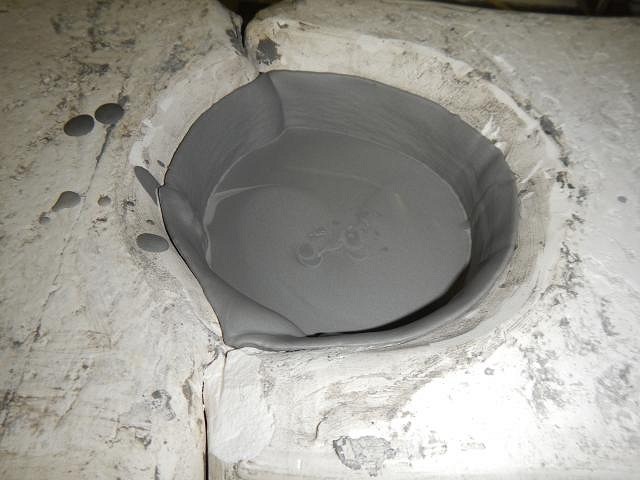
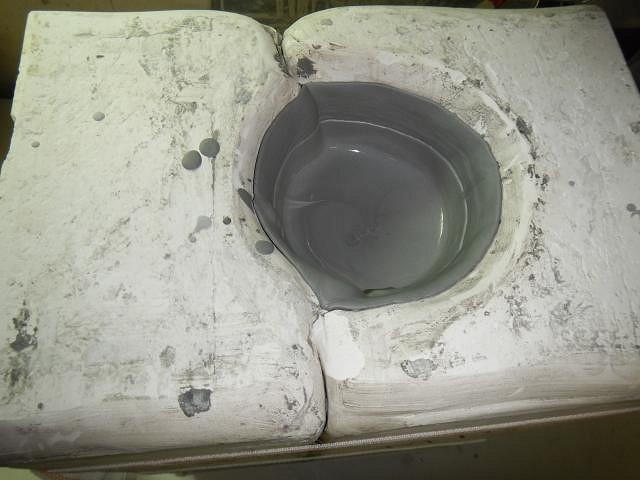
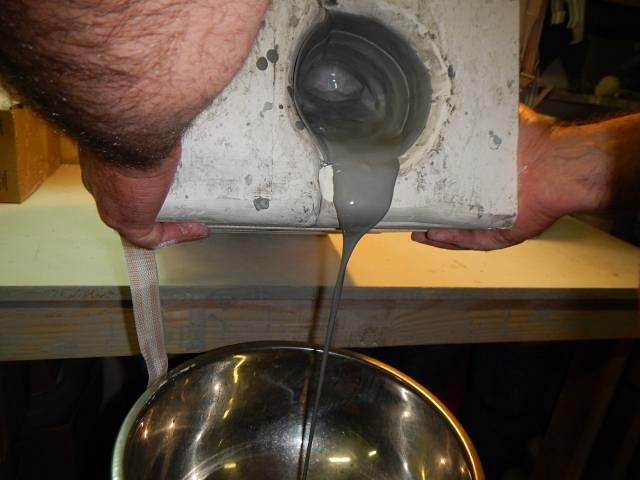
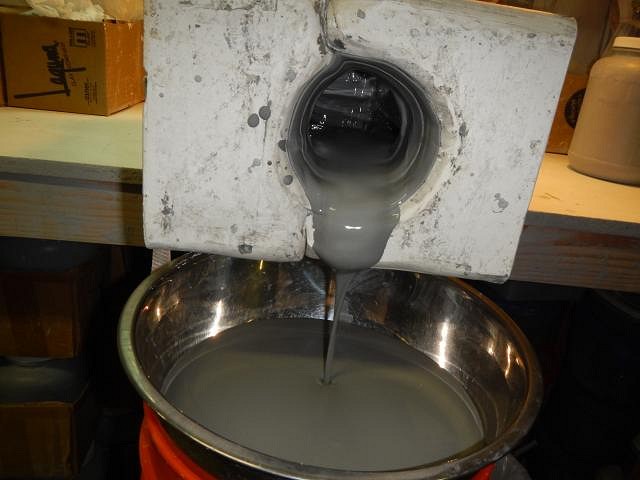
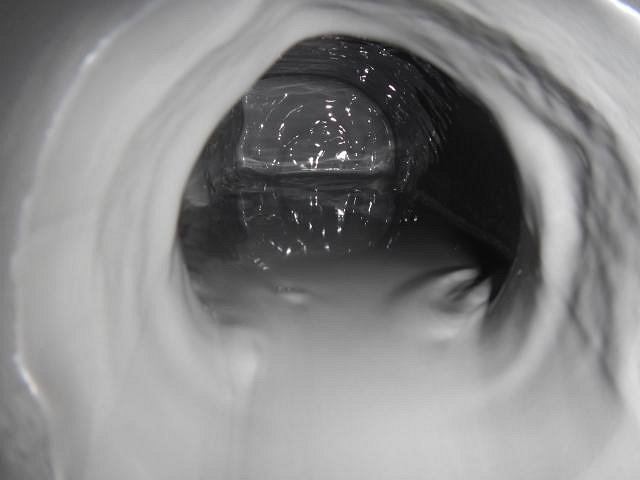
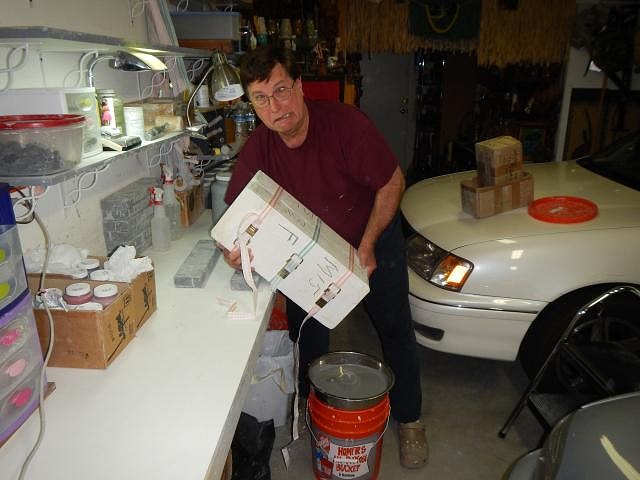
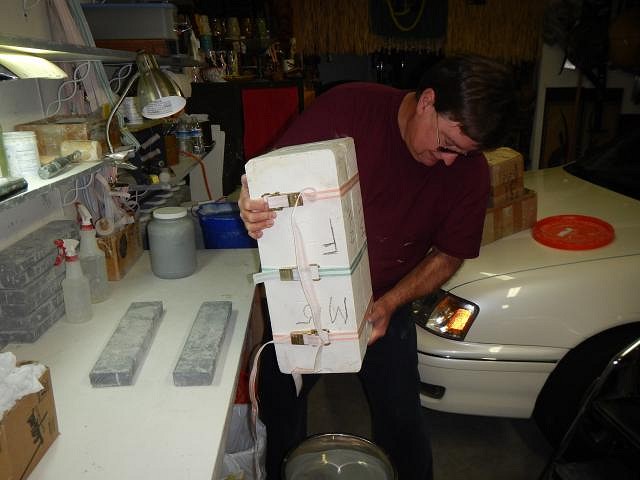
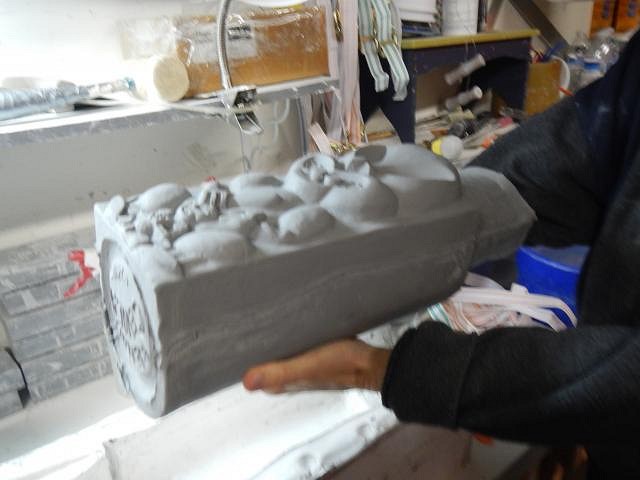
Back to Wish List #5 and Tyber Tiki HUGE Maori mug/lamp project. More than a week has past since making the Maori mold. 24/7 the fan has blown air on each side until it felt dry. I decided to pose with the mold since Dan gets in most of the photos. Look how large the small bottom piece is in my hand. The photo shows that the sculpt was in the middle of the mold and the pouring area at the top is deep and the piece at the bottom, which I am holding is tall. Since I rasped the bottom of all the pieces when they were together I can assemble the mold while it's upright. It doesn't really matter for assembling but sometime it matters when you take it apart. Here goes the last piece into place. We put the first two straps on then lowered it onto it's side and put on the last strap. We could have put it on while the mold was upright but when you put them on really tight it's better if the mold is on its side. To start with pouring we go very slowly while I bang the side with a rubber hammer. This gets the bubbles of air to rise to the surface and pop. This also helps fill in all the detail with the clay slip. Filled to the top. Now I took a break. There's the Maori Sculpt with a couple of bangs to his forehead. I keep my sculpts and only break them down as I need to reuse the clay. Romo Clay can be used over and over again. After 1 hour I went to check on the mold. The fact that the level of slip had lowered this much told me the mold was indeed dry enough to pour. I added some more slip and let the mold sit another hour. The slip again lowered. After 2 hours I hoped that the cast will thick enough to support its HUGE size. Now we start to pour out the left over slip. We do it slowly to prevent the glug glug sound which will collapse the sides. I look inside with a flash light to see if it is emptying clear to the bottom. I can see the bottom, the flat front and the rounded backside. We empty the side into a big bowl supported by two plastic containers with dry plaster in them. Dan couldn't tip the mold until I removed one container. My poor husband lifting this super heavy mold. He drained the last bit and put the mold which is upside down on these 2 x 4's to continue draining overnight. Well Tyber Tiki there's more to come, that's for sure. ========================= Cheers, Wendy |
|
TT
Tyber Tiki
Posted
posted
on
Tue, Jan 20, 2015 1:55 PM
Hi Wendy, I've been traveling and just caught up on the thread from the past few days. Wow, what great progress! Seeing the pictures of you in front of the mold as well the pics of Dan lifting, strapping, tilting, pouring from the mold really illustrates just how massive this mold is. I hope Dan remembers to lift from the knees :). Tyber Tiki [ Edited by: Tyber Tiki 2015-01-20 13:56 ] |
|
L
LoriLovesTiki
Posted
posted
on
Tue, Jan 20, 2015 7:05 PM
That thing is just massive! I can't imagine how heavy it is!! (there's another contest for you, lol) Amazing, just amazing. Looking forward to seeing the piece come out of the mold. Can't wait to see how you you carve it up too!!! Fun, fun, fun! |
|
K

Kon-Hemsby
Posted
posted
on
Wed, Jan 21, 2015 4:48 AM
Great post. I am learning a huge amount. Thanks |
|
H
hang10tiki
Posted
posted
on
Wed, Jan 21, 2015 7:14 AM
AWESOME Dan-0 is strong like bull [ Edited by: hang10tiki 2015-01-21 07:43 ] |
|
D
danlovestikis
Posted
posted
on
Wed, Jan 21, 2015 10:45 AM
Tyber Tiki he tries. Lifting was a challenge. I may have made more of a lamp than a mug. It held 1.5 gallons of slip. During the course of drying and firing it will shrink a little more than an inch. Even still I think it will hold more than a gallon. What have I done!!! LoriLovesTiki that's a great idea. I will remember that for the future. It is massive. I hope it shrinks a lot in the process. Carving it will be fun. Wait until you have your tools and you'll be doing this too. Kon-Hemsby welcome and thank you. I post each day so that I have fun messages to read. It makes it worthwhile. My thread is a connection place where we all have fun sharing and making new friends. I hope you'll be back. hang10tiki I couldn't do these molds without his strength. He wants us to retire at 70. If he gives out on my I'll have to just paint instead. Horrors I can't give up clay, no way. Poor Dan. Thank you for the countdown photos, we love that. ==================================================== Lunchtime, back later with photos. [ Edited by: danlovestikis 2015-01-21 11:28 ] |
|
T

TikiHula
Posted
posted
on
Wed, Jan 21, 2015 12:57 PM
So cool to see a bunch of your sculpts in one photo. And Dan's face pouring out that mold is priceless! Keep having fun and being creative :D |
|
H
hang10tiki
Posted
posted
on
Wed, Jan 21, 2015 1:09 PM
Well when Dan-0 wants to retire |
|
D
danlovestikis
Posted
posted
on
Wed, Jan 21, 2015 3:55 PM
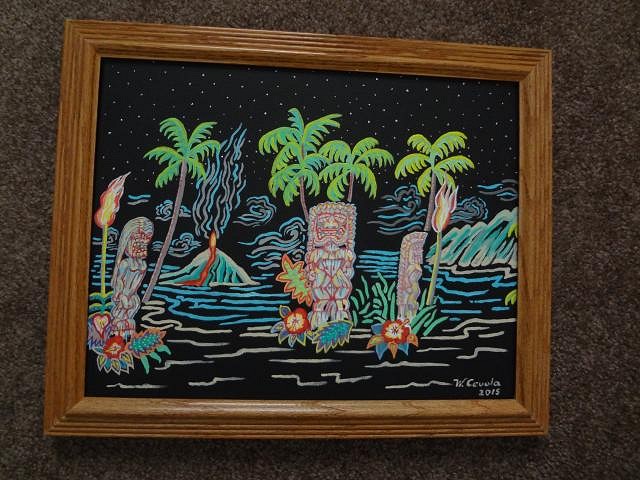
hang10tiki you are an excellent photographer. You catch Dan at all the right moments. ========================================================================== Misc. stuff. I framed my swap art today. All I need is the person to ship too and that comes at the end of the month. My cat likes to "hide" nearby when I'm working on art. Dan and I did the 23andMe ancestory by gene traits and guess what we may have had common ancestors!
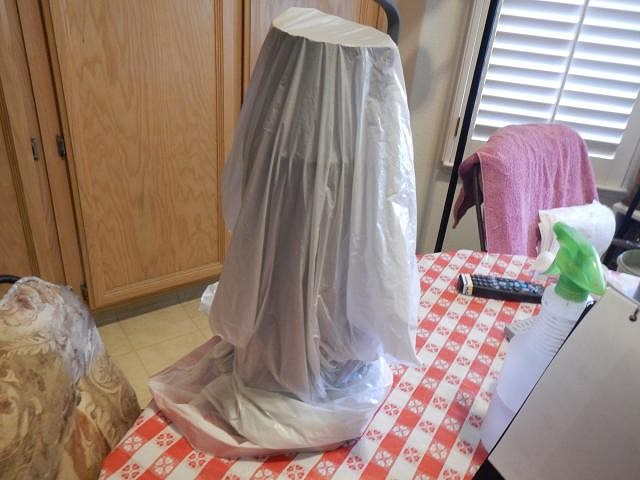
No wonder we are at home in the garage working with clay from the earth. ========================================================================== Tyber Tiki's HUGE Maori mug/lamp in progress. After emptying the mold of the remaining liquid slip we pour it back into the jugs. It now has less water content than would be good for the next cast. I always check to make sure its not to thick to use. I add water and then we shake the heck out of it. After the Maori was upside down over night I still worried that once it was out of the mold it would just collapse like when the Wicked Witch of OZ melted into a puddle. I wanted to turn it on its side and have the fan slowly blow air into it until I could feel that the insides were leather hard. So first I decided that It should go face down so the flat side had the bridge shaped back side up. That way it should sag even though it was very soft. With the fan on low I've left it for overnight. So it's drying to firm up enough that I'll be able to remove it from the mold. With Dan's help of course! Cheers, Wendy [ Edited by: danlovestikis 2015-01-21 16:03 ] |
|
H
hang10tiki
Posted
posted
on
Wed, Jan 21, 2015 9:05 PM
|
|
TT
Tyber Tiki
Posted
posted
on
Thu, Jan 22, 2015 2:52 PM
Hi Wendy, wow a tiki mug that would hold a full gallon of the drink of your choice would be most impressive! I also like your idea for possibly using our Maori as a lamp base as well. Honestly, whatever you recommend as we move forward is good with me. I will be more than proud to display this incredible piece of Maori art regardless of it is a mug or a lamp. Hang10Tiki...your picture making skills continue to impress. Any visual thoughts as to how a tiki-phile would lift a filled one gallon tiki mug. I'm thinking a bamboo A-frame :). Tyber Tiki [ Edited by: Tyber Tiki 2015-01-22 14:53 ] |
|
T
TikiHula
Posted
posted
on
Thu, Jan 22, 2015 3:27 PM
I knew there was something about you two...I just couldn't put my Neanderthal finger on it :wink: |
|
D
danlovestikis
Posted
posted
on
Thu, Jan 22, 2015 3:56 PM
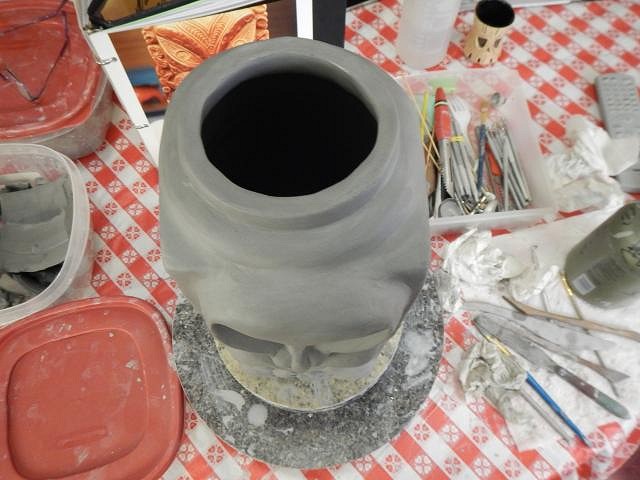
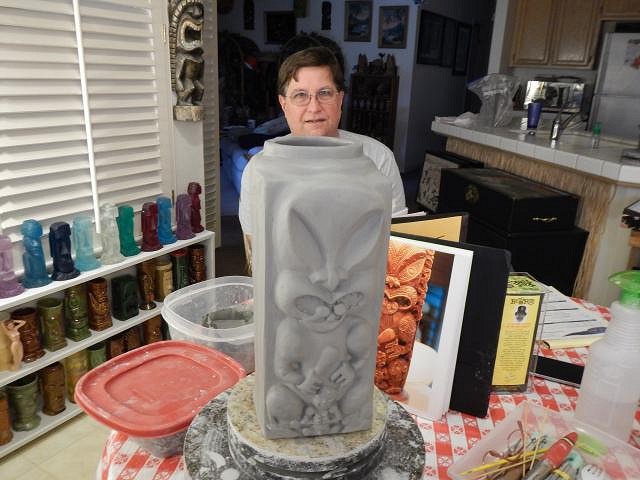
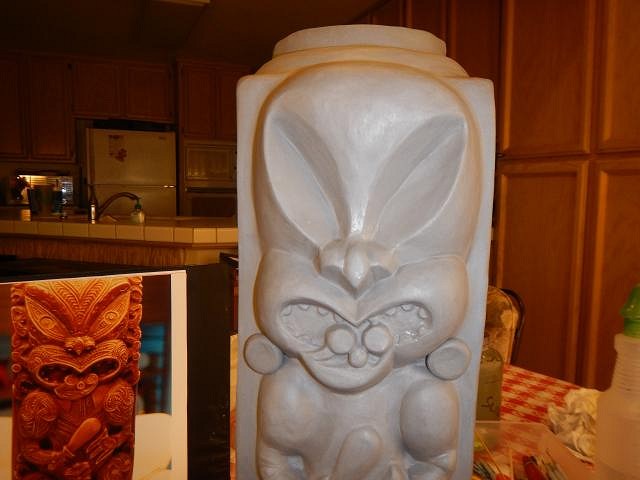
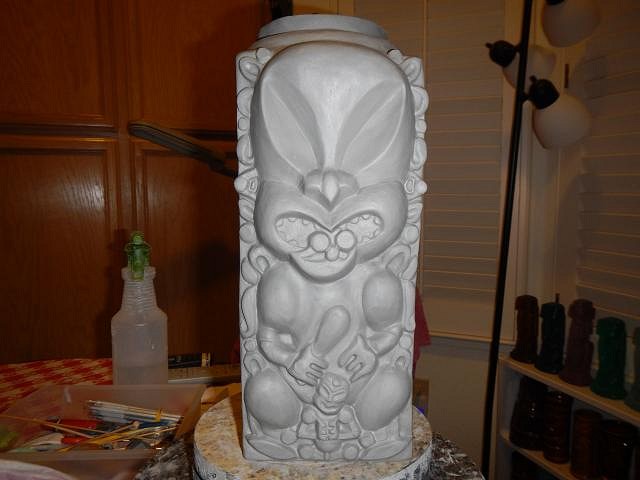
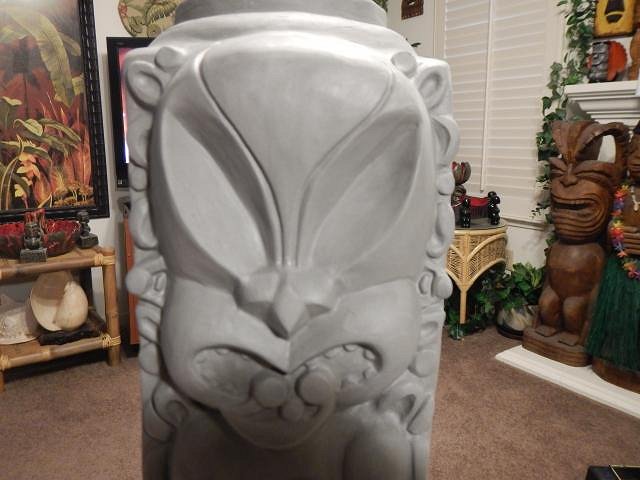
hang10tiki you really surprised us. It was perfect for a photo but I didn't even have time to Wish for one. Thank you. Tyber Tiki right now I'll make it as a mug. Then we'll go from there. I made the mold so that I can make as many as are ordered or I do on Spec. It's all fun. I wouldn't put a handle on it but it could be a pitcher for a mixed drink. Just keep thinking...shrink...shrink....shrink. TikiHula Dan was not thrilled but I think it's fun. GROG where are you? =================================================== Tyber Tiki's HUGE Maori mug/lamp is ready to open. I felt the inside of the cast and it was solid, no mushy clay. The fan worked really well. We had turned the mold over so that the Maori was face up. Now Dan had to lift the top piece off straight up. Our first view showed everything in its place. No undercut problems. Now I stuck my arm and hand into the cast to lift it straight up while Dan pulled off the end piece. Now with my other hand supporting it I took it into our home. I was able to carefully set it down on a turntable. I decided to let it rest overnight wrapped in a plastic bag. First I cut off the top. At this point I'm unsure if this is best for if I should cut this off and just have the opening one level lower. Tyber Tiki here or more flush with the top? Another view. Dan's keeping me company. I just stopped to take a look. Now I went over the entire tiki smoothing the surface with brushes. I hope start carving tomorrow. kingstiedye is coming over for a visit. I love clay days. Cheers, Wendy |
|
L
LoriLovesTiki
Posted
posted
on
Thu, Jan 22, 2015 6:19 PM
OOOH! The carving is about to get started. I'll be traveling this weekend so I know there will be a lot to catch up on when I get home. Woo-hoo! |
|
H
hang10tiki
Posted
posted
on
Thu, Jan 22, 2015 6:58 PM
Dan-0 can move it...no problem
|
|
TT
Tyber Tiki
Posted
posted
on
Fri, Jan 23, 2015 4:16 PM
Hi Wendy, This is so exiting and I am really glad that the Maori survived it's removal from the mold. Regarding the top cut, I like the cut as it looks now, rather than having it cut flush. Hang10Tiki, I knew you wouldn't disappoint. Great stuff! Tyber Tiki |
|
D
danlovestikis
Posted
posted
on
Fri, Jan 23, 2015 9:15 PM
LoriLovesTiki Woo Hoo, I'm looking forward to your carving tools arriving. They are also clay moving tools. You'll lean to shove clay into place with them. hang10tiki ohhhh I love that photo. It is that heavy. Tyber Tiki After it has been finished and has dried I will measure it and let you know just how large I anticipate it to be. It shrinks twice. Once when drying and once when bisque fired. Then you may decide if you want it changed from a HUGE mug to a normal sized lamp. To do that I would make a cap for the top with a hole in it and also put a hole at the bottom backside for the cord. You would have to get the parts and put them together after it's in your hands. That's about a month away. Once I finish the carving I have to dry it slowly so that it will not crack. ===================================================== Tyber Tiki's HUGE Maori mug/lamp has it doodads placed. I almost forgot them. Using very sticky clay and spraying the tiki with water I added pieces of clay. I can't allow air bubbles or pockets or this will explode in the kiln. Note the two round piece at the shoulders. So after adding the piece I use a wet brush or a wooden tool to seal all the edges down to the original cast piece. Once all the pieces were on and secure I went back and carved out some of the centers. Done for the day he will now rest overnight in a plastic bag to firm up. I think it's time for me to rest up too. Good night, Wendy [ Edited by: danlovestikis 2015-01-23 21:37 ] |
|
V

VampiressRN
Posted
posted
on
Fri, Jan 23, 2015 10:27 PM
Wow...simply amazing...that is going to be a bladder buster!!! I see Dan is wearing my number. |
|
H
hang10tiki
Posted
posted
on
Sat, Jan 24, 2015 6:07 AM
What Vamp said |
|
TT
Tyber Tiki
Posted
posted
on
Sat, Jan 24, 2015 7:39 AM
Looking great Wendy and I am totally on board with the mug/lamp decision to be made in a months time. Tyber Tiki |
|
D
danlovestikis
Posted
posted
on
Sat, Jan 24, 2015 9:04 PM
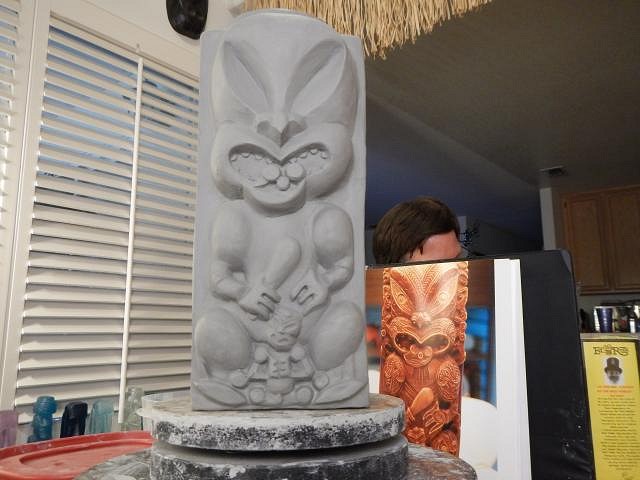
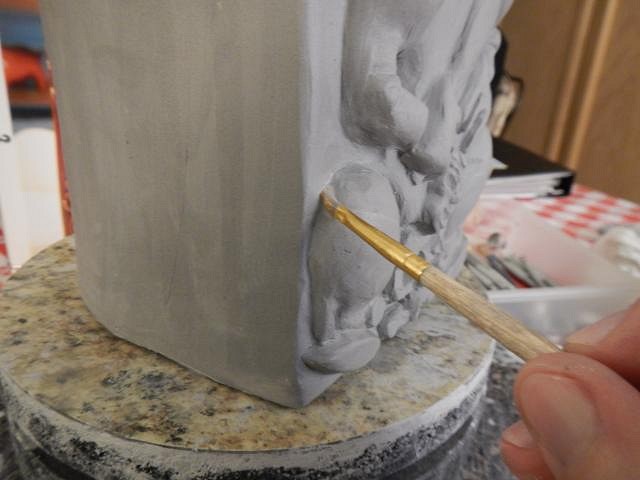
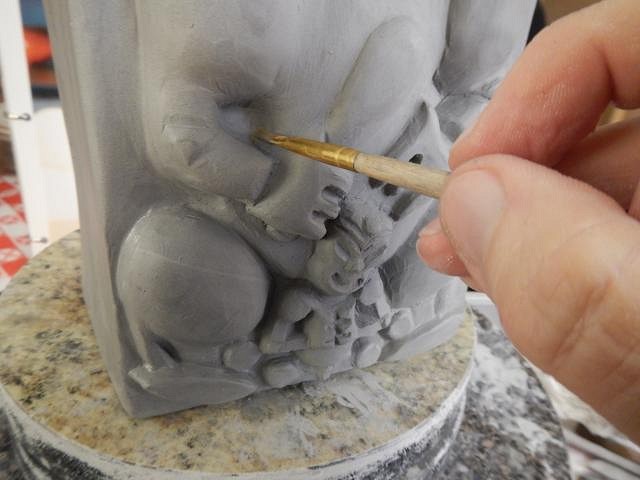
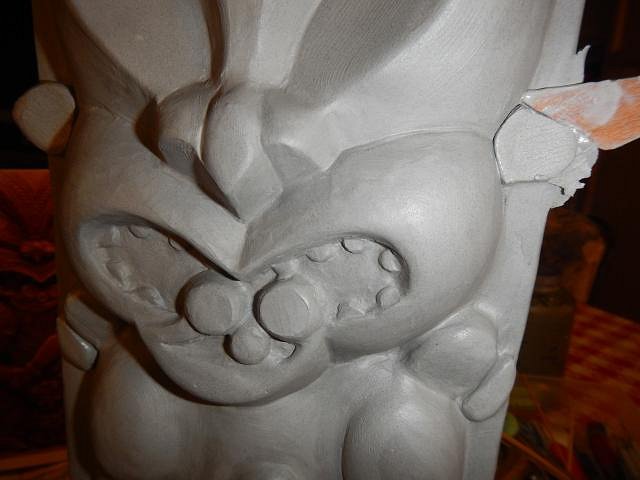
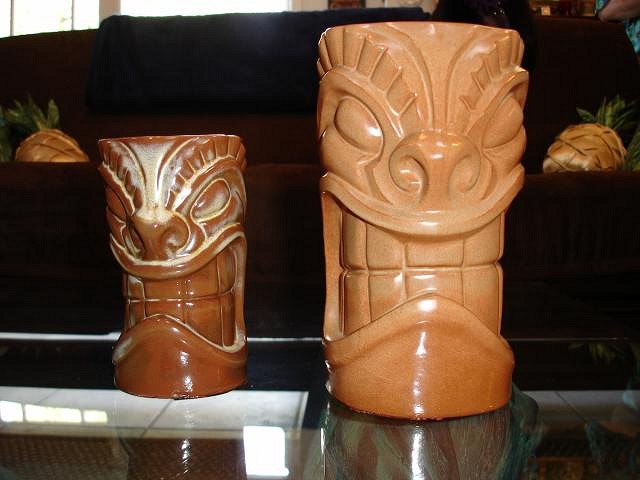
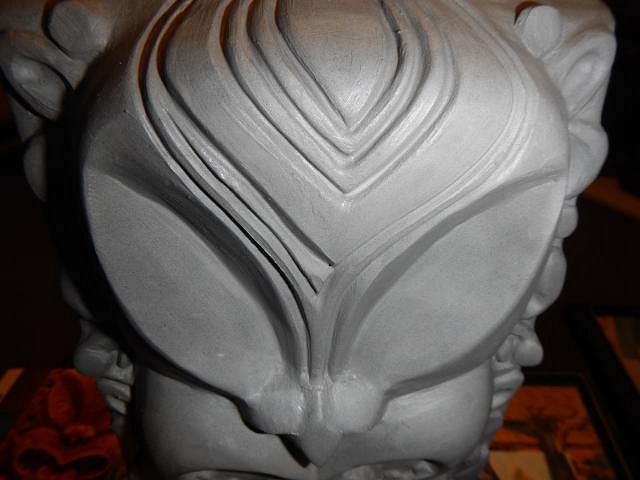
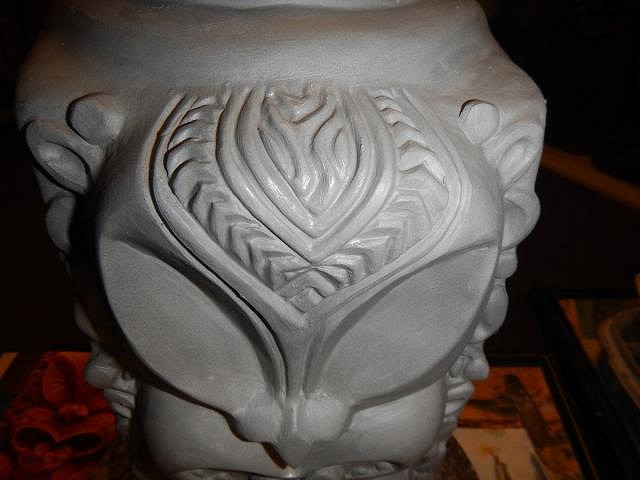
VampiressRN the first produced Frankoma War God was HUGE. To make the smaller one they would cast, bisque fire, mold. Then they would take the smaller one and again cast, bisque fire and mold. Each one was progressively smaller than the last one since drying and firing shrinks the mug. They kept doing this until they had the smaller one in the right size. All the molds were destroyed in their devastating fire shown on page one of this thread. That is one reason that there were so few ever made. All the small War Gods are clones of the first big one. This shows that at one time BIG drinks were being made. They stopped making the big ones because they were stolen too often from the bar that had them. hang10tiki just stay near the bathroom and all will be just fine. Tyber Tiki maybe I should do what Frankoma Pottery did and fire yours or the next one, mold it and keep going until I have a small version. ============================================ Carving Tyber Tiki's HUGE Maori mug/lamp began today. The doodads were firm enough. I started at the top so that any clay that fell wouldn't get stuck in an indentation. Almost immediately I saw that I wasn't centered very well. So I did a very unprofessional thing. I carved an extra line. I kept on carving even though I knew it looked bad. My gut said Wendy you can't do this so I spent an hour fixing it better until I was satisfied that I wouldn't be fired. Doing it by hand is really hard and takes a lot of time. I continuously "sand" it with water. I got a good start. This is a challenge. I have to carve it as well as I can. It will not match the photo any longer. Cheers, Wendy |
|
ATP

Atomic Tiki Punk
Posted
posted
on
Sat, Jan 24, 2015 9:20 PM
You took on a mad job this time, wendy |
|
TT
Tyber Tiki
Posted
posted
on
Sun, Jan 25, 2015 6:18 AM
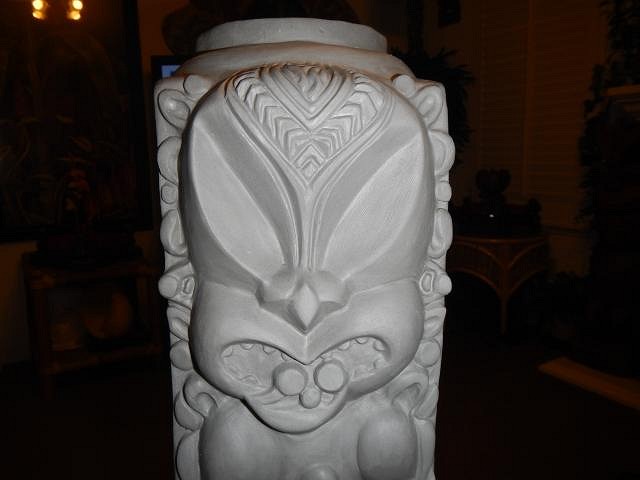
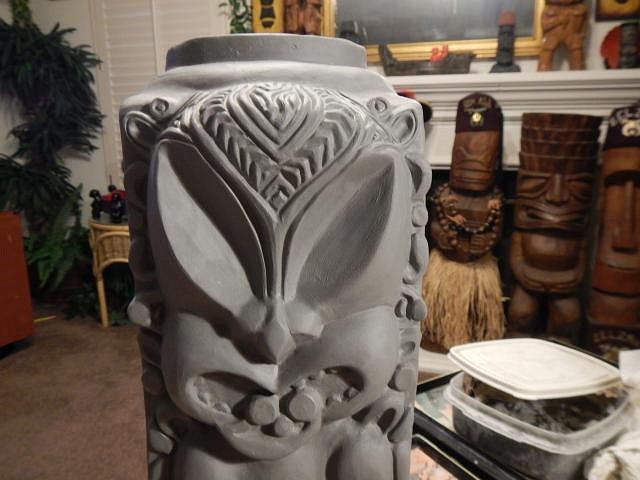
Hi Wendy, Your carvings look absolutely amazing! Seeing your interpretation of the Maori reference photo is the most exciting part of witnessing this process unfold and is way more cooler than an exact match of the photo. Regarding the size of the Maori mug, to be honest, I have become quite fond of the huge Maori mug and would proudly display it in all its hugeness :). Tyber Tiki |
|
H
hang10tiki
Posted
posted
on
Sun, Jan 25, 2015 11:40 AM
Lookin good lil lady |
|
S

SandraFremgen
Posted
posted
on
Sun, Jan 25, 2015 12:48 PM
Wow Wendy!! Beautiful carving work! :) I love how detailed your step by step pictures are. Sandra |


Pages: 1 2 3 4 5 6 7 8 9 10 11 12 13 14 15 16 17 18 19 20 21 22 23 24 25 26 27 28 29 30 31 32 33 34 35 36 37 38 39 40 41 42 43 44 45 46 47 48 49 50 51 52 53 54 55 56 57 58 59 60 61 62 63 64 65 66 67 68 69 70 71 72 73 74 75 76 77 78 79 80 81 82 83 84 85 86 87 88 89 90 91 92 93 94 95 96 97 98 99 100 101 102 103 104 105 106 107 108 109 110 111 112 113 114 115 116 117 118 119 120 121 122 123 124 125 126 127 128 129 130 131 132 133 134 135 136 137 138 139 140 141 142 143 144 145 146 147 148 149 150 151 152 153 154 155 156 157 158 159 160 161 162 163 164 165 166 167 168 169 170 171 172 173 174 175 176 177 178 179 180 181 182 183 184 185 186 187 188 189 190 191 192 193 194 195 196 197 198 199 200 201 202 203 204 205 206 207 208 209 210 211 212 213 214 215 216 217 218 219 220 221 222 223 224 225 226 10816 replies