Welcome to the Tiki Central 2.0 Beta. Read the announcement
Tiki Central logo
Celebrating classic and modern Polynesian Pop

Tiki Central / Other Crafts

Wendy Cevola - Began on 01/10/2025 - Todd Locker's black velvet wish in progress. New photos often.

Pages: 1 2 3 4 5 6 7 8 9 10 11 12 13 14 15 16 17 18 19 20 21 22 23 24 25 26 27 28 29 30 31 32 33 34 35 36 37 38 39 40 41 42 43 44 45 46 47 48 49 50 51 52 53 54 55 56 57 58 59 60 61 62 63 64 65 66 67 68 69 70 71 72 73 74 75 76 77 78 79 80 81 82 83 84 85 86 87 88 89 90 91 92 93 94 95 96 97 98 99 100 101 102 103 104 105 106 107 108 109 110 111 112 113 114 115 116 117 118 119 120 121 122 123 124 125 126 127 128 129 130 131 132 133 134 135 136 137 138 139 140 141 142 143 144 145 146 147 148 149 150 151 152 153 154 155 156 157 158 159 160 161 162 163 164 165 166 167 168 169 170 171 172 173 174 175 176 177 178 179 180 181 182 183 184 185 186 187 188 189 190 191 192 193 194 195 196 197 198 199 200 201 202 203 204 205 206 207 208 209 210 211 212 213 214 215 216 217 218 219 220 221 222 223 224 225 226 227 228 10,914 replies

T
TikiTomD posted on 12/31/2011

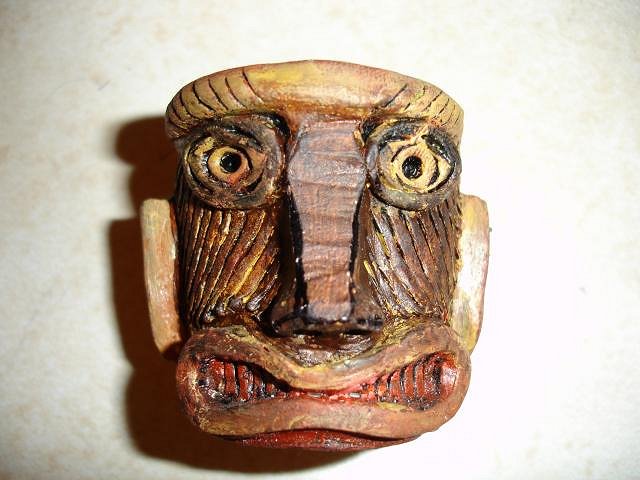
It is an amazing thing to see pastels transmuted into brilliant and intricate colors by the firing process. Those torches are awesome! This process is clearly not for the faint hearted, given the variations and mishaps that may occur in the kiln. Wendy, you are an alchemist, making clay into gorgeous art!

Happy New Year!

-Tom

TBK
The Blue Kahuna posted on 12/31/2011

I made the comment about enjoying the step-by-step unfolding here for each project, and I was prompted to say that because I went back and re read about the decanter.

As you know I was thrilled about the decanter because when I actually held it in my hands the photos didn't really do the piece justice (or so I said at the time) and by that I mean, I was enthralled with the piece seeing the pictures . . . but when I got the decanter in my grubby little paws, ZOWIE!

Being able to go back through what you did to make the decanter, really just made me appreciate the decanter even more (if that's possible - I guess it is), so I'm sure that I will have a similar reaction with the Zombie Torch . . . because I'm just as enthralled :) can't wait!

[ Edited by: The Blue Kahuna 2011-12-31 11:58 ]

D
danlovestikis posted on 12/31/2011

Hi MadDogMike, There is always so much work on mold days that an early start is important. Especially because Dan quits when the sun goes down.

I had 10 of the 60 fuse. I may be able to fix 5 and 5 I tossed into the trash. I always make extras for cases like this. Thank you for wondering. I'm looking forward to your tiki magnet for your trailer to be posted. That's a first again and you have many of those.

I was asked how many of these I will make. I think it will depend on the list. So when I know that the mold worked and that there will be a Zombie Torch I'll be closer to figuring it out.

For a ceramicist there is a dilemma. If I made 10 there would be less work and I'd be paid more per Torch. If I make 30 or more I'll be working really hard but collectors will want to pay less. So do I work hard so there are more happy people? So far my answer has always been yes. I want anyone who wants one to have the opportunity to have one.

TikiTomD you are such a sweetheart. I sure hope you (and Pat?) will come for a visit.

We have poured the last piece of the mold, maybe. Yesterday the plaster set so fast that one side may need to be tossed. I couldn't bang the mold with the mallet to get the air bubbles out. I will check it tonight to see if it has to be re-poured. I also plan to make a second mold in case I drop a side. I have been clumsy in the past so a backup is a good idea. If you only have one mold you are sunk. Also it means I can pour 2 per day.

Break time and lunch, cheers, Wendy

D
danlovestikis posted on 01/01/2012

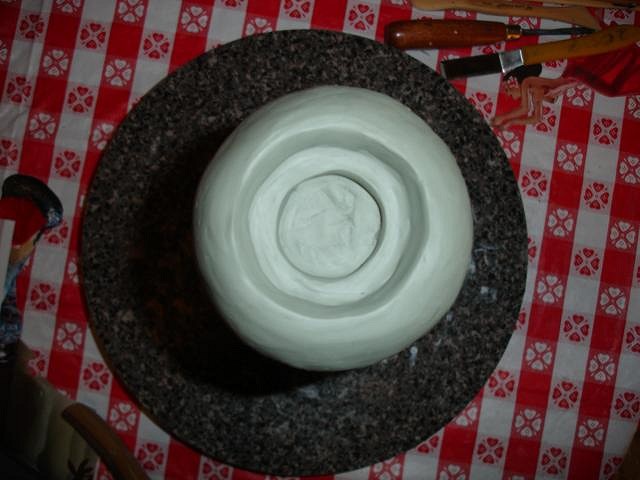
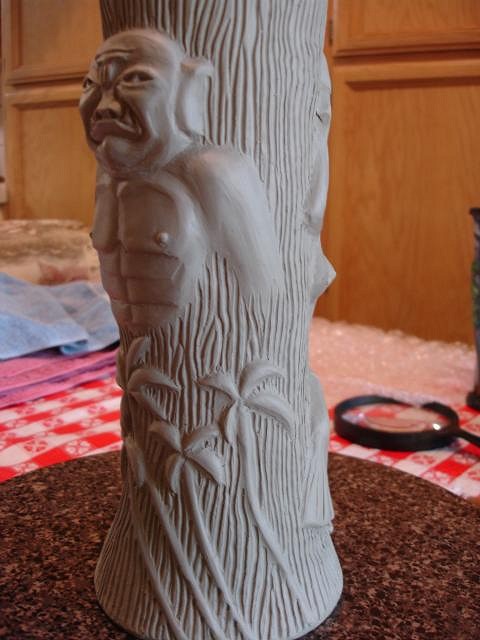
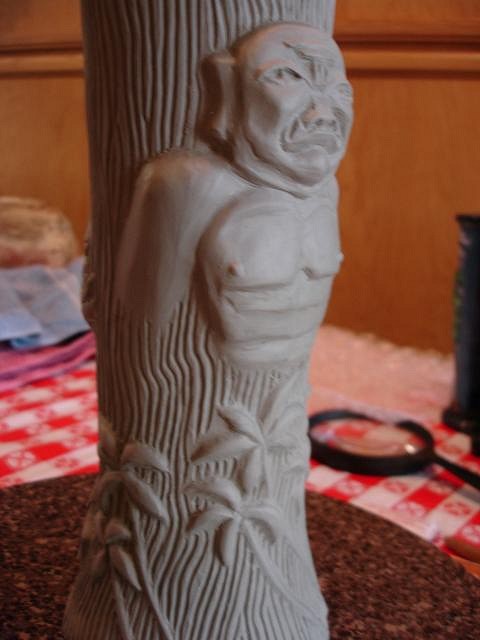
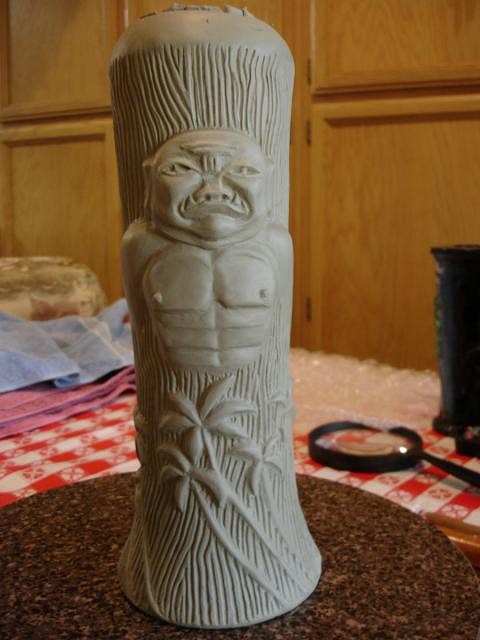
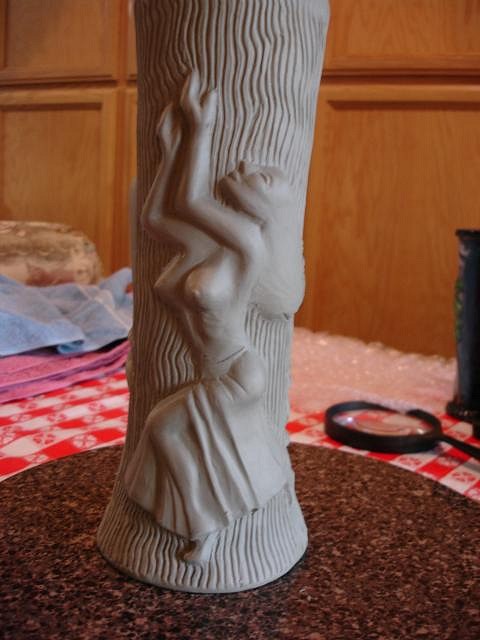
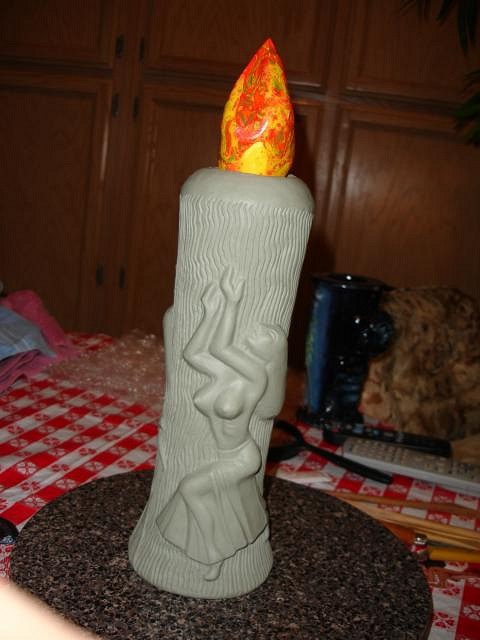
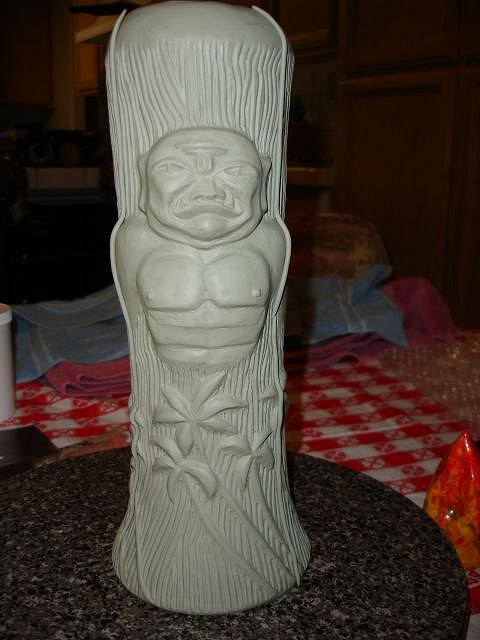
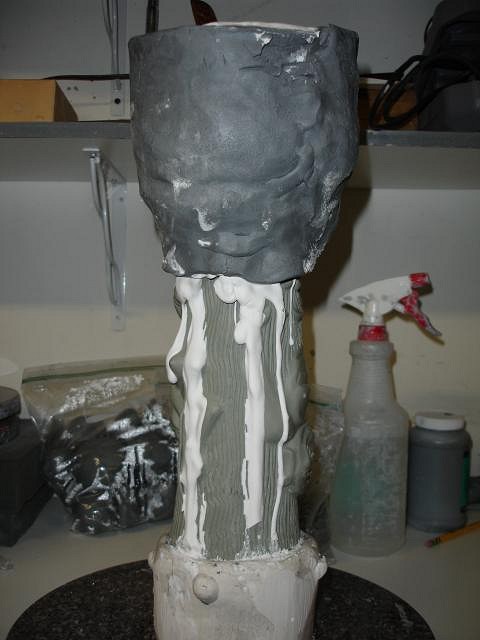
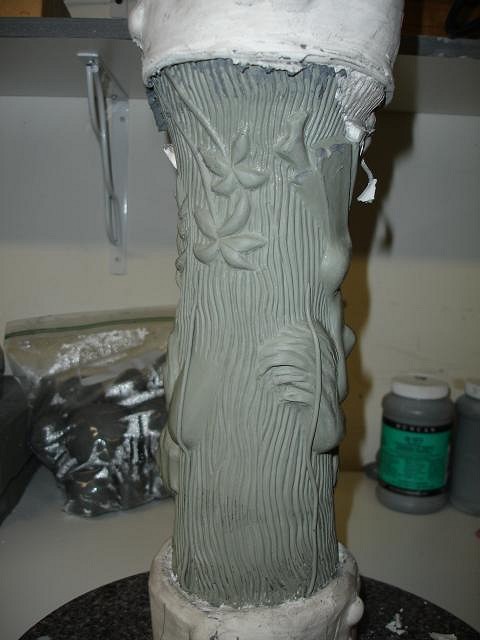
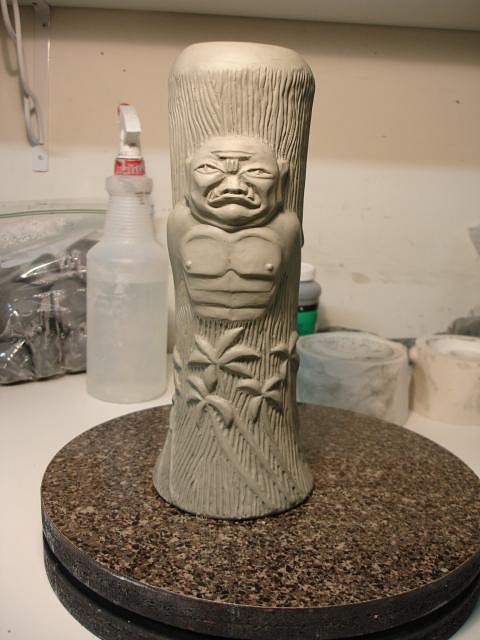
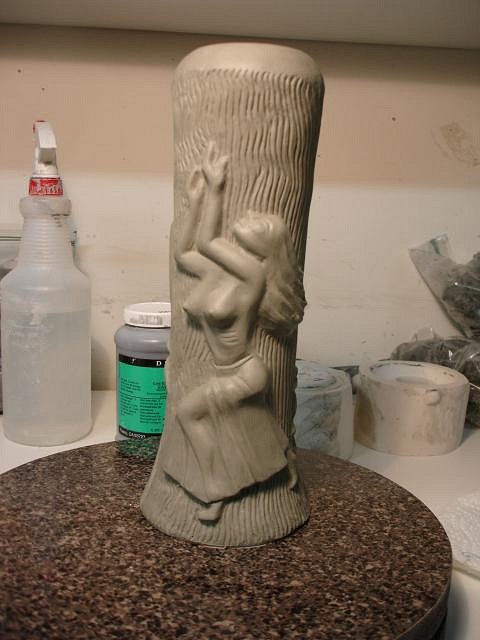
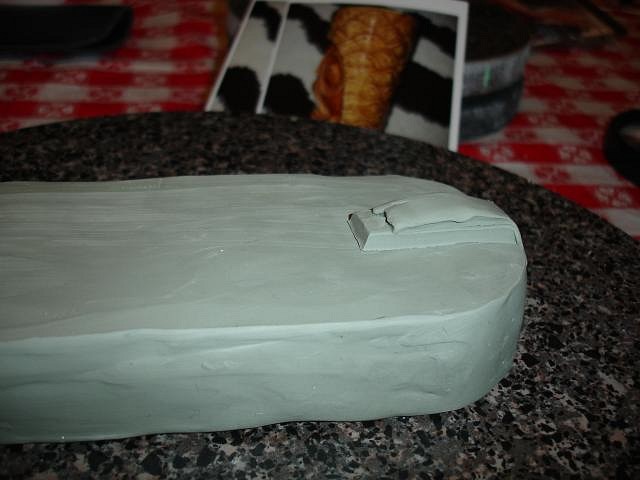
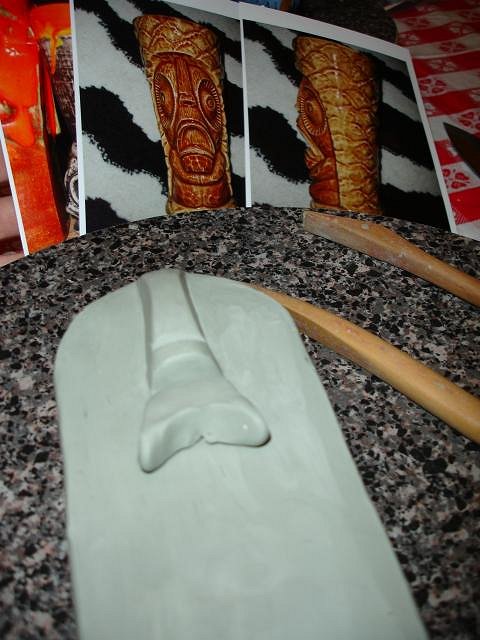
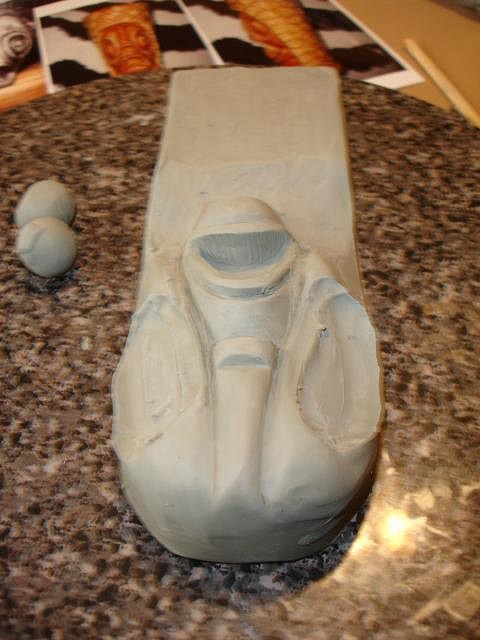
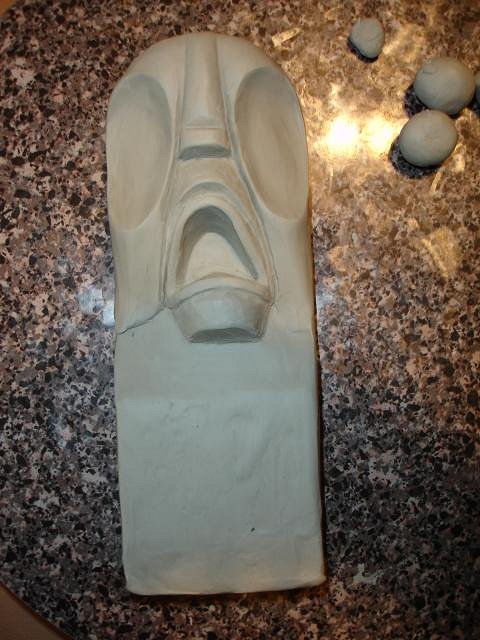
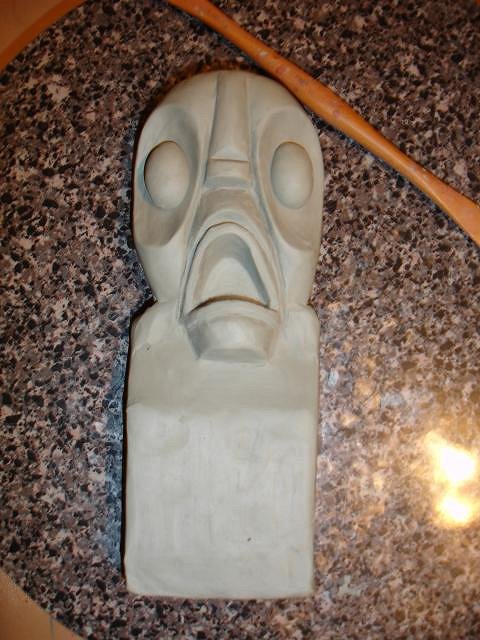
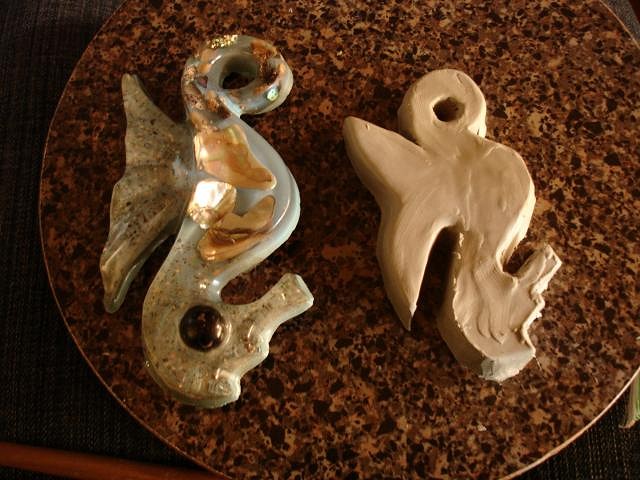
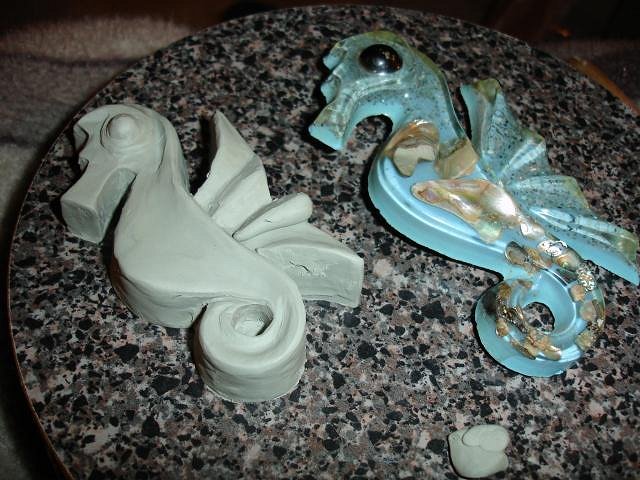
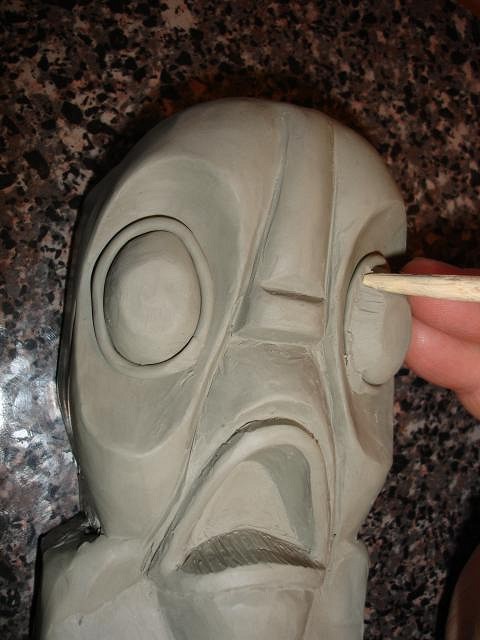
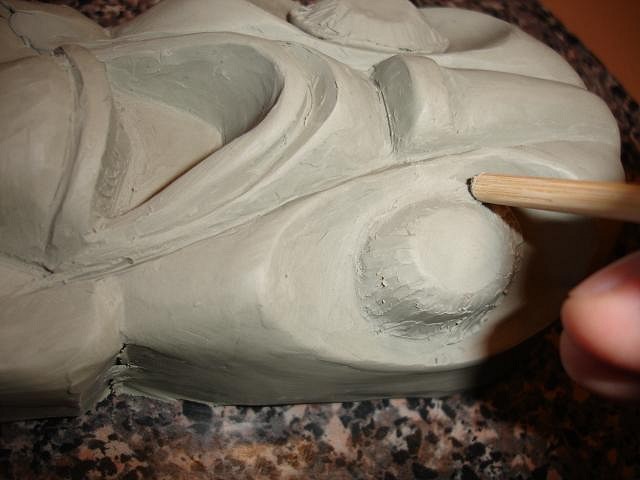
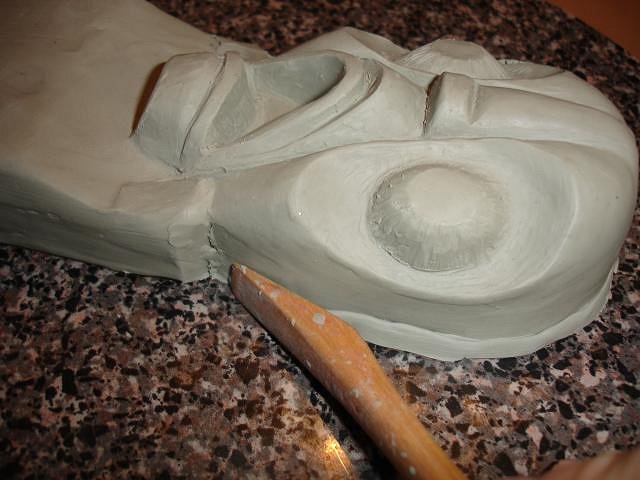
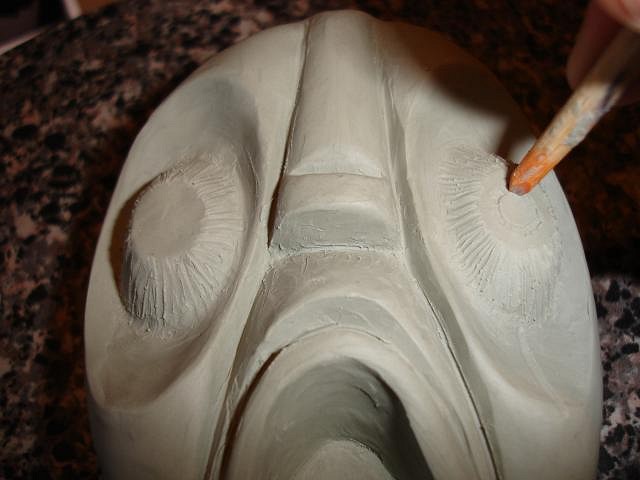
2012 how about that. We've all made it to another year. I hope you all had fun last night.

Top of the mug where the flame will sit. It probably will need earthquake putty to hold it when you walk around drinking through the straw.

This is how the two pieces will look together.

After casting I will make and add her flower and his earring.

Fingers crossed for the mold its been nothing but problems that's why I'm up in the middle of the night...worrying about making the mold work tomorrow. Wendy

M
MadDogMike posted on 01/01/2012

Wendy you said you were going to bed early, not staying up 'til 2 am to post on TC! :lol:

So awesome, love the finished sculpt! The palm trees from the pic are a great addition. So tall and elegant, the flame on top is perfect.

Good luck with your molding effort :)

H Image Missing: https://tikicentral.com/resize.php/uploads/21154/649119ceb7046.jpg?sharp=10&fit=crop&w=96&h=96&s=200302534909fce323ced4bdc72e29c6
hang10tiki posted on 01/01/2012

Lookin great
Awesome color

V Image Missing: https://www.gravatar.com/avatar/90af674b21d8778b0e093d58e340dd21?d=blank&s=192&fit=fill
VampiressRN posted on 01/01/2012

Simply awesome Wendy.

D
danlovestikis posted on 01/02/2012

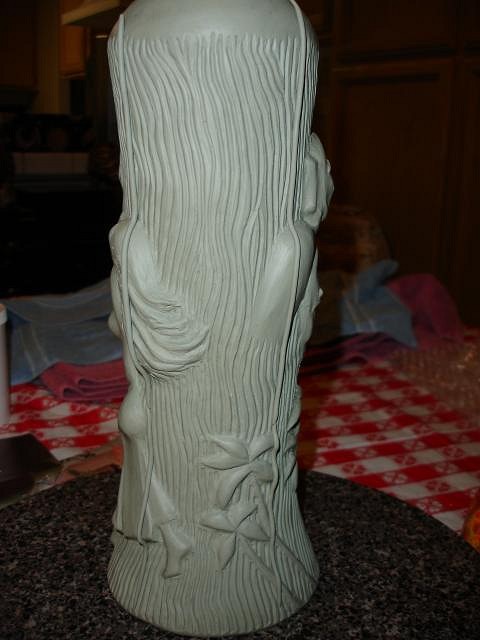
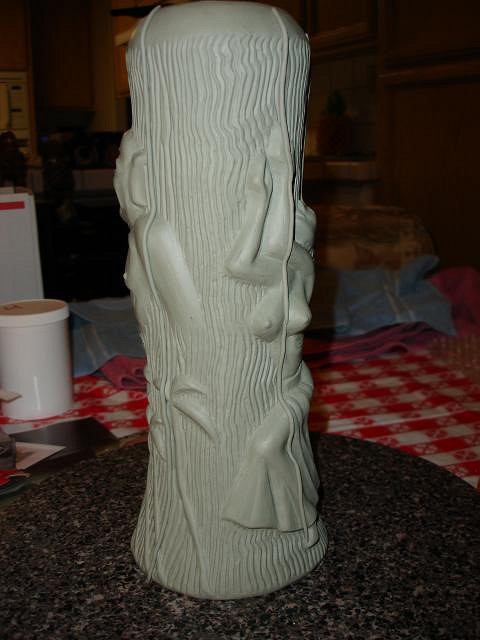
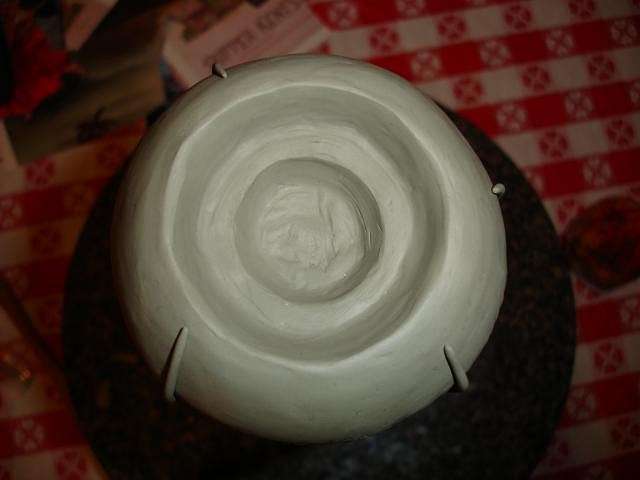
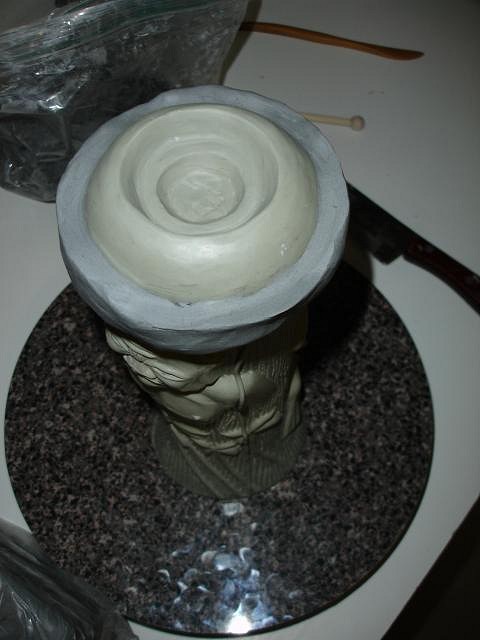
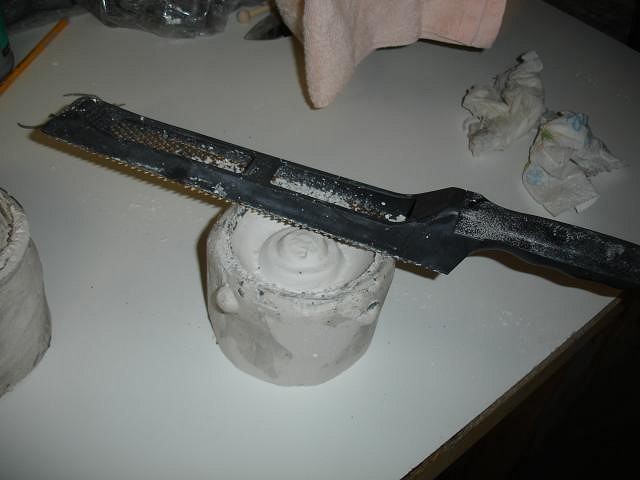
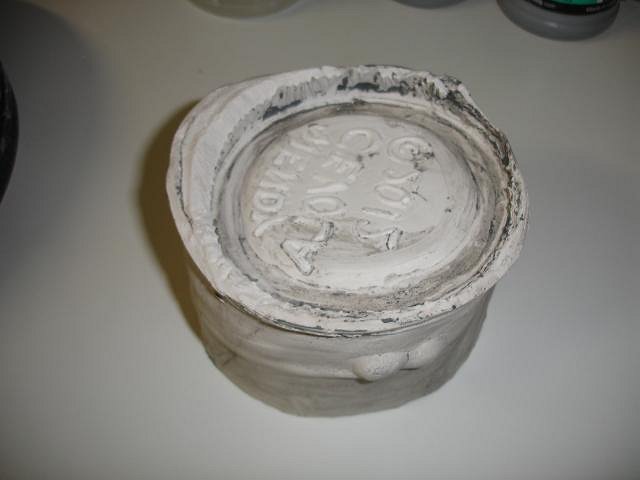
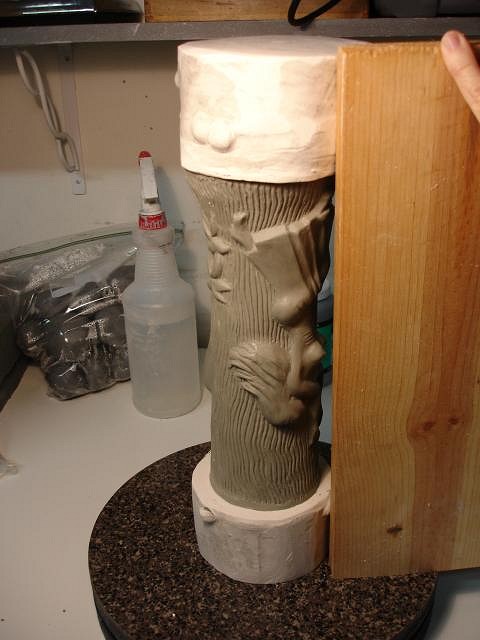
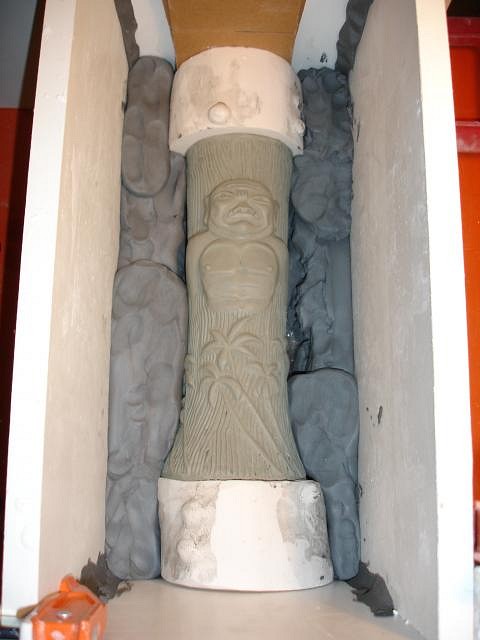
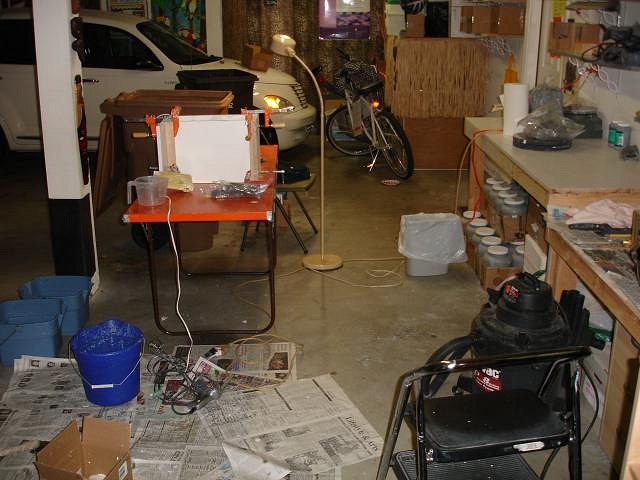
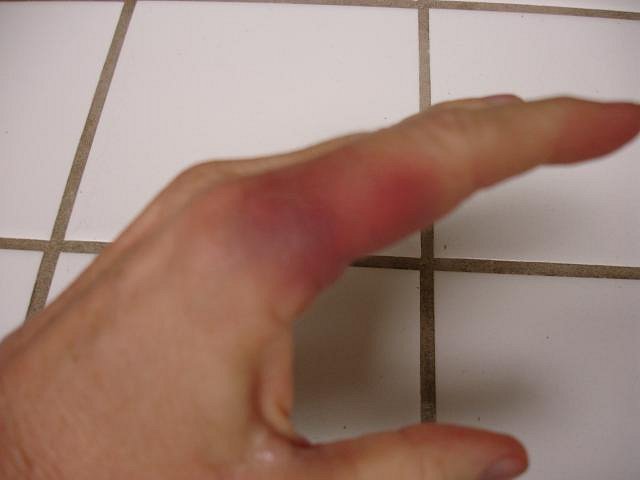
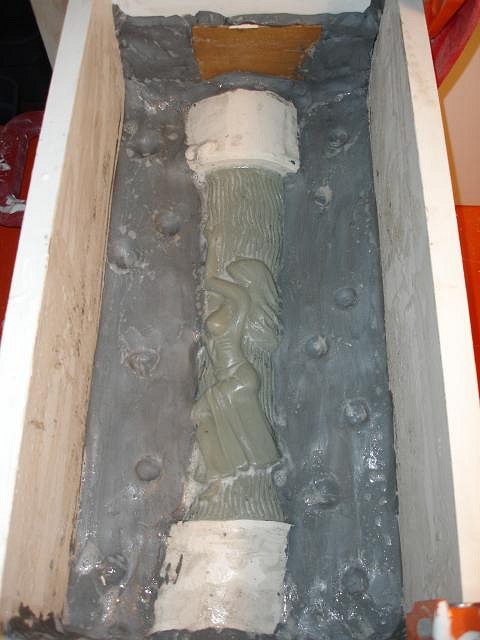
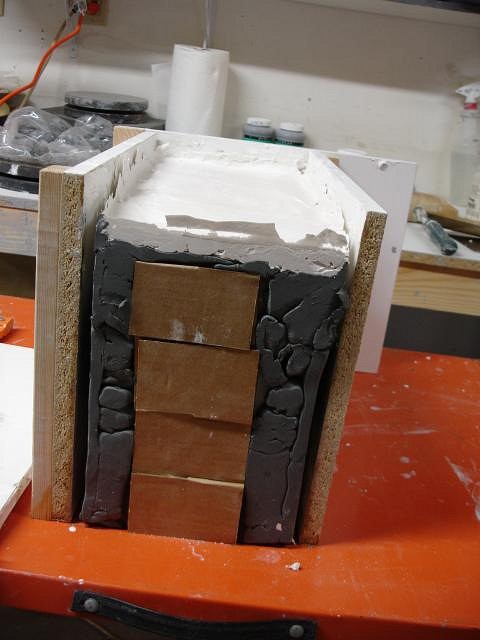
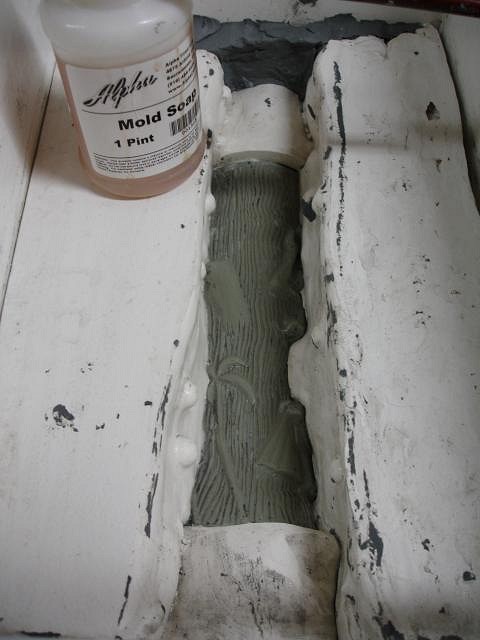
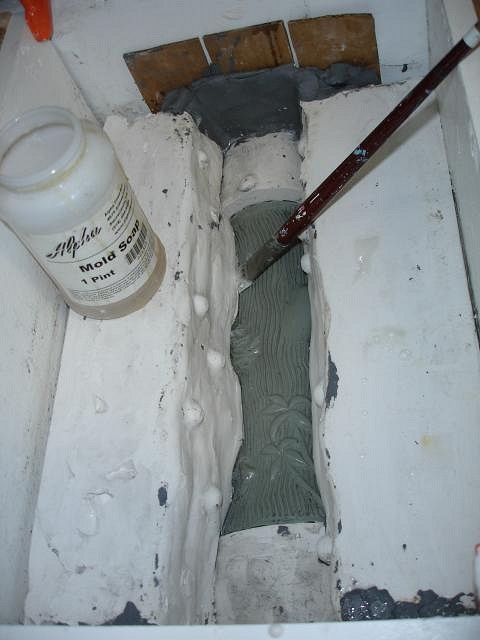
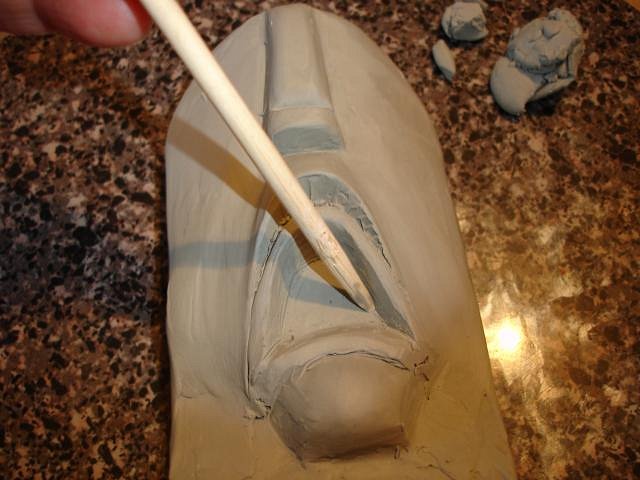
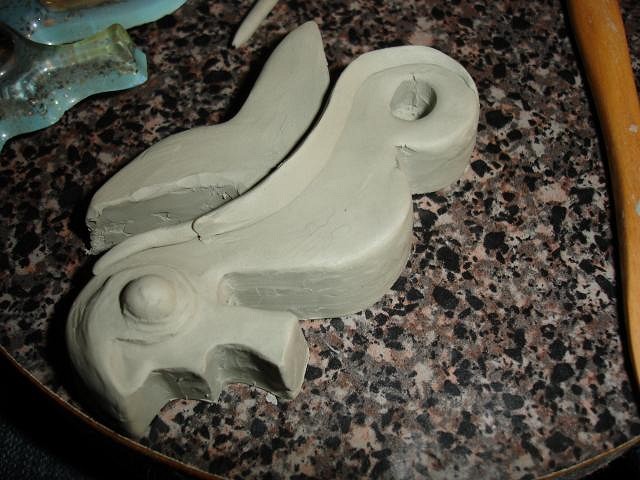
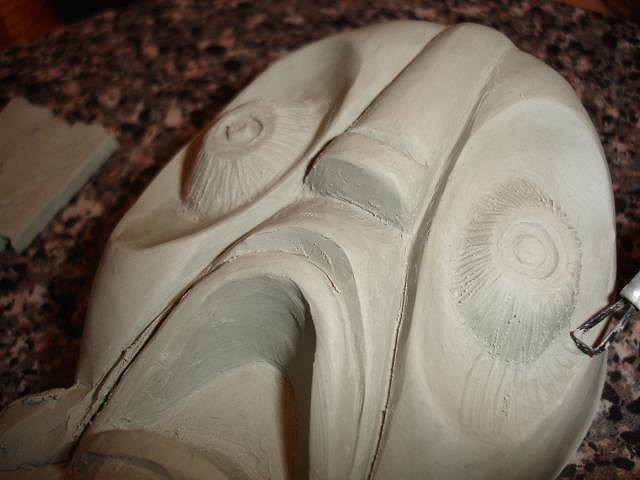
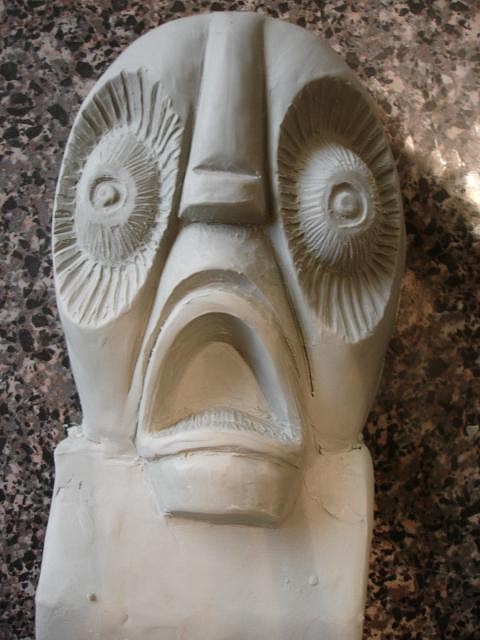
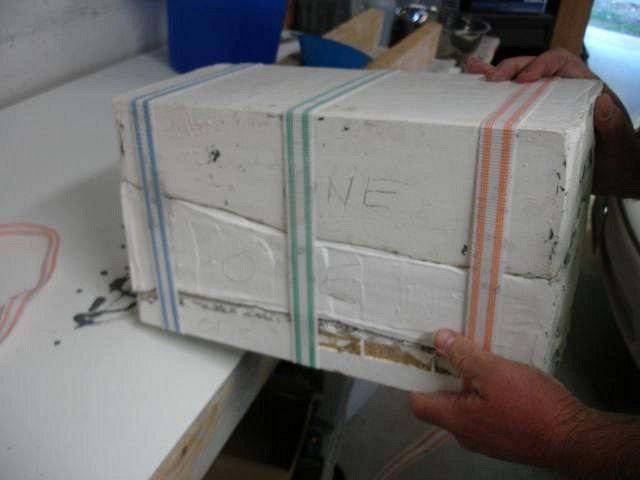
Thank you Vamp and hang10tiki. MDM I was in bed by 8 PM but woke up and decided to post a few photos.

I know that there is great interest in learning how to make molds so once again I will show you all how I did it with the Zombie Torch. Believe me when I say this is very hard work and there are so many pitfalls. Did I say falls? Yesterday with only 1 piece left to mold I caught both feet in the cord to the shop vac and did a face first fall to the concrete floor. I hit my forehead so hard that my head bounced. We left for the after hours clinic. I wanted to make sure I wasn't going to have a sub-dural hematoma. I'm fine but I can't bend what was my good knee and my nose and forehead feel like I was in a boxing match. So be careful.

Dan spends so much time going with me to doctors appointments. He's wonderful.
Image Missing: https://tikicentral.com/resize.php/uploads/251/4f01f34f.jpg?w=1280&h=1280&fit=max&sharp=5&s=e79ee920245836b5913b8d28816bc94f

Step One and more...

To start off I roll out some clay that I will use to mark sections.
Image Missing: https://tikicentral.com/resize.php/uploads/251/4f01f2b0.jpg?w=1280&h=1280&fit=max&sharp=5&s=0bed2dcf150d81f765da6d9e21ca0d4f
I sit and stare at the sculpt trying to decided how many mold pieces I will need to make. Each piece needs to pull straight off without scraping the clay. By sculpting all those wood-grain lines it meant more pieces. I came out with 6 total and I have to hope it was enough.
Image Missing: https://tikicentral.com/resize.php/uploads/251/4f01f29c.jpg?w=1280&h=1280&fit=max&sharp=5&s=b93c1c1de10b344f44eb4853c1200705

Image Missing: https://tikicentral.com/resize.php/uploads/251/4f01f284.jpg?w=1280&h=1280&fit=max&sharp=5&s=a1d0256fd4fa39b3467613b359f7b6b6

Image Missing: https://tikicentral.com/resize.php/uploads/251/4f01f274.jpg?w=1280&h=1280&fit=max&sharp=5&s=9d0de84e7efc17e290f7e3f39f80514d

Image Missing: https://tikicentral.com/resize.php/uploads/251/4f01f264.jpg?w=1280&h=1280&fit=max&sharp=5&s=8fd1334aced93ad8ebbcf164486c44cb

Image Missing: https://tikicentral.com/resize.php/uploads/251/4f01f255.jpg?w=1280&h=1280&fit=max&sharp=5&s=7f00a8cab08a1fb8ea6b3e1b22c3c251

Image Missing: https://tikicentral.com/resize.php/uploads/251/4f01f243.jpg?w=1280&h=1280&fit=max&sharp=5&s=4d5f163d6302b8a507da345477be948e

Next we get all the supplies out for molding and put down paper on the garage floor. We use a paint mixer attached to a drill and even a small blender for the plaster. The consistency should be like buttermilk.
Image Missing: https://tikicentral.com/resize.php/uploads/251/4f01f230.jpg?w=1280&h=1280&fit=max&sharp=5&s=5c2f4831859f3c7dd52822cedd423068

With so many wood-grain lines I started with a band around the top and pressed it into the clay. Image Missing: https://tikicentral.com/resize.php/uploads/251/4f01f21b.jpg?w=1280&h=1280&fit=max&sharp=5&s=bba5ff84f175006f72d41450f71345c4

I then added a sheet of clay around that. This is a technique I learned from Beachbumz on TC. We mixed and poured in the plaster and held the clay together while it set up.
Image Missing: https://tikicentral.com/resize.php/uploads/251/4f01f207.jpg?w=1280&h=1280&fit=max&sharp=5&s=b2daa42de5de5693b40215aea7bac538

When I had wrapped the clay I also pressed in a couple of dents to make locks with other mold pieces. Here is the tool I used and what it looked like as we peeled the clay away.
Image Missing: https://tikicentral.com/resize.php/uploads/251/4f01f1e9.jpg?w=1280&h=1280&fit=max&sharp=5&s=42b7e4e39187f9ad40431889a4cf2dc3

As we peeled the clay we found that the plaster had leaked anyway. But that's not really a problem other that it takes time to remove it.

Image Missing: https://tikicentral.com/resize.php/uploads/251/4f01f1d5.jpg?w=1280&h=1280&fit=max&sharp=5&s=0d71e1c1988936c670ad92f556225986
I use a dental tool and catch the edge and pull forward and it pops off.

Image Missing: https://tikicentral.com/resize.php/uploads/251/4f01f1c0.jpg?w=1280&h=1280&fit=max&sharp=5&s=2246f26aeba66b35ed0b4ac1106c2c93

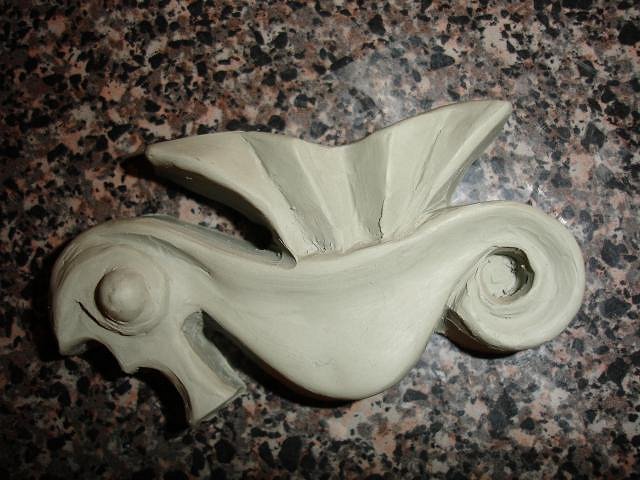
I checked the sculpt and made sure it was fine.
Image Missing: https://tikicentral.com/resize.php/uploads/251/4f01f1a9.jpg?w=1280&h=1280&fit=max&sharp=5&s=2f02d7e43f99e8eb4658eb7c9c2644bf

More later. We have a tiki guest coming tomorrow and I need to put all the Christmas decorations away. Thank you for stopping by, Wendy

M
MadDogMike posted on 01/02/2012

Wendy, I learn something everytime you post.

B Image Missing: https://www.gravatar.com/avatar/e01c7e12080283066ced001977e37f65?d=blank&s=192&fit=fill
bigbrotiki posted on 01/02/2012

Indeed! One thing I learn is that with every project, Wendy is getting one notch better in her artistry! Kudos, Ms. C !

Z Image Missing: https://www.gravatar.com/avatar/cd67976564010f19d55603c8c7220017?d=blank&s=192&fit=fill
zerostreet posted on 01/02/2012

Impressive work and documentation!

AS Image Missing: https://www.gravatar.com/avatar/61bf3fdc60dc5bf9701b06f9dd025b7e?d=blank&s=192&fit=fill
Aquatic Safarinaut posted on 01/02/2012

Aloha Wendy
Please put me on the list too...
Cheers

L Image Missing: https://tikicentral.com/resize.php/uploads/73101/62329bcc37684.jpg?sharp=10&fit=crop&w=96&h=96&s=0acfd349fcac6c0a9da1659a967d744c
LoriLovesTiki posted on 01/03/2012

Wendy -

You are AAAHHHHHMAZING! I am awed by your work. Although I would love something made by you I'm pretty sure it would be cost prohibitive.... But I just wanted to say how talented I think you are. Those flames are amazing and the mug isn't even done!!!

I hope one day to attempt making a mug but it will be a feeble attempt I'm sure. Thanks so much for the step-by-step photos!

:)
Lori

D
danlovestikis posted on 01/03/2012

Hi MadDogMike, it is awesome to teach you something, thank you.
bigbrotiki, thank you so much for the compliment. I'll keep trying.
zerotiki, I love your art so its a thrill to have you like mine.
Aquatic Safarinaut, I put you on the list, thank you as always.
Lorilovestiki, with your Tiki Central name so close to mine people will think we are related. If you want to make a mug just don't worry about how it will look just start, that's the hardest part.

This was my first tiki. As bigbrotiki said I get better as I practice. You will too. So be sure to start a other crafts thread here and post your step by steps. You will have fun and make many friends along the way. Cheers, Wendy
Image Missing: https://tikicentral.com/resize.php/uploads/251/4f026eb2.jpg?w=1280&h=1280&fit=max&sharp=5&s=c2d01f76f71485ec38bdc59676210dd0

Image Missing: https://tikicentral.com/resize.php/uploads/251/4f026ea7.jpg?w=1280&h=1280&fit=max&sharp=5&s=5eb2c3e1a24c9cf0622a283c2ffd7cf7

H Image Missing: https://tikicentral.com/resize.php/uploads/21154/649119ceb7046.jpg?sharp=10&fit=crop&w=96&h=96&s=200302534909fce323ced4bdc72e29c6
hang10tiki posted on 01/03/2012

Love the play by play

B Image Missing: https://www.gravatar.com/avatar/0e1e952728e9cabe302b0b1f186fd7bb?d=blank&s=192&fit=fill
Beachbumz posted on 01/03/2012

Wendy, didn't I tell you no more falls!! :wink: I really hope your feeling better!
This one is going to be AWESOME... Cant's wait to see it finished...

D
danlovestikis posted on 01/03/2012

Hi hang10tiki last night I ran into a photo I have of you and I said hi.
Thank you Beachbumz I just posted on your thread, love all your work. My black eye is such a fashion statement but I'll try to be more careful.

Time for revelations and more photos. The last set showed us pour the mold piece for the top. Here comes the bottom.

We flipped the mug over keeping the top in place.
Image Missing: https://tikicentral.com/resize.php/uploads/251/4f03294b.jpg?w=1280&h=1280&fit=max&sharp=5&s=97a44f356ccce6cc70ef09be93816153
Again I ran a ring around it using a bit more moisture to make the seal better.
Image Missing: https://tikicentral.com/resize.php/uploads/251/4f032933.jpg?w=1280&h=1280&fit=max&sharp=5&s=4c2c0f246aee093bccf80cb7ad04dadb
After placing the sheet around the ring I rolled out a snake of clay and pressed it inside sealing the sheet to the ring. I used the tool to make the lock dents.
Image Missing: https://tikicentral.com/resize.php/uploads/251/4f032904.jpg?w=1280&h=1280&fit=max&sharp=5&s=073a86fa4cef0a1d224586ce3a7b905d
This should have worked perfectly but after the plaster was poured in I decided to lift it up and down and to tap it so bubbles would come to the top. As shown that's the best way to make it start to leak.
Image Missing: https://tikicentral.com/resize.php/uploads/251/4f0328e9.jpg?w=1280&h=1280&fit=max&sharp=5&s=050c77914f692c81850b4c24b51a79ea
So I squeezed harder to stop it. I held it until it was firm.
Image Missing: https://tikicentral.com/resize.php/uploads/251/4f0328c3.jpg?w=1280&h=1280&fit=max&sharp=5&s=bf0fe721eeae69a55b2fe45fd4220e43
Here's the mess AGAIN! But no harm done just extra work to pop it off.
Image Missing: https://tikicentral.com/resize.php/uploads/251/4f0328a8.jpg?w=1280&h=1280&fit=max&sharp=5&s=e3017c998cc03ef38623fc887beffce2
Popping and repairing until its all off.
Image Missing: https://tikicentral.com/resize.php/uploads/251/4f032896.jpg?w=1280&h=1280&fit=max&sharp=5&s=495824084afc238780c31d63f2654611
Because all this popping leaves rough edges I removed the top and bottom.
Image Missing: https://tikicentral.com/resize.php/uploads/251/4f03287b.jpg?w=1280&h=1280&fit=max&sharp=5&s=9ce20a2ecd8aa8c516e5889267ae633e
I used a rasp to remove the rough edges. It was that moment when I realized I'd left out one important step. The top piece needed a hole or no one would ever drink from this mug!
Image Missing: https://tikicentral.com/resize.php/uploads/251/4f032853.jpg?w=1280&h=1280&fit=max&sharp=5&s=0070d1ffa437cb639e76889b54dc5118
Later on when we do mold number two I'll show you what I should have done. However all is not lost. We made a hole with a drill bit used by carpenters to make openings for attaching door knobs.
Image Missing: https://tikicentral.com/resize.php/uploads/251/4f032838.jpg?w=1280&h=1280&fit=max&sharp=5&s=dcd55f55d8f27445e2ab1b176e0f73eb
Here is the bottom with all the extra plaster.
Image Missing: https://tikicentral.com/resize.php/uploads/251/4f03280c.jpg?w=1280&h=1280&fit=max&sharp=5&s=d13290f500881335c211a619f365bd59
Here are the bottom and top after rasping them smooth.
Image Missing: https://tikicentral.com/resize.php/uploads/251/4f0327fb.jpg?w=1280&h=1280&fit=max&sharp=5&s=31ae55f783993d4278c7a8b86d6916a9
I soaked the sculpt to remove clay that had stuck. Plaster comes off easier.
Image Missing: https://tikicentral.com/resize.php/uploads/251/4f0327e7.jpg?w=1280&h=1280&fit=max&sharp=5&s=1bfc4b8a32f9c23ae41a59dc5b2b5ba9
Then I searched for any damage and repaired it.
Image Missing: https://tikicentral.com/resize.php/uploads/251/4f0327c5.jpg?w=1280&h=1280&fit=max&sharp=5&s=87c36198206f6155a64e3806396231f0
Repairing means less clean up when mugs are poured.
Image Missing: https://tikicentral.com/resize.php/uploads/251/4f0327b1.jpg?w=1280&h=1280&fit=max&sharp=5&s=eaf1c285121ae30de12623bd2cff80df
Now I'm happy with the sculpt being ok again so on to the next step.
Image Missing: https://tikicentral.com/resize.php/uploads/251/4f0327a1.jpg?w=1280&h=1280&fit=max&sharp=5&s=17a24a77e60d53907d193e8a34137423
I put the top and bottom mold pieces back in place. I ran a small amount of clay around to make sure the seal is good. I didn't want plaster to leak into the space. Image Missing: https://tikicentral.com/resize.php/uploads/251/4f032786.jpg?w=1280&h=1280&fit=max&sharp=5&s=6de37de331e166b560fe961df3dd133d
Next I choose a board that will be the bottom piece for the mold box.
Image Missing: https://tikicentral.com/resize.php/uploads/251/4f03276a.jpg?w=1280&h=1280&fit=max&sharp=5&s=38b7348397bd7dfd218be4e58c9d1f8d

Now it's time to get ready for our Pasadena guest. More photos tomorrow.

Comments are always welcome. (: Wendy

H Image Missing: https://tikicentral.com/resize.php/uploads/21154/649119ceb7046.jpg?sharp=10&fit=crop&w=96&h=96&s=200302534909fce323ced4bdc72e29c6
hang10tiki posted on 01/03/2012

Great to watch your progress
Looks fun
Keep on keepin on

D
danlovestikis posted on 01/04/2012

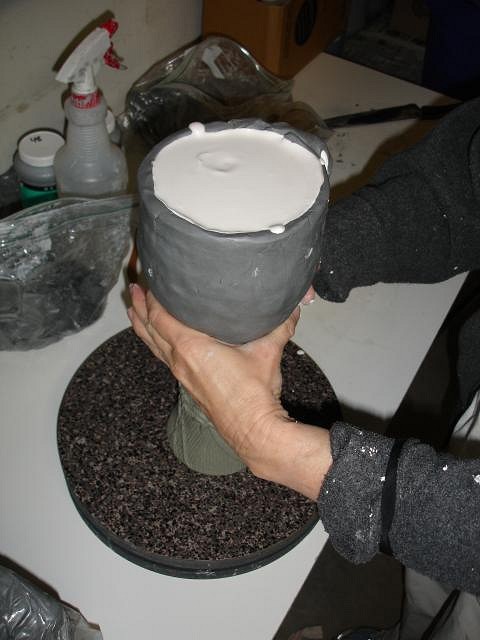
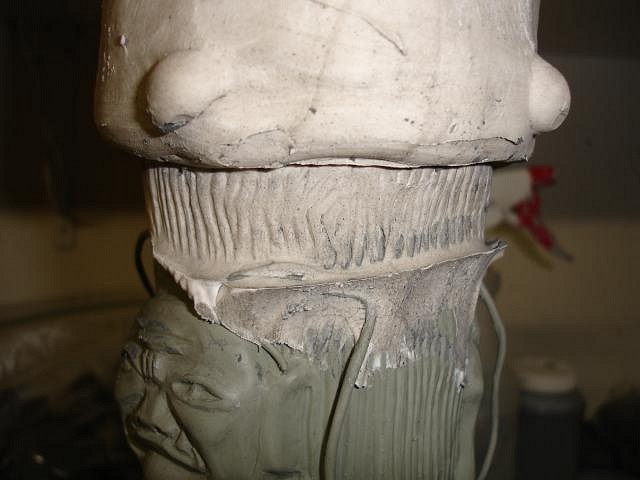
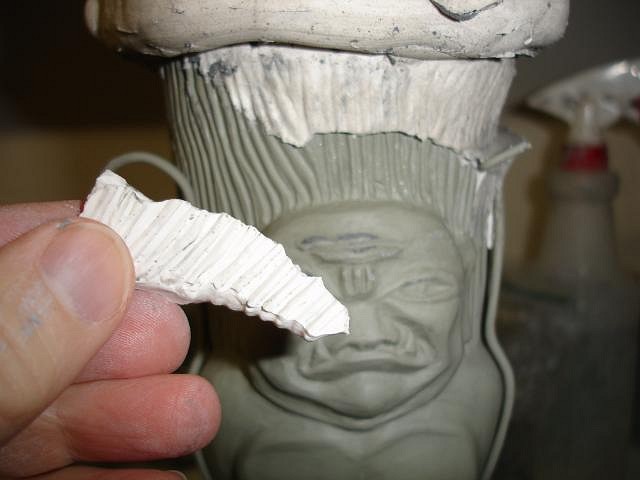
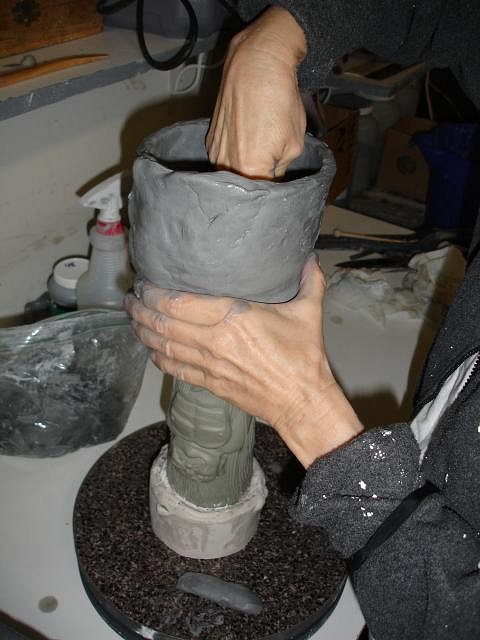
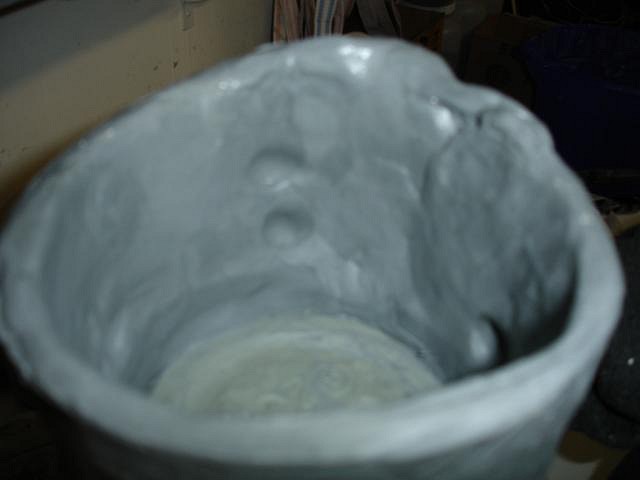
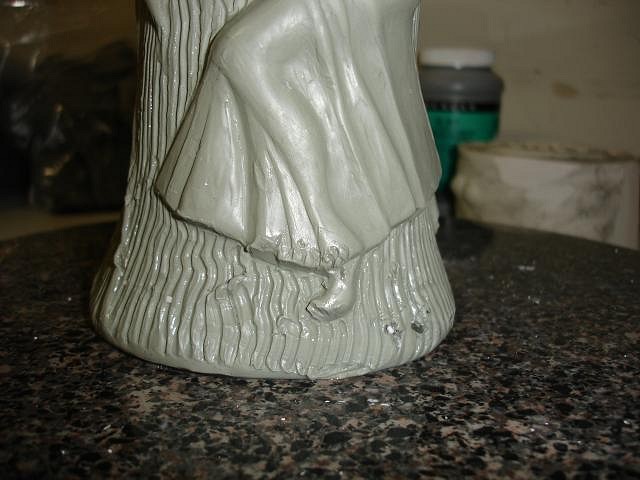
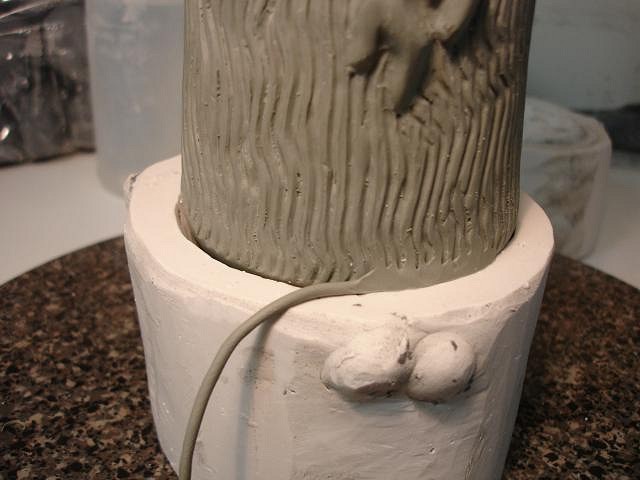
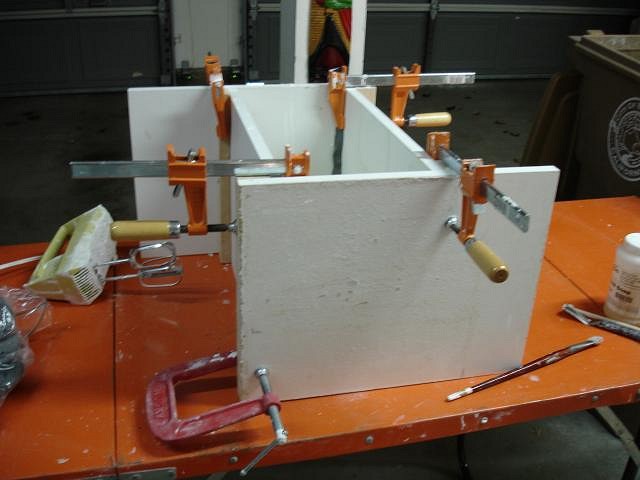
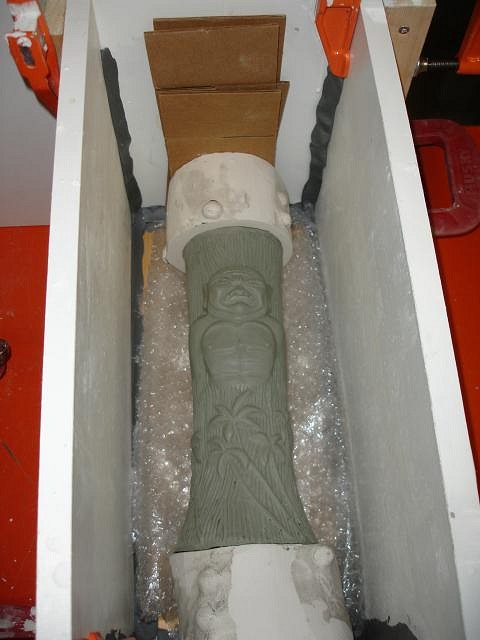
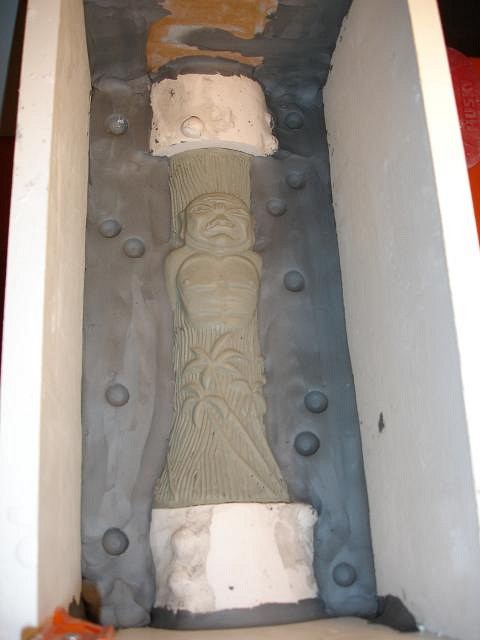
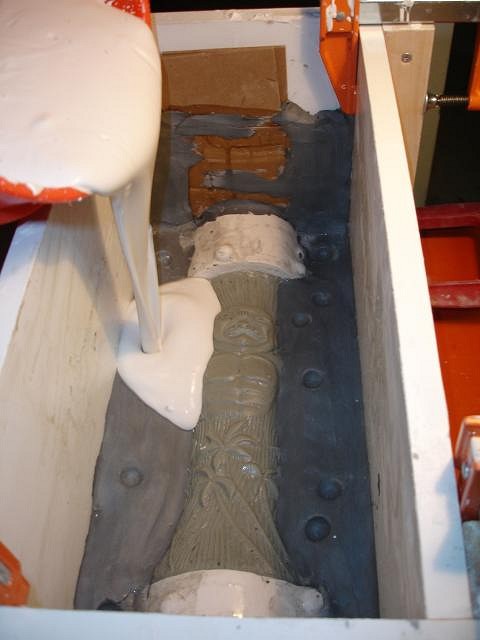
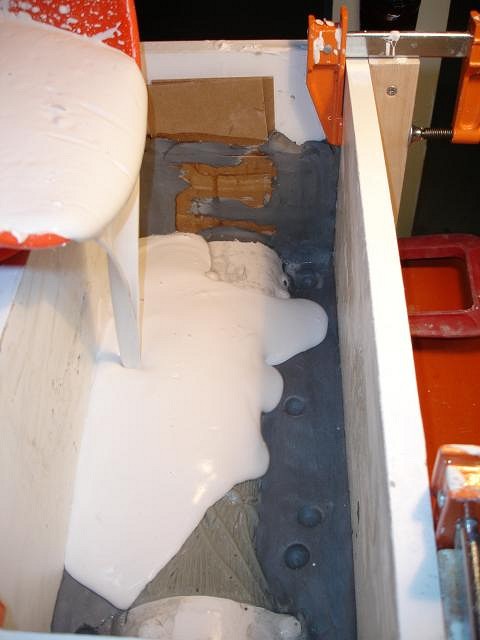
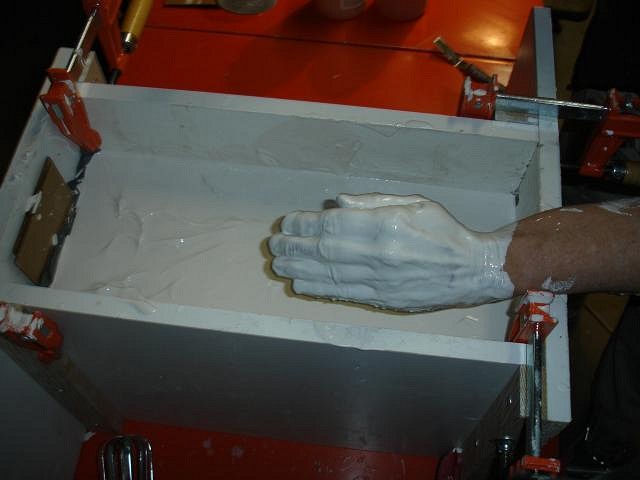
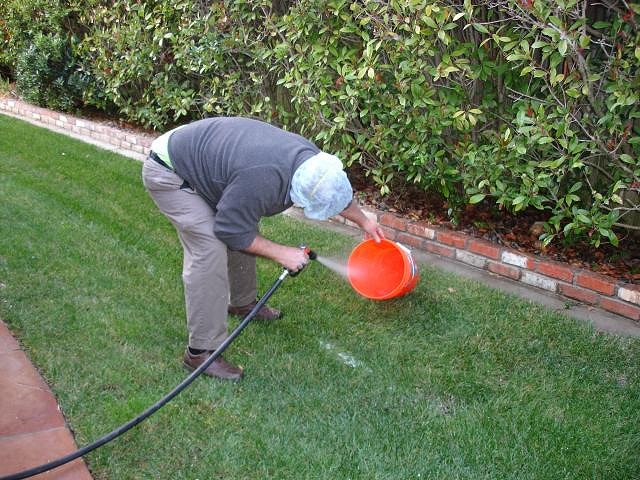
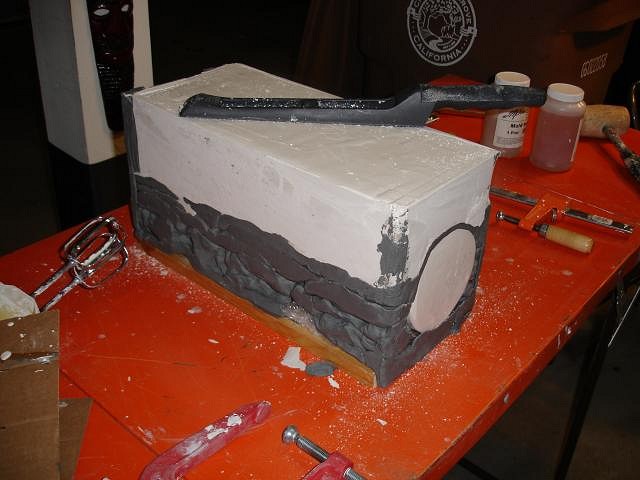
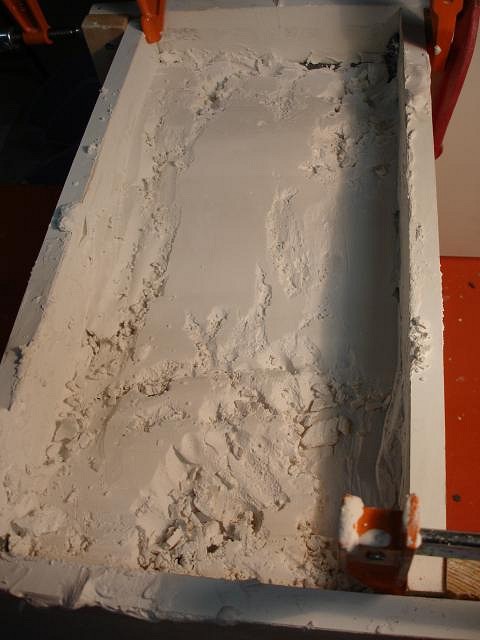
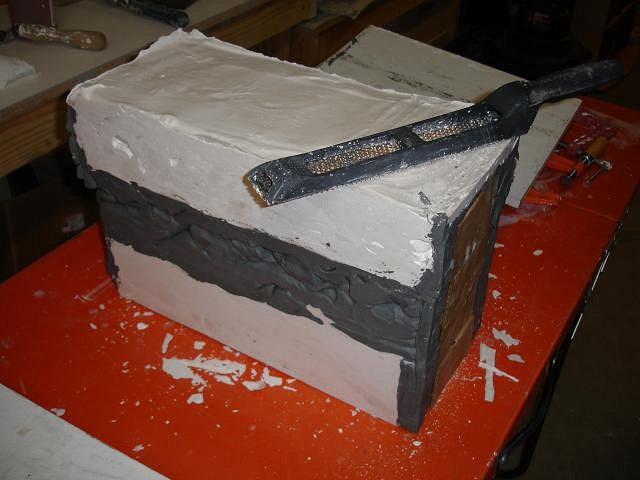
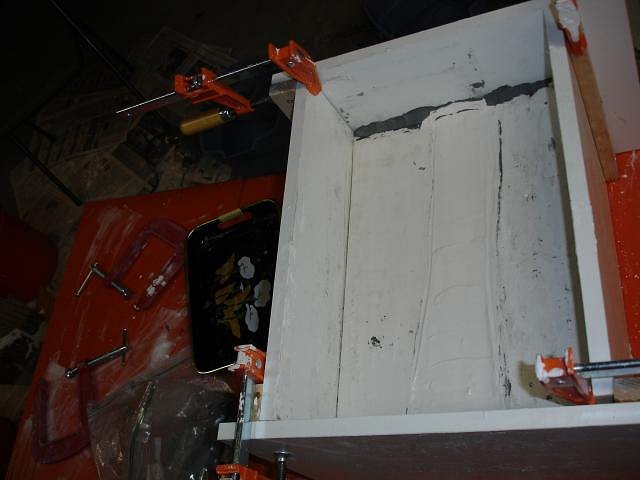
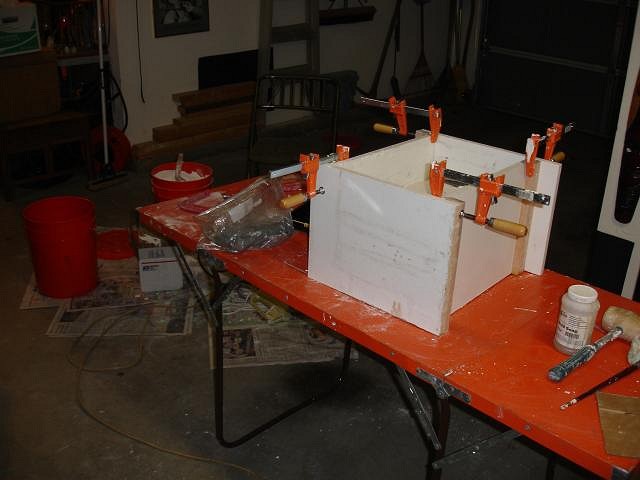
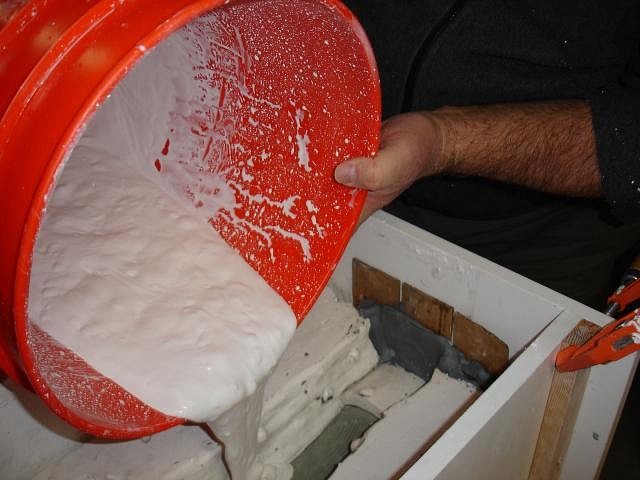
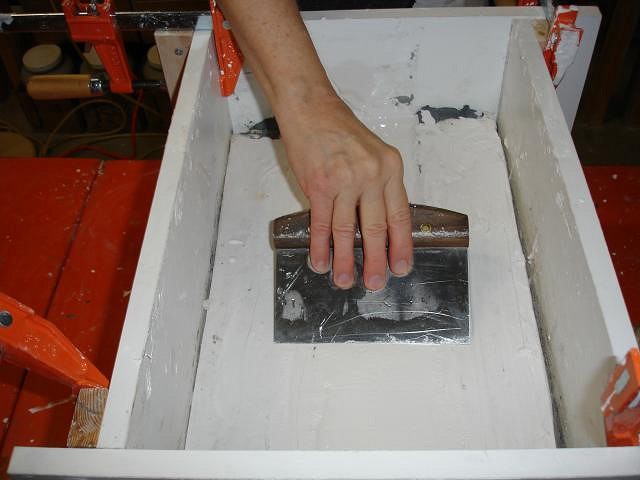
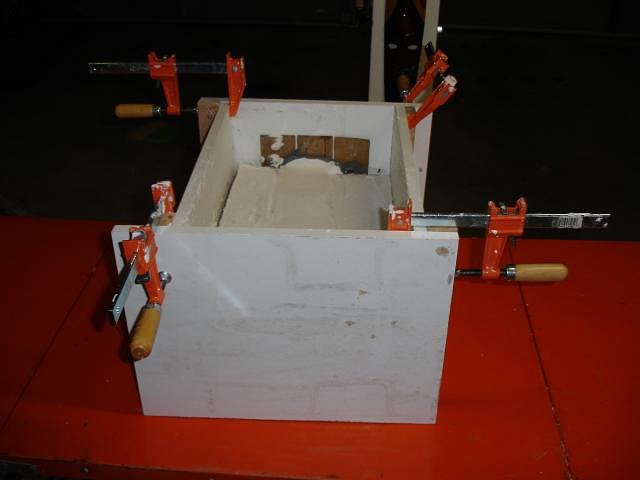
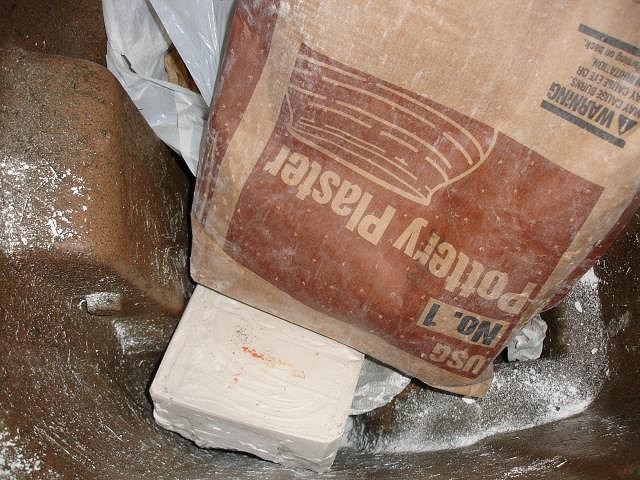
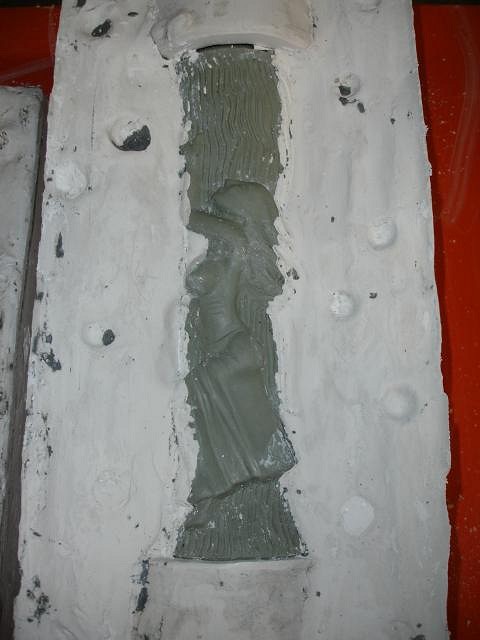
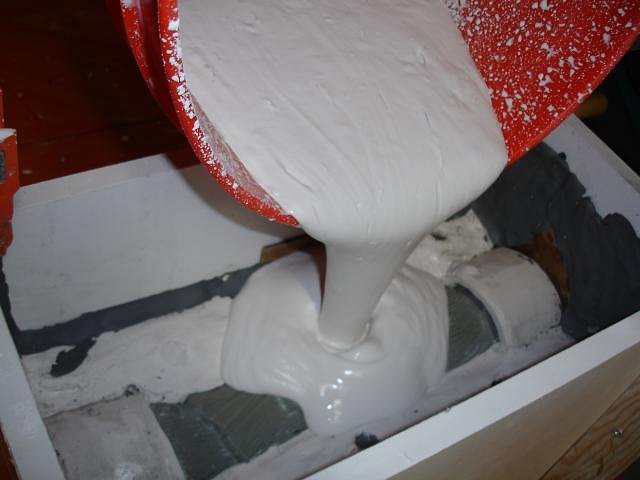
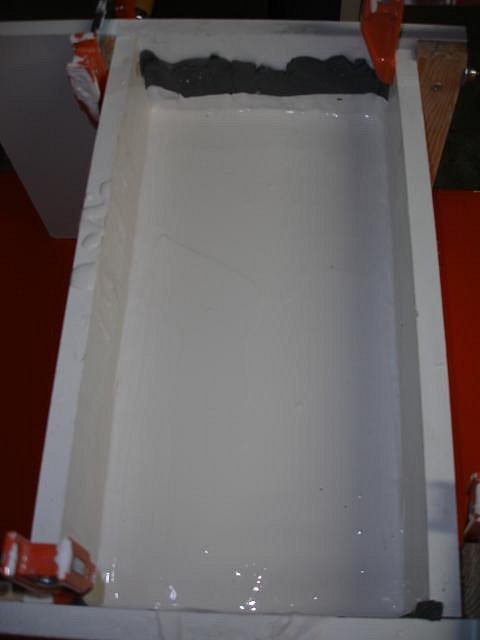
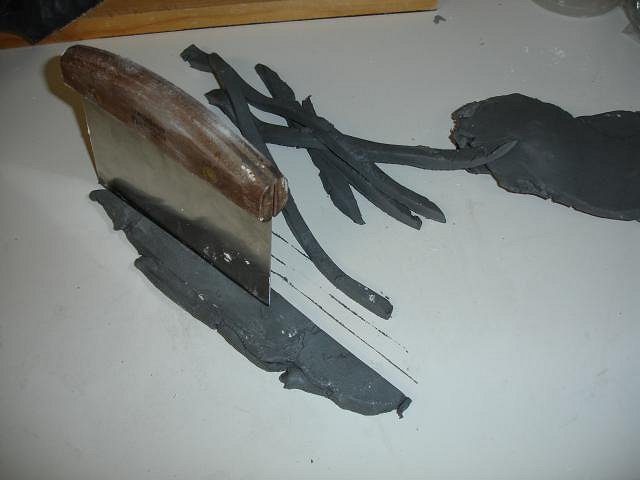
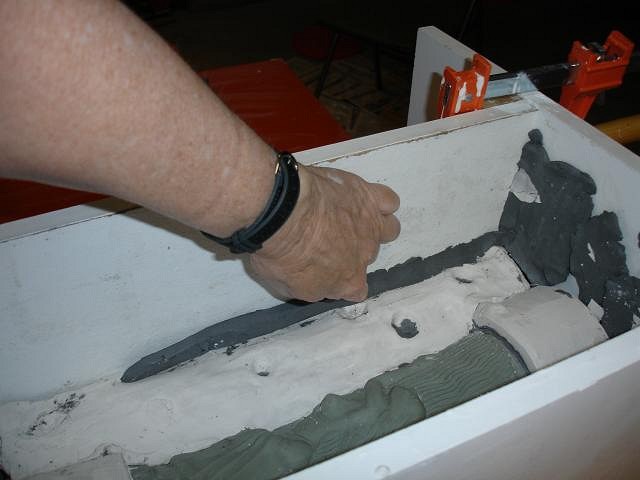
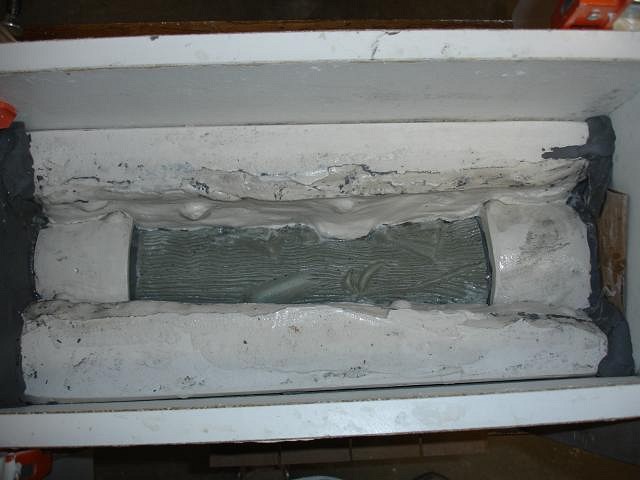
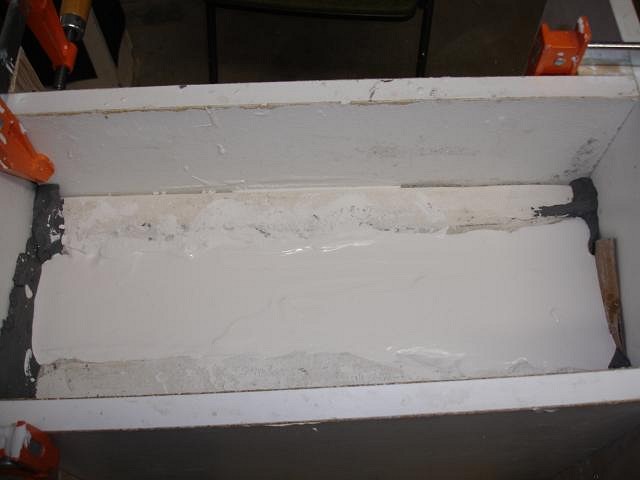
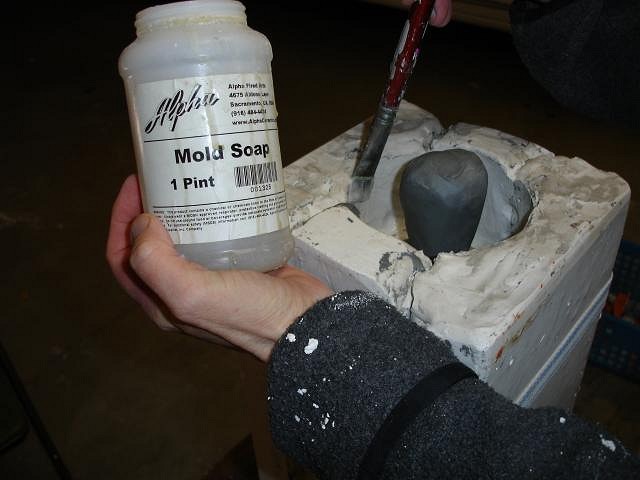
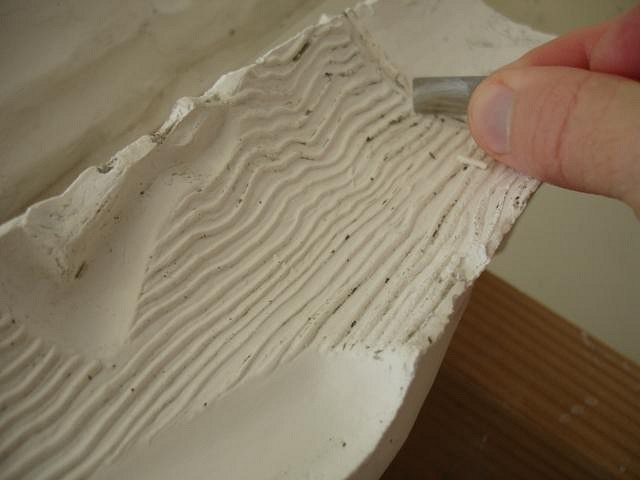
Hey hang10tiki here goes keepin on...

First we put down the bottom board and find the right size sides. We get out all the clamps that we will need.
Image Missing: https://tikicentral.com/resize.php/uploads/251/4f0475c3.jpg?w=1280&h=1280&fit=max&sharp=5&s=f467c98ab3b5808bc82e980d41f7b0af

Using soft clay I fill in all the cracks along the pieces.
Image Missing: https://tikicentral.com/resize.php/uploads/251/4f0475ad.jpg?w=1280&h=1280&fit=max&sharp=5&s=7854f20a61df50c276324cdffa59f73d

The two ends are not really holding the sculpt so I put down bubble wrap just in case the sculpt drops out. We carefully lower it in and then use pieces of cardboard to lock it in place firmly.
Image Missing: https://tikicentral.com/resize.php/uploads/251/4f047599.jpg?w=1280&h=1280&fit=max&sharp=5&s=742f76327e42aafa3babdfcaebeb36f6

I do not remove the bubble wrap I just start building soft clay around the sculpt until it has covered all the parts I do not want to mold in the first piece. I remembered where I had the clay lines at the tikis shoulders.
Image Missing: https://tikicentral.com/resize.php/uploads/251/4f047588.jpg?w=1280&h=1280&fit=max&sharp=5&s=fa3b7364f634b90432a308f046f3ac26

Once I've got it built up I smooth it tight against the tiki and then press in the ball locks. Only press in about 1/3 of the ball. Too deep and they will break off.
Image Missing: https://tikicentral.com/resize.php/uploads/251/4f047571.jpg?w=1280&h=1280&fit=max&sharp=5&s=8dce75b90ee7e87243a4ed03d7e39754

I brush on the mold soap and then soak up the excess with a few paper towels. I do this 2 or 3 times. Mold soap is poison so wear a mask and gloves or do not touch it.
Image Missing: https://tikicentral.com/resize.php/uploads/251/4f047558.jpg?w=1280&h=1280&fit=max&sharp=5&s=cdb138ccea0d9ce4f70c43c694fc5c6d

There is always soap left in the deeper portions so I use a straw to blow it out. I don't think it matters but just in case.
Image Missing: https://tikicentral.com/resize.php/uploads/251/4f04753e.jpg?w=1280&h=1280&fit=max&sharp=5&s=4d535bf471f9c5c09c9da0b5ae248ca2

Wear a mask or the plaster dust will harden in your lungs and never go away.

Figure out how much plaster you will need to cover your sculpt and be around two inches thick. Put water in a deep bucket. Start your mixer and start adding your dry plaster. Keep adding and mixing until it is like buttermilk. Do this fast the plaster sets up quickly.
Image Missing: https://tikicentral.com/resize.php/uploads/251/4f047525.jpg?w=1280&h=1280&fit=max&sharp=5&s=1ed822490005769e5c068fe816344628

Image Missing: https://tikicentral.com/resize.php/uploads/251/4f047512.jpg?w=1280&h=1280&fit=max&sharp=5&s=56cde798ecd79da361a53951173dced3

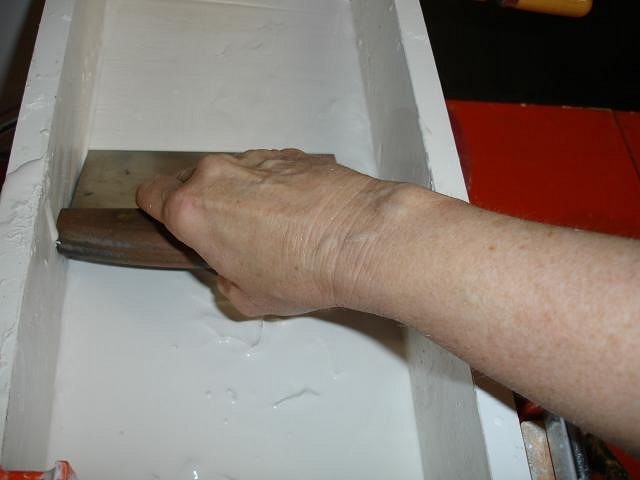
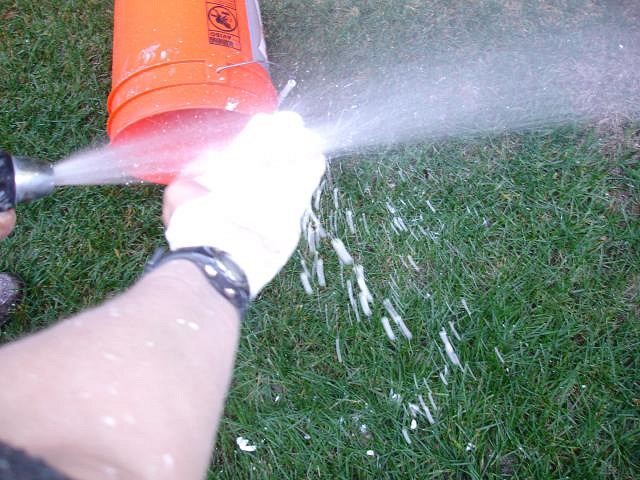
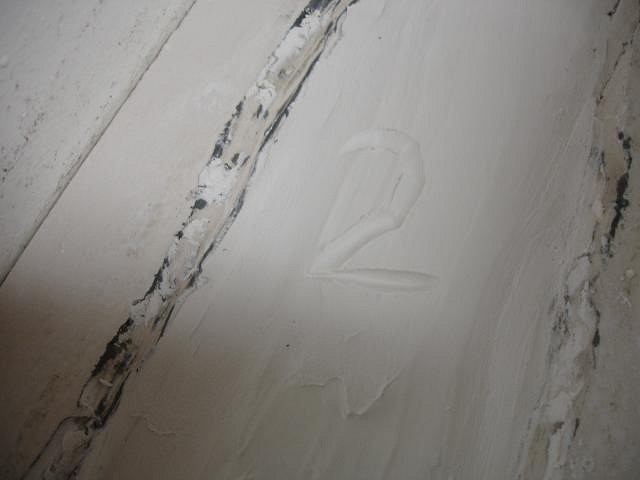
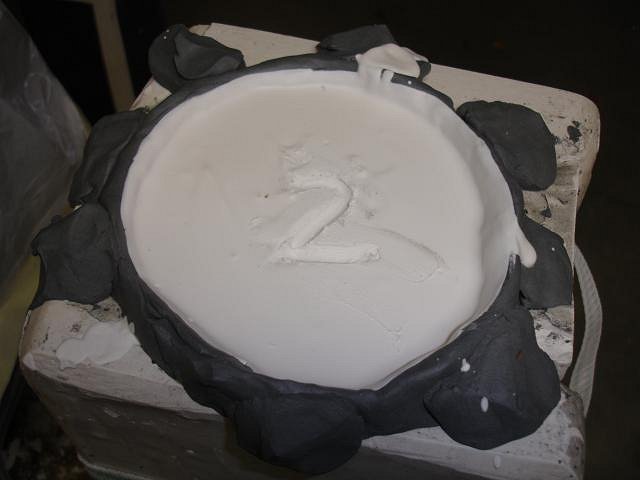
I like to stick my hand in and rub the plaster into my sculpt and to make sure there are no dry lumps. I can break them up if I feel them. This is hard on the skin so get it off as soon as possible.
Image Missing: https://tikicentral.com/resize.php/uploads/251/4f0474fd.jpg?w=1280&h=1280&fit=max&sharp=5&s=a913170c80ac84105defe8d8889e50b7

Dan goes out to wash off all the tools and I run out there to get hosed off.
Image Missing: https://tikicentral.com/resize.php/uploads/251/4f0474e7.jpg?w=1280&h=1280&fit=max&sharp=5&s=6d7a28e960749a4b5d013c4061e10535

Then I run back in and smooth the top with my favorite kitchen tool. In a few minutes I will carve into the top a 1. This is not for the side its for mold number 1.
Image Missing: https://tikicentral.com/resize.php/uploads/251/4f0474d1.jpg?w=1280&h=1280&fit=max&sharp=5&s=ba2778a7b1e750e6cb25b89d944b816c

The garage is a mess and will be until we finish.
Image Missing: https://tikicentral.com/resize.php/uploads/251/4f0474bc.jpg?w=1280&h=1280&fit=max&sharp=5&s=f48f1e4848178a916dfbe196724673aa

This is a mom day so off we go. See you tomorrow. Wendy

LLT Image Missing: https://www.gravatar.com/avatar/0f93b835d9c966d014229fe343bb928a?d=blank&s=192&fit=fill
little lost tiki posted on 01/04/2012

DANG!
YOU ARE PROOF THAT HARD WORK YIELDS FORTH GREAT TREASURES!
Lovin that Zombie Torch mug,Wendy!
:)

M
MadDogMike posted on 01/04/2012

Wendy, I missed yesterday's post! Thanks for the progress reports, looking forward to the next installment

PG Image Missing: https://www.gravatar.com/avatar/4e26a9f98a762dd7f7f1e5d3f116de83?d=blank&s=192&fit=fill
Professor G posted on 01/04/2012

This is amazing to me. All florid prose and odd metaphors aside, I am absolutely fascinated by this whole process.

T Image Missing: https://www.gravatar.com/avatar/128aff852ef8ddf6b66ab1287d3a25a3?d=blank&s=192&fit=fill
tigertail777 posted on 01/05/2012

Man Wendy I love seeing your in progress shots, and this zombie mug/torch looks like it is going to be a hit out of the ballpark. Makes me wish I had room for mugs in my little habitat. Thanks for posting all the great in progress pics it is always so fascinating to see other artist's techniques. I will look forwards to watching further progress.

D
danlovestikis posted on 01/05/2012

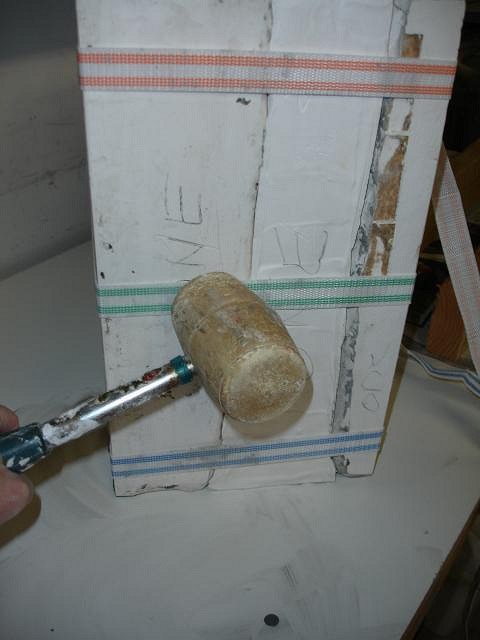
Hi Fellows, its such a joy to hear from you.

Little Lost Tiki your brain is a national treasure, I am loving all your new paintings on gallery. It is super hard work but hopefully in the end it worked and I'll be able to make this mug. I'm so happy you like it.

MadDogMike I need more photos on your thread. How's the axel coming? It's time for more beautiful clay work from you.

Professor G I too am fascinated that this is possible. I hope that in showing all my errors that it will help someone be able to jump in and have perfect molds.

tigertail777 looking back over this list of friends who cheer me on I am thankful for each new person I meet this way. You are one of them. I enjoy watching you make art too.

More step by steps and another error.

One step I left out yesterday involved the rubble mallet. When pouring the wet plaster into the box bang the sides so that all the air bubbles will rise to the top. I bang one side and then the other. I was moving fast and once during this process banged my finger. There are so many ways to get hurt during mold making so be careful.
Image Missing: https://tikicentral.com/resize.php/uploads/251/4f05d0d4.jpg?w=1280&h=1280&fit=max&sharp=5&s=9ef0b76f64f6b6f7e85df467197a2155
The third piece has been poured and it is time to use the rasp to clean it up and then to flip it on its back.
Image Missing: https://tikicentral.com/resize.php/uploads/251/4f05d477.jpg?w=1280&h=1280&fit=max&sharp=5&s=5f9e581477d930c7b447be8c6a76220b
I removed the bubble wrap and here's how the clay looked.
Image Missing: https://tikicentral.com/resize.php/uploads/251/4f05d458.jpg?w=1280&h=1280&fit=max&sharp=5&s=51f56e58b80ff93c8ce3f68b740a0378
I put the box back in place. Added more clay smoothed it out, added the impressed ball locks and painted a couple of layers of mold soap. I removed the excess soap and it ready to have the plaster.
Image Missing: https://tikicentral.com/resize.php/uploads/251/4f05d442.jpg?w=1280&h=1280&fit=max&sharp=5&s=017a3862beed4dc609cedc1c62cbf623
Remember about adding the plaster to the water to mix. Well we tried the reverse. It made the plaster start to set just as we were pouring it into the box. I couldn't get any air bubbles out and immediately I could tell this wasn't going to work.
Image Missing: https://tikicentral.com/resize.php/uploads/251/4f05d433.jpg?w=1280&h=1280&fit=max&sharp=5&s=7721920042d5e686ceb671f5f8e4380a
Being an optimist I mixed a small amount of plaster and covered the rough top just in case. Plaster will fuse to plaster. Without mold soap you would never get pieces apart. It's so easy to forget that I try to keep the mold soap next to the box at all times.
Image Missing: https://tikicentral.com/resize.php/uploads/251/4f05d422.jpg?w=1280&h=1280&fit=max&sharp=5&s=dacd440a77bf8f071be81d652c1b6b94
Sad that so much work was going to be thrown out we closed down for the night.
Image Missing: https://tikicentral.com/resize.php/uploads/251/4f05d407.jpg?w=1280&h=1280&fit=max&sharp=5&s=e1b67bc7f554d7e037728948f03db103
The next morning we took the mold apart. this shows the clay and cardboard at one end of the mold. The mold piece is 2 inches thick and most is hidden by clay. To understand look at the next photo. Clay is placed so the the top of the mold will be even and not dip where the cardboard is placed.
Image Missing: https://tikicentral.com/resize.php/uploads/251/4f05d3f6.jpg?w=1280&h=1280&fit=max&sharp=5&s=72fb7a2edfa8152e575198065bb5062f
Even though I was sure the slab would be tossed I rasped the sides so that it would sit on the table. I would leave it in place until I poured the two side pieces. That way the bad slab acted as the clay and saved me some time.
Image Missing: https://tikicentral.com/resize.php/uploads/251/4f05d3de.jpg?w=1280&h=1280&fit=max&sharp=5&s=6940ee842edd636e5bc2217e03db767e
Each clay slab should be solid. Looking at the side I could see horrible air bubbles. It's better to have the plaster be too wet than too dry. This will never work.
Image Missing: https://tikicentral.com/resize.php/uploads/251/4f05d3c0.jpg?w=1280&h=1280&fit=max&sharp=5&s=e2b76f4466792fbac724b8732a67efdf
We turned the mold on the side and I dug out the clay to expose the sculpt.
Image Missing: https://tikicentral.com/resize.php/uploads/251/4f05d3aa.jpg?w=1280&h=1280&fit=max&sharp=5&s=c8e35592b90109afcde42378fdf74c6b
Paint with the mold soap twice and wipe. Remember its poison don't touch it and wear a mask.
Image Missing: https://tikicentral.com/resize.php/uploads/251/4f05d37b.jpg?w=1280&h=1280&fit=max&sharp=5&s=0ee029d980dc9658f6cdc5f195b08d86
Wearing a mask we mixed the plaster and poured it. I was short a bit of plaster. It's best to keep all sides at the same level so mix too much than too little. Have a waste box to put excess in for disposal.
Image Missing: https://tikicentral.com/resize.php/uploads/251/4f05d365.jpg?w=1280&h=1280&fit=max&sharp=5&s=19246ed0c7a7966082fd4892c9240c0f
By now the mold and box are super heavy and my metal table is starting to cave in.
Image Missing: https://tikicentral.com/resize.php/uploads/251/4f05d352.jpg?w=1280&h=1280&fit=max&sharp=5&s=07ec283ae24d9767132c779e2b05769a
I used some 2 X 4's to support the weight.
Image Missing: https://tikicentral.com/resize.php/uploads/251/4f05d33e.jpg?w=1280&h=1280&fit=max&sharp=5&s=0b54c6499013acf941e1bb817efdf226
After it set about 30 minutes the plaster feels very hot. We again removed the box and flipped it over. Painted it with mold soap.
Image Missing: https://tikicentral.com/resize.php/uploads/251/4f05d32a.jpg?w=1280&h=1280&fit=max&sharp=5&s=8a004430214c8d68da8e9ab1125ea6ea
Mixed and poured the plaster.
Image Missing: https://tikicentral.com/resize.php/uploads/251/4f05d31a.jpg?w=1280&h=1280&fit=max&sharp=5&s=44f46ffbff9957f45741adfd44b8f309
Smoothed it out with my kitchen tool.
Image Missing: https://tikicentral.com/resize.php/uploads/251/4f05d2fc.jpg?w=1280&h=1280&fit=max&sharp=5&s=a74308a086e1b66a9a10e2811d20d2e3
Here it sits setting up.
Image Missing: https://tikicentral.com/resize.php/uploads/251/4f05d2e5.jpg?w=1280&h=1280&fit=max&sharp=5&s=175ae1be2081abb54d05a93dc281ac59
We are now ready to remove the bad piece and toss it in the garbage along with a empty plaster bag. We use high quality plaster. The difference is $8 to $30. This $30 plaster is dental stone and will keep the detail better though all the casts.
Image Missing: https://tikicentral.com/resize.php/uploads/251/4f05d254.jpg?w=1280&h=1280&fit=max&sharp=5&s=2ec6d71432ed2ff0bd2067dac004a2b8
Removing the bad plaster slab which had pieces breaking off as I handled it I can also see where there were leaks.
Image Missing: https://tikicentral.com/resize.php/uploads/251/4f05d2d5.jpg?w=1280&h=1280&fit=max&sharp=5&s=145f218df88be1e48d23c0c196d4dc49
I took off the other two side slabs and cleaned the edges carefully. I only removed the leaks. I also cleaned up my sculpture.
Image Missing: https://tikicentral.com/resize.php/uploads/251/4f05d2ba.jpg?w=1280&h=1280&fit=max&sharp=5&s=19871a68f7107428af01f500b804ea9d
Mixed and poured.
Image Missing: https://tikicentral.com/resize.php/uploads/251/4f05d2a9.jpg?w=1280&h=1280&fit=max&sharp=5&s=00ad92ecc59971e44ee4c8d6c6ba7211
Cleaned up for the fourth time. Plaster will harden anywhere so don't leave it on your tools or body.
Image Missing: https://tikicentral.com/resize.php/uploads/251/4f05d26d.jpg?w=1280&h=1280&fit=max&sharp=5&s=2105bafb45f95c6df1d39c052b1260ac
Let it set.
Image Missing: https://tikicentral.com/resize.php/uploads/251/4f05d240.jpg?w=1280&h=1280&fit=max&sharp=5&s=b1da0177f791ef3b4fece238a8775fae
Removed the box and cleaned the edges with the rasp.
Image Missing: https://tikicentral.com/resize.php/uploads/251/4f05d22f.jpg?w=1280&h=1280&fit=max&sharp=5&s=312e4db5c48e9459b31cc9c87b609bb2
We are now hopeful that we have one working mold. Next up making a mold from this mold and the original sculpt that is still inside of it.

Now it's time to take down all the Christmas Decorations and store them for next year. I Made the tree and post covers out of chicken wire and string lights. They go up in 15 minutes and come down even faster.

Image Missing: https://tikicentral.com/resize.php/uploads/251/4f05dec5.jpg?w=1280&h=1280&fit=max&sharp=5&s=a26bc157d06348b14cb2f6d9d9529601

Happy New Year, Wendy


[ Edited by: danlovestikis 2012-01-05 09:46 ]

H Image Missing: https://tikicentral.com/resize.php/uploads/21154/649119ceb7046.jpg?sharp=10&fit=crop&w=96&h=96&s=200302534909fce323ced4bdc72e29c6
hang10tiki posted on 01/05/2012

Wow
You are a machine...awesome

W Image Missing: https://tikicentral.com/resize.php/uploads/10439/63b5d8b8aa127.jpg?sharp=10&fit=crop&w=96&h=96&s=5768b4f7f36427c82632c0f7791fb7c9
WestADad posted on 01/05/2012

More amazing progress pictures! Sorry about your hand, I hope it heals without complications.

Chris

M
MadDogMike posted on 01/06/2012

Opening that new mold will be like opening a present - how will it turn out? Good I hope :) Hope that knee is doing OK?

CTIT Image Missing: https://www.gravatar.com/avatar/1249f9c092813ba59c2421ea25f4d2da?d=blank&s=192&fit=fill
Chuck Tatum is Tiki posted on 01/06/2012

That's a hell of alot of work, no wonder I avoided getting into Mug making
Thanks for the step by step.

D
danlovestikis posted on 01/06/2012

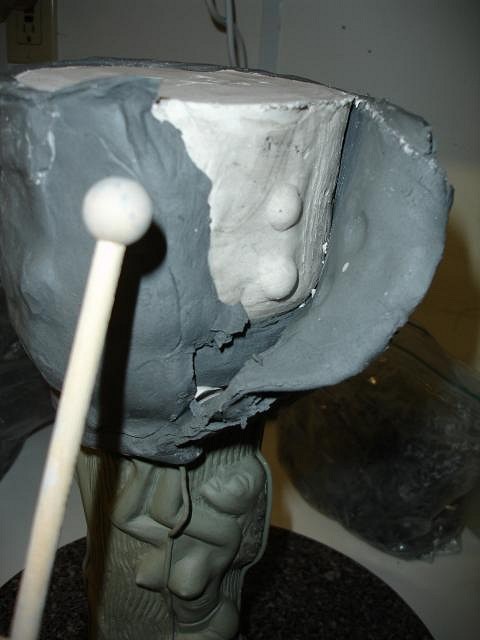
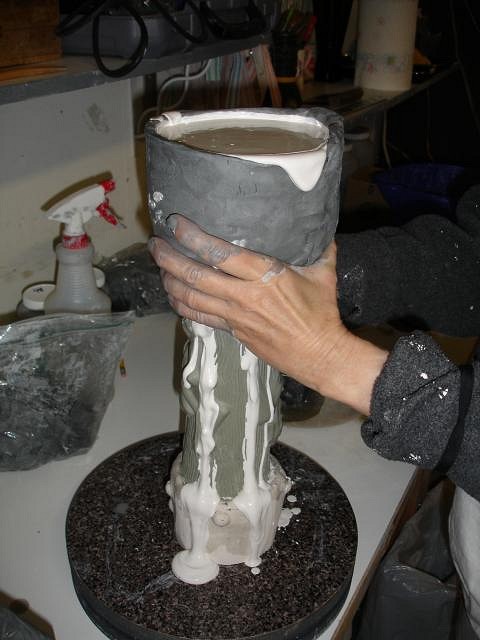
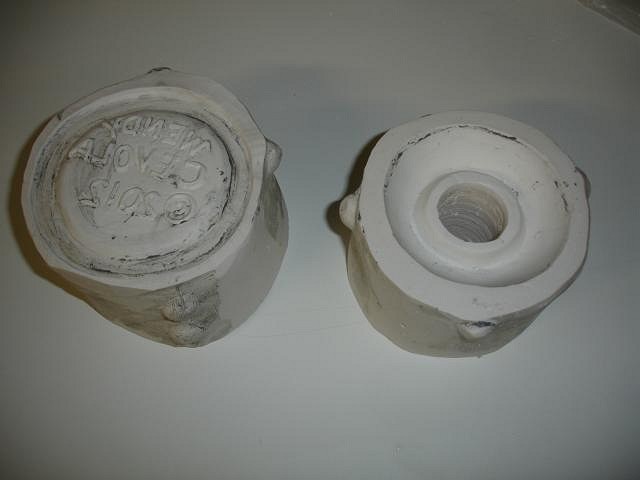
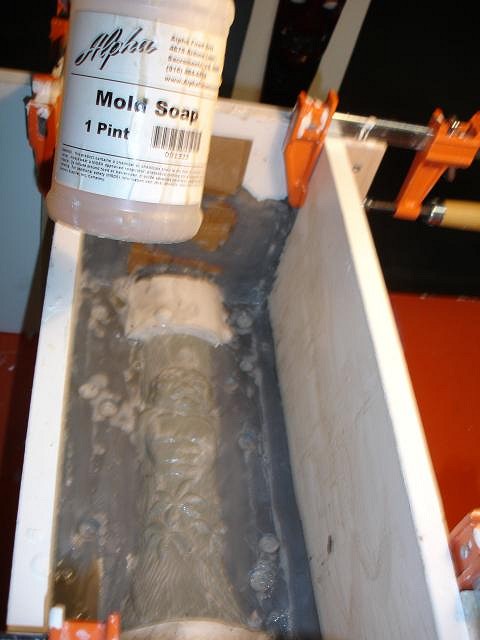
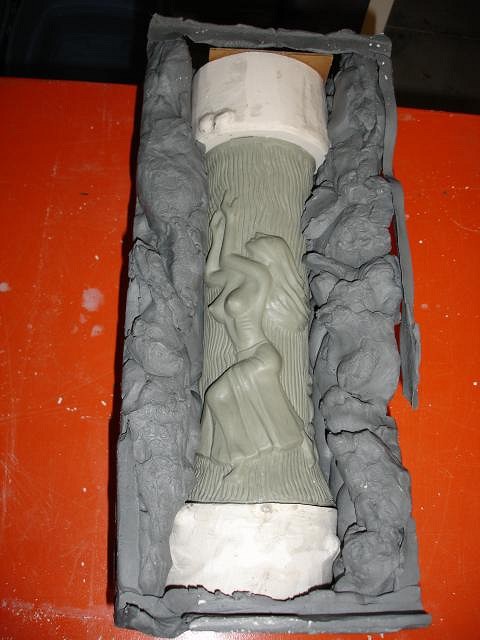
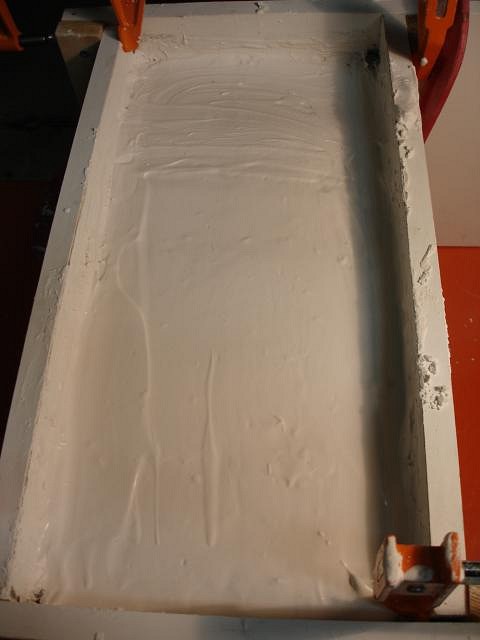
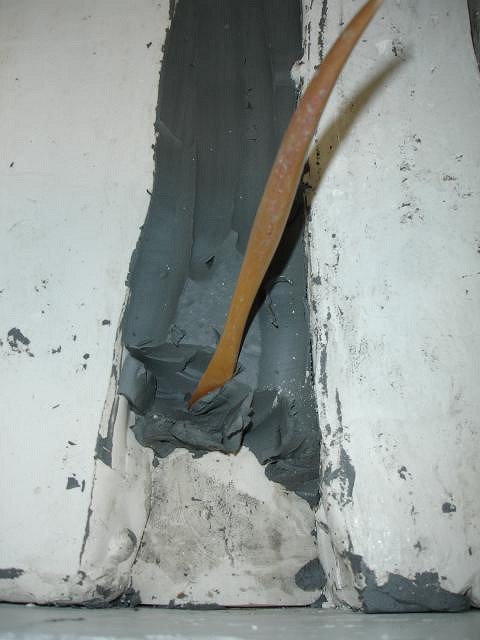
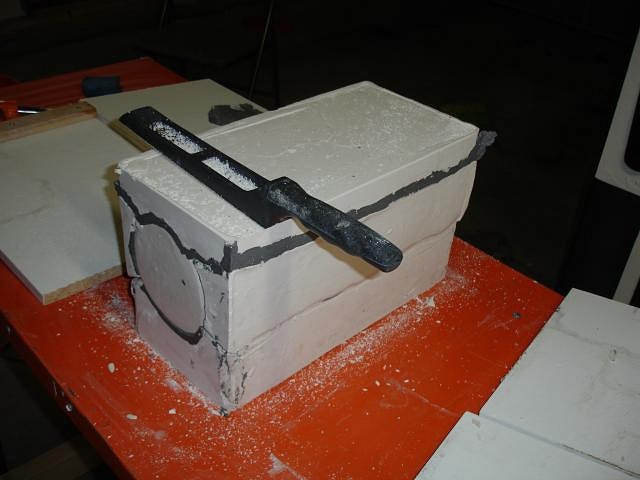
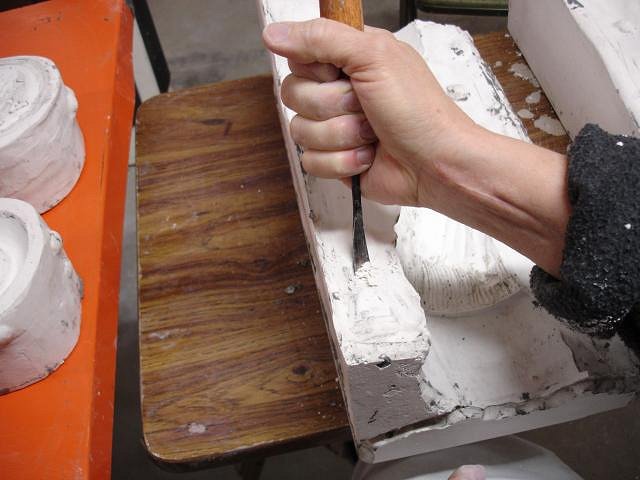
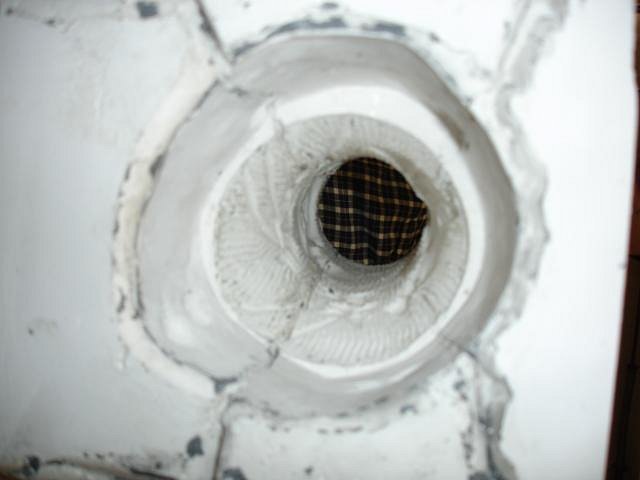
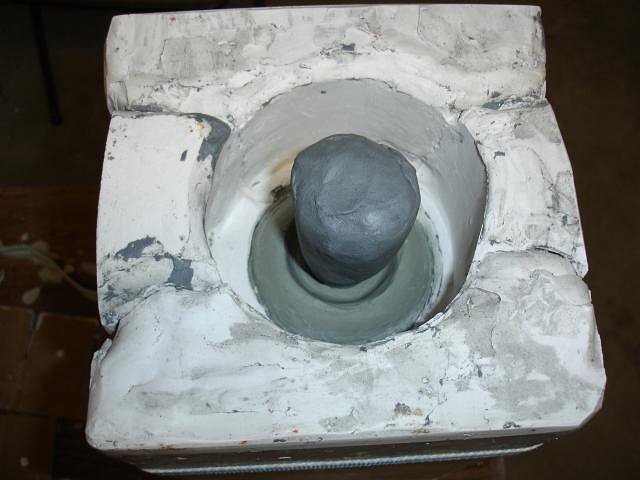
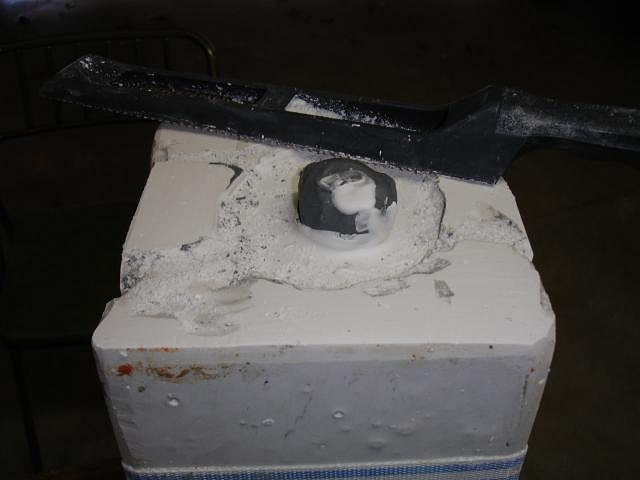
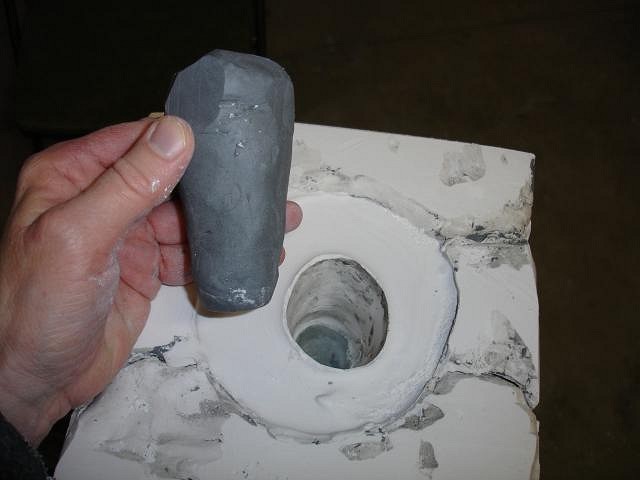
hang10tiki isn't there an athlete named the machine? I do know how to work hard and I'm very organized. Most of all I have the best partner in the world. Dan hates making molds but he does it because he loves me and my art. He works for tikis. I couldn't do all this work without his help.

WestADad you are such a dear heart. The bruise is gone and so is most of the tenderness. We always get banged up making molds.

MDM it is so scary and so much fun to open the mold and to see if the work you did was good or not. It's a ways off.

Chuck my photos don't even show half the work. So many parts generate hazards. We are constantly cleaning the table tops and the floor to keep dust from entering our home. Breathing it now would give us lung disease in the future.

I'm going to post all the photos for the second mold right now. Here goes the rest of the moldy story.

Using my favorite kitchen tool to make lots of clay snakes to plug cracks.
Image Missing: https://tikicentral.com/resize.php/uploads/251/4f072970.jpg?w=1280&h=1280&fit=max&sharp=5&s=82824d90e9367a796f57f1ce039b2b1b

To make a second mold you just remove one piece and re-pour it. Then you go on to the next piece one by one until every piece is new. Once again I'm prepping with the snakes.
Image Missing: https://tikicentral.com/resize.php/uploads/251/4f07295b.jpg?w=1280&h=1280&fit=max&sharp=5&s=c05131bef13b2a570c1368cd646c4696

Poured the side and when the plaster was semi hard I carved in a 2 for second mold.
Image Missing: https://tikicentral.com/resize.php/uploads/251/4f072946.jpg?w=1280&h=1280&fit=max&sharp=5&s=5541ddbc5766b3ed2a9f0efba1df7896

Oh no! I forgot the mold soap. I kept my fingers crossed that there was enough left over from the first time that it wasn't going to all fuse and ruin the first mold. I was very lucky. A few of the round locks broke off. So I just carved them out. If I didn't then the mold piece we removed would not fit because its locks still existed.
Image Missing: https://tikicentral.com/resize.php/uploads/251/4f07292c.jpg?w=1280&h=1280&fit=max&sharp=5&s=bc82e35e031bce894e5e67a5240da0aa

I kept putting the mold together until it fit. Now it was time to make another piece and to use mold soap every time.
Image Missing: https://tikicentral.com/resize.php/uploads/251/4f07291d.jpg?w=1280&h=1280&fit=max&sharp=5&s=019d71a1799edf12bc601ccbb2444cbb

Now I filled any gaps that existed between the mold and the sculpt. You hope you don't have these because more clean up of poured mugs will be needed but if there is a gap you have to go with it the best you can.
Image Missing: https://tikicentral.com/resize.php/uploads/251/4f07290d.jpg?w=1280&h=1280&fit=max&sharp=5&s=8f694a501f3b1aeeff5853448414454a

Ready to pour. Remember to pound the sides of the box to get out the bubbles.
Image Missing: https://tikicentral.com/resize.php/uploads/251/4f0728f8.jpg?w=1280&h=1280&fit=max&sharp=5&s=2a9615227aedf461cfd7b7c8a346bdbd

Poured and waiting to have a 2 carved into it..
Image Missing: https://tikicentral.com/resize.php/uploads/251/4f0728e6.jpg?w=1280&h=1280&fit=max&sharp=5&s=6e6cceb37fc3d181bd3fbfb99db741d2

The first piece on the first mold I forgot to make a hole. We had to drill it out. It's much easier to make the hole out of clay. make the size and shape you want and put it in place.
Image Missing: https://tikicentral.com/resize.php/uploads/251/4f0728d3.jpg?w=1280&h=1280&fit=max&sharp=5&s=9a5450614b038d54c014850b770aba8f

Paint with mold soap twice and blot.
Image Missing: https://tikicentral.com/resize.php/uploads/251/4f0728ae.jpg?w=1280&h=1280&fit=max&sharp=5&s=05bde0d1c872c2f5acb97e0a9b32ec80

To celebrate New Years day I decided to break my resolution to not fall and hurt myself. Here's Dan in the room with me as I waited for the doctor to come in.
Image Missing: https://tikicentral.com/resize.php/uploads/251/4f07288c.jpg?w=1280&h=1280&fit=max&sharp=5&s=acf6080cfa6402f7b95a2f5a6e389f39

I had plugged in a shop vac to suck up extra soap bubbles. I plugged it in then I turned and tripped over the cord. I came down like a log and hit my forehead on the concrete floor. Here's lookin at ya!
Image Missing: https://tikicentral.com/resize.php/uploads/251/4f072874.jpg?w=1280&h=1280&fit=max&sharp=5&s=7995f701ddbc8ee73404a2e586625a0d

So with banged up ankles, knee and head we went back to work. After the plaster set I used a rasp to level all the sides so that when we turn it over it would sit flat.
Image Missing: https://tikicentral.com/resize.php/uploads/251/4f07285f.jpg?w=1280&h=1280&fit=max&sharp=5&s=f3289656f29f1e0823b138048a0bd084

When the plaster has set remove the plug. Don't let it stay in there and dry because it will become hard and difficult to remove.
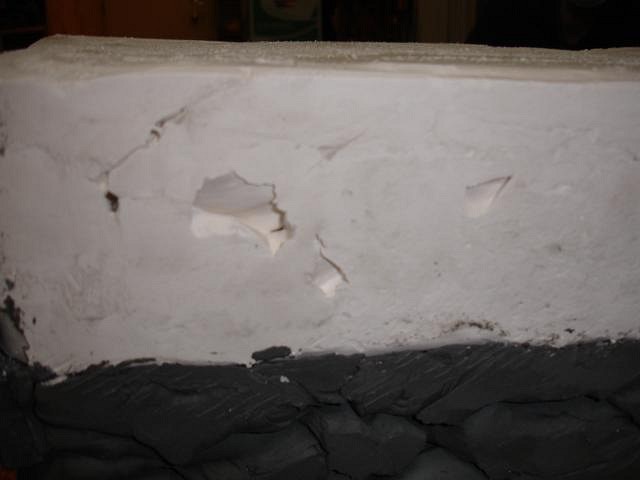
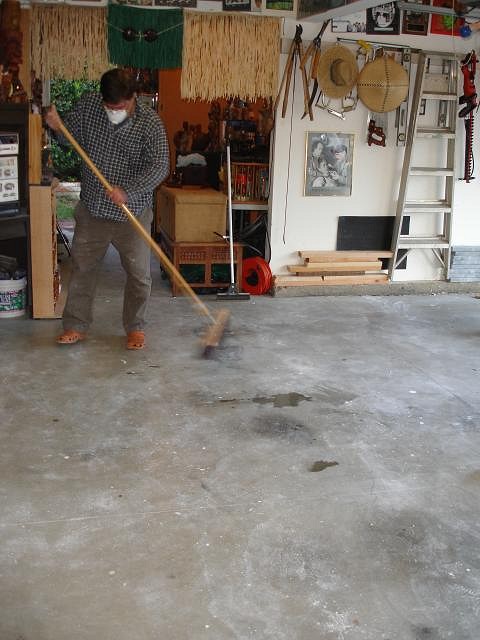
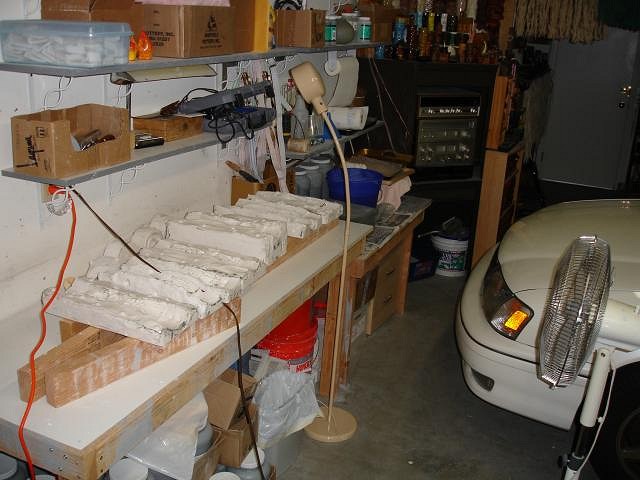
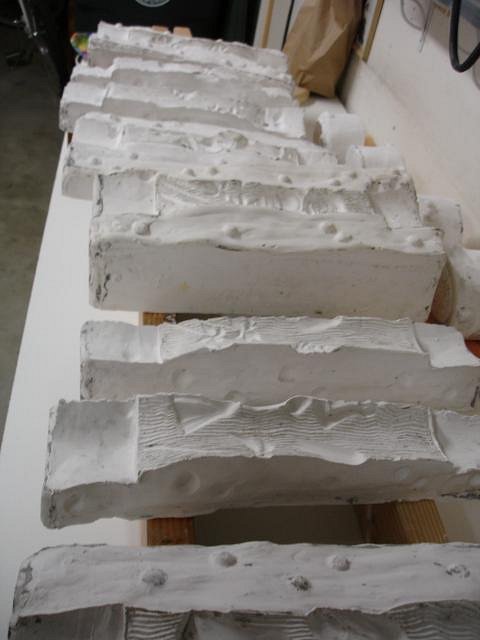
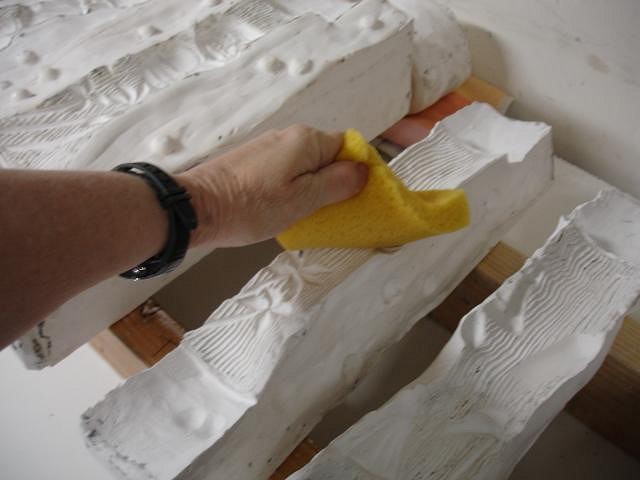
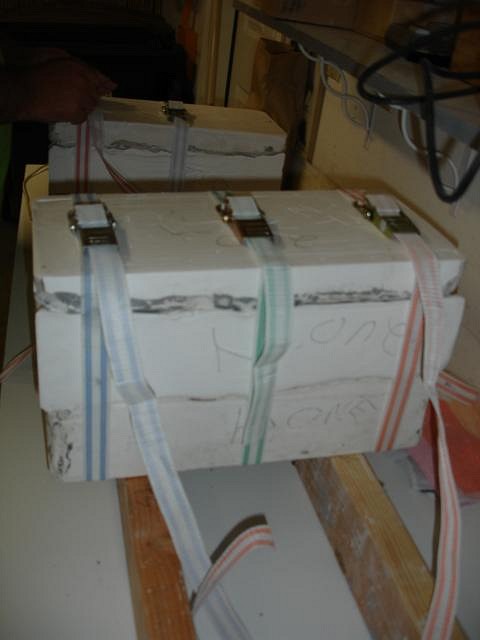
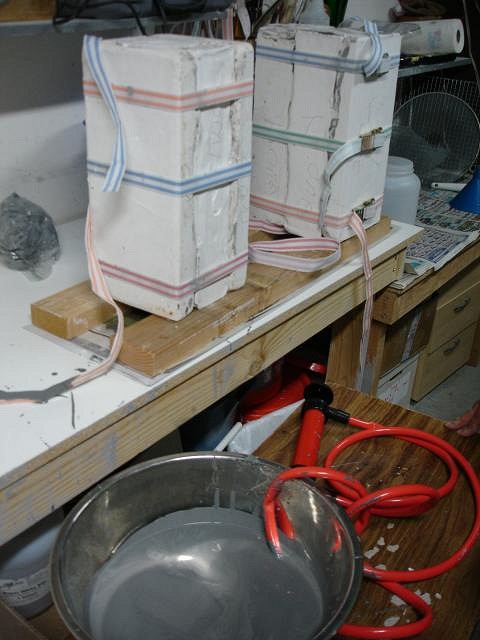
Image Missing: https://tikicentral.com/resize.php/uploads/251/4f07284e.jpg?w=1280&h=1280&fit=max&sharp=5&s=f63b26e0814f6360d5ae4e44c5619bac

The last piece is poured. Hurray!!
Image Missing: https://tikicentral.com/resize.php/uploads/251/4f072839.jpg?w=1280&h=1280&fit=max&sharp=5&s=f222cb41329b85c66c4863de2f96dfce

Using straps we checked to see if we could take the mold apart and put it back together again.
Image Missing: https://tikicentral.com/resize.php/uploads/251/4f072828.jpg?w=1280&h=1280&fit=max&sharp=5&s=00db88afa327f657e3f51df81a339cb7

Dan swept then mopped the floor while I went in to put my feet up.
Image Missing: https://tikicentral.com/resize.php/uploads/251/4f0727fd.jpg?w=1280&h=1280&fit=max&sharp=5&s=df04fb75326a6409f4ad0b02554c5a20

Later we took both molds apart and put each piece on top of boards and started a fan to blow on them. It takes a couple of weeks to dry them out. You must dry them completely the first time so that the plaster will retain its detail for your casts. After this it's ok to pour each day. Some artists who like their work thin will do more than one a day. I like thick mugs so I will do just one set per day. the mold needs to completely dry between casts so that it is able to pull water from the slip.
Image Missing: https://tikicentral.com/resize.php/uploads/251/4f0727e2.jpg?w=1280&h=1280&fit=max&sharp=5&s=a00f6d77237c2f2bab05ef8a5d8052d8

So while these dry I'm going to start sculpting for new Resin Chunk Lamps for Roge. There's never a dull moment. I'll start posting those photos tomorrow.

Thanks for sharing this part of the journey with me. The next leg of the trip will be when the molds are dry. Cheers, Wendy


[ Edited by: danlovestikis 2012-01-06 16:34 ]

M
MadDogMike posted on 01/06/2012

Hey Wendy. It's hard to judge scale in photographs, but did you make the top and bottom pieces of the mold thicker than 2 inches?

D
danlovestikis posted on 01/06/2012

Hi Mike in the beginning we made too much or too little plaster. So on one mold we have a super thick piece. It wasn't intentional. I've had molds like that in the past. I worried that the thicker side would pull more water out of the slip and make that side of the mug thicker. It didn't happen.

What is your experience? (: Wendy


[ Edited by: danlovestikis 2012-01-06 09:49 ]

M
MadDogMike posted on 01/07/2012

Here Wendy, looks like the top and bottom are thicker than 2 inches?
Image Missing: https://tikicentral.com/resize.php/uploads/251/4f03276a.jpg?w=1280&h=1280&fit=max&sharp=5&s=38b7348397bd7dfd218be4e58c9d1f8d

I don't have enough experiance making molds to be of any help :)

D
danlovestikis posted on 01/07/2012

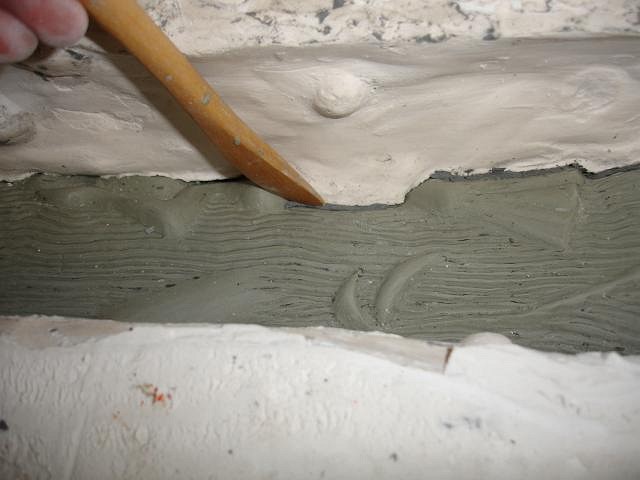
Hi Mike, two inches is ideal but I just don't worry too much. Many of my pieces look like one inch but they are triangular in shape and are 2 inches when close to the hole (sculpt). You can kind of see that on the top piece on the right. Look how thick the bottom piece is on the left. If we made them all that thick we would need a jack to lift them.

Image Missing: https://tikicentral.com/resize.php/uploads/251/4f07cda1.jpg?w=1280&h=1280&fit=max&sharp=5&s=052b1897771875019651092cd123d760

We were going to dry them like this in the house and then I thought maybe they would mold with the warmth so back out and apart with the fan. Cheers, Wendy

D
danlovestikis posted on 01/09/2012

I've just begun to sculpt a Bumatay for casting for a new lamp by Roge. Copying an existing tiki with so many planes is a challenge. I'll go slow and see how I do. I'm following in the footsteps of Gecko and Tiki Al and so many others. Mine will have a flat back for the lamp and no pineapple around it because that's where the chunks will be. Cheers, Wendy

Image Missing: https://tikicentral.com/resize.php/uploads/251/4f0b09a8.jpg?w=1280&h=1280&fit=max&sharp=5&s=682084f4fb108f603f1bb5157080b002

Image Missing: https://tikicentral.com/resize.php/uploads/251/4f0b099b.jpg?w=1280&h=1280&fit=max&sharp=5&s=8924552acdbce189cb54ccf2a91f1f54

Image Missing: https://tikicentral.com/resize.php/uploads/251/4f0b098b.jpg?w=1280&h=1280&fit=max&sharp=5&s=ef1de8a40f29da4095a12f1c307de4ac

Image Missing: https://tikicentral.com/resize.php/uploads/251/4f0b097f.jpg?w=1280&h=1280&fit=max&sharp=5&s=423aa584c43de80adc13b346b570bc5c

D
danlovestikis posted on 01/10/2012

http://www.specsspaces.com/Blogger/KastleWaserman/Article/DesignInspirationHowtoGoTiki.aspx

Kastele Waserman is a blogger for a paint company. She has done three tiki blogs that are super fun and worth a look...Dan and I have a section at the end of the third blog. There are lots of photos and fun articles. We are thrilled to be a part of this tribute to tiki decor and art.

Cheers, Wendy


[ Edited by: danlovestikis 2012-01-10 08:12 ]

[ Edited by: danlovestikis 2012-01-10 18:39 ]

[ Edited by: danlovestikis 2012-01-10 18:39 ]

M
MadDogMike posted on 01/10/2012

You gotta love a reporter who is willing to get down in the trenches and drink at the Rumpus Room! Wendy, your place looks fantastic as always - I got to make it up there on of these days to see it in person. My son is in Sebastapol right now, I should have hitched a ride with him :D

The Bumatay is looking great, can't wait to see it in a lamp. Soon every tiki bar in the world with have a lamp with your tikis on it.

E Image Missing: https://www.gravatar.com/avatar/a9872472a5f9b86ecd7b5d2d625fbb73?d=blank&s=192&fit=fill
ebtiki posted on 01/11/2012

I continue to be impressed with both your skills and your appetite for learning, Wendy!

PG Image Missing: https://www.gravatar.com/avatar/4e26a9f98a762dd7f7f1e5d3f116de83?d=blank&s=192&fit=fill
Professor G posted on 01/11/2012

What a nice tribute to your domicile stylings, ma'am, and thanks for letting us get a glimpse of your home. Now I understand your drive to create new mugs: Chez Cevola contains at least one of every mug ever made. I think I saw the corner of the time machine you had Dan build to facilitate your mug procurement, although it may have been a shop-vac.

D
danlovestikis posted on 01/11/2012

Hey Mike, you should have come with him. Sebastopol is only 2 hours from us. We could have had so much fun.

ebtiki thanks for stopping by and for the kind words.

Professor G, its fun to have people view Dan's collection, thanks for taking a look. I still have my bruised ankles and black eye from that shop vac. Horrors In The Garage a new series by danlovestikis.

More photos tomorrow, Wendy

D
danlovestikis posted on 01/11/2012

Step by step update on the Bumatay for the next Chunk Lamp. (: Wendy

I always save and use chop sticks from restaurants.They are easy to carve into a tool to use with clay. They are strong and hold their shape. So I cut one by shaving off pieces. Next I sand it.
Image Missing: https://tikicentral.com/resize.php/uploads/251/4f0db663.jpg?w=1280&h=1280&fit=max&sharp=5&s=d2d3f70f0a24018685d3d4ffd44e16d4

The chop stick will fit into small places. I also use the opposite end to tamp down the clay and to smooth it in small places.
Image Missing: https://tikicentral.com/resize.php/uploads/251/4f0db658.jpg?w=1280&h=1280&fit=max&sharp=5&s=8c5b41021c27b47ca07c9b4827275da7

I also sculpt upside down and from the sides.
Image Missing: https://tikicentral.com/resize.php/uploads/251/4f0db633.jpg?w=1280&h=1280&fit=max&sharp=5&s=8c0cb3220ca58d449385303219eea1c9

Next the eyes.
Image Missing: https://tikicentral.com/resize.php/uploads/251/4f0db620.jpg?w=1280&h=1280&fit=max&sharp=5&s=a1b26add8be1147ac9b4601938ce50e7

Here's looking at you!
Image Missing: https://tikicentral.com/resize.php/uploads/251/4f0db612.jpg?w=1280&h=1280&fit=max&sharp=5&s=4302b55b0ea71ebaa5f75c0819781809

The Zombie Torch molds are almost dry, its very hard to wait!

R Image Missing: https://www.gravatar.com/avatar/ef6d45b2af7931cfa31c5b2ab3ed91a0?d=blank&s=192&fit=fill
rugbymatt posted on 01/11/2012

...and the hits just keep coming! Nice stuff Wendy.

H Image Missing: https://tikicentral.com/resize.php/uploads/21154/649119ceb7046.jpg?sharp=10&fit=crop&w=96&h=96&s=200302534909fce323ced4bdc72e29c6
hang10tiki posted on 01/12/2012

lookin good....

D
danlovestikis posted on 01/12/2012

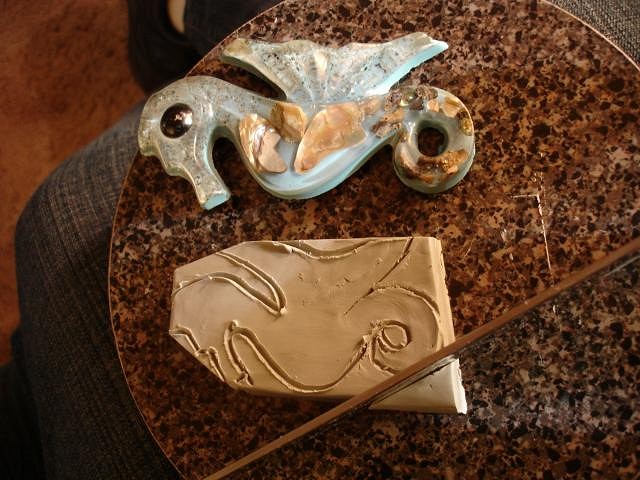
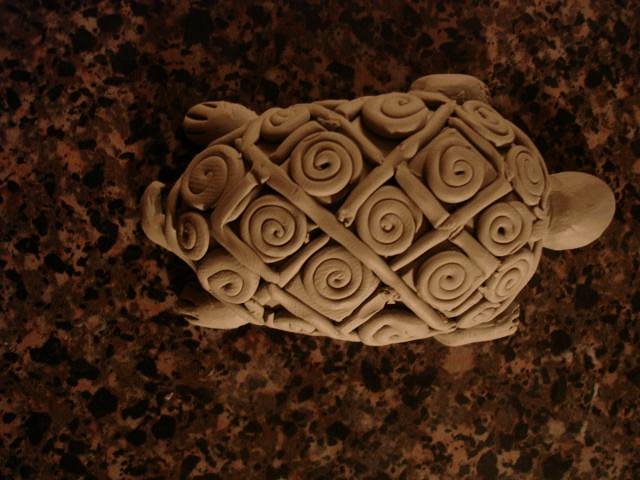
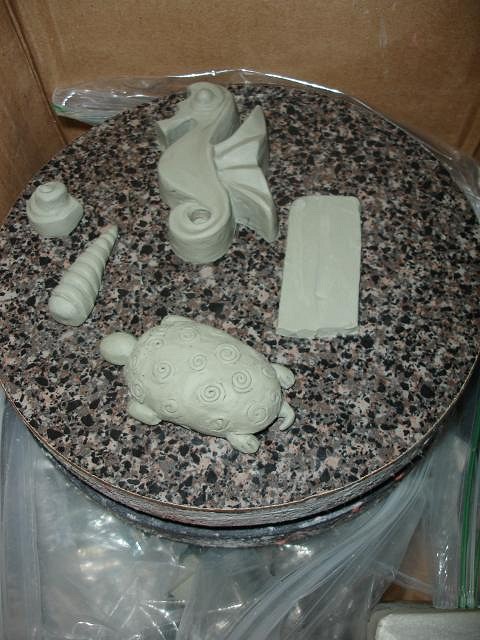
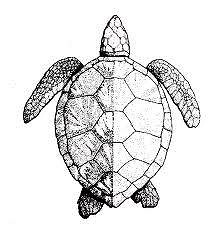
Thank you rugbymatt and hang10tiki

We were with Dan's mom all day yesterday so I just worked a bit of clay for Roge's next lamp. The Bumatay will be the center piece and then there will be other sea creatures and shells. I used a 4.5 inch seahorse as a model for a 3.5 inch sculpt.

Mom was so happy I was making something other than a tiki. She wishes I was making dolls which is what she collects. Sorry mom-in-law I love tikis!

Sketched out the seahorse and cut off the excess with a huge knife.
Image Missing: https://tikicentral.com/resize.php/uploads/251/4f0f0f1a.jpg?w=1280&h=1280&fit=max&sharp=5&s=77566dd2f0db62d3f3974d2dd1ec29ea

Smoothed it out with my fingers.
Image Missing: https://tikicentral.com/resize.php/uploads/251/4f0f0f0a.jpg?w=1280&h=1280&fit=max&sharp=5&s=83ee5d87cb15cd8cc19af31d9b9c7408

Worked on the face and added the backbone.
Image Missing: https://tikicentral.com/resize.php/uploads/251/4f0f0ef7.jpg?w=1280&h=1280&fit=max&sharp=5&s=e8d6f4bd8b1e1bc94b5a52677529dd6b

Added the detail to the back fin.
Image Missing: https://tikicentral.com/resize.php/uploads/251/4f0f0ed5.jpg?w=1280&h=1280&fit=max&sharp=5&s=2f69e2de86512350518cbb217f628dd8

This is as far as I could go, there is no light in the home. I'll finish it at ours.
Image Missing: https://tikicentral.com/resize.php/uploads/251/4f0f0ebd.jpg?w=1280&h=1280&fit=max&sharp=5&s=5984353febb75a6aa1495eca74b497e9

So I thought I knew what a turtle looked like because I had one when I was a child.
Image Missing: https://tikicentral.com/resize.php/uploads/251/4f0f0ea7.jpg?w=1280&h=1280&fit=max&sharp=5&s=cfe7146386dc744aab922c3b416976a8

So I played around with it the rest of the night.
Image Missing: https://tikicentral.com/resize.php/uploads/251/4f0f0e8f.jpg?w=1280&h=1280&fit=max&sharp=5&s=818f546fb746d6bb8dc8c0a66fe8801d

Today I went to google and scanned images under Hawaiian Turtle. Wow was I off. I didn't even have sea turtle in my mind at all. So I'll use this one as a base and fix it until it's like this drawing. I had fun anyway and mom loved it.
Image Missing: https://tikicentral.com/resize.php/uploads/251/4f0f0e76.jpg?w=1280&h=1280&fit=max&sharp=5&s=d6e6e01225d7a13a86c9b14276bc1d5e

There's always something fun to work on, cheers, Wendy

M
MadDogMike posted on 01/13/2012

Did you have a hard time finding a seahorse for inspiration? :lol: (Wendy has a whole bathroom FULL of them!) Funny how the turtle wasn't the way you remembered it.

T
TikiTomD posted on 01/13/2012

Wendy, Floyd here thinks your turtle was a fine likeness!

Image Missing: https://tikicentral.com/resize.php/uploads/11308/4f10311b.jpg?w=1280&h=1280&fit=max&sharp=5&s=0c471cf53ea29a8eb5f1c8c84e10a5da

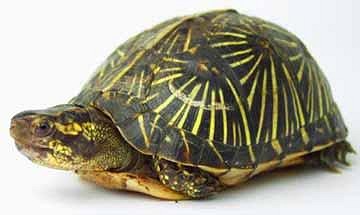
Floyd is a male Florida Box Turtle. For anyone who doubts that Floyd is a "he," just see Bill Tracey's web site.

Floyd doesn't understand what you see in marine turtles, but he has a limited terrestrial background.

-Tom

D
danlovestikis posted on 01/13/2012

MadDogMike, TikiTomD (thank you for the photo) found the turtle of my childhood which I was thinking of when I did the first attempt. Because the next Chunk Lamp will be a sea life version with a Bumatay centerpiece I have to stick to an aquatic turtle. Sorry Floyd. Wendy

Next Step by Steps

I use a ring of clay to glue the eye mounds to the socket. I use a chop stick to smooth half the clay up and half down.
Image Missing: https://tikicentral.com/resize.php/uploads/251/4f105806.jpg?w=1280&h=1280&fit=max&sharp=5&s=990fb46745038ca96cb2bb09b163c830

A chop stick that has its large end sanded to a rounded shape is used to smooth the clay.
Image Missing: https://tikicentral.com/resize.php/uploads/251/4f1057e4.jpg?w=1280&h=1280&fit=max&sharp=5&s=f4ce628d66a34856ac69068fc60d2e5a

During the sculpt I constantly check for undercuts. The body needed some additional clay to keep from being one. If I cast it like this then the cast wouldn't come out of the mold. I built strips of clay up the sides.
Image Missing: https://tikicentral.com/resize.php/uploads/251/4f1057c7.jpg?w=1280&h=1280&fit=max&sharp=5&s=5b023bd20251093e507bd02695e49ecc

Another square carved end of a chopstick makes the eye groove.
Image Missing: https://tikicentral.com/resize.php/uploads/251/4f1057b1.jpg?w=1280&h=1280&fit=max&sharp=5&s=0741ff48f5c113d26ab8961a451cff9a

Carving the eye groves was one of the fun parts.
Image Missing: https://tikicentral.com/resize.php/uploads/251/4f1057a1.jpg?w=1280&h=1280&fit=max&sharp=5&s=9887b6e683bc1776526900c914eaaefd

Once the body is done I'll do the surface texture.
Image Missing: https://tikicentral.com/resize.php/uploads/251/4f10578f.jpg?w=1280&h=1280&fit=max&sharp=5&s=626af9939dbfb8d40032960dccf0984b

Cheers, Wendy

B Image Missing: https://www.gravatar.com/avatar/1f2c2f8e0779fa8b262c53b0c1d20297?d=blank&s=192&fit=fill
bavtech posted on 01/14/2012

How do I get my name on the list for the next mug you make?

D
danlovestikis posted on 01/14/2012

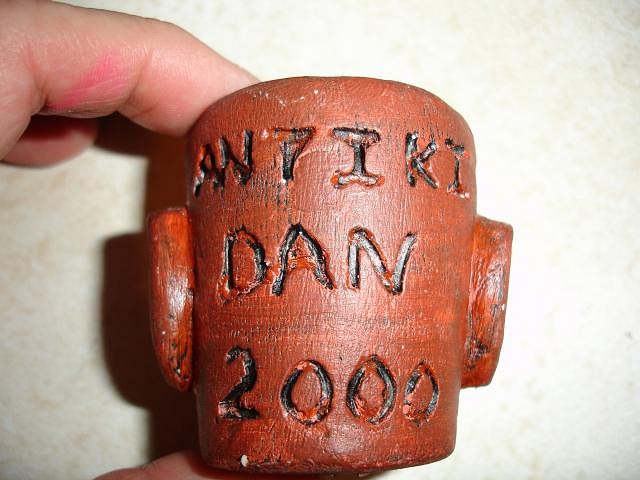
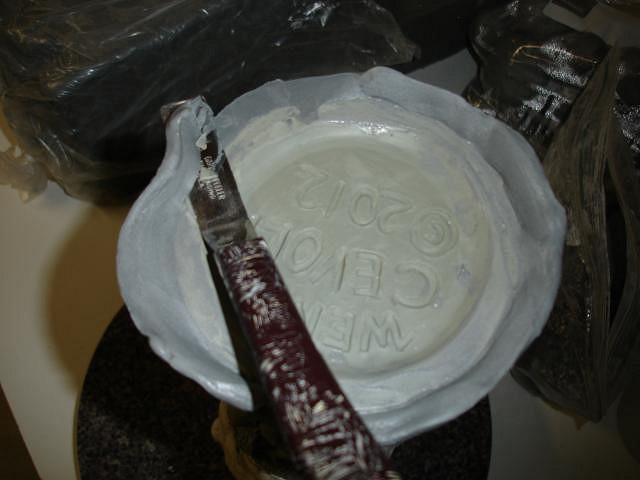
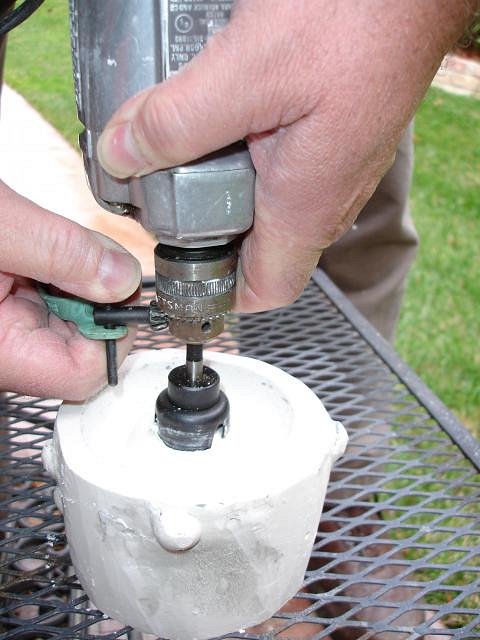
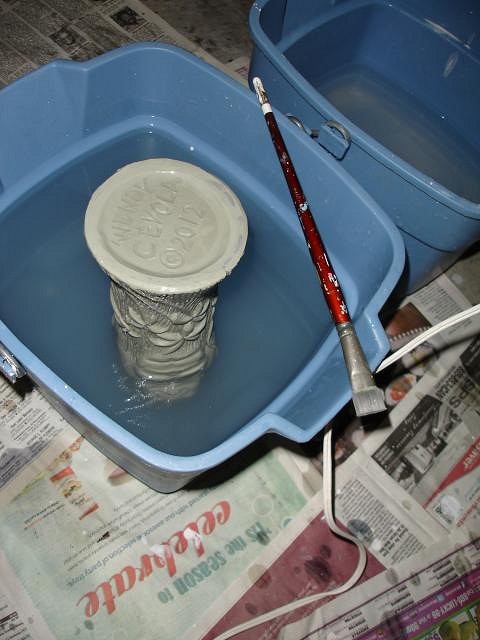
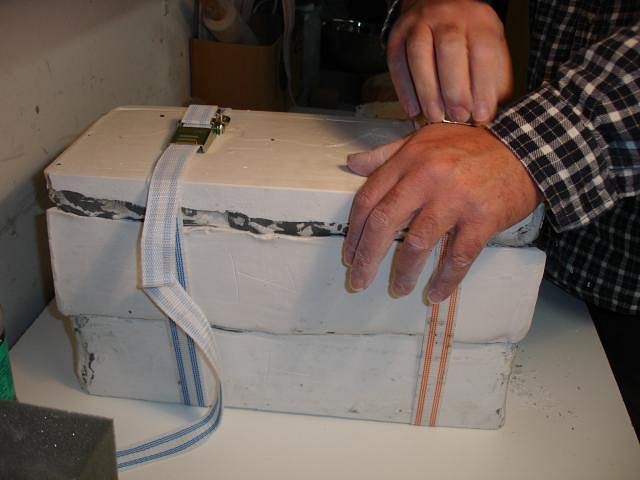
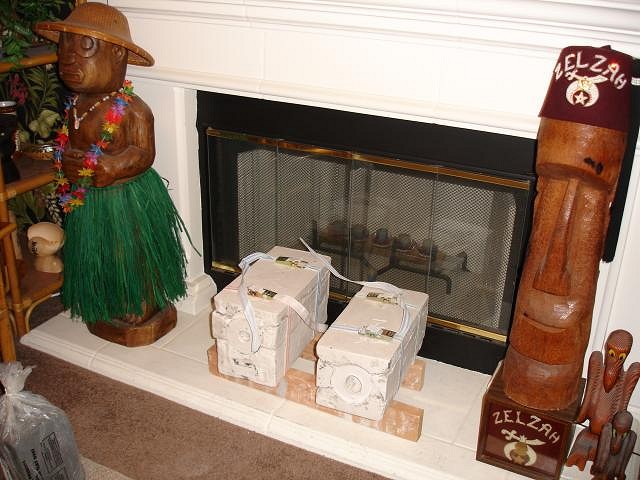
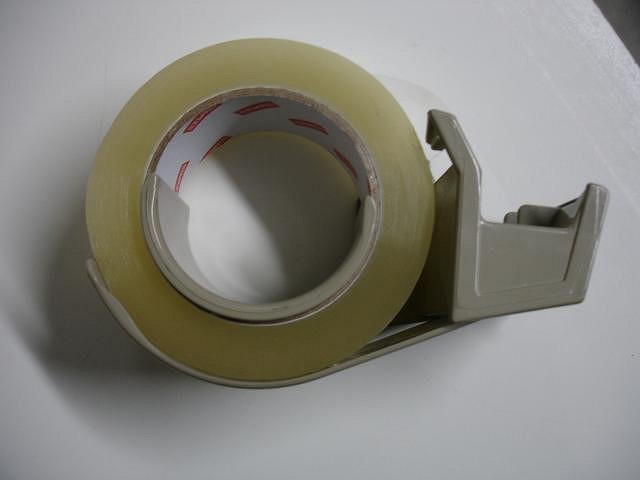
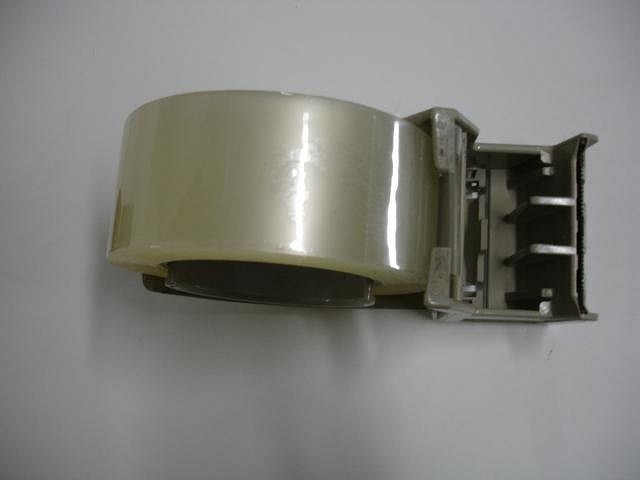
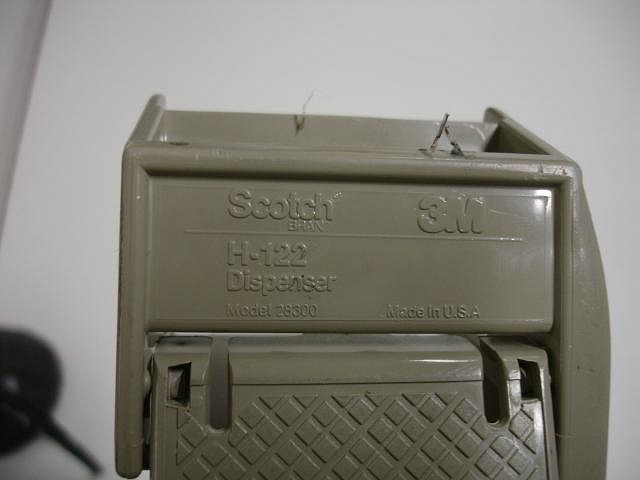
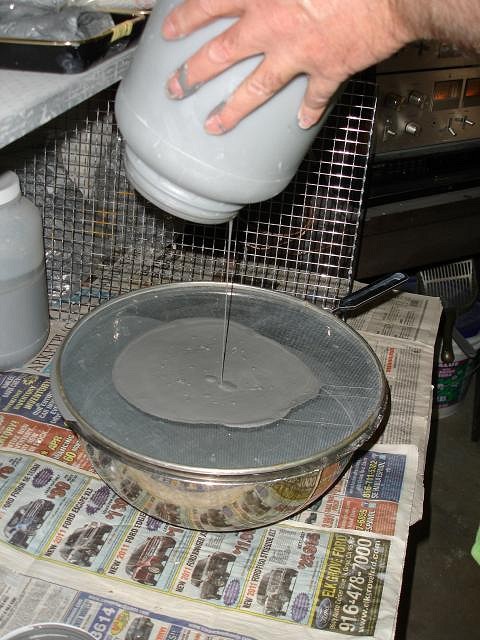
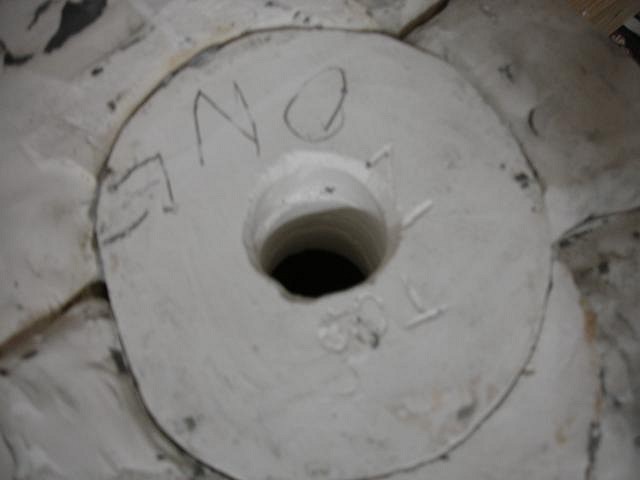
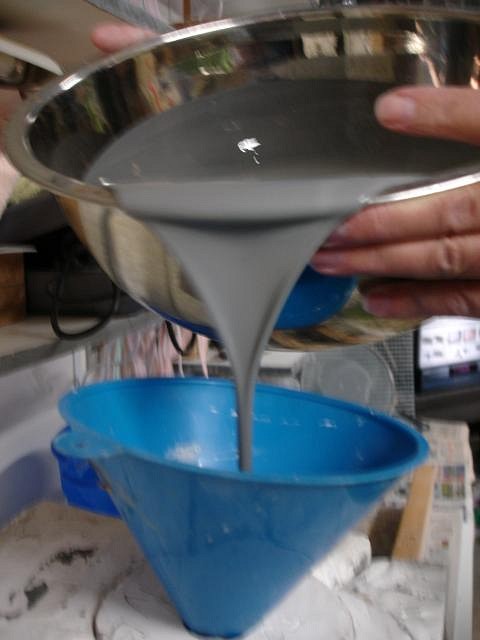
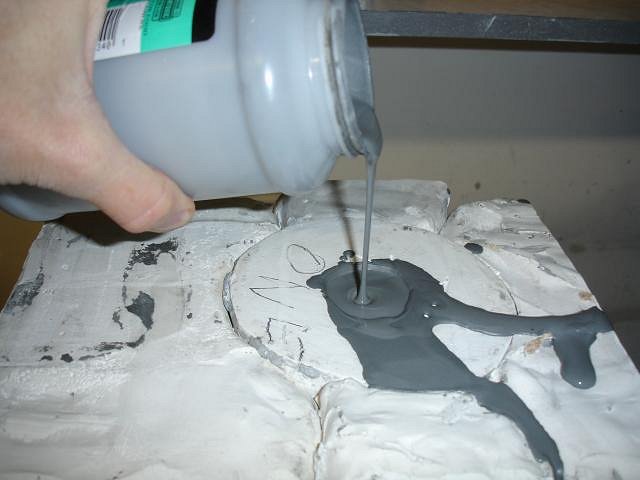
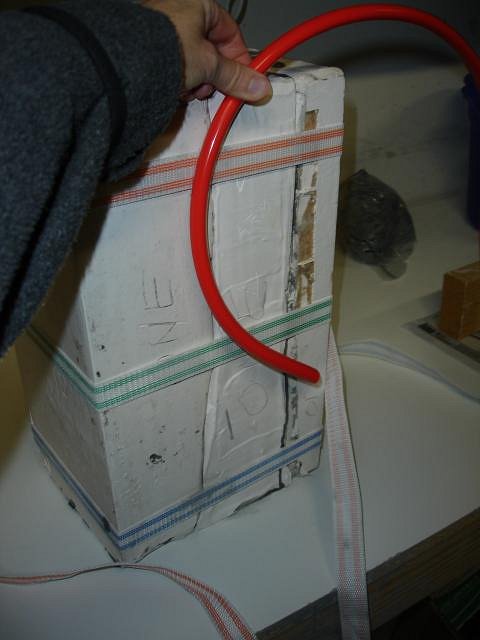
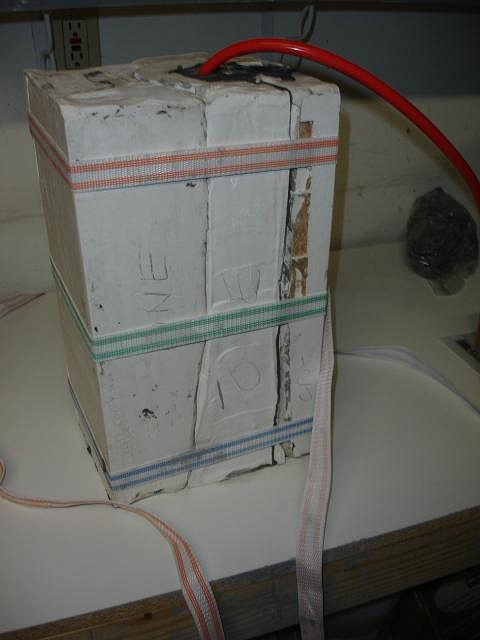
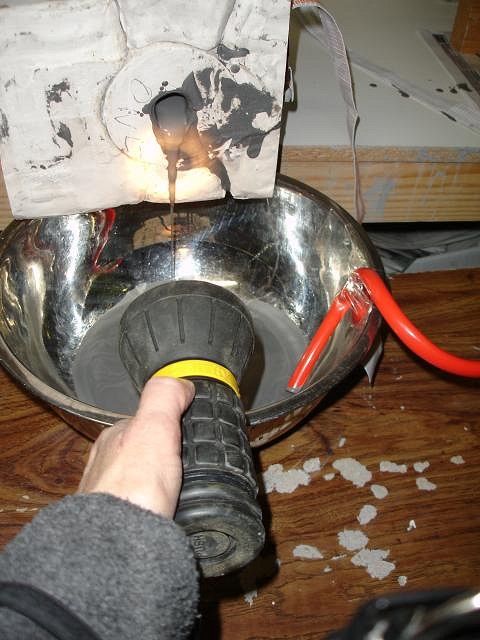
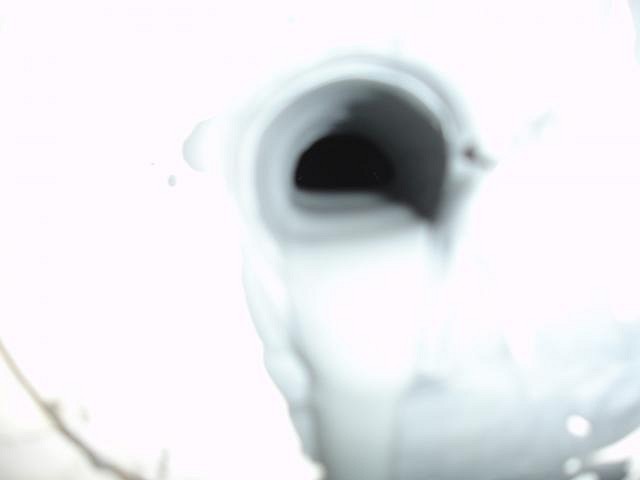
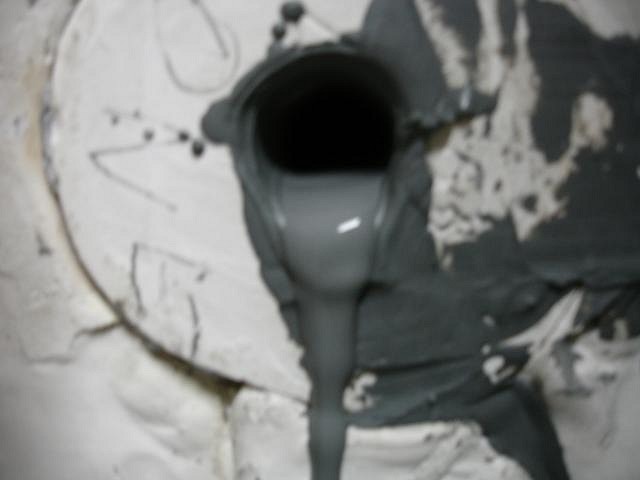
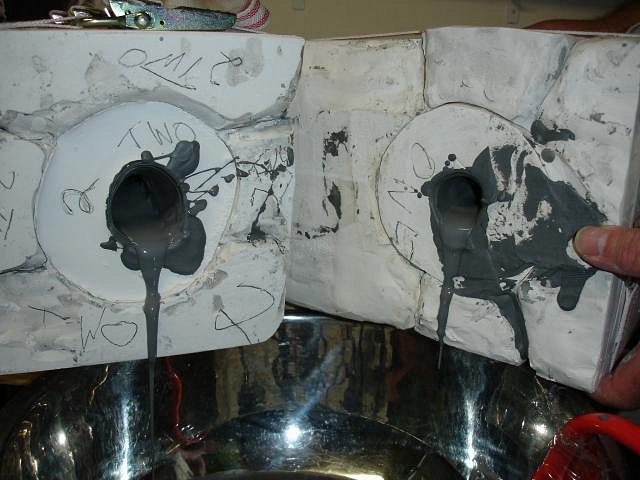
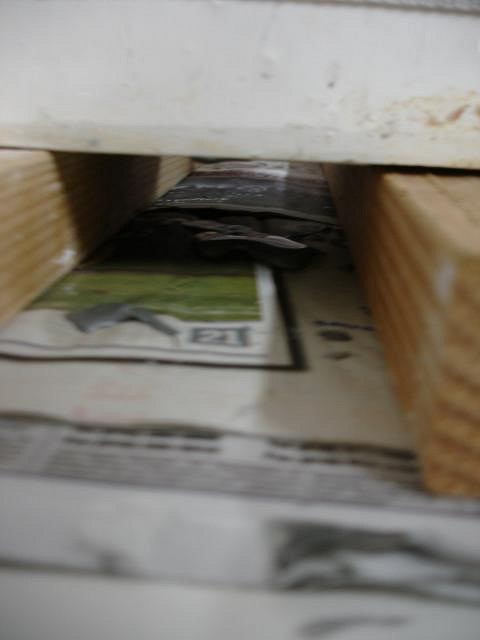
bavtech that's how just ask, I've added your name, thank you

The first two mugs have been poured and here are all my step by steps with helpful hints. Tomorrow I should have photos of the outcome.

Sold by ULINE this is the best tape dispenser I've ever found. I've tried those one handed metal versions from Staples and ended up swearing a lot. I just treated myself to one to keep with my mold equipment. I will be using it soon, photos to come.
Image Missing: https://tikicentral.com/resize.php/uploads/251/4f11a31b.jpg?w=1280&h=1280&fit=max&sharp=5&s=c49a2e241344331eff83da74da0e500c
Image Missing: https://tikicentral.com/resize.php/uploads/251/4f11a30d.jpg?w=1280&h=1280&fit=max&sharp=5&s=aa914da2f869fa6999c74f51f0846d23
Image Missing: https://tikicentral.com/resize.php/uploads/251/4f11a2fc.jpg?w=1280&h=1280&fit=max&sharp=5&s=46bff1c1689a194f2313582af4cd92fa

Finally dry it was time to get started. Then I remembered the most important step. The molds are new and still covered with mold soap. There are also a few defects that can also be removed prior to pouring.
Image Missing: https://tikicentral.com/resize.php/uploads/251/4f11a3a6.jpg?w=1280&h=1280&fit=max&sharp=5&s=060b09fcdb62930904599c3f9e25888d
Since the molds dried out completely the plaster is very hard so when I take a tool and run it along all the wood grain crevasses I'm not hurting any of the detail. I'm just loosening up the soap.
Image Missing: https://tikicentral.com/resize.php/uploads/251/4f11a428.jpg?w=1280&h=1280&fit=max&sharp=5&s=f0d278746961cdc058ba92cf60b5c7b9
I dip a soft sponge in water and wipe the soap away. Rinse, repeat over and over again.
Image Missing: https://tikicentral.com/resize.php/uploads/251/4f11a499.jpg?w=1280&h=1280&fit=max&sharp=5&s=5e730fa2fedcf27549586b3deb1bc17c
I put the #1 and #2 molds together and placed three super tight straps to hold them together.
Image Missing: https://tikicentral.com/resize.php/uploads/251/4f11a4f7.jpg?w=1280&h=1280&fit=max&sharp=5&s=0093187c2b52701fd290c800ccd63d5b
Shake and stir the slip because water always comes to the top. To prevent defects we always pour the slip through a screen to remove chunks.
Image Missing: https://tikicentral.com/resize.php/uploads/251/4f11a5c2.jpg?w=1280&h=1280&fit=max&sharp=5&s=f518e5ec9961aa01d77e368239de9284
Because the opening is so small we used a funnel to pour the slip. Pour slowly and hit side of mold with a rubber mallet.
Image Missing: https://tikicentral.com/resize.php/uploads/251/4f11a55b.jpg?w=1280&h=1280&fit=max&sharp=5&s=f6cab44e8f15d4ef092b17b882e34e22
Image Missing: https://tikicentral.com/resize.php/uploads/251/4f11a54e.jpg?w=1280&h=1280&fit=max&sharp=5&s=d7a9706b28858b20ce9a8d46ceabd0c6
We count to 10 and then stop pouring. We have now way to know if these new molds will leak or be fine. You can plug leaks by pouring in a small amount of slip and then lower each side of the mold so that slip will pour into the mold joints and become solid. This is a fast process because you don't want the slip to dry so much that it starts to pull away from the mold. So lower turn lower each side and then quickly pour in the rest of the slip.
Image Missing: https://tikicentral.com/resize.php/uploads/251/4f11a738.jpg?w=1280&h=1280&fit=max&sharp=5&s=d7c31acafff8f704ee6f65ff56d3df42
Image Missing: https://tikicentral.com/resize.php/uploads/251/4f11a719.jpg?w=1280&h=1280&fit=max&sharp=5&s=cee4d6b22e66b58b6cfd258ffd202174
During this time watch for leaks. We only found one on the bottom. So I plugged it with clay.
Image Missing: https://tikicentral.com/resize.php/uploads/251/4f11a709.jpg?w=1280&h=1280&fit=max&sharp=5&s=a303009169bb46fc11cda16785767911
I forgot to show that this should be covered with plastic wrap or it will stick to your table and pull loose later.
Image Missing: https://tikicentral.com/resize.php/uploads/251/4f11a6f8.jpg?w=1280&h=1280&fit=max&sharp=5&s=37e013aede1d90db2711bc13bbea8e23
Whenever adding slip to the mold even during that first 10 second pour pound the sides with a rubber mallet to keep air bubbles from sticking. Every air bubble will leave a hole to fix later.
Image Missing: https://tikicentral.com/resize.php/uploads/251/4f11a81e.jpg?w=1280&h=1280&fit=max&sharp=5&s=6980c8a4b912957bffb698d9c545e318
I want the top to be as thick as the side so for the next 15 minutes I add slip to the top until it stops lowering fast.
Image Missing: https://tikicentral.com/resize.php/uploads/251/4f11a808.jpg?w=1280&h=1280&fit=max&sharp=5&s=17a6cbe697f545398689cb9ea134bba3
These will be the first casts so I let them sit for 1 hour before removing the excess slip. If these mugs are too thick the next will be left for less time.

Now it is time to remove the slip and the opening is way too small to pour it out. On my last project I figured out that a gas siphon would work well with clay.
First I estimate how much of the tube to feed into the mold. Place it slowly so that you don't scrap the side.
Image Missing: https://tikicentral.com/resize.php/uploads/251/4f11a9d4.jpg?w=1280&h=1280&fit=max&sharp=5&s=70748b160b1be7d435389bc3756a381f
Image Missing: https://tikicentral.com/resize.php/uploads/251/4f11a9b5.jpg?w=1280&h=1280&fit=max&sharp=5&s=0afcda1296b161c8024410ca8e5adb14
The bowl that will receive the slip has the opposite end of the siphon Taped to the side. Our first time we didn't Tape the end and I got shot by slip, not fun.
Image Missing: https://tikicentral.com/resize.php/uploads/251/4f11aa70.jpg?w=1280&h=1280&fit=max&sharp=5&s=9ab9ec924f540c821092e90c50c1b8fa

We pump out the slip until most is gone but not all. We don't want to have the tube attach to the soft clay bottom. While I watch with a flash light Dan starts to lower the mold toward the bowl.
Image Missing: https://tikicentral.com/resize.php/uploads/251/4f11ab00.jpg?w=1280&h=1280&fit=max&sharp=5&s=b0498e0bbc7979ebbfc50c2c051c86c1
Watching to make sure the opening never closes up with slip causing the glug glug noise. If you hear this you may have made your mug collapse due to suction.
Image Missing: https://tikicentral.com/resize.php/uploads/251/4f11aae2.jpg?w=1280&h=1280&fit=max&sharp=5&s=fbd2b072144260c71a14a6dd0bf6e0d3
Image Missing: https://tikicentral.com/resize.php/uploads/251/4f11aacf.jpg?w=1280&h=1280&fit=max&sharp=5&s=8a8a63ed484acb6660665bf2ab3a517e
Image Missing: https://tikicentral.com/resize.php/uploads/251/4f11aaf2.jpg?w=1280&h=1280&fit=max&sharp=5&s=b481267b79d6e81069d0acfe16df1e6f
When the slip is out and only drips are coming put them upside down on support boards. 2 x 4's work really well.
Image Missing: https://tikicentral.com/resize.php/uploads/251/4f11aab9.jpg?w=1280&h=1280&fit=max&sharp=5&s=0d8f64dcd0563b2f2d3cb5bcd37182da
Some will continue to drip out so I have newspaper to collect it.
Image Missing: https://tikicentral.com/resize.php/uploads/251/4f11aaa5.jpg?w=1280&h=1280&fit=max&sharp=5&s=5c9adb3fef4c6687551b2a9dedc47fb7

This is my book for today. Please ignore any gramatical errors its time to go to work. Cheers, Wendy

Pages: 1 2 3 4 5 6 7 8 9 10 11 12 13 14 15 16 17 18 19 20 21 22 23 24 25 26 27 28 29 30 31 32 33 34 35 36 37 38 39 40 41 42 43 44 45 46 47 48 49 50 51 52 53 54 55 56 57 58 59 60 61 62 63 64 65 66 67 68 69 70 71 72 73 74 75 76 77 78 79 80 81 82 83 84 85 86 87 88 89 90 91 92 93 94 95 96 97 98 99 100 101 102 103 104 105 106 107 108 109 110 111 112 113 114 115 116 117 118 119 120 121 122 123 124 125 126 127 128 129 130 131 132 133 134 135 136 137 138 139 140 141 142 143 144 145 146 147 148 149 150 151 152 153 154 155 156 157 158 159 160 161 162 163 164 165 166 167 168 169 170 171 172 173 174 175 176 177 178 179 180 181 182 183 184 185 186 187 188 189 190 191 192 193 194 195 196 197 198 199 200 201 202 203 204 205 206 207 208 209 210 211 212 213 214 215 216 217 218 219 220 221 222 223 224 225 226 227 228 10914 replies